
Types of Nail Guns Explained: A Beginner’s Guide
This post contains affiliate links. As an Amazon Associate, we earn from qualifying purchases.
Types of nail guns come down to power source, fastener size, and the safety mechanism in the trigger. The three main categories are framing nailers for structural work, finish nailers for trim and cabinets, and brad nailers for delicate woodworking. Choosing the wrong one splits your wood, leaves a mess of visible holes, or fails to hold the joint.
Those three categories get you started, but the details decide everything. The gap between a 16-gauge finish nail and an 18-gauge brad nail looks small on paper. On your project, it’s the difference between a joint that holds and a piece of trim that splits down the middle before the glue even dries. Understanding these differences is key when the various types of nail guns explained are put into practice.
What follows in the types of nail guns explained: a breakdown of every nailer you’re likely to need, where they’re used, and the specs that really matter. We’ll also clear up the confusion between firing modes, the safety difference between a sequential and a bump-fire trigger isn’t optional knowledge.
Key Takeaways
- Use a framing nailer for walls and decks, a finish nailer for doors and cabinets, and a brad nailer for delicate trim. Stray from this rule and you’ll split the work or leave behind a field of holes you have to fill.
- Understand nail gauge: the higher the number, the thinner the nail (e.g., 18-gauge is thinner than 16-gauge). Get this wrong and you buy fasteners that won’t fit your tool.
- Prioritize a sequential trigger for safety, especially if you’re new. An OSHA report notes that two-thirds of nail gun injury claims involve unintended discharge, the sequential trigger design cuts that risk drastically.
- Choose pneumatic nailers for cost and weight, cordless for convenience. A pneumatic tool weighs half as much as a comparable cordless model, but you trade that for dragging a hose and needing a compressor.
- Always match your nail length and angle to the gun’s magazine. A 15-degree nail won’t load into a 21-degree magazine, and a 3-inch nail won’t fit into a 2-inch-max tool.
Nail Gun Types at a Glance
Nail gun names aren’t random. Nail gun names aren’t random. They tell you exactly what job they’re built for. A framing nailer isn’t for picture frames, and a pin nailer can’t hold a deck together. Here’s a quick reference to cut through the noise.
| Nail Gun Type | Best For | Typical Gauge / Nail Size | Holding Power |
|---|---|---|---|
| Framing Nailer | Walls, decks, roof sheathing, fencing | 10-gauge to 12-gauge; 2″ – 3-1/2″ nails | Maximum. This is structural. |
| Finish Nailer | Door/window trim, cabinets, stair treads | 15-gauge or 16-gauge; 1-1/4″ – 2-1/2″ nails | Strong, but holes are visible. |
| Brad Nailer | Thin trim, molding, small crafts, paneling | 18-gauge; 5/8″ – 2″ nails | Moderate. Think “glue assist.” |
| Pin Nailer | Delicate veneers, securing trim for glue-up | 23-gauge; 5/8″ – 1-3/8″ headless pins | Minimal. It’s a temporary clamp. |
| Roofing Nailer | Asphalt shingles, roofing felt, house wrap | Coiled roofing nails with large heads | High, designed for weather exposure. |
| Siding Nailer | Wood, fiber-cement, vinyl siding | Coiled nails, often ring-shanked | High, with corrosion resistance. |
The voluntary ANSI standard calls for all large pneumatic framing nailers manufactured after 2003 to be shipped with a sequential trigger. This isn’t a suggestion, it’s a baseline for preventing the unintended discharges that cause most injuries.
That table covers the “what.” Now for the “why.” Each tool is engineered around a specific fastener and a specific kind of force.
The Framing Nailer
This is your brute-force tool. It drives thick, long nails, often with a ring or screw shank, designed to lock lumber together. Think wall studs, floor joists, and deck framing. It’s overkill for anything less.
I learned the weight lesson the hard way on a shed project. Renting a cordless framing nailer seemed smart, until hour three when my wrist ached from maneuvering an 11-pound tool. The Paslode F325R pneumatic framer, by comparison, weighs just 7 lbs. That four-pound difference might as well be forty after a few hundred nails.
For example, the Paslode F325R framing nailer operates between 90 and 120 psi and handles nails from 2 to 3-1/4 inches. The magazine is typically a 30-degree strip. Don’t try to drive 3-inch nails with a gun rated for a 2-inch maximum, you’ll either jam it or damage the driver blade.
The Finish Nailer
Finish nailers bridge the gap between raw power and finesse. They use 15-gauge or 16-gauge nails, which are thick enough to hold substantial trim like baseboards and crown molding but leave a hole small enough to fill and hide.
The most common mistake here is using a finish nailer to attach baseboard directly to drywall without hitting a stud. It lacks the holding power. You’ll be re-attaching that trim within a year. The fastener is meant to supplement glue or to anchor into solid framing.
Where this goes sideways: Using a finish nailer on quarter-round or shoe molding. The thicker nail often splits the delicate, thin stock, especially near the end of a piece. Switch to an 18-gauge brad nailer instead.
The Brad Nailer
Here’s your go-to for fine work. An 18-gauge brad nailer drives thin, small-headed nails that leave almost invisible holes. It’s perfect for attaching thin trim, securing cabinet face frames, or holding a project together while the glue dries. Its holding power is modest, so it’s not a structural fastener.
The difference between a brad nailer and a finish nailer isn’t just size. A finish nailer like the DeWALT DWFP12233 uses a 16-gauge nail with a head. An 18-gauge brad is essentially a piece of wire with a tiny head. One holds a window casing; the other holds a piece of picture frame molding.
Pin Nailers, Roofers, Siding, and More
The list goes on for specific trades. A 23-gauge pin nailer is a specialist, its headless pins leave near-zero holes, perfect for securing veneer or delicate trim before gluing. It has almost zero holding power on its own.
Roofing and siding nailers use coil magazines that hold hundreds of nails, often with coated or ring-shanked nails for extra grip and weather resistance. A palm nailer is a weird little tool you use in tight spaces where a full-sized gun won’t fit; it’s slow, but it gets the job done.
Power Sources: Pneumatic vs. Cordless vs. Electric
The heart of a nailer is its power plant. Your choice here affects your budget, your mobility, and how much you’ll feel the tool’s weight.
Pneumatic nailers run on compressed air. They’re lightweight, relatively inexpensive, and deliver consistent power. The trade-off is the hose. You’re tethered to a compressor, and that compressor needs to be sized correctly for the tool’s air demand. A small “pancake” compressor will struggle to keep up.
Common mistake: Using dirty or wet air in a pneumatic tool. SENCO’s warranty is valid only if “clean, dry, regulated compressed air has been used.” Moisture in the line rusts the internal components, and grit scores the cylinder walls, killing the tool long before its time.
Cordless nailers use batteries, often with a gas piston or a lithium-ion powered hammer mechanism. The big win is portability, no hose, no compressor. The big loss is weight and cost. The Milwaukee M18 FUEL framing nailer weighs 11.65 lbs. For a full day of overhead work, that’s a deal-breaker for many pros.
Electric nailers plug into a wall outlet. They’re a niche option, usually for lighter-duty finish or brad work, and you’re still dealing with a cord. They make sense in a static workshop setting but offer few advantages over a pneumatic setup with a permanent air line.
My take? For a home shop where you’ll use it intermittently, a pneumatic nailer is the smarter buy. The performance is proven, the tools are cheaper, and you can add a small, quiet compressor for less than the price bump to a cordless platform. On a job site with no power, the math flips.
How Nail Guns Fire: Triggers and Safety
This is the part the manual glosses over, but it’s the most important for your fingers and your coworkers’ safety. The trigger system controls how and when the nail fires.
OSHA identifies four trigger types: Full Sequential, Contact, Single Sequential, and Single Actuation, while some manufacturers like SENCO use different classifications such as Sequential Actuation and Contact Actuation. Their nail gun safety guide stresses that two-thirds of nail gun injury claims involve unintended discharge, a risk directly tied to the trigger type.
Sequential Trigger (a.k.a. Single Shot)
This is the safest mode, especially for beginners. The tool requires a specific order of operation: 1) Place the safety tip firmly on the workpiece. 2) Then pull the trigger. One nail fires. You must lift the tool and repeat the sequence for the next nail. It prevents “bump firing” and is the default on most framing nailers made after 2003.
Contact Trigger (a.k.a. Bump Fire)
Here, you can hold the trigger down and “bump” the safety tip against the workpiece to fire a nail rapidly. It’s faster for production work but far more dangerous. If the trigger is held and the tip brushes against anything, your leg, a coworker, a ladder rung, the gun will fire.
The OSHA nail gun safety guide notes that about 1 in 10 nail gun injuries happen to co-workers, often from bumping into a contact-trigger gun with the trigger squeezed.
Anti-Double-Fire Features
Many modern contact-trigger tools have mechanisms to prevent a “double fire,” where the tool recoils and re-contacts the surface, driving a second unwanted nail. The DeWALT manual is explicit: to avoid double fires, don’t engage the tool against the work with excessive force, allow it to recoil fully, or simply use a sequential trigger.
Nail Sizes, Gauges, and Collation
You can’t just grab any box of nails. They must match your gun’s specifications in three ways: gauge (thickness), length, and collation (how they’re held together).
Nail Gauge is counter-intuitive: a higher number means a thinner nail. An 18-gauge brad is thinner than a 16-gauge finish nail. Your gun is built for one specific gauge. Trying to load the wrong one simply won’t work.
Nail Length is stamped on the tool’s magazine or listed in the manual. The Paslode F325R framing nailer handles 2″ to 3-1/4″ nails. The DeWALT DWFP12233 brad nailer takes 5/8″ to 2-1/8″ fasteners. Exceed the maximum and you risk a severe jam or damage.
Collation Type is about how the nails are glued or welded together for feeding.
- Strip Collation: Nails are glued side-by-side in a straight strip. Common for finish and framing nailers.
- Coil Collation: Nails are wound into a coil, holding hundreds at a time. Standard for roofing, siding, and some framing nailers.
- Magazine Angle: This is critical. Nails are collated at a specific angle (15°, 21°, 30°, 34°) to fit the gun’s magazine. A 15-degree nail will not load into a 21-degree magazine. Check your tool’s casting.
Choosing the Right Nail Gun for Your Project
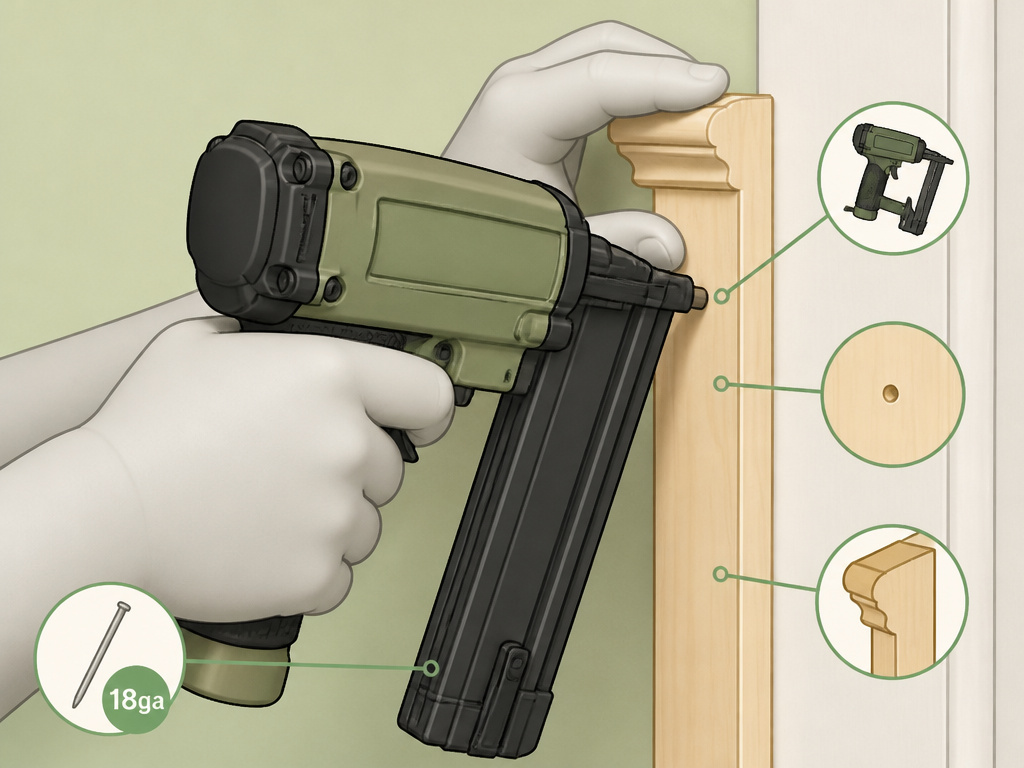
Your project dictates the tool. Your project dictates the tool in the types of nail guns explained, not the other way around. Here’s a quick decision guide.
| Your Project | Recommended Nailer | Why |
|---|---|---|
| Building a deck, shed, or wall | Framing Nailer | Delivers the length and holding power needed for structural connections. |
| Installing interior trim (baseboards, crown) | Finish Nailer (16ga) or Brad Nailer (18ga) | 16ga for heavier trim, 18ga for thinner stock to prevent splitting. |
| Assembling small crafts, picture frames, thin molding | Brad Nailer (18ga) | Thin nail minimizes visible holes and risk of splitting delicate wood. |
| Installing kitchen cabinets | Finish Nailer (16ga) | Provides the necessary holding strength for the cabinet’s weight. |
| Securing veneer or delicate trim before gluing | Pin Nailer (23ga) | Leaves virtually invisible holes and won’t split the material. |
For a beginner, the most versatile single tool is an 18-gauge brad nailer. It handles a huge range of small to medium projects, from trim work to furniture assembly. Pair it with a pancake compressor and you have a capable, affordable setup. If you’re doing heavier remodeling, a 16-gauge finish nailer becomes essential.
If you’re deciding between a brad nailer vs finish nailer, the rule is thickness. Thicker than 3/4 inch and you need the holding power of a finish nailer. Thinner than that, and the brad nailer is safer for the material.
Essential Nail Gun Safety and Maintenance
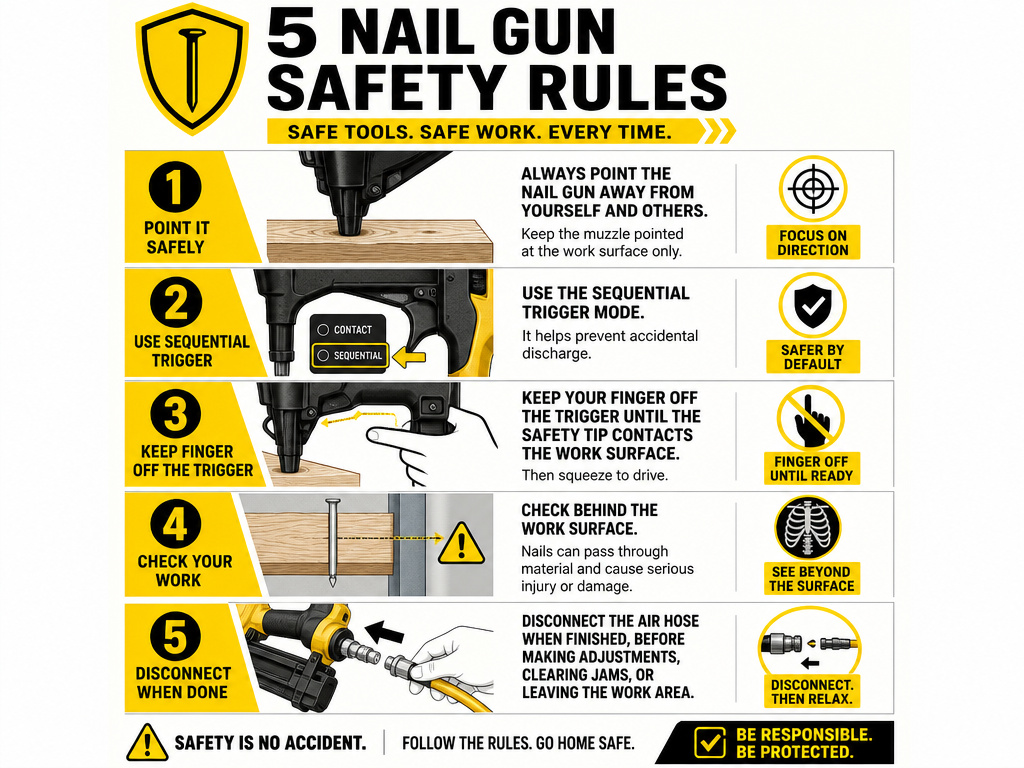
A nail gun is not a toy. It drives a metal spike with enough force to penetrate wood and bone. Respect it.
Before you start: Wear safety glasses every time. Wear hearing protection, especially with pneumatics. Keep your free hand well away from the firing path. Never bypass or modify the safety mechanisms, manufacturers strongly recommend against it, and it voids warranties.
Basic Safety Rules:
- Always treat the tool as if it’s loaded. Point the muzzle away from yourself and others.
- Know your trigger. Use sequential mode whenever possible, especially if you’re learning.
- Keep your finger off the trigger until the safety tip is squarely on your workpiece.
- Be aware of what’s behind your work piece. A nail can blow through or ricochet.
- Disconnect the air supply or remove the battery before clearing a jam or performing any adjustment.
Maintenance is essential. For pneumatics, that means adding a few drops of tool oil into the air inlet daily. It lubricates the internal O-rings and seals. A dry gun will fail. For cordless tools, keep the battery contacts clean and store batteries in a moderate climate.
The part nobody mentions: A nail gun jam often sounds like a dull thud instead of a sharp pop. When you hear that, stop. Don’t try to “clear” it by firing again. Disconnect the power source, open the magazine, and remove the nails to find the obstruction.
For a full breakdown, our guide on how to use a nail gun safely covers the procedures in detail.
What is the difference between first fix and second fix nail guns?
First fix and second fix refer to the two main stages of construction where different nail guns are essential. First fix work is the structural, rough carpentry that happens early on. This includes framing walls, installing floor joists, and sheathing roofs. The nailers for this stage, like framing nailers, are built to drive large, long nails that provide immense holding power. They are typically heavier tools designed for speed and strength in demanding conditions.
Second fix work comes later, after the structure is complete and insulated. This is the finish carpentry, where appearance matters. Tasks include installing trim, baseboards, door and window casings, and cabinetry. The nailers for this stage, like brad nailers and pin nailers, use much smaller, thinner fasteners that leave minimal holes. These tools are generally lighter and more precise to handle delicate materials without splitting them.
Frequently Asked Questions
What is the difference between a finish nailer and a brad nailer?
Finish nailer typically uses 15-gauge or 16-gauge nails. They’re thicker, have a larger head, and provide stronger holding power for heavier trim and cabinetry. A brad nailer uses 18-gauge nails, which are thinner, leave smaller holes, and are better suited for delicate trim and lightweight projects where splitting is a concern. The difference between brad and finish nailers often comes down to material thickness.
Which is better, a 16 or 18 gauge nail gun?
Neither is universally better; they’re for different jobs. An 18-gauge brad nailer is better for thin materials and delicate work where a small, less visible hole is important. A 16-gauge finish nailer is better for thicker, heavier trim and applications where maximum holding power is needed from a finish nail. Your project dictates the gauge.
What is better, a finish nailer or a brad nailer for baseboards?
For standard 1/2-inch to 3/4-inch thick baseboards, a 16-gauge finish nailer is often preferred because it provides stronger holding power into the wall studs. However, for thinner, more flexible baseboard profiles, an 18-gauge brad nailer can be a better choice to prevent splitting, especially if you are also using construction adhesive.
What is the best nail gun for a beginner DIYer?
For a beginner, an 18-gauge brad nailer is the most versatile and forgiving choice. It can handle a wide variety of common projects like small trim, crafts, and furniture assembly. Pair it with a small, affordable pneumatic compressor. It’s less likely to split wood than a finish nailer and is easier to manage than a heavy framing nailer. Our article on the best nailers offers specific model recommendations.
What’s the difference between sequential and bump fire?
In sequential mode (safer), you must place the tip, then pull the trigger for each nail. In bump-fire mode (faster), you can hold the trigger and bump the tip to fire repeatedly. Bump-fire is more efficient for high-volume work but significantly increases the risk of accidental firing. Understanding sequential vs bump fire modes is a core part of safe operation.
Before You Go
Nail guns are powerful force multipliers, but they demand respect. The single most important rule is this: match the tool to the fastener, and the fastener to the job. A framing nailer with 3-inch nails is for joining 2x4s, not securing quarter-round. That mismatch is where projects get damaged and people get hurt.
For your first nail gun, don’t overthink it. Start with a basic pneumatic 18-gauge brad nailer and a compressor. Learn its feel, its sound, and its limits on scrap wood. Master loading it with our guide on how to load a nail gun. Get comfortable with the sequential trigger. That basic skill allows you to safely move to a finish nailer or framing nailer when a bigger project demands it.
And finally, never stop learning the specs. Before you buy any box of fasteners, check the gauge, length, and collation angle against your tool’s manual. That thirty-second check saves an hour of frustration clearing a jam.
