
How to Use a Nail Gun Safely: Step-by-Step Safe Procedure
This post contains affiliate links. As an Amazon Associate, we earn from qualifying purchases.
To use a nail gun safely, you must control three things: the trigger mechanism, your personal protective equipment, and the air supply setup. The trigger choice alone doubles your injury risk, studies of residential carpenters found the overall risk of nail gun injury is twice as high when using contact trigger nail guns compared to using sequential trigger nail guns. Your air pressure must stay within the manufacturer’s range (commonly 70–120 psi or 90–120 psi depending on the model), and only male pneumatic connectors should be used to vent pressure upon disconnection.
That 2x injury risk statistic from OSHA is the predictable outcome of a tool that can fire a fastener with significant force in a fraction of a second, paired with a trigger system that trades safety for speed. The difference between a safe job and a trip to the emergency room often comes down to a 30-second setup check you skipped because the manual felt like a chore, which is why it’s crucial to learn how to use a nail gun safely.
What follows is a breakdown of the seven major risk factors OSHA identifies, the specific PPE standards you need, the correct way to set up your air hose to avoid a charged tool, and the step-by-step loading and firing procedure central to how to use a nail gun safely.
Key Takeaways
- The sequential trigger cuts your injury risk in half compared to a contact trigger. If your nail gun has a switch, set it to sequential mode and leave it there.
- High-impact safety glasses marked ANSI Z87.1 are mandatory. A ricocheting nail or a fragment from a blow-out moves faster than you can blink.
- Never exceed the manufacturer’s stated operating pressure (commonly 70–120 psi or 90–120 psi depending on the model). Higher pressure doesn’t drive nails better; it increases the force of misfires and tool wear.
- Disconnect the air supply and clear the magazine before clearing a jam or making any adjustment. A loaded, pressurized nail gun is a live weapon.
- For pneumatic tools, use only male quick-disconnect fittings on the tool. A female fitting traps high-pressure air in the hose, leaving the tool charged and ready to fire unexpectedly.
The Two Triggers That Decide Your Injury Risk
You don’t choose a trigger for comfort. You choose it for control. The internal mechanism is what stands between a deliberate nail and an accidental one that hits bone.
A voluntary ANSI standard calls for all large pneumatic framing nailers manufactured after 2003 to be shipped with a sequential trigger. Studies of residential carpenters found the overall risk of nail gun injury is twice as high when using contact trigger nail guns compared to using sequential trigger nail guns.
Sequential Triggers (Single-Shot)
This is the safest mode. It requires two separate, deliberate actions in a specific order: first, you must press the safety contact tip firmly against the work surface, then you pull the trigger. The gun fires once. You must release the trigger and lift the tool to reset the sequence for the next nail. It’s slower, but it eliminates the chance of a double fire, a second, unintended nail driven because the tool recoiled and bounced back onto the surface.
Contact Triggers (Bump Fire)
Here, the trigger acts as an on/off switch. You hold the trigger down, and the gun fires each time the safety tip is pressed against a surface. This allows for rapid “bump” nailing. The danger is in the recoil. If the tool bounces after a shot and re-contacts the surface while your finger is still on the trigger, it will fire again instantly. This double fire is a leading cause of injury. The other major risk is carrying the tool with your finger on the trigger; bumping the safety tip against your leg, a ladder rung, or a coworker will result in an immediate, unintended discharge.
| Trigger Type | How It Fires | Best For | The Built-In Risk |
|---|---|---|---|
| Sequential | 1. Press safety tip. 2. Pull trigger. | Precision work, beginners, any situation where control is critical. | Virtually none when used correctly. The enforced order prevents accidental firing. |
| Contact (Bump) | Hold trigger down, press safety tip to fire. | High-speed production on long, flat runs (e.g., sheathing, decking). | Double fire from recoil; unintended discharge if the tip is bumped while carrying. |
The DeWalt DWFP71917 manual states it clearly: “NEVER carry tool with finger on trigger. In contact mode tool will fire a fastener if safety is bumped while trigger is depressed.” If your nail gun has a mode selector, switch it to sequential and tape it down. The slight speed gain from bump fire isn’t worth the documented 2x higher injury rate.
The Non-Negotiable PPE (It’s Not Just Glasses)
Eye protection is a requirement printed in every manual and backed by federal regulation. The goal is to stop a projectile moving at several hundred feet per second.
Eyes: ANSI Z87.1 or Nothing
You need safety glasses or goggles marked ANSI Z87.1. This isn’t a brand; it’s a performance standard for high-impact resistance. Everyday prescription glasses or cheap plastic lenses will shatter. The hazard isn’t just a direct hit. A nail can ricochet off a knot or hidden metal, or it can blow out the side of a workpiece, sending fragments sideways.
Ears: It’s a Jackhammer in Your Hand
A pneumatic framing nailer operates at a sound level comparable to a jackhammer. The POWERNAIL 50F manual explicitly recommends “ear plugs with a noise reduction rated at 29 dB or higher.” Cordless nailers like the Makita DBN501 are quieter but still produce sharp, repetitive noise that causes cumulative hearing damage. Use foam earplugs or earmuffs.
The Rest: Gloves and Boots
Sturdy work gloves improve your grip and protect your hands from sharp edges, splinters, and the tool’s recoil. Steel-toed boots protect your feet from dropped tools or, in a worst-case scenario, a nail that deflects downward. Your clothing should be close-fitting, no loose sleeves or dangling drawstrings that can get caught in the magazine or trigger.
Your Air Supply: The Setup That Prevents Catastrophe
A pneumatic nail gun is only as safe as the air system feeding it. This is where DIYers make the most dangerous mistakes, assuming a hose is a hose.
Pressure: Respect the Window
Every tool has a specified operating pressure range. Exceeding it doesn’t make the tool more powerful; it strains its internal seals and increases the violent force of any misfire.
- The Paslode F325R framing nailer requires 90 to 120 p.s.i..
- The DeWalt DWFP71917 finish nailer has an operation pressure range of 70 – 120 psig.
- The POWERNAIL 50F flooring nailer advises adjusting pressure between 70-120 psi based on fastener and wood.
Set your compressor’s regulator within your tool’s specified range and adjust down only if nails are overdriven. Never go above the maximum.
The Fitting: Male vs. Female is a Safety Feature
This is the single most important piece of hardware no one talks about. The Paslode manual is adamant: “Only MALE pneumatic type air connectors should be fitted to the tool to ensure high-pressure air is vented to atmosphere upon disconnection.”
Where this goes sideways: Installing a female quick-disconnect on the tool. When you disconnect the hose, a female fitting traps all the compressed air between the fitting and the tool’s internal valve. The tool remains fully charged and can fire at least one nail the next time the trigger is actuated, even with the hose detached. A male fitting vents this pressure instantly, rendering the tool safe.
Hose and Compressor Safety
Your hose must be rated for the pressure you’re using. Visually inspect it for cracks, cuts, or bulges before each use. Secure connections with a positive means (like a locking collar) to prevent accidental disconnection, as required by OSHA regulation 29 CFR 1926.302(b)(1). Never use the air hose to hoist or lower the tool.
The Step-by-Step Safe Operating Procedure
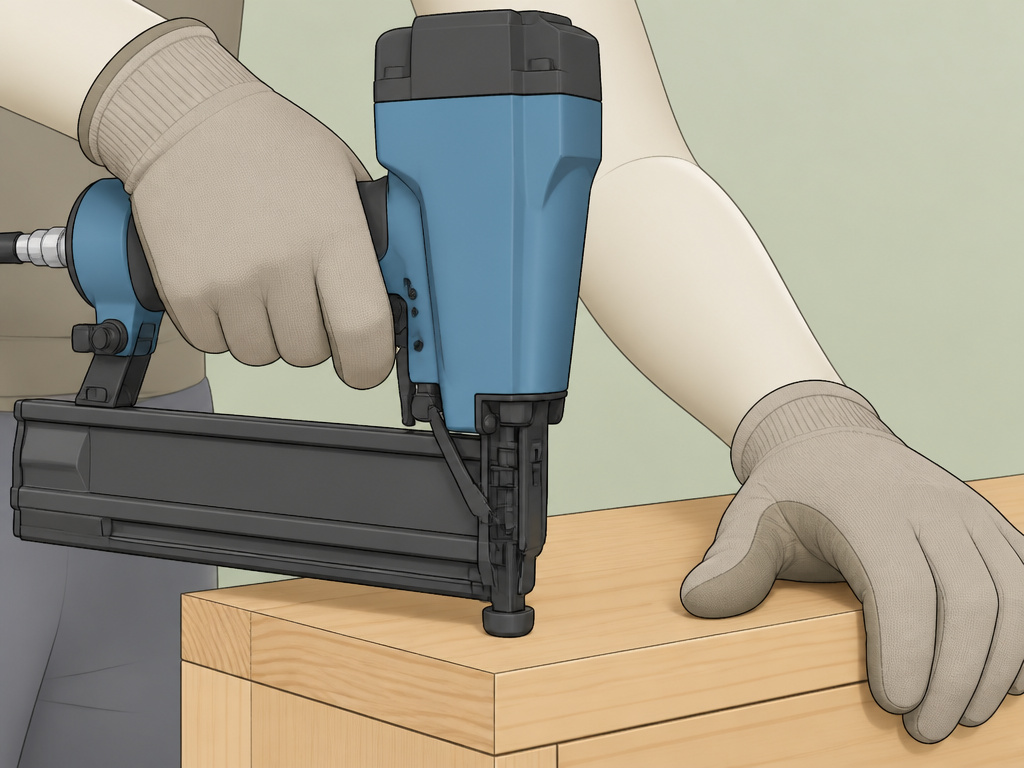
Follow this sequence every time you pick up the tool. Shortcuts here are how accidents happen.
1. Pre-Operation Check (Before Air)
- Inspect the tool for damage, especially the safety contact tip and muzzle.
- Ensure the magazine is empty.
- Verify the trigger mode is set to sequential.
- Don your PPE: ANSI Z87.1 glasses, hearing protection, gloves.
2. Connect and Pressurize
- Connect your air hose to the compressor, ensuring all connections are tight.
- Connect the hose to the tool last, confirming you’re using a male fitting on the tool.
- Turn on the compressor and allow it to build to its cutoff pressure.
- Set the regulator to your target pressure (e.g., 100 psi).
3. Load the Tool
- With the air disconnected, open the magazine. Follow the specific procedure for loading your nail gun. For the Bosch EXNH18V-90MD, this means not loading more than two fastener strips, and each strip must contain at least five nails.
- Pull the magazine follower back slowly and let it engage against the nails. Don’t let it snap forward.
4. Test Fire and Adjust
- Fire two or three nails into a large, secure scrap piece of the same material you’ll be using.
- Check the nail head depth. Use the tool’s depth adjustment feature to ensure the nail is flush or slightly countersunk without damaging the wood surface.
- This 30-second test confirms your air pressure and depth setting are correct for the job.
5. Work Procedure
- Plant your feet firmly for balance.
- Hold the tool firmly with both hands when possible.
- Place the safety contact tip flat and flush against the workpiece before applying any pressure to the trigger.
- Keep your free hand and body out of the line of fire. Never hold a workpiece in place with your hand directly behind the nailing point.
- Be aware of what is behind your workpiece to avoid penetration injuries.
6. When You Stop
- Disconnect the air hose from the tool first. Listen for the hiss of venting pressure.
- Fire the tool into a safe backstop (like a log) to discharge any nail left in the chamber.
- Open the magazine and remove all remaining fasteners.
- Store the tool in a dry, secure location.
Clearing Jams and Handling Misfires
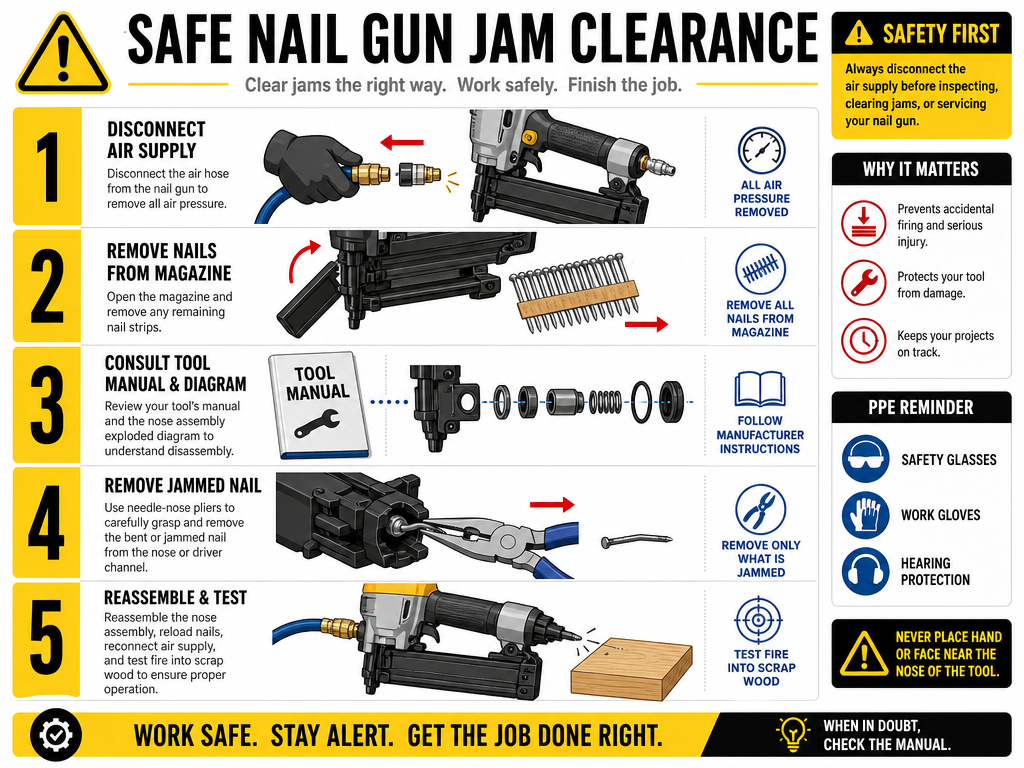
A jammed nail gun is under tension. The wrong move turns it from a faulty tool into a hazard.
Before you start: Disconnect the air supply (or remove the battery). Clear all fasteners from the magazine. Point the muzzle in a safe direction. Your finger must be off the trigger.
The Safe Clearance Process:
- Disconnect and Depressurize. For pneumatics, disconnect the hose. For cordless, remove the battery.
- Clear the Magazine. Open it and remove all nail strips.
- Access the Jam. Follow your tool’s manual to open the nose or driver mechanism. This often involves removing a few screws or pins.
- Remove the Obstruction. Use needle-nose pliers to gently work the jammed nail or fastener fragment free. Never use excessive force or screwdrivers that could slip and damage the chamber.
- Reassemble and Test. Reassemble the tool, reload, and test fire into scrap.
For a detailed, model-specific walkthrough, see our guide on clearing a nail gun jam. Rushing this process is how people get hurt fixing a simple problem.
Special Situations and Edge Cases
The standard rules have exceptions. Knowing them keeps you safe when conditions aren’t perfect.
Cold Weather Operation
The Paslode F325R manual has a specific cold-weather procedure: “When temperatures are below freezing, tools should be kept warm… If not possible, reduce regulated air pressure to 30 psi, remove all fasteners, and collect an air line to warm up the tool.” Cold air and metal parts cause condensation, which can freeze inside the tool, leading to sluggish operation or internal damage.
Awkward Positions (Ladders, Toe-Nailing)
Nailing above your shoulders, on a ladder, or in tight quarters reduces control and increases fatigue. The recoil is harder to manage. In these situations, the risk of an awkward recoil or a double fire skyrockets. Switch to sequential trigger mode without exception. Take extra time to position yourself and the tool securely. Consider whether pre-drilling and hand-nailing might be safer for a one-off awkward fastener.
Battery-Powered Nailer Specifics
Cordless tools like the Makita DBN501 eliminate hose hazards but introduce others. Never recharge a hot or fully charged battery, as overcharging shortens its life. Let a hot battery cool before charging. Be aware that a low battery can cause incomplete driving or jams, so keep a spare charged. The absence of a hose doesn’t mean you can skip the other general power tool safety rules.
First aid and injury reporting
If a nail gun injury occurs, apply immediate first aid to control bleeding and protect the wound. Seek professional medical attention without delay, as puncture wounds can be deep and carry a risk of infection or damage to underlying structures. Report the incident to your supervisor or site manager following your company’s established safety protocols. Documenting the injury is a critical step for workplace safety records and helps identify hazards to prevent similar accidents in the future. Always disconnect the air supply and remove all fasteners from the tool before attempting to help an injured person or inspect the equipment involved.
Training importance
Proper training on how to use a nail gun safely is the foundation of nail gun safety. A trained user understands how to handle the tool, knows the function of the safety mechanisms, and can recognize hazardous situations before they cause an injury. Training should cover the critical difference between trigger types; for instance, the risk of injury is significantly higher with a contact trigger compared to a sequential trigger. It also ensures you know how to correctly connect the air hose, maintain safe operating pressure, and use essential personal protective equipment like high-impact safety glasses and hearing protection. Never operate a nail gun you have not been trained to use.
Frequently Asked Questions
What is the single most important nail gun safety rule?
Keep your finger off the trigger until the safety contact tip is firmly planted exactly where you want the nail to go. This one habit prevents the vast majority of unintended discharges, whether you’re using a sequential or contact trigger.
Can a nail gun kill you?
Yes. While most injuries are to the extremities, a nail penetrating the skull, chest, or a major artery can be fatal. The nail gun dangers documented by OSHA and hospital reports show these are not trivial tools. They demand the same respect as a circular saw or a firearm.
How do I know what size nails to use?
The nail gun itself dictates the nail size. Check the tool’s specification plate or manual. For example, the Makita DBN501 uses 18 Ga nails from 15 to 50 mm in length, while a framing nailer like the Paslode F325R uses nails with a shank diameter of .113″ to .131″. Using the wrong nail is a primary cause of jams and tool damage. Our guide on different types of nail guns covers the common nail and staple types for each tool category.
Why won’t my nail gun fire?
Follow a diagnostic sequence: 1) Is the air connected and the compressor above the minimum pressure? 2) Is the magazine loaded correctly? 3) Is the safety contact tip being fully depressed? 4) Is the trigger in the correct mode? 5) Is there a jam? Always disconnect the air or battery before investigating.
How do I set up a nail gun with an air compressor for the first time?
Start with a compressor that can deliver the required CFM (cubic feet per minute). The DeWalt DWFP71917, for example, needs 2.0 cfm at 80 psi for a rate of 60 fasteners per minute. Use a hose rated for at least 150 psi. Install a filter/regulator/oiler combo at the compressor to clean and lubricate the air. Finally, connect the hose to the tool using a male quick-disconnect fitting on the tool. For a full setup walkthrough, see our article on using a nail gun with an air compressor.
The Bottom Line
Safe nail gun operation is a system, not a single trick. It starts with choosing the sequential trigger mode and ends with depressurizing and storing the tool correctly. The 2x higher injury rate for contact triggers is a hard statistic from the federal OSHA nail gun safety guide. Your job is to stack the odds in your favor with every step.
So here’s the one action to take this week: find your nail gun’s manual. Check the operating pressure, identify the trigger type, and verify the fitting on the air inlet is a male connector. If any of those three things are wrong, fix them before you pull the trigger again. That’s how you move from hoping you’re safe to knowing you are.
