
Why Is My Power Tool Battery NOT Charging?
This post contains affiliate links. As an Amazon Associate, we earn from qualifying purchases.
A power tool battery won’t charge when its internal protection system has locked it out, the charger or power source is faulty, the battery terminals are dirty or corroded, the ambient temperature is outside the acceptable range (typically below 40°F/4°C or above 104°F/40°C), or the battery pack has reached the end of its usable life due to age or a failed component like a blown FET.
That answer covers the common causes, but which one is your culprit depends on a few specific, observable signs. The color and pattern of your charger’s lights, whether the battery feels unusually warm or cold, and a simple voltage test with a multimeter will point you directly to the problem, and often to a fix you can do in ten minutes without buying a thing. If you’re asking ‘why is my power tool battery not charging’, these diagnostics are the next step.
What follows is a diagnostic walkthrough built from the actual service manuals, starting with the fastest checks and moving to the more involved ones. By the end, you’ll know whether you need to warm up a battery, clean a contact, reset a charger, or start shopping for a replacement.
Key Takeaways
- Check the charger lights first. A solid red usually means charging; alternating red/green (on Milwaukee) often indicates a temperature lockout or bad connection; no lights point to a power or charger fault.
- Temperature is a silent killer. Milwaukee chargers wait if the battery is below 15°F (-9°C) or between 150°F and 194°F; DeWalt units won’t start below 40°F (4.5°C) or above 104°F (40°C). Let a hot battery cool for 10–30 minutes, or warm a cold one indoors.
- A multimeter is your best friend. A healthy 18V/20V Max battery will show a voltage relative to its state of charge; a severely depleted pack may read well below its nominal voltage. A reading under 10V suggests a deeply discharged or dead cell, while 0V often means a blown internal FET.
- Dirty contacts are the simplest fix. Corrosion or grime on the battery or charger terminals creates high resistance. A pencil eraser or contact cleaner can restore a connection in seconds.
- Storage charge matters for longevity. While DeWalt advises storing a fully charged battery pack, general Li-ion best practice (and brands like Stihl) recommend 40–60% charge for long-term health to minimize stress on the cells.
The First Thing to Check: Power and Lights
Look at your charger. Is it plugged in and is any light on? It sounds obvious, but you’d be surprised. I once spent twenty minutes diagnosing a “dead” battery before realizing the wall outlet was controlled by a light switch that was off.
If there’s no light at all on the charger when plugged in, the problem is upstream. Try a different outlet. If that doesn’t work, check the charger’s cord for damage. Some chargers, like the Milwaukee 48-59-1801, require line voltage between 90VAC and 132VAC for 120V units. A significant drop below that, from a long extension cord or a crowded circuit, can prevent the charger from waking up at all.
If the charger light is on but behaves oddly when you seat the battery, you’ve entered diagnostic territory. Modern chargers use light patterns to communicate.
Common mistake: Misreading a temperature delay as a failure. If your battery was just in use or came from a cold car, the charger may be waiting. Milwaukee chargers will pause with an alternating red/green light if the pack is below 15°F or between 150°F and 194°F. Give it time.
| Charger Light (Milwaukee / DeWalt typical) | Likely Meaning | Your Next Move |
|---|---|---|
| Solid Red | Charging in progress. | Wait. A full charge time varies based on battery capacity, charger model, and temperature. |
| Solid Green | Charge complete (or false signal). | Remove battery. If tool dies immediately, the pack may be giving a false “full” signal due to damaged electronics. |
| Alternating Red/Green (Milwaukee) | Temperature lockout or bad connection. | Feel the battery. Hot? Let it cool 10–30 min. Cold? Warm it indoors. Also clean the terminals. |
| Flashing Red | Fault detected (bad battery or charger). | Try a known-good battery in this charger, and this battery in a known-good charger. Isolate the culprit. |
| No Lights | No power to charger, or charger fault. | Check outlet, cord, and plug. Try a different outlet. |
When Temperature Locks Out Your Charger
Lithium-ion batteries are fussy about temperature. Their chemistry doesn’t like extreme cold or heat, and the charger knows it. This is one of the most common reasons a battery won’t charge, and the thresholds are specific.
According to the Milwaukee M18 Charger manual, the recommended ambient charging range is 40°F to 105°F (5°C to 40°C). Their general troubleshooting guide adds that the charger will wait if the battery itself is below 15°F (-9°C) or between 150°F and 194°F (65°C–90°C), needing the pack to be between 15°F and 149°F to start. DeWalt’s DCB118 manual prohibits charging below 40°F (4.5°C) or above 104°F (40°C).
DeWalt’s DCB118 manual is more conservative: “DO NOT charge the battery pack in an air temperature below +40 °F (+4.5 °C), or above +104 °F (+40 °C).”
The difference isn’t a mistake, it’s a reflection of each brand’s engineered safety margins. The practical takeaway is the same: if your battery feels very hot after heavy use, or ice-cold from winter storage, the charger will refuse to work until it’s in the safe zone.
Let a hot battery cool for 10 to 30 minutes before attempting to charge. Move a cold battery to a warmer environment. The charger will reduce current in the cold, so charge times will be longer. That’s normal.
Let everything acclimate to room temperature, and ensure the contacts are dry before trying again.
The Step-by-Step Voltage Check (and What the Numbers Mean)
If temperature isn’t the issue behind why is my power tool battery not charging, it’s time for a multimeter. This $20 tool gives you a direct look inside the battery’s health, bypassing all the smart electronics. You’re checking the raw voltage between the main positive (Bat+) and negative (Bat-) terminals, usually the larger, outer contacts on the battery pack.
- Set your multimeter to DC Volts, on the 20V or 200V setting.
- Identify the main terminals. They are often marked with a “+” and “-” or are simply the two largest, widely spaced metal pads.
- Touch the red probe to Bat+, black probe to Bat-. Hold them steady for a few seconds to get a stable reading.
According to Milwaukee’s guide, a FET can fail if the pack is repeatedly overloaded, subjected to extreme internal temperatures, or exposed to water. The circuit is open, so no voltage reaches the terminals.
If your voltage is in the 17-20V range, the problem isn’t a dead cell. Move on to cleaning and inspecting connections. If it’s below 10V, you might attempt a jump-start, but understand the risks and that the pack’s long-term health is compromised.
Cleaning Contacts and Resetting the System
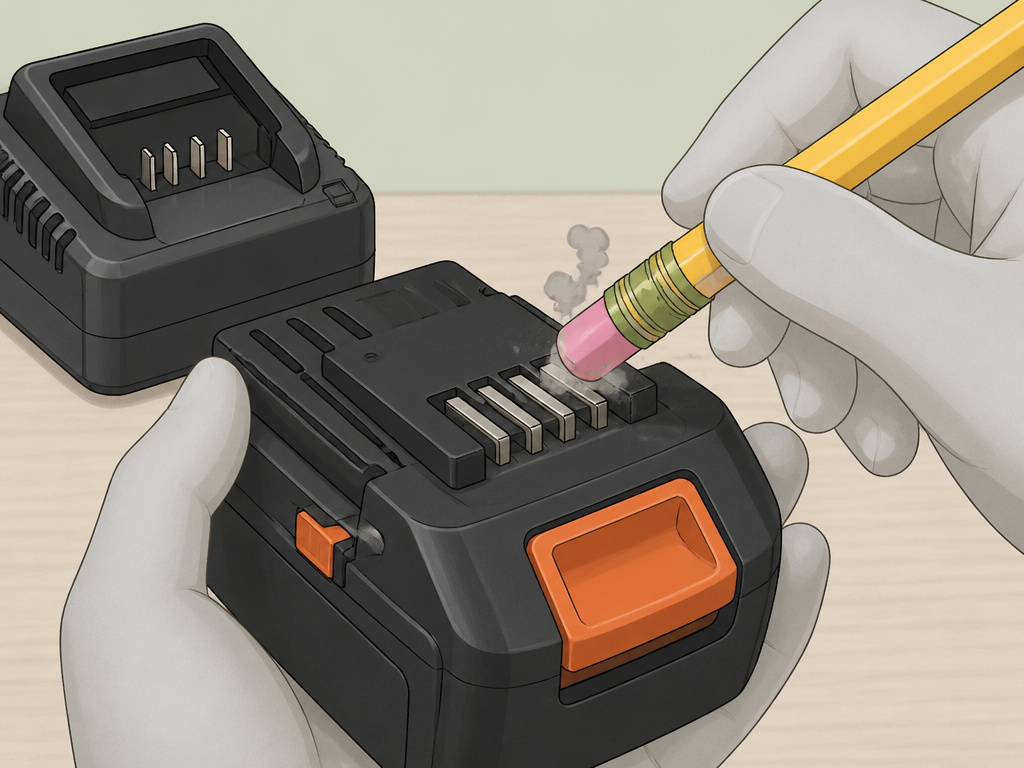
Dirt, sawdust, and corrosion are insulators. A film of grime on the battery or charger terminals creates enough resistance to fool the smart circuit into thinking there’s no connection. The fix is simple and effective.
First, unplug the charger. Safety first, you’re dealing with metal contacts. Look at the battery terminals and the corresponding pins inside the charger bay. You’re looking for discoloration, green corrosion, or a layer of black/grey grime.
A clean pencil eraser is a perfect tool for this. Rub it firmly over the metal contacts on the battery. For the charger pins, you can use a cotton swab lightly dampened with isopropyl alcohol (90% or higher) or a dedicated electronics contact cleaner. Never use water or abrasive pads.
Before you start: Unplug the charger. For any internal inspection, Milwaukee’s manual advises letting it sit for 3-4 minutes before disassembling to allow capacitors to discharge.
Sometimes, the system just needs a hard reset. If the charger’s progressive charge indication fails to advance, a known issue if power was interrupted, the Milwaukee fix is specific: unplug the charger, remove the battery for one minute (60 seconds), then replug and reinstall the battery. This clears any glitched state in the charger’s logic.
Internal Failures: BMS, FETs, and Old Age
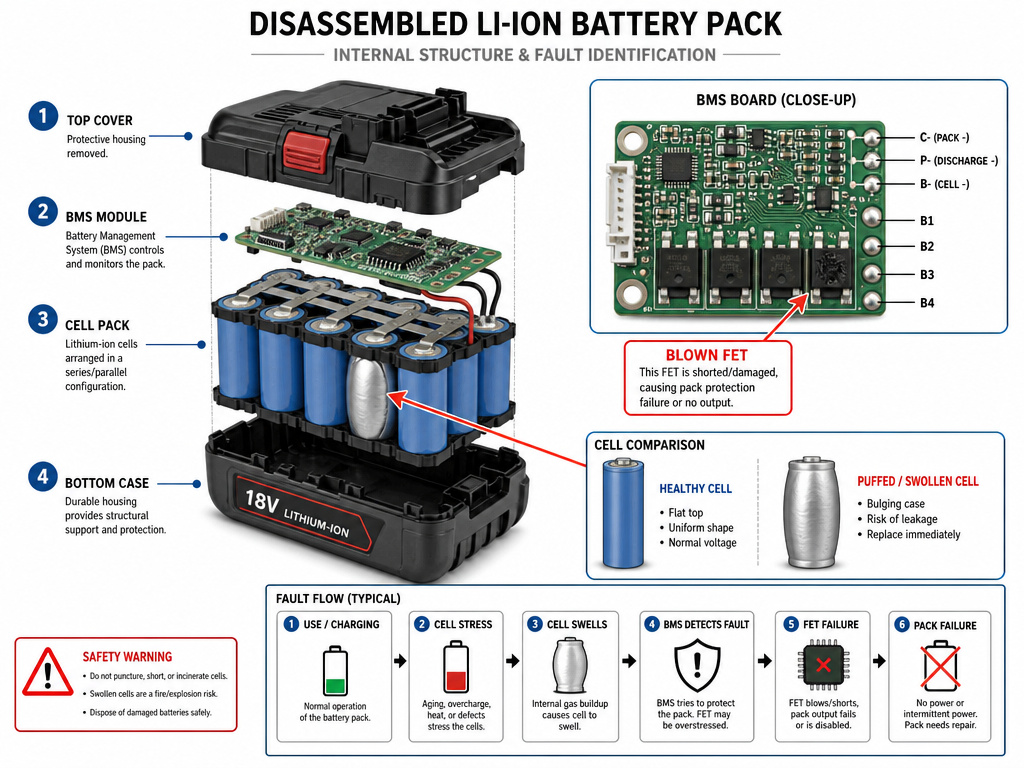
When all the simple checks pass for why is my power tool battery not charging, power is good, contacts are clean, temperature is right, voltage looks okay, but the battery still refuses to charge, the fault is internal. You’re dealing with the Battery Management System (BMS), individual cells, or physical damage.
The BMS is the tiny circuit board inside every lithium-ion pack. It manages charging, prevents over-discharge, and monitors temperature. If this board is damaged, say, by a short circuit, water ingress, or a voltage spike, it can lock the battery permanently. A common failure point is the FET, which acts as the main power switch. A blown FET, as noted in the Milwaukee fact sheet, results in a pack that shows 0 volts on your multimeter.
Age is the other silent killer. Lithium-ion cells degrade with each charge cycle. After several years of heavy use, they simply can’t hold enough charge to be useful. The charger isn’t lying; the cells are so worn they hit their voltage peak quickly but have no capacity.
| Symptom | Probable Internal Cause | Is it Fixable? |
|---|---|---|
| Battery reads 0V on multimeter. | Blown FET or completely severed connection inside pack. | For advanced DIYers only; requires soldering and sourcing exact replacement cells and BMS. |
| Battery charges to full green light in minutes, then dies instantly. | Severely degraded cells (old age) or BMS giving false “full” signal. | Not economically viable. The pack is at end-of-life. |
| Physical swelling or cracking of the battery case. | Internal cell damage or gas buildup. Do not charge. | No. This is a safety hazard. Dispose of properly immediately. |
| Tool “buzzes” for 5 seconds then shuts off repeatedly. | BMS is triggering overload protection (per Milwaukee’s protection guide). | Let battery cool. If persistent, internal cells or BMS may be failing. |
If you’re mechanically inclined, rebuilding a battery pack is possible. It involves carefully opening the case, identifying and sourcing the correct replacement cells, desoldering the old ones, and soldering in new, matched cells. It’s a project that requires care, lithium-ion cells are not forgiving, but it can save you the cost of a new battery.
For everyone else, when a pack shows these internal failure signs, replacement is the safest and most reliable path. The cost of new cells, a spot welder, and your time often exceeds the price of a new aftermarket battery.
Can You Jump-Start a Dead Tool Battery?
Some smart chargers have a recovery mode for deeply depleted batteries. You might hear a repeated chirping sound from the charger as it attempts this process. If the charger isn’t initiating recovery, do not attempt to bypass the electronics with another power source. Modern lithium-ion packs have protection circuits that can be permanently damaged by such methods, creating a safety hazard. If the charger’s recovery mode fails after a reasonable attempt, the battery is likely beyond safe repair and should be recycled.
How to Look for Internal Battery Damage
Physical damage is a common killer. Inspect the battery case for cracks, bulges, or signs it was dropped hard. Check the metal charging contacts for dirt, corrosion, or being pushed in. Before opening any battery pack, you must unplug the charger and let it sit for several minutes to discharge capacitors. Inside, look for disconnected wires, cracked solder joints, or a burnt electronic component, which can appear as a small, discolored chip. Water damage or extreme heat can also cause these internal failures. If you see any of this, the pack is not safe to use.
Frequently Asked Questions
How can I reset a battery that isn’t charging?
For most brands, a “reset” means removing the battery from the charger and tool for a full minute, then re-seating it. For a Milwaukee charger whose fuel gauge lights are stuck, the official procedure is to unplug the charger, remove the battery for 60 seconds, then reconnect everything. This clears transient electronic faults.
How to bring a power tool battery back to life?
If the battery is deeply discharged but not at 0V, some chargers have a recovery mode. Milwaukee chargers emit a “chirping” sound during this attempt. You can also try a manual jump-start using a DC power supply set to the pack’s nominal voltage (e.g., 18V) for a very short period, but this carries risk of fire or damage if done incorrectly. Our guide on reviving a dead battery covers safer methods.
Why is my 20v battery not charging but the light is green?
Green light with a dead battery points to a false signal. The battery’s internal electronics (BMS) are damaged but still telling the charger, “I’m full!” The charger then stops the process. Try the battery in another charger if possible. If the problem follows the battery, its BMS is likely faulty and the pack needs replacement.
Can cold weather permanently damage a power tool battery?
Yes, if you attempt to charge a battery when it’s extremely cold (well below the manufacturer’s specified minimum, like 0°F/-18°C), you can cause lithium plating on the cells, which permanently reduces capacity and can create internal short circuits. Always warm a cold battery to within the acceptable range (above 40°F/4°C for DeWalt, above 15°F/-9°C for Milwaukee) before charging.
Before You Go
Start with the physical and free fixes. Check the outlet. Feel the battery for extreme temperatures. Clean the contacts with an eraser. Try the one-minute charger reset. These steps resolve a surprising majority of “won’t charge” problems because they address the most likely points of failure: human error and environmental factors.
If you get a low voltage reading (under 10V), recognize that you’re on the edge. Recovery might be possible, but the battery’s long-term reliability is already compromised. Weigh the effort of a jump-start or reconditioning attempt against the cost and safety of a new pack.
Finally, invest in a basic multimeter. That one tool moves you from guessing to knowing. Seeing 19V on a “dead” battery immediately tells you the problem is communication, not energy. That insight alone is worth the price, and it’s a skill that translates to every other battery-powered device in your shop and home.
