
How to Revive a Dead Power Tool Battery: Step-by-Step
This post contains affiliate links. As an Amazon Associate, we earn from qualifying purchases.
To revive a dead power tool battery, you must first diagnose why it’s dead. Start by testing the charger and battery voltage, then attempt a charger reset. If that fails, controlled methods like using a known-good charger, warming a cold battery, or a careful parallel jumpstart from a healthy battery may work. A truly dead lithium-ion battery with swollen cells or no voltage cannot be revived and must be recycled.
That “dead” feeling is usually the Battery Management System (BMS) locking the pack down to protect it, from deep discharge, extreme temperatures, or a fault. Your job is to convince the BMS the pack is safe to power up again, without bypassing the very protections that prevent a fire. This is the core of how to revive a dead power tool battery.
What follows is a safety-first path from the simplest fix to the most involved, answering how to revive a dead power tool battery. This guide details the diagnostic steps the manuals skip, explains three revival methods from safest to riskiest, and shows when to stop and recycle the pack.
Key Takeaways
- Start with a 60-second charger reset. Unplug the charger, remove the battery for one full minute, then reconnect. This clears many communication errors between the charger and battery’s BMS.
- Test battery voltage before any risky revival. A reading below 10V for an 18V pack often means the cells are damaged beyond recovery; attempting to force-charge them risks thermal runaway.
- Never use a car battery charger on a Li-ion pack directly. The uncontrolled high current can bypass the BMS, instantly overheating and potentially igniting the cells.
- Parallel jumpstarting is a last resort. Connecting a healthy battery in parallel with a dead one for 5-10 minutes can sometimes ‘trickle in’ enough voltage to wake the BMS, but monitor for heat constantly.
- Swelling or a sweet, chemical smell means stop. These are physical signs of internal cell damage; the battery is a fire hazard and must be taken to a recycling center like RBRC immediately.
The 5-Step Diagnostic Flow (Before You Try Anything Risky)
Ever plug in a battery and get nothing, no lights, no click, just silence? Your first move isn’t a revival trick; it’s diagnosis. Jumping straight to jumpstarting is like giving CPR without checking for a pulse.
Step 1: Verify Power and Connection. Is the outlet live? Is the charger firmly plugged in? Milwaukee’s troubleshooting guides repeatedly point users to first verify the charger is receiving correct line voltage: 90–132 VAC for 120V units. A simple outlet tester or multimeter check rules out half the problems.
Step 2: The 60-Second Hard Reset. This is the single most overlooked step in the official manuals. If power is interrupted during a charge, the charger and battery’s communication can freeze. The fix is specific: unplug the charger from the wall, remove the battery pack, wait for one full minute (60 seconds), then plug the charger back in and reinstall the battery. I’ve seen this clear a “dead” battery on a Milwaukee M18 charger more times than I can count.
Step 3: Try a Known-Good Charger and Battery. This is the isolation test. Does your questionable battery work on a friend’s known-good charger? Does a known-good battery work on your charger? It tells you instantly whether the fault lies in the battery or the charging system. A faulty charger, like one with a blown internal fuse, won’t revive anything.
Step 4: Check the Battery Voltage. This is where you need a multimeter. Set it to DC Volts and touch the probes to the battery’s main positive and negative terminals (not the small data pins). According to Milwaukee’s diagnostic flow, a healthy 18V pack should read in the range of 25-29 VDC. According to Milwaukee’s diagnostic flow, if the voltage is in the 25–29 VDC range but the tool doesn’t run, the internal electronics are likely damaged. If the voltage is very low (under 10V), the cells are deeply depleted and revival is riskier.
Step 5: Inspect for Physical Damage. Look for cracks in the housing, bulging sides, or corrosion on the terminals. Smell the battery pack near the vents. Any unusual odor from the battery pack is a major red flag. Any physical damage means stop. This pack is not revivable; it’s hazardous.
Before you start: Lithium-ion batteries contain energy-dense cells that can vent with flame if damaged or improperly charged. Work on a non-flammable surface, keep a Class D fire extinguisher nearby, and never leave a battery unattended during revival attempts. If skin contacts battery fluid, wash with soap and water and rinse with vinegar per Milwaukee’s safety sheet.
| Symptom | Likely Cause | Next Action |
|---|---|---|
| No charger lights | Dead outlet, faulty charger, or communication error | Perform 60-second hard reset; test outlet/charger. |
| Blinking red/green light | Bad connection, battery too cold (<14°F/-10°C) | Clean terminals with dry brush; move to warmer area. |
| Fuel gauge LEDs don’t progress | BMS lockout, deeply depleted cells | Try known-good charger; check voltage. |
| Swollen case | Internal cell damage, thermal runaway | STOP. Recycle immediately. |
| Sweet chemical smell | Electrolyte leakage | STOP. Recycle immediately. |
Method 1: The Safe, Official Fixes (Charger Reset and Warming)
Most “dead” batteries aren’t dead. They’re just locked out, cold, or confused. The manufacturer’s own troubleshooting guides point to these fixes first when you compare a how to revive a dead power tool battery, because they carry almost no risk.
The Charger Wake-Up Call. Milwaukee specifically uses the term “Wake Up” for a deeply depleted or electronically damaged pack: place it on a charger. For some packs, this sends a pulsed, low-current signal that can nudge the BMS back online without a full charge cycle. If the fuel gauge LEDs fail to light or progress, the official remedy is the 60-second reset described above. Persistence matters, try this cycle two or three times.
Dealing with the Cold. Lithium-ion chemistry hates the cold. A pack that sat in an unheated garage might refuse to charge because its internal temperature is too low. Milwaukee notes that if a battery pack is cold, “charge current is ‘pulsed’ at a slow rate,” which can show as blinking fuel gauge lights. The manual solution is straightforward: move the charger and battery pack to a warmer environment and let them acclimate. Don’t use a hair dryer or heat gun; gradual, ambient warming is safe.
Where this goes sideways: Assuming a cold battery is dead and forcing it with a high-current charger. The BMS is blocking the charge for a reason, to prevent plating lithium onto the anode, which permanently kills capacity. Patience is the tool here.
The part nobody mentions: After a tool stalls under heavy load, the battery needs a minute. Fuel gauge readings are most accurate if the battery pack is allowed to rest for several minutes after use. What looks like a dead battery might just be a tired one. Let it rest.
Method 2: The Controlled Jumpstart (Using a Healthy Battery)
When the official fixes fail, the next step is a controlled jumpstart. This is the “parallel connection” method you see on forums. It works by using a healthy battery to gently feed voltage into the dead pack, potentially raising its level enough for the BMS to recognize it and accept a normal charge. This is where you cross from no-risk to some-risk.
Why it works (the why-layer): A deeply discharged battery’s voltage can sag below the BMS’s low-voltage disconnect threshold. The BMS opens the circuit, protecting the cells. By connecting a healthy battery in parallel (positive to positive, negative to negative), you create a path for current to flow from the high-voltage source to the low-voltage one. This can slowly raise the dead pack’s voltage back above the BMS’s wake-up point.
The Step-by-Step Guide:
- Gather Tools: You need a known-good, healthy battery of the same voltage (e.g., 18V), two short lengths of wire with alligator clips, and a voltmeter.
- Check Voltages: Measure the good battery (should be ~20V). Measure the dead battery. If the dead battery reads a very low voltage, the risk of internal damage is high. Proceed with extreme caution or stop.
- Make the Connection: Connect the positive clip to the positive terminal of the good battery, then attach the other end to the positive terminal of the dead battery. Then, connect the negative clips between the negative terminals. Double-check you have positive-to-positive and negative-to-negative.
- Monitor Closely: Leave connected for a short time while monitoring constantly. Do not walk away. Feel both batteries for heat every two minutes. If either battery gets warm to the touch, disconnect immediately.
- Test and Charge: Disconnect, then check the dead battery’s voltage. If it has risen to 12V or more, try placing it on its official charger. If the charger lights activate, let it charge fully.
WARNING: This method forces current into a battery that may have damaged cells. It can cause excessive heating. It is a last-ditch effort, not a standard procedure. Never use a car battery or high-current power supply for this, the amperage is unregulated and dangerous.
Method 3: Using a Bench Power Supply (The Expert Approach)
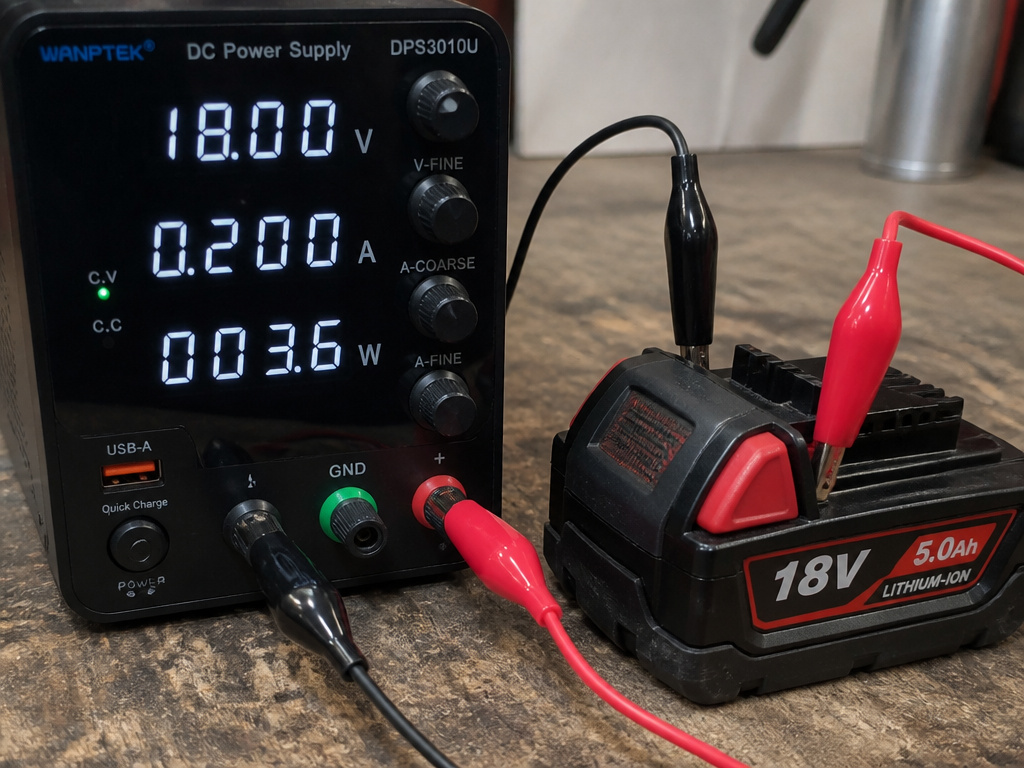
For those with technical confidence, a variable benchtop power supply is the safest, most controlled way to attempt a revival. This addresses a key content gap in the top search results.
How to Set It Up:
- Set the power supply voltage to the nominal voltage of your battery pack (e.g., 18.0V for an M18 pack).
- Set the current limit very low, between 0.1A and 0.5A. This is critical. The low current acts as a gentle trickle charge, minimizing heat and stress on the cells.
- Connect the supply’s positive lead to the battery’s positive terminal and negative to negative, using alligator clips.
- Turn on the supply and monitor the voltage reading on the battery terminals (not the supply’s output). You should see it begin to climb slowly from its deep-discharge voltage.
- Continue until the battery voltage rises to a level where the BMS may wake up. This may take 30-60 minutes. If the battery gets warm at any point, stop immediately.
- Once the voltage is raised, disconnect the supply and try the battery on its normal charger.
Why this beats a car battery charger: A bench supply with a current limit cannot deliver more amperage than you set. A car charger has no such limit and can dump 2-10 amps into a tiny battery pack, causing instant overheating. This is why the car charger method is so dangerous and not recommended.
| Method | Risk Level | Success Rate for BMS Lockout | Tools Needed |
|---|---|---|---|
| Charger Reset / Warming | Very Low | Moderate-High | Official charger, warm space |
| Parallel Jumpstart | Medium | Moderate | Healthy battery, wires, voltmeter |
| Bench Power Supply | Low (with proper settings) | Moderate | Variable DC power supply |
| Car Battery Charger | Very High | Low (with high damage risk) | Car charger – NOT RECOMMENDED |
When to Stop: Recognizing a Truly Dead Battery

You need to know your off-ramp. Reviving a battery isn’t alchemy; you can’t fix physical damage. Continuing to try can turn a dead battery into a dangerous one.
Heed Physical Signs. A swollen battery pack is the clearest stop sign. The swelling is caused by gas buildup inside damaged cells, creating internal pressure. This is a prelude to possible venting or rupture. Similarly, any sign of leakage, corrosion, or that distinct sweet odor means the internal chemistry is compromised.
Voltage Tells the Final Story. If, after a careful jumpstart attempt, the battery voltage will not rise or immediately collapses back to zero when disconnected, the cells are deceased. They cannot hold a charge. According to Milwaukee’s guides, if a low voltage is measured and the tool still doesn’t run, “there may be a broken connection inside the pack.” That’s a manufacturer saying it’s not user-serviceable.
The Warranty and Recycling Reality. Before you spend hours, check if your battery is still under warranty. For example, certain Milwaukee M18, V18, and V28 batteries have a five-year or 2000-charge warranty, with the first 1000 charges or two years covered by free replacement. A call to their service line might get you a new pack for the cost of shipping. If it’s truly dead, recycle it responsibly through the Rechargeable Battery Recycling Corporation (RBRC). These packs contain valuable and hazardous materials; they don’t belong in a landfill.
Reviving Milwaukee and Bosch Power Tool Batteries
For Milwaukee batteries showing no signs of life, try a ‘Wake Up’ by placing it on a compatible charger. If the charger overheats, allow it to cool for 3-5 minutes and remove power for at least one minute before reapplying. For a battery that shut down from overload, placing it on the charger should reset it. Check that your outlet voltage is correct for your charger model. If the fuel gauge lights blink or don’t progress, unplug the charger and remove the battery for one full minute before trying again. Always let a hot battery cool before charging. Sources disagree on the exact minimum temperature: Bosch recommends charging only above 0°C, while Milwaukee recommends a range starting at approximately 4.4°C (40°F). For Bosch packs, ensure you charge only within its specified temperature range to prevent damage. Cleaning the battery terminals with a dry, soft brush can sometimes resolve poor connections.
Frequently Asked Questions
How do you bring a power tool battery back to life?
Start with the manufacturer-approved steps: perform a 60-second hard reset on the charger, ensure the battery isn’t too cold, and try a different known-good charger. If the battery is physically intact and shows some voltage (above ~10V for an 18V pack), a controlled parallel jumpstart from a healthy battery may revive it by raising the voltage enough to wake the Battery Management System.
Can a completely dead lithium-ion battery be revived?
It depends on why it’s “dead.” If the Battery Management System (BMS) has locked out due to deep discharge but the individual cells are still healthy, revival is possible with careful methods like a bench power supply. If the cells are physically damaged, swollen, or have no voltage, they cannot be revived and attempts are dangerous.
Is the freezer method for reviving batteries safe?
No. Putting a lithium-ion battery in a freezer is a folk remedy with no scientific basis and significant risk. Condensation can form inside the pack when you remove it, leading to internal short circuits. Extreme cold can also damage the cell chemistry. Follow manufacturer guidance, if a battery is too cold, warm it gradually to room temperature.
What should I do with a battery that won’t revive?
If a battery shows physical damage (swelling, leakage, odor) or holds no voltage after attempted revival, it is a fire hazard and must be recycled. Do not dispose of it in household trash. Search for “RBRC drop-off” or “tool battery recycling” in your area. Many hardware stores and tool retailers offer free take-back programs.
The Bottom Line
Reviving a battery is a diagnostic puzzle, not a magic trick. Your best tool is patience, and your first step is always the 60-second charger reset. From there, let voltage readings and physical signs guide you, not hope.
If you get to the point of a parallel jumpstart, you’re in the danger zone. Monitor for heat like it’s your job, because it is. The moment you see swelling or smell that chemical scent, the job is over. Your new task is safe battery disposal.
For the next battery, prevention is straightforward. Store packs at room temperature and at a partial charge. Follow the proper storage guidelines to avoid deep discharge. And when a tool starts to bog down, don’t force it, that’s the BMS begging you to stop before it has to lock the pack down for good. A little care saves you the trouble of rebuilding a battery later.
