
How to Use an Impact Wrench: Step-by-Step (Without Damage)
This post contains affiliate links. As an Amazon Associate, we earn from qualifying purchases.
To use an impact wrench, you need three things set correctly before you pull the trigger: clean air at 90 psi maximum pressure, the right impact-rated socket, and the direction selector set for loosen or tighten. Place the socket fully on the fastener, hold the tool steady, and squeeze the trigger, the hammering action does the work, not your muscle.
That 90 psi ceiling comes straight from the manuals for tools like the Sealey SA6006 and Snap-on MG3255L. Exceed it, and you’re trading tool life for a marginal speed boost that usually isn’t worth the risk. The real skill is in the setup and knowing when to let the tool do its job versus when to step back, which is a core part of how to use an impact wrench.
What follows is the checklist most first-timers miss when learning how to use an impact wrench, the step-by-step sequence that prevents stripped threads, and the maintenance move that adds years to your wrench’s life, all sourced directly from the manufacturer PDFs that the pros use.
Key Takeaways
- Operate at 90 psi maximum air pressure; higher pressure damages the tool’s internal mechanism and is explicitly warned against by Sealey, Snap-on, and Ingersoll Rand.
- Use only impact-rated sockets; standard chrome sockets can shatter under the hammering force, a safety warning repeated in every manual from Chicago Pneumatic to Sealey.
- Let the tool do the work; applying extra downward force (a common instinct) can damage the fastener and the wrench, as cautioned in the Sealey SA6006 manual.
- Connect a short leader hose between the wrench and any quick-change coupling to prevent vibration-induced failure, per Sealey and Snap-on instructions.
- Lubricate daily if your air system lacks an oiler; the Sealey SA6006 manual specifies a few drops of air tool oil in the inlet to prevent wear.
Safety First: Your Non-Negotiable PPE
The sound of an impact wrench working is a rapid, metallic brrrrrrrp. Without ear protection, that can be damaging over time. That noise isn’t just loud; it’s damaging over time.
You need more than just ears covered.
- Safety glasses or a face shield. Metal shards, rust flakes, and debris get launched. Regular prescription glasses aren’t enough.
- Heavy-duty work gloves. They protect against pinches, sharp edges, and the tool’s vibration.
- Sturdy boots. You’re dealing with heavy, reactive tools and possibly dropping large fasteners.
Where this goes sideways: Skipping gloves because “you have a good grip.” The vibration from a high-torque wrench like the Sealey SA6006 can leave your hands numb and tingling after continuous use. That’s hand-arm vibration syndrome knocking, and it’s cumulative.
Before you even plug in the air hose, do a visual inspection. Check the power cord or air hose for cracks. Ensure the socket retainer pin (the little spring-loaded ball in the drive) is present and has some tension. A loose socket is a projectile.
Gearing Up: Compressor, Hose, and Socket Setup
Your air compressor is the lungs of the tool. Its job is to deliver clean, dry air at the right volume. The manual for the Sealey SA6006 is blunt: “Ensure the air supply is clean and does not exceed 90psi.” The Snap-on MG3255L manual says the same. This isn’t a suggestion. Pressure above 90 psi (6.2 bar) pushes the tool beyond its design limits, over-stressing the hammer mechanism and bearings.
The hose matters more than people think. You need enough airflow, measured in CFM. Your compressor needs to deliver enough airflow (CFM) for your specific wrench. Hose diameter is your lifeline, the Sealey manual mandates a minimum 1/4” I.D. Anything smaller strangles the tool.
Here’s where the manuals disagree on a specific detail, and you should know both positions.
| Manufacturer | Quick-Connect Coupling Advice | Hose Length Guidance |
|---|---|---|
| Sealey (SA6006) | “Vibration may cause failure if… Connected directly.” Use a short leader hose. | Compensate for pressure drop on hoses over 8 metres (26 ft). |
| Snap-on (MG3255L) | “Do not connect quick-connect couplings directly to the tool.” | Use a whip hose no longer than 60” (150 cm). |
The principle is the same when you compare a how to use an impact wrench guide: a stiff coupling right at the tool’s inlet transmits harmful vibration. Fix it with a short flexible leader hose between the wrench and your main line coupling; Sealey advises compensating for pressure drop on hoses over 8 metres, while Snap-on recommends a whip hose no longer than 60” (150 cm).
Now, the socket. This is essential.
Only use impact sockets which are specifically designed for use with an impact wrench. That’s a direct quote from the Sealey SA6006 instructions. Impact sockets are made from softer, tougher steel that bends slightly rather than shattering. They’re also typically black (phosphate-coated) rather than chrome. Using a regular chrome socket is asking for it to explode like a grenade. For flexible joints, the Snap-on manual is even more specific: “Use only ball-joint flexible sockets. Do not use square block type flex sockets.”
The Core Operating Sequence (Step-by-Step)
Ever wondered why your impact wrench seems to spin furiously but not budge a bolt? It’s almost always a setup flaw, not a power issue. Follow this sequence.
-
Set the Direction. Locate the forward/reverse switch or button. Usually, pushing it one way shows an “R” or arrow for remove/loosen, the other for tighten. The Sealey SA6021 notes its button also regulates air flow. Ensure it’s set for loosening (counter-clockwise for standard threads) before you start.
-
Seat the Socket. Push the correct impact socket onto the drive square until it clicks or seats fully. Give it a slight tug to confirm it’s secure. An incomplete seat means the socket can fly off at 9,000 RPM.
-
Position the Tool. Hold the wrench with both hands if possible, one on the grip, one supporting the body or the front of the motor housing. Position the socket squarely over the fastener. Misalignment cams the socket off and rounds the bolt head.
-
Pull the Trigger. Briefly. Give the trigger a short, firm squeeze. Listen. You should hear the distinct pock-pock-pock of the hammer impacting. If you only hear a high-speed whirring, the socket isn’t engaged, the pressure is too low, or the fastener is already moving. For running nuts down, the Sealey SA6006 offers a “soft start” feather-touch trigger that delivers 272 Nm.
-
Let the Impacts Do the Work. This is the hardest habit to break. Do not lean on the tool. The Sealey SA6006 manual has a clear warning in a box: “DO NOT use any additional force upon the wrench in order to remove a nut.” The hammer mechanism needs to recoil slightly between blows; pushing down dampens that action and kills efficiency.
-
Stop Before It’s Too Late. For tightening, especially with lug nuts, stop before the impact wrench starts “chattering” (a rapid series of light impacts). That’s the signal it has reached its torque. Final torque should be set with a hand torque wrench. As the Ingersoll Rand safety guide states: “Impact Wrenches are not torque wrenches. Connections requiring specific torque must be checked with a torque meter.”
Right. So the sequence is: direction, seat, position, bump, listen, hold back, stop early. Miss one, and you’re either wasting time or damaging something.
When Not to Reach for the Impact Wrench
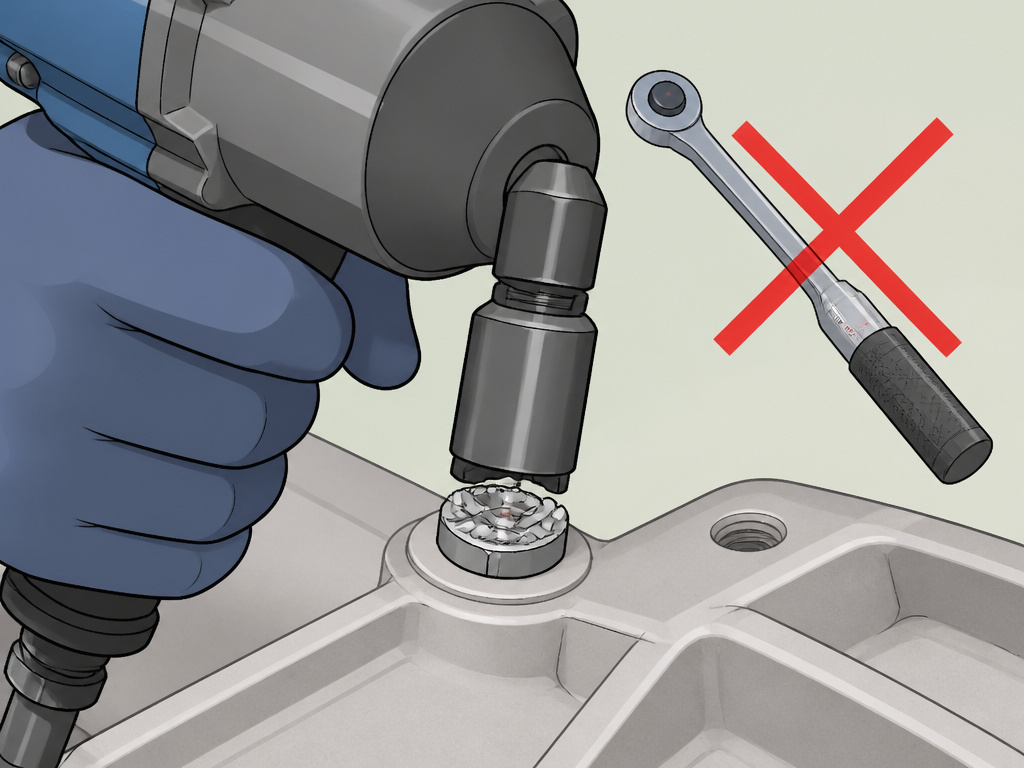
An impact wrench is a blunt instrument. Its genius is delivering high torque in short, sudden bursts. That makes it terrible for several common jobs.
- Precision Torque Work. Never use it for final assembly of engine components, cylinder heads, or any fastener with a precise torque spec (e.g., 35 lb-ft). You will over-torque it. Use a hand torque wrench.
- Small or Soft Fasteners. Aluminum, brass, or plastic fittings will strip or shear instantly. So will small or soft fasteners. The shock load is too much.
- Where You Can’t See or Feel. If you can’t watch the fastener seat squarely, or if you’re working by feel in a tight space, the risk of cross-threading skyrockets. Start it by hand.
- With Extensions or Universal Joints. Adding a long extension or a u-joint creates deflection. The impact’s energy gets absorbed by the flex in the adapter, not transferred to the fastener. It feels weak because it is.
The Snap-on manual puts it plainly: “An impact wrench is not a torque control device. Do not use an impact wrench for torque control.” It’s for breaking loose and running down fast, not for precision.
Troubleshooting Weak Power or Strange Behavior
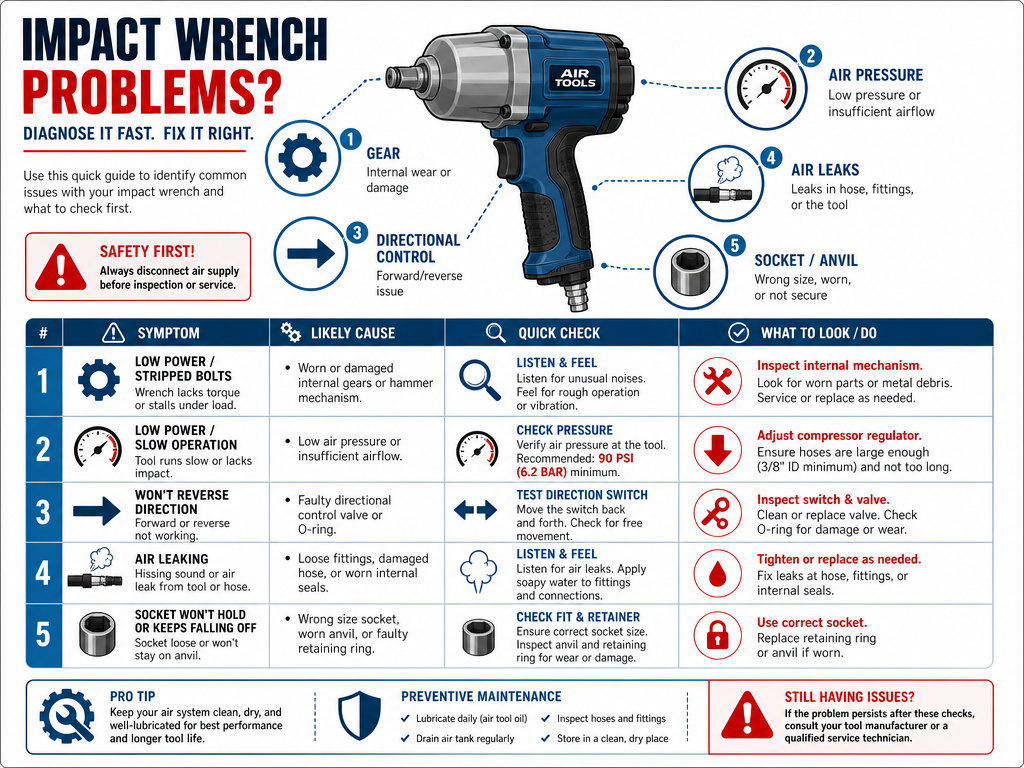
If your wrench spins but doesn’t impact, or feels gutless, don’t blame the tool first. Run through this diagnostic list. I learned this the hard way on a project where my wrench suddenly went quiet, turned out the compressor tank drain valve was stuck, and a cup of water had made its way into the airline.
| Symptom | Most Likely Cause | Check This First |
|---|---|---|
| Spins fast, no impact | Internal hammer mechanism jammed or broken | Has it been oiled? Check for moisture in the line. May need service. |
| Weak power, sluggish | Low air pressure or volume | Confirm gauge reads 90 psi at the tool. Check your compressor’s CFM rating against your tool’s requirement. |
| Works in one direction only | Faulty forward/reverse valve or internal damage | Listen for air exhaust in both settings. Valve may be clogged with debris. |
| Air leaking from trigger or body | Worn O-rings or seals | Disconnect air, inspect for visible cracks. Needs seal kit replacement. |
| Socket won’t stay on | Worn or broken socket retainer spring | Can you push the retention ball down easily? It should have firm spring pressure. |
Post-Use Maintenance That Actually Matters
You just zipped off a set of rusted lug nuts in 30 seconds. The tool feels invincible. This is when it’s most vulnerable to neglect. The single biggest lifespan killer for air tools is water and lack of lubrication.
After every use, especially in humid conditions, disconnect the air hose and briefly pull the trigger to blast out any residual moisture from the line. This simple 3-second habit prevents internal corrosion.
If your air system doesn’t have an inline lubricator, you must oil the tool manually. The Sealey SA6006 manual specifies: “If the air system does not have an oiler, lubricate the air wrench daily with a few drops of Sealey air tool oil dripped into the air inlet.” Not weekly. Daily. The Chicago Pneumatic CP0611-D28H manual agrees, calling for SAE #10 oil at two drops per minute via lubricator, or a daily dose if you don’t have one.
For a heavily used professional tool, the Chicago Pneumatic manual also recommends a more involved service: “Disassemble and inspect the tool every three months if the tool is used every day.” Most DIY users won’t hit that threshold, but if you’re doing a big project every weekend, a yearly teardown and clean isn’t overkill.
Common mistake: Storing the wrench with the air hose connected. Condensation forms inside the tool overnight, leading to internal rust. Always disconnect and drain the hose from the compressor end.
Impact Wrench vs Impact Driver
An impact wrench is a high-torque tool designed for heavy-duty fastening, like lug nuts and large bolts. It is not a torque control device. Connections requiring a specific tightness must be checked with a torque meter after using the wrench. This is different from an impact driver or drill, which are typically used for driving screws and smaller fasteners into materials. The wrench delivers its power through a hammer and anvil mechanism that produces concussive rotational blows, allowing it to break loose or tighten fasteners that would stall a standard drill or driver.
How an Impact Wrench Works
Inside the wrench, a motor spins a hammer mechanism. When resistance is met, this hammer is forced back and then driven rotationally into an anvil that turns the socket. This creates a series of powerful, concussive blows. The flow of air to the motor can sometimes be regulated to adjust the power and frequency of these impacts. The tool should not be allowed to free run for an extended period, as this rapid spinning without load can shorten the tool’s life by reducing bearing life.
Starting Fasteners by Hand
When tightening a fastener, always start it by hand. This ensures the threads are properly aligned to prevent cross-threading. Once the fastener is snug, you can use the impact wrench. Some wrenches offer a soft-start feature by using a light trigger press for initial engagement, which provides lower torque. Never use additional force by pushing down on the wrench during operation. Let the tool’s impact mechanism do the work. For final precision, remember that an impact wrench is not a torque wrench, so critical fasteners need to be checked with a torque meter.
Frequently Asked Questions
How do I use an impact wrench?
Connect it to a clean, dry air supply at 90 psi maximum. Use an impact-rated socket, set the direction switch to loosen, seat the socket fully on the fastener, hold the tool steady without pushing down, and pull the trigger. Let the hammering action do the work.
Can an impact wrench be used as a regular drill?
No. An impact wrench delivers rotational hammering blows for high-torque fastening. A drill rotates continuously for drilling holes. The chucks, mechanisms, and speed controls are completely different. You need an impact driver, a tool that blends some drilling capability with high-torque driving.
When using an impact wrench, what are the key things to be sure of?
Do you use an impact wrench to remove lug nuts?
Yes, an impact wrench is excellent for removing and installing lug nuts, which is why it’s a staple in tire shops. For final tightening to the vehicle manufacturer’s exact specification, always follow up with a hand torque wrench. We have a dedicated guide on using an impact wrench for lug nut removal.
How much torque do I need?
For most automotive lug nuts and general workshop bolts, a wrench with 300-500 lb-ft of breakaway torque (like the Sealey SA6021 at 500 lb-ft) is sufficient. Larger truck lug nuts or suspension work may require 700+ lb-ft. Your project’s torque requirements should guide your choice.
Why won’t my impact wrench loosen a bolt?
First, verify your air pressure is at 90 psi at the tool. Second, ensure you’re using the correct size socket, a worn or slightly oversized socket will cam out. Third, try applying a penetrating oil to the bolt and letting it sit. If it still won’t budge, you may need a wrench with higher breakaway torque or a different technique for removing a seized bolt.
Before You Go
The real trick isn’t in the trigger pull; it’s in the minutes before. Setting the air pressure to a true 90 psi, picking a socket that’s marked for impact use, and attaching a short, flexible hose to isolate vibration, these steps decide whether the job is a five-minute win or a frustrating half-hour of failure.
Remember the manufacturer warnings verbatim. They’re not just suggestions. “DO NOT allow the wrench to free run” (Sealey). “Do not connect quick-connect couplings directly” (Snap-on). These are the documented failure modes you’re avoiding.
For your next project, walk through the sequence like a checklist. If the wrench isn’t performing, go straight to the troubleshooting table, chances are it’s air, oil, or a socket issue, not a broken tool. And if you’re still shopping, our breakdown of the best impact wrenches cuts through the spec sheets to what matters on the job.
