
How to Use a Circular Saw: Step-by-Step (Without Kickback)
This post contains affiliate links. As an Amazon Associate, we earn from qualifying purchases.
To use a circular saw, you match three things: a secure workpiece, a correctly set blade depth, and a controlled forward motion starting at full speed. Set the blade to protrude about 1/4 inch below the material, clamp the wood, start the saw, let it reach full RPM, then guide it along your line without forcing. The lower guard must move freely and cover the blade when not cutting.
Setting the blade excessively deep is where most beginners go wrong. Set it deeper, and the blade exposes more teeth, grabs more material, and dramatically increases the risk of binding and kickback. A key part of how to use a circular saw safely is to avoid this. The tool’s own physics turns a small depth mistake into a dangerous shove.
What follows is the full sequence for how to use a circular saw, pulled straight from the manuals brands like Ridgid, Skil, and DeWalt print for a reason. This guide explains setting up, the six steps that prevent kickback, how to handle large sheets, and what to do when a cut starts to wander.
Key Takeaways
- Set blade depth so the blade just clears the workpiece; excessively deep settings can cause binding and kickback.
- Always let the blade reach full speed before it touches the wood, and never pull the saw backward.
- For large panels, provide support on both sides of the cut line to prevent sag and blade pinching.
- A dull blade produces a narrow, friction-filled kerf and is a primary cause of dangerous kickback.
- Manually retract the lower guard only for plunge cuts; for all other cuts, it must operate automatically.
The Non-Negotiable Safety Kit
You need more than just the saw. Every manual from Ridgid to Skil opens with the same list, and skipping any item isn’t a shortcut, it’s a gamble with your eyes, lungs, and hands.
Start with ANSI Z87.1-rated safety glasses with side shields, which Ridgid cites. Note that Skil also recommends using a full face shield in addition to safety goggles or glasses. Sawdust and chips fly sideways. Next, a dust mask or respirator. Protect your lungs. The operation is dusty, and that fine particulate isn’t just annoying, it’s a long-term health hazard. For extended use, add hearing protection. A circular saw runs at speeds like 3,700 RPM (Ridgid) or 5,300 RPM and greater (Skil); that’s a sustained, damaging whine.
Finally, think about your workspace. Are you using clamps or a practical way to secure the workpiece? Holding the wood by hand is unstable. The second the blade catches, the wood twists, and you lose control. The manuals emphasize the importance of these safety measures.
Before you start: The lower guard must move freely and close instantly. If it’s sticky, bent, or sluggish from debris, service the saw first. Never clamp or tie the guard open. An exposed, coasting blade can make the saw walk backward after a cut.
Know Your Saw: The Three Controls That Matter
You don’t need to memorize every part, but three controls dictate every cut you make. Get these wrong, and accuracy and safety vanish.
First, the depth adjustment lever. This sets how deep the blade cuts. Loosen it, pivot the saw’s base (the shoe), then retighten it securely. If it shifts mid-cut, the blade can bind. Second, the bevel adjustment. This control tilts the shoe for angled cuts. The same rule applies: lock it tight before you pull the trigger. Third, the lower guard retraction lever. This is not a general-use control. You use it only for starting plunge cuts or compound angles. For 95% of cuts, the guard should snap down automatically when you lift the saw from the wood.
The front of the shoe has a kerf indicator. This small notch shows where the blade’s cut (the kerf) will fall. It shows where the blade’s cut (the kerf) will fall. Use it to track your pencil line, but remember the blade itself is to the right of the indicator. That offset is why you cut on the waste side of your line.
How to Set Blade Depth (The 1/4-Inch Rule)
Unplug the saw or remove the battery. Place the saw next to your workpiece with the shoe flat. Loosen the depth lever and pivot the saw until the blade teeth just clear the material’s underside. Now, lower the blade about 1/4 inch further. Tighten the lever.
Setting the blade excessively deep exposes more teeth to the wood. More teeth grabbing means more friction, more heat, and a higher chance the kerf closes and pinches the blade, which can lead to binding and violent kickback. The blade should be set to just clear the material’s underside.
The 6-Step Cutting Sequence (and Why Order Matters)
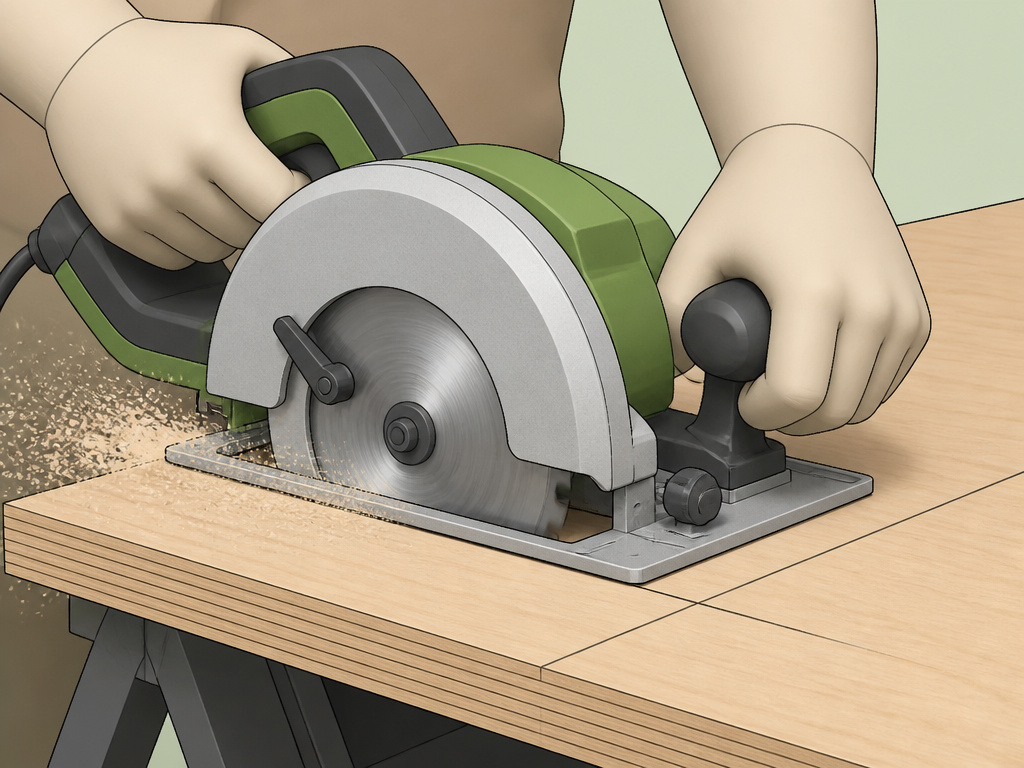
This isn’t just a list; it’s a physical sequence that manages the saw’s energy. Swap the steps, and you manage a hazard instead of a tool.
- Mark and Support. Draw your cut line clearly. Place the workpiece on stable supports. Ensure the piece is stable and the cut section won’t sag.
- Align and Position. Line up the saw’s kerf indicator with your cut line. Set your body stance so you’re not directly behind the blade. Stand to the side.
- Start the Saw. Pull the trigger and let the motor reach its full, screaming RPM. You’re listening for the pitch to stabilize, not just an initial whir.
- Begin the Cut. With the blade at full speed, lower it smoothly into the wood at the edge of your board. Don’t shove; let the teeth bite.
- Guide and Follow Through. Push the saw forward at a steady pace that doesn’t slow the motor. Let the blade do the cutting. Keep the shoe flat on the workpiece.
- Finish and Release. Once you cut through the end, release the trigger. Hold the saw in place until the blade stops completely. Only then lift it, letting the lower guard snap back over the blade.
A dull or damaged blade produces a narrow kerf causing excessive friction, blade binding and kickback. – Ridgid Circular Saw Manual
Skipping step 3, starting the cut before full speed, is how you get kickback. The blade doesn’t have the rotational momentum to power through the initial bite, so it grabs and throws itself backward toward you. It’s not a mystery. It’s physics you can hear.
How to Support Wood Without a Workbench
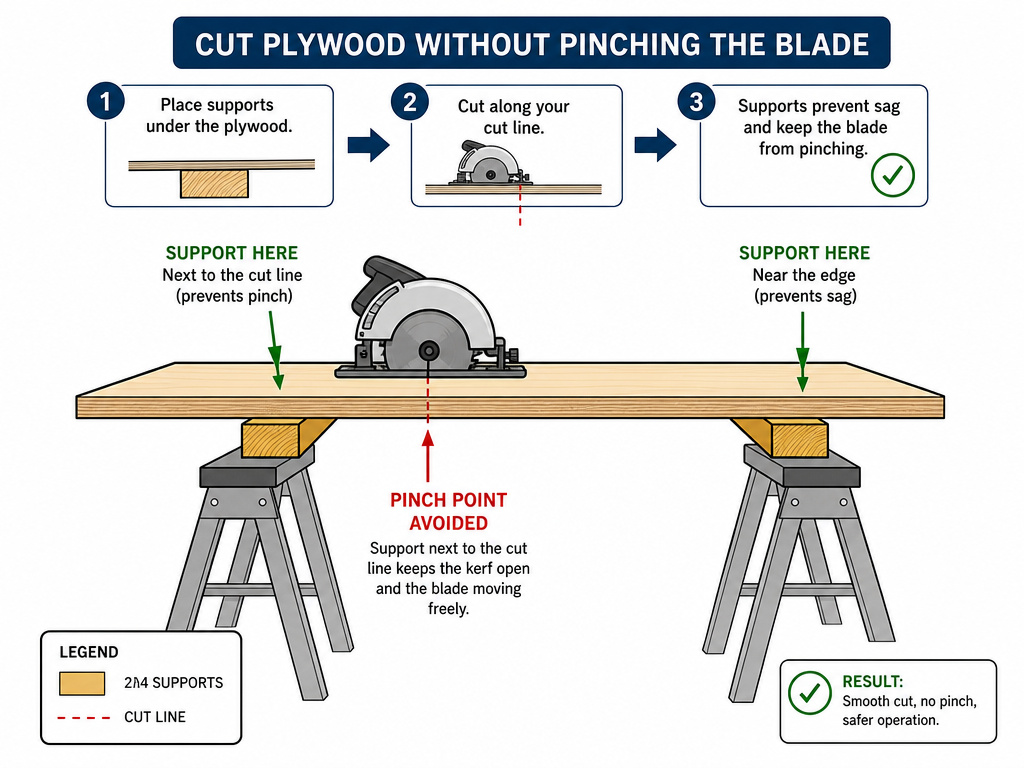
You don’t need a fancy shop. Two sawhorses and a couple of 2x4s create a perfect cutting platform. The real trick is supporting both sides of the cut line, especially on large sheets.
Large panels sag under their own weight. If you cut across the middle of a sheet of plywood resting on two sawhorses, the unsupported center will bend down as you finish the cut, pinching the blade. The fix is simple: run a supporting 2×4 under the sheet, perpendicular to your cut line, on each side of the saw. One board goes near the line you’re cutting, the other near the sheet’s edge. This keeps the material level and prevents the deadly pinch.
For cutting on the floor, use the same principle. Place scrap boards under the sheet to raise it and provide stable support on both sides of your line. Never cut a panel that’s resting flat on the ground; you’ll cut into the floor and the blade will bind instantly.
Making Special Cuts: Plunge Cuts & Bevels
Sometimes you need to start a cut in the middle of a panel, not at the edge. That’s a plunge cut. It’s the one time you manually use the lower guard lever.
- Mark the cutout area.
- Tip the saw forward so the front of the shoe rests on the wood, with the blade clear of the surface.
- Retract the lower guard using the lever and hold it.
- Start the saw and let it reach full speed.
- Slowly pivot the saw down, lowering the spinning blade into the material.
- As soon as the shoe sits flat, release the guard lever and proceed with the cut.
For bevel cuts, you’re tilting the shoe. Loosen the bevel adjustment, set your angle (most saws have detents at 0° and 45°), and lock it down tightly. Double-check the blade depth after adjusting the bevel, as the effective cutting depth decreases. For example, a Makita 5007N cuts 2-1/2″ deep at 0°, but only 1-3/4″ deep at 45°.
Troubleshooting: When the Cut Goes Wrong
The wood starts to smoke. The saw motor bogs down with a deep groan. The back of the blade is pinched in the kerf. You just experienced blade binding. Here’s what to do, and what the manuals say not to do.
First, release the trigger immediately. Don’t try to power through or yank the saw out. Hold the saw in place and wait for the blade to stop. Forcing it can snap the blade or cause a severe kickback. Once it’s stopped, you need to remove it from the pinch. You might have to drive a wooden wedge into the kerf behind the blade to open it up slightly, then carefully back the saw out.
If the cut fails to properly follow your intended cut line, do not attempt to turn or force the tool back to the cut line. Doing so may bind the blade and lead to dangerous kickback… Release switch, wait for blade to stop and then withdraw tool. Realign tool on new cut line, and start cut again. – Paraphrased from Makita Owner’s Manual
If you need to restart a cut in the middle of a kerf, center the blade in the existing cut line and make sure the teeth aren’t already engaged in the wood. Starting a saw with the blade pinched is asking for it to “walk up or kickback from the workpiece,” as DeWalt puts it.
| Problem | Likely Cause | Immediate Fix |
|---|---|---|
| Cut wanders off line | Pushing too fast, forcing the saw | Stop. Let blade halt. Realign on line and start over, guiding more slowly. |
| Wood burns/blade smokes | Dull blade, cutting too slowly | Stop. Replace with a sharp blade. Ensure you’re pushing at a steady, confident pace. |
| Motor bogs/binds | Blade depth too deep, wood pinching kerf | Stop. Wedge kerf open behind blade. Check depth setting (1/4″ protrusion rule). |
| Saw kicks back violently | Blade contacting wood before full speed | Maintain proper stance (off to the side). Always start saw and let it reach full RPM before engaging. |
Circular Saw Maintenance: The 5-Minute Post-Cut Ritual
A clean saw is a safe, accurate saw. Sawdust and pitch build up in the lower guard mechanism, around the blade washer, and inside the motor vents.
After each use, blow out the saw with compressed air or use a stiff brush. Pay special attention to the lower guard, it needs to move freely. Wipe down the shoe to prevent rust and ensure it slides smoothly. Periodically, check that all nuts and levers are tight. A loose depth lever is a failure waiting to happen.
When it comes to changing the blade, unplug the saw first. Depress the spindle lock, use the wrench to loosen the arbor nut (it’s reverse-threaded on most saws), and replace the old blade with a new one, ensuring the teeth point in the direction of rotation (usually forward at the top). Tighten the nut securely. A loose blade wobbles and creates a dangerous, wider kerf.
Battery and Power Safety (For Cordless Saws)
Cordless tools are always in operating condition. That convenience comes with specific hazards.
Don’t place the saw or its battery near fire or heat. Damaged batteries can explode. If you drop a battery pack, inspect it carefully. Don’t use a pack that’s been crushed, cracked, or severely impacted. As Ridgid states, “Properly dispose of a dropped or damaged battery immediately.” Charge batteries in a dry location where the temperature is between 50°F and 100°F for best results. Most critically, batteries can explode in the presence of a source of ignition, such as a pilot light. Never use a cordless saw near open flame.
Corded vs. Cordless saw types
Your choice between a corded or cordless circular saw comes down to power source and mobility. Cordless saws offer complete freedom from an outlet, which is ideal for job sites without power or for making quick cuts anywhere. However, you must manage the battery. Always charge battery tools in a dry location. Do not place battery tools or their batteries near fire or heat. Never place batteries near heat or fire, as they can be dangerous. If a battery is dropped, damaged, or crushed, dispose of it properly and immediately.
Circular saw vs. Other saws (jigsaw, table saw)
A circular saw is your primary tool for making long, straight cuts in sheet goods and dimensional lumber. Unlike a jigsaw, which excels at curved cuts, a circular saw uses a spinning blade for fast, efficient rip cuts and crosscuts. Compared to a stationary table saw, a circular saw is portable; you bring the tool to the material. This makes it the go-to for breaking down large panels. To do this safely, you must support the panel on both sides of the cut line to prevent the material from sagging and binding the blade, which is a common cause of kickback.
Frequently Asked Questions
How do you use a circular saw step by step?
Follow the six-step sequence: 1) Mark and support the wood, 2) Align the saw, 3) Start the saw and let it reach full speed, 4) Lower the spinning blade into the wood, 5) Guide it forward steadily, 6) Release the trigger and hold the saw until the blade stops before lifting.
Is it hard to use a circular saw?
It’s not hard if you respect the sequence and the safety rules. The difficulty comes from rushing, skipping support, ignoring blade depth, or forcing the cut. Go slow, follow the steps, and it becomes a predictable, controllable tool.
Why can’t I cut straight with my circular saw?
You’re likely not using a guide or not focusing on keeping the saw’s shoe flat against the workpiece. For long cuts, clamp a straight board to the workpiece to act as a guide for the saw’s shoe. Also, ensure you’re cutting on the correct side of your pencil line so the kerf removes the waste material.
Can I use a circular saw to cut metal?
No, not unless you have a specific metal-cutting blade and the saw is rated for it. Standard wood-cutting circular saws should not be used with abrasive wheels or for cutting metal, as stated in manuals like DeWalt’s. The RPM and design are wrong for it, creating extreme hazard.
How often should I change my circular saw blade?
Change a dull or damaged blade, as it produces a narrow kerf causing excessive friction, blade binding and kickback.
The Bottom Line
Using a circular saw safely comes down to discipline, not talent. Support the wood on both sides of the cut. Set the blade to protrude just a quarter-inch. Let the saw scream to full RPM before it touches anything. And never, ever fight it when it binds, stop, wedge, and reset.
The noise and vibration can feel intimidating, but the tool’s behavior is mechanical and predictable. The manuals from Ridgid, Skil, and DeWalt aren’t legal padding; they’re the collective record of every way how to use a circular saw can go wrong. Follow them, and you’re not just building something, you’re building the habit of coming away from the workbench with all your fingers.
