
How to Cut a 4×4 With a Circular Saw: The 3-Step Method
This post contains affiliate links. As an Amazon Associate, we earn from qualifying purchases.
To cut a 4×4 with a circular saw, you need to use a multi-pass technique because a standard 7 1/4-inch saw blade only cuts about 2.5 inches deep. A 4×4 is actually 3.5 inches thick. The method involves making a cut from one side, flipping the post, making a second cut from the opposite side, and then using a hand saw to finish the small remaining center section.
That 2.5-inch limit is the whole game. It means you cannot rely on a single pass, and trying to force it is how you get kickback, splintered wood, and a blade pinched in the kerf. The process isn’t about power; it’s about following a sequence that works within the tool’s physical limits.
What follows is that sequence: how to measure and mark so the cuts align, the three-step flip-and-finish method, the one safety rule everyone ignores, and how to handle the common scenario of trimming a post that’s already in the ground.
Key Takeaways
- A standard 7 1/4-inch circular saw maxes out at a 2.5-inch cutting depth, forcing a multi-pass technique for the full 3.5-inch thickness of a 4×4.
- For clean, aligned cuts, mark all four sides of the post before you make the first cut with a speed square.
- The “flip and finish” method, cut, flip, cut, then hand-saw the center, is the standard, reliable way to get through a 4×4 with a circular saw.
- Sources disagree on blade depth: the Makita 5104 manual advises setting the depth so “no more than one blade tooth projects below the workpiece,” while another common recommendation is 1/4 to 1/2 inch below the material.
- When cutting pressure-treated lumber, wear a dust mask, the sawdust contains chemical preservatives that are harmful to breathe.
The Saw and the Spec: Why One Pass Won’t Work
A 4×4 post isn’t four inches square. Its true dimension is 3.5 inches by 3.5 inches. Your saw’s blade, however, can only cut so deep. The most common tool, a 7 1/4-inch circular saw, has a maximum cutting depth of about 2.5 inches at 90 degrees. The math is simple: 2.5 is less than 3.5.
A 7 1/4-inch circular saw blade has a max cut depth of 2.5 inches.
This isn’t a quality issue, it’s geometry. Even a smaller 6.5-inch saw only cuts about 2.18 inches deep. This limitation dictates the entire process. If you need a tool that can do it in one clean pass, you’re looking at a 12-inch miter saw or a large 10 1/4-inch circular saw like the Makita 5104. For the rest of us with a standard saw, the multi-pass method is the answer. It’s why understanding how to cut a 4×4 with a circular saw effectively for thick stock is a fundamental skill.
Gear Up: The Short, Non-Negotiable List
You don’t need a workshop full of tools, but you do need a few specific items. Get this wrong, and the cut will wander or, worse, the wood will shift mid-cut.
- Circular Saw: A 15-amp corded model or an 18V/20V Max cordless brushless saw has the power needed without bogging down. The brand matters less than the condition of the blade.
- Sharp Blade: A sharp blade designed for framing will cut fast but rough. A combination blade leaves a cleaner edge, which is helpful when your cuts need to meet in the middle. Don’t use a worn-out blade; it will burn the wood and increase binding.
- Speed Square: This is your marking and guide bible. An aluminum one is cheap and dead accurate.
- Clamps: Two C-clamps or bar clamps. The 4×4 must be immobilized to sawhorses. Your knee is not a clamp.
- Hand Saw: A sharp crosscut hand saw. You’ll use it for the final inch in the center of the post after the circular saw cuts.
- Safety Gear: Hearing protection (Wear hearing protection when using a circular saw.), safety glasses, and a dust mask, especially if the lumber is pressure-treated.
Skipping the clamps is the most common mistake. An unsecured 4×4 can roll as you cut, binding the blade and causing a violent kickback. The sound changes from a steady roar to a sudden, high-pitched shriek. That’s the sound of a blade catching and the wood trying to throw the saw back at you.
The Critical First Step: Marking for a Perfect Match
Precision happens before the saw is even plugged in. If your marks are off by an eighth of an inch on one side, the two saw kerfs won’t meet in the middle, leaving a ragged, misaligned cut. Here’s how to lock it in.
- Mark Your Cut Line: Use your speed square to draw a perfectly square line across the top face of the 4×4. Press the square firmly against the side of the post to keep it true.
- Wrap the Line: This is the step people skip. Continue that pencil line down one adjacent side, across the bottom, and up the final side, using the speed square to keep everything at 90 degrees. You should now have a continuous line wrapping around all four faces of the post.
- Secure the Post: Place the 4×4 across two sturdy sawhorses. Position the clamps on either side of your cut line, cinching the post down so it cannot move or rotate. The goal is rigid stability.
Why wrap the line? When you flip the post after the first cut, you need a visible mark on the new “top” face to align the second cut. Without that wrapped line, you’re guessing, and the cuts will almost certainly be offset. For more on achieving perfect lines, our guide on how to cut a 4×4 with a circular saw dives deeper into guide techniques.
The 3-Step Flip & Finish Method
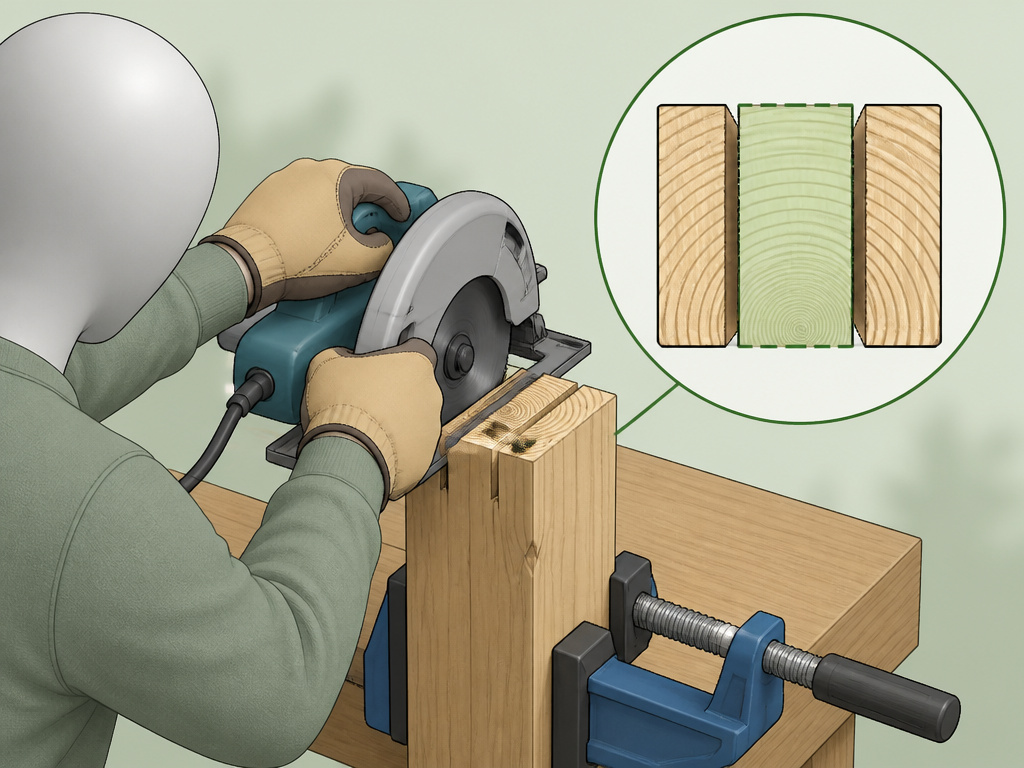
This is the core technique. It works because you’re using the saw to remove the bulk of the material from two sides, leaving a small center section for a hand saw.
| Step | Action | Goal & Consequence |
|---|---|---|
| 1. First Pass | Cut along the line on the top face, stopping at the saw’s max depth (~2.5″). | Removes material from the top half. Cutting too deep risks binding. |
| 2. Flip & Second Pass | Flip the post 180°. Align the blade with the wrapped line on the new top face and cut. | Removes material from the opposite side. Misalignment here creates a step in the cut. |
| 3. Finish the Center | Use a hand saw to cut through the remaining uncut wood in the middle of the post. | Cleans up the final connection. A few careful strokes are all it takes. |
Step 1: The First Pass. Set your blade depth. This is where sources disagree. The Makita 5104 manual advises setting the depth so “no more than one blade tooth projects below the workpiece.” Another common recommendation is 1/4 to 1/2 inch below the material. The one-tooth rule is safer and gives you a cleaner cut with less tear-out; the blade has less exposed surface to catch and cause kickback. Start the saw, let it reach full speed, and smoothly push it along your marked line. You’ll feel the motor note change as it reaches its maximum depth, that’s your cue that the first pass is done.
Step 2: The Flip and Second Pass. Unplug the saw. Loosen the clamps, carefully rotate the post 180 degrees so the first cut is now on the bottom, and re-clamp. Find the continuation of your pencil line on this new top face. This is why wrapping the line is critical. Make your second pass exactly as you did the first. If you’ve marked and aligned well, the two kerfs will be perfectly opposite each other.
Step 3: Hand-Saw the Core. You’ll now have a post with two deep cuts opposite each other and a solid core of wood still connecting the two pieces. Don’t try to pry it apart; you’ll splinter the grain. Use your hand saw to cut this remaining bridge. Three or four focused strokes will do it, leaving you with a clean, complete cut.
Where this goes sideways: Flipping the post without re-clamping. The wood shifts a fraction of an inch, the second cut is misaligned, and you’re left with a jagged step in the middle that no hand saw can fix cleanly.
The Installed Post Problem
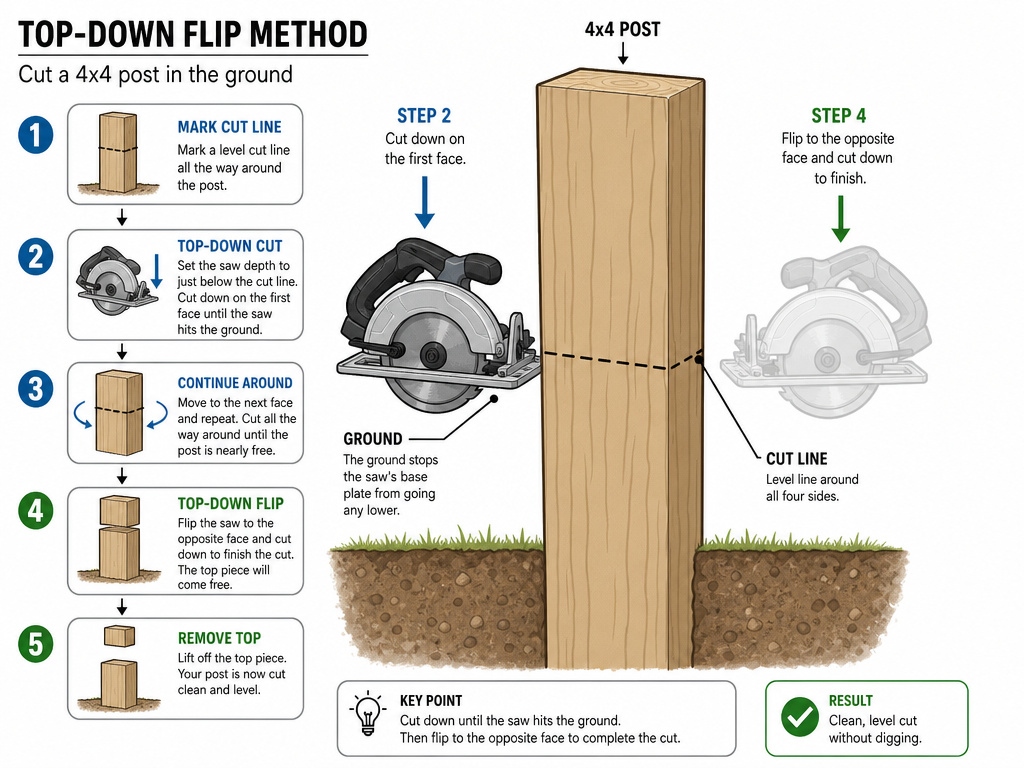
Sometimes you’re not cutting a post on sawhorses; you’re trimming the top of one that’s already set in the ground for a fence or deck. The principles are the same, but the execution is trickier.
The main challenge is clearance. The saw’s base plate needs a flat surface to ride on, and the ground or concrete footing gets in the way. You have two options:
- The Top-Down Flip: This is the same flip method, but vertically. Mark all four sides. Make your first pass as deep as you can on one face. Then, rotate the post 180 degrees and cut the opposite face. You’ll likely need to finish the center with a hand saw, working at an awkward angle. It’s messy but works.
- The Reciprocating Saw Finish: Use your circular saw to make the deepest cuts you can on two opposite sides. Then, use a reciprocating saw with a long, aggressive wood blade to zip through the uncut center. This is faster than a hand saw but requires more control to stay on line.
A circular saw is often called the best tool for trimming installed posts simply because it’s portable and powerful. A miter saw can’t get down in there. Whichever method you choose, stability is key. Have a helper steady the post if possible, and never force the saw.
Bevel Cuts and Blade Depth Debates
What if you need a 45-degree angle on the end of your 4×4? The effective thickness the blade must penetrate increases, and your saw’s capacity shrinks.
This usually means you’ll need additional passes with the circular saw, flipping and rotating the post each time, before finishing the center with a hand saw. The process for how to cut a 4×4 with a circular saw on a bevel is the same, but it demands even more patience and precise marking.
The blade depth debate is worth a final word. The “one-tooth” rule from the manufacturer’s manual seems extreme, but it has a mechanical reason: less blade exposure means less chance for the teeth at the back of the rotation to catch the wood and lift the saw, which is a primary kickback cause. The 1/4-inch guideline gives a bigger margin for error on depth setting but increases that risk. For a 4×4, where you’re making multiple passes, I lean toward the safer one-tooth rule. It forces cleaner technique. You can learn more about this crucial setting in our dedicated guide on how to set blade depth.
Safety & Maintenance: The Forgotten Half of the Job
Cutting pressure-treated lumber? The preservative chemicals (like copper) are in the dust. Wear a dust mask, especially if the lumber is pressure-treated. Clean up the dust promptly, and don’t let it settle on your skin.
After the job, especially with treated wood, blow out your saw’s motor vents with compressed air. The corrosive dust can shorten the tool’s life. And for the love of all things straight, never remove the saw’s safety guard or riving knife to try to gain an extra fraction of an inch of depth. That guard is there to keep the spinning blade covered and to prevent kickback. Defeating it is asking for a trip to the emergency room.
Finally, if you’re doing a lot of this work, consider your blade. A sharp, clean blade designed for cutting lumber makes all the difference. A dull blade requires more force, heats up the wood, and increases the chance of binding.
How a Circular Saw Compares to a Miter Saw or Table Saw
A circular saw is a versatile choice for cutting a 4×4, especially for posts already in the ground. However, its limited cutting depth means you must make two passes, flipping the wood. In contrast, a 12-inch miter saw can cut a 4×4 in one clean pass, making it ideal for repetitive, precise crosscuts in a workshop. A table saw with a 12-inch blade can also handle the full depth, but it’s less portable and best for ripping long pieces. For most on-site jobs where you need to trim a single post or make a cut where the wood can’t be moved, the circular saw’s portability and the flip method make it the practical tool, even if it takes an extra step.
Frequently Asked Questions
Can a 7 1/4 circular saw cut a 4×4?
Yes, but not in one pass. Its maximum cutting depth is about 2.5 inches, and a 4×4 is 3.5 inches thick. You must use the multi-pass flip-and-finish method described above.
What is the best saw to cut a 4×4 in one pass?
12-inch miter saw is the typical choice for clean, single-pass cuts on 4×4 lumber before installation. For posts already in the ground, a circular saw with a multi-pass technique is your best option.
Can I use a 6.5 inch circular saw?
Yes, but it’s more work. A 6.5-inch saw has a maximum depth of about 2.18 inches, leaving over an inch of material in the center to finish by hand. The process is the same, but the hand-sawing portion is more substantial.
How do I ensure my cuts line up when I flip the post?
Mark a continuous, square cut line around all four sides of the post using a speed square before making your first cut. This gives you a registration line on every face, so when you flip the post, you know exactly where to place the blade for the second pass.
The Bottom Line
Cutting a 4×4 with a circular saw is a test of preparation, not strength. The tool’s 2.5-inch depth limit is a fixed constraint, so your job is to work within it. Mark all four sides, clamp everything down, and follow the flip-and-finish sequence. Trust the one-tooth depth rule, it feels wrong until you see how much cleaner and safer the cut is.
If you find yourself doing this regularly, the upgrade path is clear: a larger saw. But for the occasional post, deck beam, or fence repair, this method is reliable, safe, and gets the job done with the tools most of us already have in the garage.
