
How to Use a Miter Saw: The 7-Step Pro Sequence
This post contains affiliate links. As an Amazon Associate, we earn from qualifying purchases.
To use a miter saw, you follow a specific 7-step sequence: secure the saw to a stable surface, put on ANSI Z87.1-rated safety goggles and hearing protection, select the correct crosscut blade, adjust the miter and bevel angles to your desired cut, clamp the workpiece firmly against the fence, start the blade away from the wood and lower it into the cut, then let the blade stop completely before raising it. Never pull the saw toward you or cut metal.
That sequence is the physical logic of the tool. A miter saw is a pendulum on a hinge; its power comes from controlled, predictable motion. A core part of how to use a miter saw is to avoid deviating from that motion, pulling, twisting, forcing, as that is how the blade binds and the workpiece gets thrown.
What follows is the real-world breakdown of how to use a miter saw: the exact safety gear the manuals demand, the specs that actually matter (like a 10-inch blade with a 5/8-inch arbor), and the fixes for the three problems you’ll almost certainly face. By the end, you’ll know how to make a cut and how to read the saw’s own feedback when a cut goes wrong.
Key Takeaways
- Always mount your miter saw to a stable, level surface or stand before first use; an unsecured saw can walk or tip during a cut.
- Wear ANSI Z87.1-rated safety goggles (not everyday glasses) and hearing protection; wood dust and prolonged noise are no joke.
- Use only crosscut blades designed for miter saws; ripping blades or those with a hook angle over 7 degrees can bind and kick back.
- For accurate cuts, clamp every workpiece against the fence; hand-holding introduces wobble that ruins angles and is dangerously unstable.
- Let the blade reach full stop before lifting it after a cut; raising a spinning blade drags the workpiece and can cause a violent kickback.
What a Miter Saw Actually Does (And Doesn’t Do)
A miter saw makes precise angled cuts in wood and wood-composite materials. Its job is crosscutting, cutting across the grain of a board, at specific angles for trim, framing, and joinery. It is not a table saw for ripping long boards, and it is categorically not designed for cutting metals, as the RIDGID safety manual explicitly states. Trying to cut metal can shatter the blade or cause the material to bind, with predictable results.
The core mechanism is simple: a circular blade mounted on an arm that swings down in a controlled arc. You set the angle of that swing (the miter) across the table, and often the tilt of the blade itself (the bevel) through the board’s thickness. The accuracy comes from the rigidity of that swing and the flat reference of the fence, which is fundamental to how to use a miter saw. A Harbor Freight 61971 model, for example, has preset miter detent stops at 0°, 15°, 22.5°, 30°, and 45° on both sides to lock in common angles quickly.
For a 120V miter saw drawing 12-16 amps, like many models, the DeWalt DWS713 manual specifies a minimum extension cord gauge: use a 14 AWG cord for runs up to 50 feet, and a 12 AWG cord for up to 100 feet. An undersized cord causes voltage drop, power loss, and motor overheating.
The Non-Negotiable Safety Setup
You cannot outsmart physics with this tool. The manuals from DeWalt, RIDGID, and SKIL agree on a short list of absolute rules, born from documented failure modes. This isn’t scare talk; it’s the predictable outcome of ignoring them.
First, secure the saw. The Harbor Freight 61971 manual starts with “Mount Saw to a stable, level surface or saw stand.” This isn’t a suggestion. An unbolted miter saw on a wobbly table will creep during use. The vibration from a 5000 RPM blade is enough to walk it off the edge of a bench. Bolt it to a dedicated stand or a heavy workbench. Do you have to bolt down a miter saw? For anything beyond a single, light cut, yes. It’s the first step in the miter saw calibration process for a reason.
Second, wear the right gear. ANSI Z87.1 is the code for impact-rated safety goggles (or CSA Z94.3 in Canada). Everyday glasses are not substitutes. If you’re cutting for more than a few minutes, add hearing protection, the whine of the motor and the scream of the blade through wood damages hearing cumulatively. For dusty operations, which is almost all of them, add a NIOSH-rated dust mask. The SKIL manual includes a Prop 65 warning about wood dust being a known carcinogen. Ventilate your space.
Third, respect the blade’s path. The DeWalt DWS713 manual states: “NEVER HAVE ANY PART OF YOUR BODY IN LINE WITH THE PATH OF THE SAW BLADE.” And “NEVER PLACE HANDS CLOSER THAN 4″ (100 mm) FROM THE BLADE.” Use push sticks or clamps for small pieces. Your hands stay behind the fence, always.
The 7-Step Cutting Sequence
This is the rhythm that replaces guesswork. Each step exists because skipping it has a mechanical consequence, usually within the same cut.
- Secure the Workpiece. Place your board against the fence. Then clamp it. Every time. A hand-held board can twist when the blade teeth grab it, ruining the angle and potentially pulling your fingers forward. For cutting small pieces, use a dedicated hold-down clamp or a sacrificial backer board.
- Set the Angles. Loosen the miter lock knob (about a 1/4 turn counterclockwise on the Harbor Freight model) and rotate the table to your desired angle. For a bevel, loosen the bevel lock handle (a 1/2 turn on that model) and tilt the blade assembly. Lock both firmly. Don’t overtighten, you just need to remove slop.
- Position the Blade. With the saw off, pull the blade guard back and lower the blade until the teeth just touch the workpiece. This is a “dry run” to visualize the cut path and ensure nothing is in the way.
- Retract and Start. Raise the blade fully. Slide the saw head forward so the blade is in front of the workpiece. Now, and only now, press the trigger and let the blade reach full speed (you’ll hear the motor pitch settle).
- Make the Cut. Smoothly lower the blade into the wood, then gently push the saw head backward through the cut. Let the blade do the work, no extra pressure. The RIDGID manual is emphatic: “NEVER pull the saw toward you during a cut.” Pushing backward gives you control; pulling can cause the blade to climb.
- Release the Trigger. Once the cut is complete, release the trigger but keep holding the saw head down. Wait for the blade to stop spinning completely. You’ll hear the electric brake on models like the DeWalt DWS713 engage with a distinct whirring stop.
- Raise the Blade. After full stop, raise the saw head. Now you can release the clamp and remove the cut piece.
Common mistake: Raising the blade while it’s still spinning. A spinning blade lifting out of the kerf can catch the off-cut and fling it across the room. Wait for the silence.
How to Make a Miter Cut vs. A Bevel Cut
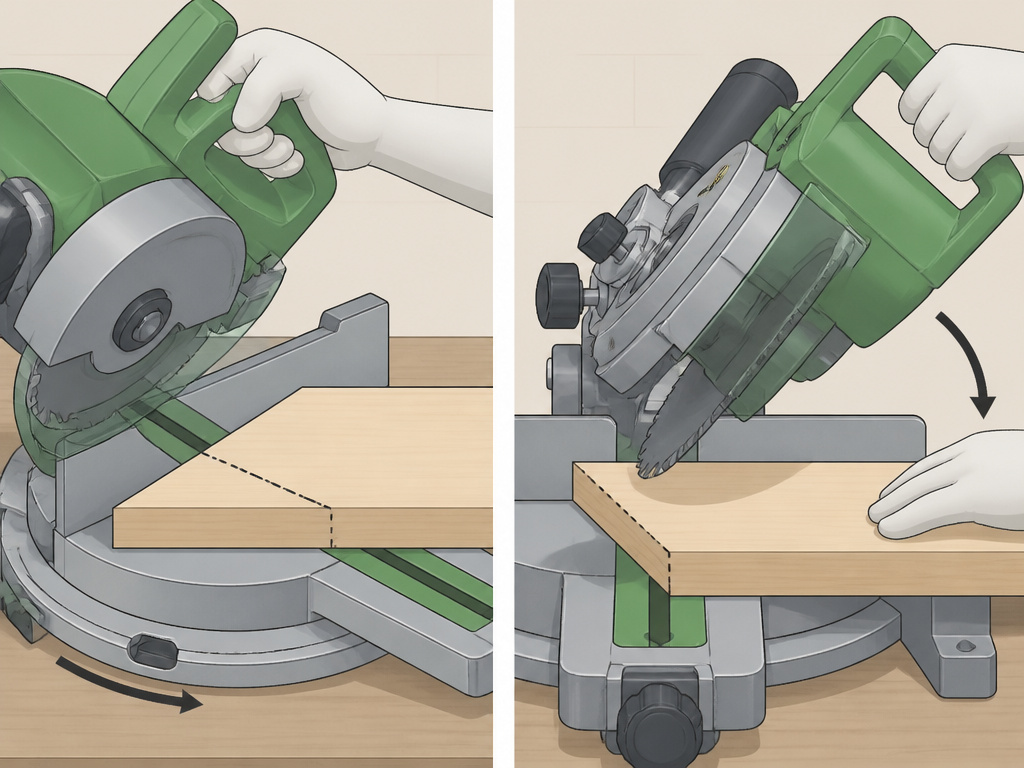
Most projects need one or the other, and some need both at once (a compound cut). The difference is which plane you’re angling.
A miter cut angles across the face of the board. You’re changing the line of the cut along the table surface. This is for picture frames, door trim, or any joint where two boards meet at a corner. To set it, you rotate the saw’s base left or right. The preset detents at 22.5° and 45° are your friends here. For more on the theory, see our guide on the difference between miter and bevel.
A bevel cut angles through the thickness of the board. You’re tilting the blade itself left or right. This is for fitting trim against a sloped ceiling or creating a chamfered edge. Here’s where models disagree: the DeWalt DWS713 has a maximum right bevel of only 3°, while the SKIL MS6305 allows a 45° right bevel; the Harbor Freight 61971 manual specifies a maximum left bevel of 45° and does not explicitly state a right bevel capacity. Your manual is law for your saw.
| Cut Type | What It Changes | Common Use | Model-Specific Quirk |
|---|---|---|---|
| Miter | Angle across the table (horizontal) | Picture frames, trim corners | Many saws, like the Harbor Freight 61971, miter 45° left and right. |
| Bevel | Blade tilt through thickness (vertical) | Crown molding, chamfers | Right bevel capacity varies wildly (3° to 45°). |
| Compound | Both miter and bevel simultaneously | Crown molding laid flat | Requires calculating “spring angle” of the molding. |
Making these cuts uses the same 7-step sequence. The only change is in step 2: you’re locking in a different kind of angle. For complex projects like cutting crown molding or baseboard corners, you’ll be making compound cuts regularly.
Setting Up for Success: Stands, Supports, and Blades
Your saw’s accuracy is only as good as its environment. A great cut starts before you touch the trigger.
The Stand: A dedicated miter saw stand is a portable, stable foundation that brings the work to a comfortable height and often includes extendable arms to support long boards. Building a miter saw station in your shop takes this further, adding storage and dedicated electrical outlets.
Supporting Long Boards: Trying to cut a long, heavy board with no support is a recipe for inaccurate, dangerous cuts. The unsupported end will sag, binding the blade. Use roller stands or simple sawhorses placed just below the table height to create a continuous, level support surface. This is the single biggest upgrade for cutting deck boards or trim.
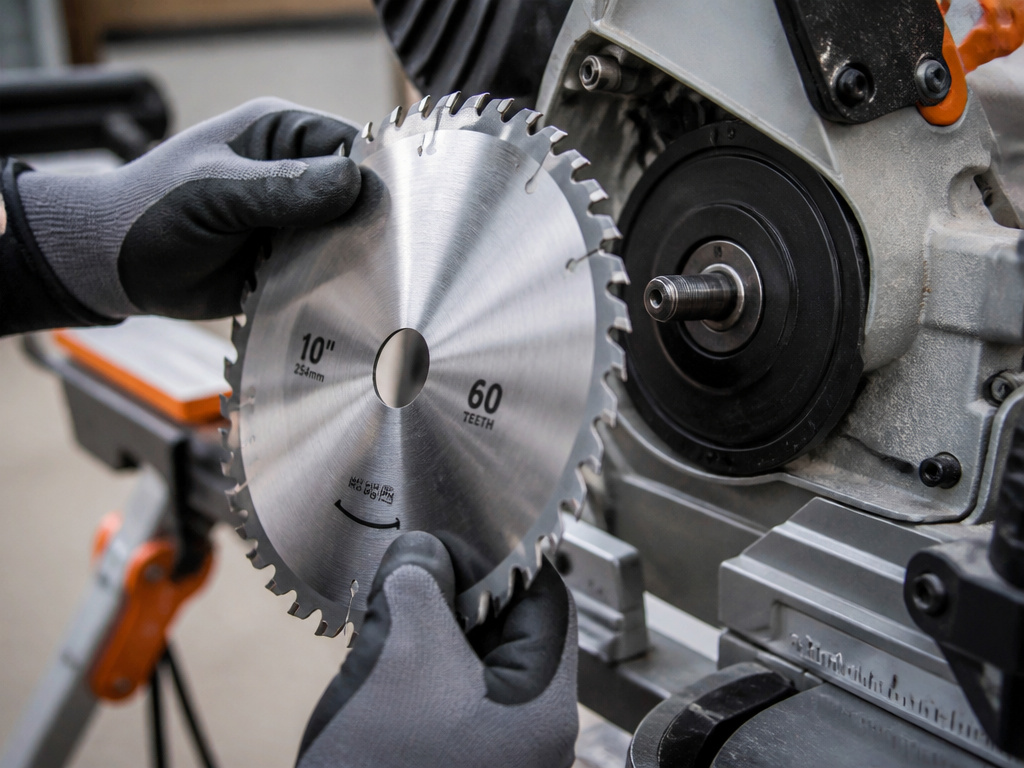
Choosing the Blade: The blade is the business end. The DeWalt and Delta manuals are clear: use crosscut blades only. Ripping blades have a different tooth geometry that pulls the work into the blade, which can cause violent binding on a miter saw. Use a crosscut blade designed for miter saws with a hook angle not over 7 degrees. A good miter saw blade is essential for clean, safe cuts. Also, never use a warped blade, it vibrates, reduces accuracy, and can shatter.
Common Miter Saw Problems and Fixes
You will encounter these. Here’s what’s happening and how to correct it.
Problem: Tear-out or Splintering on the Back Side of the Cut.
The blade teeth are exiting the wood unsupported, tearing out fibers instead of shearing them cleanly. Fix: Apply masking tape over the cut line on the back side of the board before cutting. The tape holds the fibers. For a cleaner cut, use a blade designed for fine crosscutting.
Problem: The Cut Angle is Inaccurate.
Your 45-degree corner doesn’t meet tightly. This is almost never the saw’s fault out of the box. Fix: First, check that your workpiece is firmly clamped flush against the fence along its entire length. Any gap introduces error. Second, verify your saw’s calibration. The miter and bevel scales can drift. Use a precision square to check a 90-degree cut, then adjust the calibration screws as per your saw’s calibration guide.
Problem: The Blade Burns the Wood or Smokes.
A burning smell and black scorch marks mean the blade is struggling to cut, usually because it’s dirty or dull. Fix: Stop. A dull blade requires more pressure, which deflects the cut and overheats the wood. Clean the blade with a dedicated cleaner to remove pitch, or replace it. Also, ensure you’re not forcing the cut; let the blade feed at its own pace.
Problem: The Motor Sounds Labored or Slows Down During the Cut.
This is a voltage drop or an overload. Fix: If using an extension cord, ensure it’s thick enough (12-14 AWG for a 15-amp saw under 100 feet). If the cord is fine, the blade may be dull or unsuitable for the material.
Miter Saw Types Explained
The basic miter saw makes angled crosscuts across the width of a board, useful for trim and framing. This sliding action, however, means these saws are specifically designed for cutting only wood and wood-like products. Using them to cut metal can be dangerous and damage the tool.
Key Parts of a Miter Saw
The main parts you’ll interact with are the blade, the blade guard, the fence, and the miter gauge. The blade spins to make the cut; manuals like those for the DeWalt DWS713 specify to use only crosscut blades designed for miter saws. The blade guard is a crucial safety feature that retracts as you lower the blade. The fence is the vertical surface at the back that supports your workpiece. The miter gauge is the calibrated plate the saw pivots on to set your left or right cutting angle, often with detent stops at common angles. Never place any part of your body in line with the path of the saw blade.
Frequently Asked Questions
Do you have to bolt down a miter saw?
For any serious or repeated use, yes. The vibration will cause an unsecured saw to “walk,” compromising cut accuracy and creating a tipping hazard. Bolt it to a dedicated stand or a solid workbench. For a single quick cut, it might stay put, but that’s a risk you don’t need to take.
How do you get a 45-degree angle on a miter saw?
Rotate the miter table until the pointer aligns with the 45-degree mark on the scale, then lock the miter lock knob. Most saws have a positive detent stop at 45 degrees that gives a solid “click” into place. Always make a test cut on scrap wood to verify the angle is true before cutting your good material.
How do you use a miter saw to cut trim?
Cutting trim demands precision and clean finishes. Use a high-tooth-count blade (80+ teeth), clamp the trim securely against the fence to prevent flex, and make a practice cut on scrap of the same species. For inside and outside corners, you’ll need to cut specific angles and often cope one piece for a seamless fit.
Can you cut metal with a miter saw?
No. Manufacturer safety instructions, like those from RIDGID, explicitly state these saws are “not designed for cutting metals.” Metal can shatter carbide teeth, bind on the blade, or cause dangerous kickback. Use a metal-cutting chop saw or an abrasive wheel instead.
Why does my miter saw blade wobble?
Visible wobble usually means the blade isn’t seated flat on the arbor. Unplug the saw, remove the blade, and clean both the blade mounting hole and the arbor flanges. Ensure any washers are correctly oriented. If the wobble persists, the blade itself may be bent or the arbor bearings could be worn.
Before You Go
The real skill is in hearing the saw tell you something’s wrong before it goes wrong. A high-pitched whine means it’s working too hard, check the blade. A change in vibration means something is loose, check the workpiece clamp and the saw’s mounts. The manufacturer’s operation instructions aren’t just rules; they’re a compiled list of every way the machine has failed before.
So start with a sharp, correct blade. Secure everything, the saw to the stand, the wood to the fence. Follow the seven steps like a pilot follows a pre-flight checklist. That rhythm turns a powerful, dangerous tool into a predictable, accurate partner. Your first project might be a simple picture frame. Your tenth might be a full crown molding installation. The process stays the same.
