
How to Adjust Nail Gun Depth: The 30-Second Rule
This post contains affiliate links. As an Amazon Associate, we earn from qualifying purchases.
To adjust nail gun depth, you use the on-tool depth adjustment dial and the air pressure at your compressor. Always test on scrap wood first, and disconnect the air hose or remove the battery before making any adjustments.
That dial is your primary control, but it works within the limits of your tool’s power. If the dial is maxed out and nails still sit proud, you need more air pressure. If they’re sinking too deep at the shallowest setting, you need less. This is the core principle of how to adjust nail gun depth.
What follows is the full sequence for how to adjust nail gun depth: how to find the dial, how to read the nail head, and what to do when the simple turn doesn’t work. We will list the specs for common models like the Makita DBN series and the Senco FN71T1, and explain the fixes for a striker stuck deep in the wood or a tool that refuses to fire in the cold.
Key Takeaways
- Adjust depth with the tool’s dial or wheel, always after removing the battery or disconnecting air.
- Turn the dial clockwise for deeper, counter-clockwise for shallower drives; Specific models like the Makita DBN601 have a 6.0 mm range, while the DBN900 has an 8.5 mm range.
- If the dial alone doesn’t work, adjust the compressor’s PSI — For example, the Senco FN71T1 operates between 70 and 120 PSI, while a generic pneumatic finishing nailer manual lists 70 to 110 PSI., and For the Senco FN71T1, low air pressure can cause nails to be set above the work surface.
- Test every new setting on scrap wood of the same hardness; Harder materials will require more force to drive the nail.
- A stuck striker is often caused by over-driving; For a 21° framing nailer from Lowe’s, one procedure is to remove the battery, set the depth selector to minimum, hold back the magazine pusher, and fire against scrap to retract it.
The Two-Step Method: On-Tool Dial & Compressor PSI
You have two main controls over how deep a nail goes. The first is the physical depth adjuster on the nailer itself. The second is the air pressure feeding it. They work together, and you usually start with the dial.
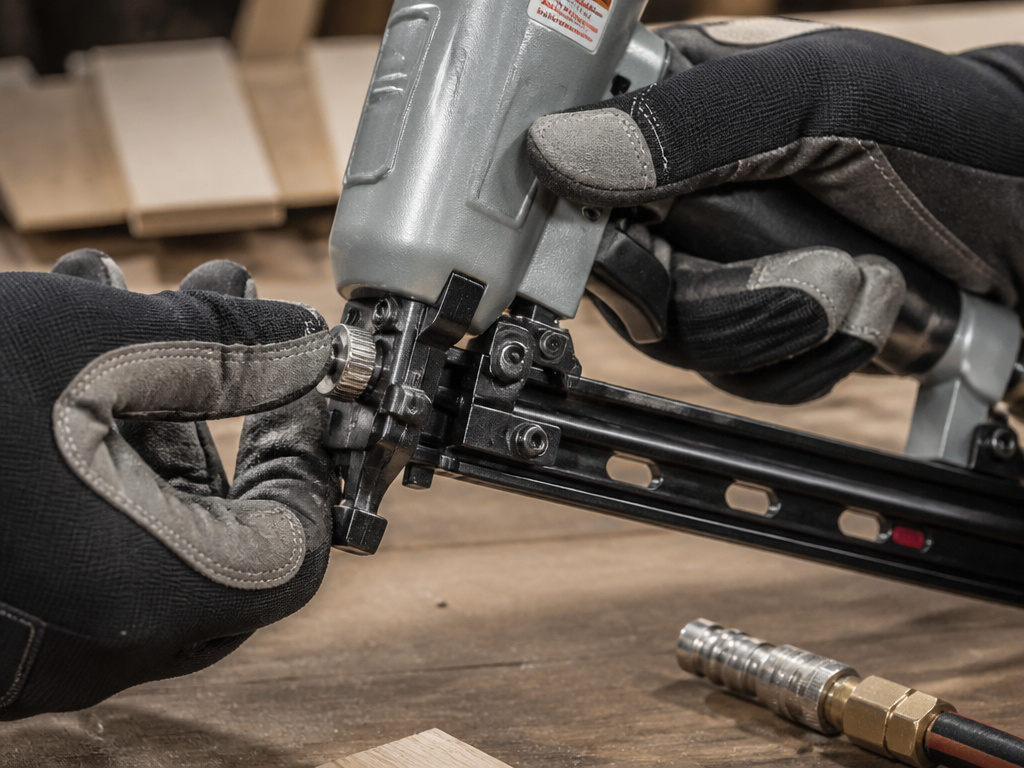
On most nailers, the depth adjuster is a knurled wheel or dial near the nose of the tool. The Makita DBN601/DBN610 cordless finish nailer‘s manual states its adjustment range is 6.0 mm. You turn it clockwise to drive nails deeper, counter-clockwise for shallower. A generic pneumatic finishing nailer manual notes adjustments are often in half-turn increments.
The depth adjuster on a Makita cordless nailer provides 6.0 mm of travel. Turning it clockwise increases depth; turning it counter-clockwise decreases it. Turning it too far can cause the mechanism to stick.
The second control is your compressor’s regulator. The dial on the nailer positions the driving head, but the air pressure provides the force. If your nail is still sitting proud with the depth dial turned all the way to “deep,” you’re out of mechanical travel and need more power. Too little pressure, and the tool skips or leaves nails proud. Operating the tool at the wrong air pressure (too low or too high) will cause excessive noise or rapid wear.
Here’s the practical sequence: disconnect the air or pull the battery. Adjust the dial a few clicks. Reconnect. Fire a test nail into your scrap. Read the head. Then, and only then, adjust the compressor PSI up or down in small increments if the dial isn’t getting you there.
What “Flush,” “Proud,” and “Countersunk” Actually Mean
Your goal is one of three visual conditions on the wood surface, not a number on a dial.
A flush nail head is perfectly even with the surface. You can’t catch it with a fingernail. This is your standard target for most trim and finish work where you’ll fill the hole.
A proud nail head sticks out above the surface. This is usually a problem, meaning your depth setting is too shallow or your air pressure is too low. However, it’s useful temporarily when you need to pull a nail out easily.
A countersunk nail head is driven slightly below the surface, creating a small dimple. This is ideal when you plan to fill and sand the spot perfectly smooth, like on cabinet face frames or furniture.
The hardness of your wood changes everything. A setting that sinks a nail perfectly flush in soft pine will leave that same nail sticking out proud on a piece of oak. A Lowe’s framing nailer manual points out this directly: “Harder materials will require more force to drive the nail.” That’s why your scrap test piece must match your project wood.
| Nail Head Condition | Looks Like | Best For | Risk If Wrong |
|---|---|---|---|
| Flush | Even with surface, invisible to a fingernail drag. | Finish work before filling. | A slightly proud nail catches on everything; a slightly sunk one leaves a visible hole after filling. |
| Proud | Protrudes above the surface. | Temporary tacking or when you need to pull nails easily. | Snags on tools, fabric, or hands; indicates under-driving, which creates a weak joint. |
| Countersunk | Slightly below surface, creating a small dimple. | Fine furniture or cabinet work before a flawless fill-and-sand. | Driving too deep splits the wood face, especially near edges or in brittle materials like MDF. |
Step-by-Step: Adjusting Depth on Any Nail Gun
Follow these steps in order. Skipping the safety step is how you get an accidental firing into your thumb or the workpiece.
- Disconnect the Power Source. For a pneumatic gun, pull the quick-connect air hose. For a cordless model, remove the battery pack. The Makita DBN610 manual is explicit: “Always make sure that your fingers are not placed on the switch trigger or the contact element and the battery cartridge is removed before adjusting the depth of driving.” This isn’t a suggestion.
- Locate and Turn the Depth Dial. Find the knurled wheel, usually near the nose. Looking at the tool nose-on, turn it clockwise to increase depth (deeper drive), counter-clockwise to decrease it (shallower drive). On some models, there’s a diagram showing a nail going deeper.
- Reconnect and Test on Scrap. Reattach the air hose or battery. Load the correct nails. Fire one test nail into a piece of scrap wood that is identical to your project material in species and thickness.
- Inspect and Repeat. Examine the nail head. Is it flush, proud, or countersunk? If it’s not your target, disconnect the power again, adjust the dial a click or two, reconnect, and test again.
- Fine-Tune with Air Pressure (Pneumatic Only). If you’ve turned the dial to its limit and the nail still isn’t deep enough, increase the PSI at your compressor regulator by 5 PSI. If the nail sinks too deep at the shallowest dial setting, decrease the PSI. Test after each change.
Common mistake: Testing on softwood when your project is hardwood. The depth setting that works on pine will fail on oak, leaving every nail proud and your trim loose.
The goal is consistency. When you find the correct combination of dial setting and PSI, every nail from that gun into that material should land identically. Write that setting down if you switch between materials often.
Why Can’t I Just Crank the Dial All the Way?
Because you’ll break it. And even if you don’t, you’ll create a different problem.
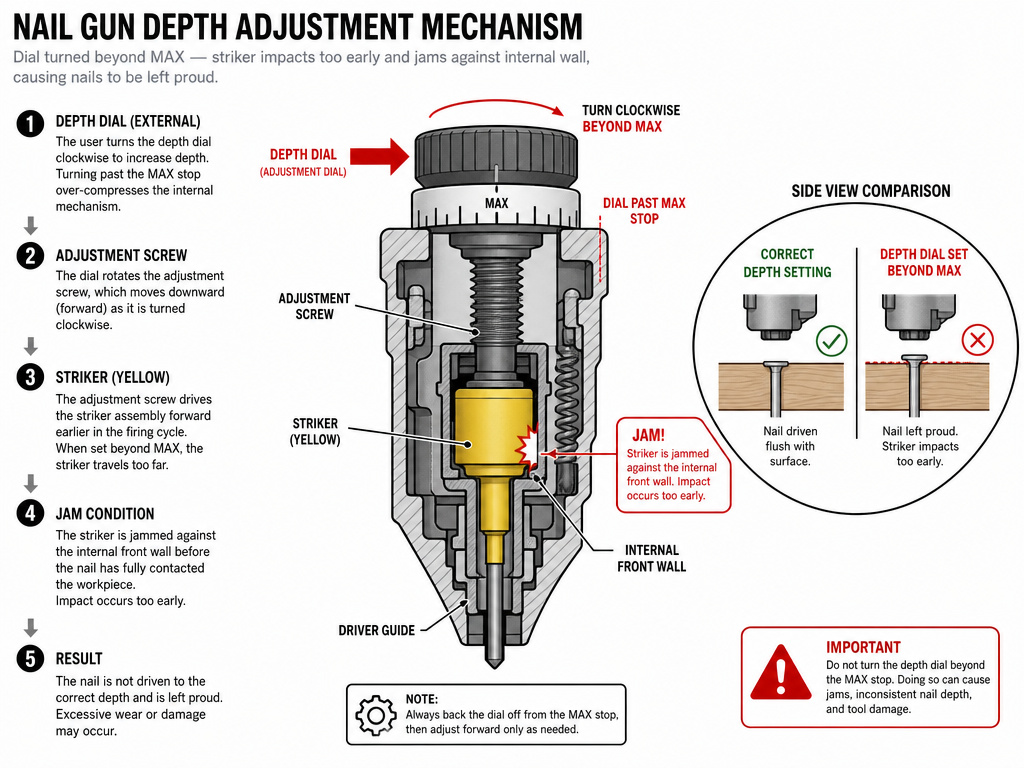
Every depth adjustment mechanism has a physical limit. The Makita manuals for the DBN601 and DBN501 include this specific warning: “Do not turn the depth adjuster too much, or the depth adjuster may get stuck.” Forcing it past its designed stop can jam the mechanism, requiring a disassembly to free it.
Furthermore, the depth dial doesn’t create power; it just positions the tool’s internal striker. Cranking it to the deepest setting without sufficient air pressure or battery power just means the striker will impact the nail head too early in its travel, resulting in a weak, shallow drive. The real power comes from the pressure behind it. This is the critical difference between depth adjustment (where the striker starts its hit) and power adjustment (how hard it hits).
Think of it like a hammer. The depth dial is how far you pull the hammer back. The air pressure is how hard you swing it. Pulling the hammer all the way back but then swinging it softly still won’t drive the nail.
Troubleshooting When Depth Adjustment Fails
Sometimes you follow the steps and the nail still does the wrong thing. Here are the common failures and how to fix them.
Problem: Nails are consistently proud, even with dial at deepest setting and good PSI.
- Likely Cause: Worn driver blade or internal bumper. These are consumable parts. Low temperature can also sap battery or air tool performance.
- Fix: Service the tool. For cold issues, the Lowe’s framing nailer manual advises: “Tool cannot work properly (no nails or slowed speed) due to excessively low temperatures. Use the nailer within the recommended temperature range or warm up both the nailer and the battery pack before operation.” Its range is 41°F to 104°F.
Problem: Nails sink too deep at the shallowest dial setting.
- Likely Cause: Air pressure is too high, or the depth mechanism is damaged/stuck.
- Fix: Turn down your compressor regulator significantly. If that doesn’t work, the internal stop for the depth adjuster may be broken.
Problem: Striker is stuck in the extended (fired) position.
- Likely Cause: You drove a nail too deep, hit a knot, or have debris jammed in the drive channel.
- Fix: The Lowe’s manual has a clear procedure: remove battery/nails, set depth selector to minimum, reinsert battery, hold back the magazine pusher, press the contact element against scrap, and squeeze the trigger to retract it.
Problem: Tool skips nails or fires intermittently.
- Likely Cause: Low air pressure. The Senco FN71T1 manual states “tool skipping or nails set above the work surface can be caused by low air pressure.” Also check for a nearly empty magazine—the same Lowe’s guide notes a full LED light but no firing can mean “too few nails remain in the magazine.”
| Symptom | Most Likely Cause | Immediate Fix | If That Fails |
|---|---|---|---|
| Nails proud, dial maxed | Low air pressure, weak battery, cold temps. | Increase PSI 10%, use fresh battery, warm tool. | Internal wear (driver blade, bumper) needs service. |
| Nails too deep, dial at minimum | Excessive air pressure. | Reduce PSI at regulator by 10-15 PSI. | Depth adjuster mechanism is damaged/jammed. |
| Striker stuck down | Over-driven nail, debris jam. | Follow manufacturer retraction steps (min depth, fire on scrap). | Mechanical jam requires disassembly. |
| Inconsistent depth (deep/shallow) | Worn O-rings, fluctuating compressor output. | Check compressor tank and regulator, add tool oil to air inlet. | Internal seals need replacement. |
How Different Nail Gun Types Change the Process
A framing nailer isn’t a finish nailer. The core principle of how to adjust nail gun depth is the same, but the scale and consequences are different.
A framing nailer drives large 3.5-inch nails with a lot of force. Depth is critical for structural integrity. Too shallow, and the nail lacks holding power. Too deep, and you can split the critical header or stud. The margin for error is smaller, and testing on an extra stud is essential. These tools often have a more robust depth adjuster, like the one on the 21° framing nailer from our sources.
A finish or brad nailer is for finesse. You’re often working with delicate trim where a blowout on the face is a project-ender. The depth adjustment is finer, often with those half-turn clicks. The goal is often a perfectly countersunk head for filling, requiring more precise control.
A roofing nailer has a different goal: to set the nail head just to the surface of the shingle, not below it. Over-driving crushes the shingle and compromises the seal. The depth setting is often fixed at the factory or has a very limited range, as the primary control is the pressure setting on the compressor to account for shingle thickness and nail length.
The type of nail matters too. Using the wrong strip will jam the tool and make consistent depth impossible. Always match the nail strip to the tool’s magazine specs.
Common Nail Gun Models and Their Settings
Different brands and models have their own specific adjustment ranges and safety features. For example, several Makita cordless nailers, like models in the DBN series, have defined depth adjustment ranges. The manufacturer provides clear warnings for these tools, such as not turning the depth adjuster too far to avoid it getting stuck and always removing the battery before making any adjustments. Similarly, a Senco pneumatic framer like the FN71T1 has a specified operating pressure range, and issues like nails sitting above the surface can be linked to air pressure being too low. Always consult your specific tool’s manual for its exact capabilities and safety steps.
Frequently Asked Questions
Why is my nail gun not sinking nails deep enough?
The three most common reasons are low air pressure (check your compressor PSI), a weak or cold battery, or using the wrong nail length for the material. Hardwood needs more force than softwood. Always troubleshoot by first increasing your air pressure or swapping to a fresh battery, then testing on an identical scrap piece.
What PSI should I set my nail gun to?
Refer to your tool’s manual. For example, the Senco FN71T1 pneumatic nailer operates between 70 and 120 PSI. Start at the midpoint (around 90 PSI), set your depth dial, and then adjust the PSI up or down in small increments until your test nail sinks to the perfect depth.
How do I adjust the depth on a DeWalt nail gun?
The process is universal. Find the depth adjustment dial, usually a black or silver wheel near the nose. With the battery removed or air disconnected, turn it clockwise for deeper drives, counter-clockwise for shallower. Reconnect, test on scrap, and repeat. The specific location is in the DeWalt manual—often on the side of the nose piece.
Can you adjust the power on a nail gun?
On pneumatic nailers, “power” is adjusted by changing the air pressure (PSI) at the compressor. On cordless models, power is generally fixed by the battery voltage and motor, though some high-end models may have a power mode selector. Depth and power are separate: depth controls how far the nail goes, power controls how hard it’s driven to get there.
Why does my nail gun keep jamming when I adjust the depth?
Jam is rarely caused by the depth adjustment itself. More likely, you are using the wrong nail size or type for the tool, the magazine is dirty, or a previous jam wasn’t fully cleared. Ensure you’re using nails that match your gun’s gauge and length specifications, and keep the magazine and drive channel clean.
Before You Go
Here’s the one rule that reframes all the others: depth adjustment is a 30-second pre-flight check for every new batch of wood you pick up, not a set-and-forget task for the life of the tool.
If you walk away with one action, make it this: find your scrap bin. Keep a piece of your project wood next to your workstation. Before you fire the first nail into your actual work, dial in your depth on that scrap. It costs nothing but a single nail and ten seconds. It saves you from split trim, weak joints, and the uniquely frustrating task of prying out a dozen over-driven nails.
Everything else—the PSI charts, the model-specific ranges, the retraction sequences—is just detail supporting that habit. The difference between a pro result and a DIY mess is often just taking that half-minute to verify the machine is set up for the material in your hand, not skill. Start there, and the rest of the process falls into place.
