
How to Use a Roofing Nailer: Step-by-Step (Without Damage)
This post contains affiliate links. As an Amazon Associate, we earn from qualifying purchases.
To use a roofing nailer, you need clean, dry air between 70 and 120 PSI, the correct 15°-angle coil nails (0.120″ diameter), and a steady, perpendicular technique. Load 120 nails into the magazine, set your depth, and use bump-fire mode for shingles, keeping the tool flat against the roof to drive nails flush without damaging the material.
That operating range isn’t a suggestion, it’s the mechanical limit where the tool works without self-destructing. Go under 70 PSI and the nail won’t seat; go over 120 PSI and you risk blowing out the O-rings or splitting the shingle. The difference between a clean install and a call-back often comes down to three variables you control before the first nail is fired, including knowing how to use a roofing nailer correctly.
What follows: the setup most guides skip (especially for cold weather), the loading sequence that prevents jams, the firing technique that avoids “shiners,” and the daily maintenance that keeps a pneumatic nailer running for seasons instead of weeks.
Key Takeaways
- Use only 0.120″ diameter, 15°-angle, wire-collated coil nails; the wrong angle or diameter will jam the magazine and damage the driver blade.
- Always hold the nailer perfectly perpendicular to the roof deck; even a slight angle causes nails to glance off trusses, creating dangerous, exposed “shiners.”
- For pneumatic models, add pneumatic tool oil into the air inlet daily before connecting the hose to prevent internal rust and O-ring wear.
- After finishing a roof, detach the air hose and empty the magazine; storing a loaded nailer compresses the magazine spring and invites moisture corrosion.
Before You Start: The Non-Negotiables
This isn’t a drill. You’re working with compressed air at high pressure, driving large nails at high speed, on a sloped surface where a fall is fatal. The manual for the Central Pneumatic Model 63993 explicitly states that connecting to an air source exceeding 200 PSI may cause bursting. Your compressor’s regulator is your first and most important safety device.
Every manual agrees on the core personal protective equipment (PPE). The Benchmark Tools manual is blunt: WEAR CSA APPROVED EYE PROTECTION, WEAR EAR PROTECTION, WEAR A FACE MASK. Tar granules, wood splinters, and nail fragments are airborne hazards. A roofing nailer operates at a high noise level, and hearing damage from prolonged exposure is cumulative and permanent.
Where this goes sideways: Climbing a ladder while holding a connected nailer. A snagged hose can yank the tool from your grip, causing it to fire on impact. The safe method is to climb first, then pull the tool up using a rope with the air supply disconnected.
If you are using a pneumatic nailer regularly, the Central Pneumatic manual has a specific, often-overlooked warning: Anyone using vibrating tools regularly or for an extended period should first be examined by a doctor and then have regular medical check-ups. This is a real, documented occupational health concern, not legal boilerplate.
Gearing Up: Compressor, Hose, and Regulator
Your nailer is only as good as its air supply. This is the most common point of failure for beginners. The specs from the manuals show why.
| Tool Model | Operating Pressure | Air Consumption (CFM @ ~90 PSI) | Air Inlet Size |
|---|---|---|---|
| PORTER-CABLE RN175C | 70–120 PSI | 4.13 CFM @ 80 PSI | 1/4” N.P.T. |
| SENCO RP445XP | 70–120 PSI | 3.86 SCFM | 1/4” N.P.T. |
| Central Pneumatic 63993 | Max 120 PSI | 2 CFM @ 90 PSI | 1/4″-18 N.P.T. |
| Central Pneumatic 92917 | 70–100 PSI | 4.5 CFM @ 90 PSI | 1/4” N.P.T. |
That CFM (Cubic Feet per Minute) number is your compressor’s report card. If your compressor can’t deliver the required CFM, the nailer will “starve,” firing weakly or not at all as the pressure drops between shots. For the common 4–4.5 CFM demand, a compressor that can deliver sufficient CFM is required; for sustained work, a larger capacity unit is better.
A skinny, 50-foot 1/4″ hose creates friction loss that robs your nailer of power. Use the shortest, widest diameter hose you can.
Your setup must include, in order from the compressor: a moisture filter/separator, a regulator with a gauge you can see, an inline oiler (for pneumatic tools), and a quick-connect coupler. The oiler is non-optional for many pneumatic tools, but always consult your tool’s manual for its specific lubrication requirements. It injects a fine mist of oil into the air stream, coating the nailer’s internal piston and O-rings with every cycle.
Nail Selection: The One Thing You Can’t Get Wrong
The tool doesn’t decide this, the roof does. But the nailer’s mechanics are brutally unforgiving if you pick wrong.
Use only the recommended nails. Refer to Nail Specifications. . DEWALT DCN45RN Manual
All coil roofing nailers are designed for 0.120″ diameter nails with a 15° collation angle. The collation is the plastic or wire strip that holds the nails together in a coil. You’ll see 15° and 34° angles, they are not interchangeable. A 34° nail will not load into a 15° magazine. The length range is universally 3/4″ to 1-3/4″.
For asphalt shingles, select a nail length within the tool’s range (3/4″ to 1-3/4″) that provides adequate penetration into the deck. For thicker substrates or when nailing into purlins, you might step up to 1-1/2″ or 1-3/4″. Using a nail that’s too short is a major cause of wind-uplift failure.
Nail material matters, too. Hot-dipped galvanized or stainless steel nails are for roofs. They resist the rust that plain steel nails develop, which can stain shingles and weaken over decades. Don’t use interior framing nails outside.
The 7-Step Process for Loading Your Nailer
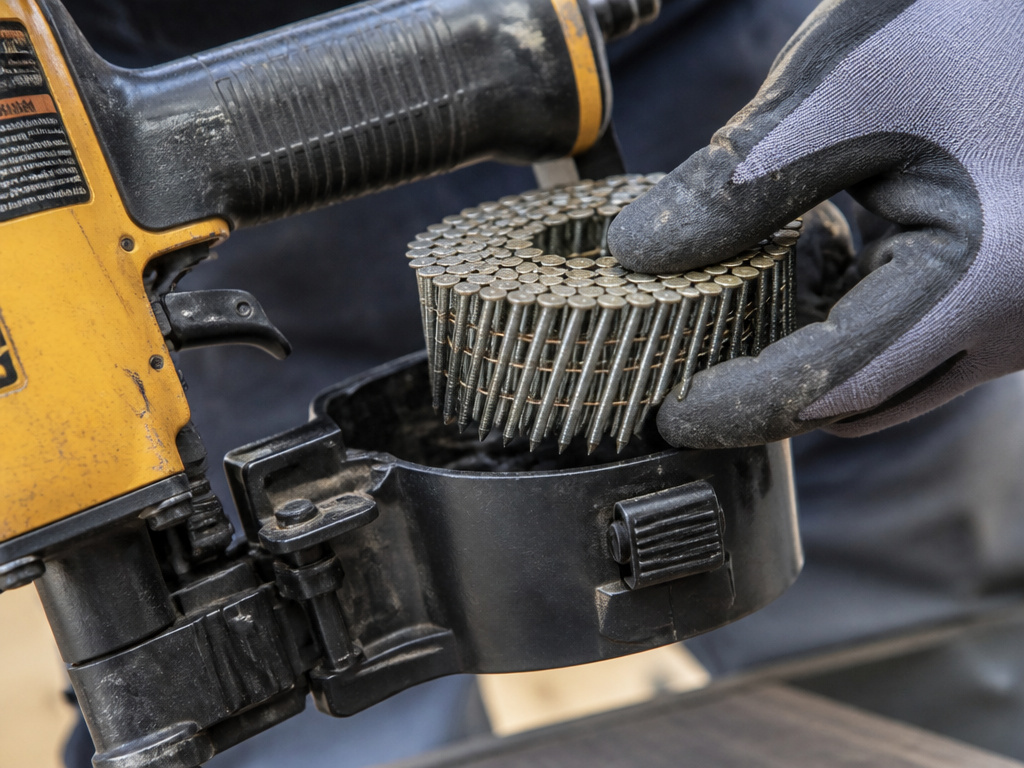
This process is universal for coil nailers. Rushing it causes 90% of jams.
- Disconnect the air supply (or remove the battery). This is rule zero. The magazine latch is under spring tension.
- Depress the canister latch and swing the magazine open. On most models, you’ll push a lever or button near the rear of the magazine.
- Remove any old nails or debris. Blow out the track with compressed air. A single fragment of a broken nail can cause a misfire.
- Take a fresh coil and ensure the nails are facing the correct direction. The nails should point toward the front of the tool (the nosepiece). The coil will have an arrow indicating feed direction.
- Slide the coil into the magazine track. You’ll feel it click into place against the feed mechanism. Don’t force it.
- Pull the lead nail strip forward until the first nail is positioned at the drive blade channel.
- Close the magazine firmly until the latch clicks shut. You should hear a solid snap.
The part nobody mentions: After loading, always fire two or three test nails into a thick piece of scrap lumber on the ground. This ensures the nails are feeding correctly and seats the first nail properly in the drive path. Skipping this test is how you get a jam on the roof, where clearing it is ten times more annoying.
Setting Up on the Roof: Depth and Pressure
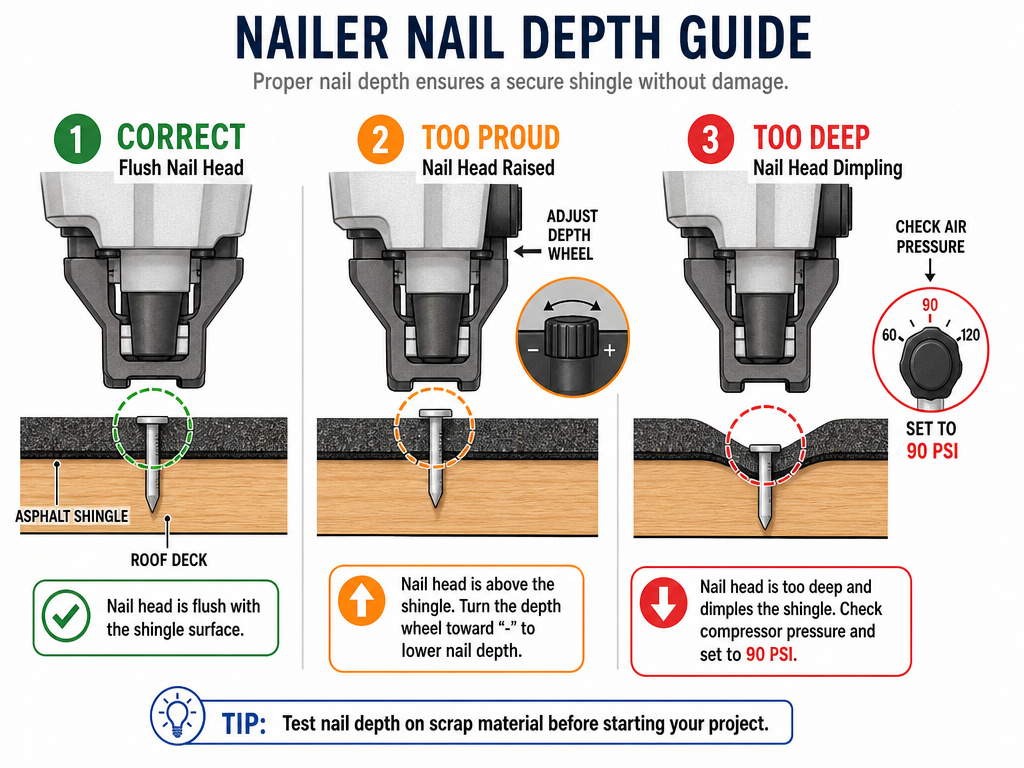
You have two controls: air pressure (on the regulator) and depth adjustment (on the tool). They work together.
First, set your compressor’s regulator. Start at 90 PSI. This is a safe midpoint. Connect your hose and fire a few test nails into your scrap. Look at the nail head.
- Nail head is proud of the shingle surface? The depth is too shallow. Increase pressure in 5 PSI increments OR turn the depth adjustment wheel on the tool (usually near the nosepiece) to a deeper setting.
- Nail head is driven too deep, dimpling or cutting the shingle? The depth is too deep. Decrease pressure or adjust the wheel for a shallower drive.
Common mistake: Cranking the pressure to 120 PSI to solve a depth problem. This wears out the tool’s internals and risks splitting wood. Adjust the tool’s depth wheel first. Use pressure as a fine-tune.
The goal is a flush nail head. It should sit just on top of the shingle, not above it and not sunk into it. A sunken nail compromises the shingle’s sealant strip; a proud nail can catch the wind or the next course of shingles.
The Two Firing Modes and When to Use Them
Roofing nailers have two firing modes, and using the wrong one is a safety and quality issue.
- Sequential (Single-Shot) Mode: You must press the safety tip firmly against the workpiece, then pull the trigger. One cycle, one nail. This is the safest mode, required by most job sites. It prevents accidental double-fires and is best for starter courses, hips, ridges, and valleys where precision is critical.
- Bump (Contact) Fire Mode: Hold the trigger down and “bump” the safety tip against the workpiece. The nail fires each time the tip is depressed and released. This is for high-speed, repetitive nailing on open field sections of the roof. It’s vastly faster but requires more control to avoid accidental discharges.
Most pneumatic nailers ship in sequential mode. To switch to bump fire, you often need to change a trigger or insert a different part (like the “Red Contact Actuation Trigger” included with the Central Pneumatic 63993). Never use bump-fire mode on a ladder, scaffold, or when positioning the tool with the tip off the work surface. The tool can fire the instant the tip touches anything.
The Right Technique: Rhythm and Placement
The mechanics are simple: hold the nailer perpendicular, place the tip, and fire. The art is in the rhythm and consistency.
- Stance and Position: Keep your body weight balanced. Work from the rake edge toward the peak, keeping the air hose behind you.
- Perpendicular is Key: Tilt the nailer even slightly, and the nail can deflect off the roof deck truss, becoming a “shiner”, an exposed, bent nail that punctures shingles and leaks. Hold the tool so it’s straight up and down relative to the roof plane.
- Nail Placement: For standard shingles, place nails according to the manufacturer’s specifications, typically above the sealant strip. Most nailers have a guide base or gauge that can be set to this measurement.
- Develop a Rhythm: For bump-fire on the field, it’s press-fire-lift-move. A smooth, consistent motion is faster and less fatiguing than herky-jerky movements. Don’t rush. A steady pace with accurate placement beats a frantic one with errors you have to go back and fix.
Daily and Seasonal Maintenance
A roofing nailer lives a hard life, tar, dust, moisture, and vibration. Maintenance isn’t optional; it’s what separates a tool that lasts five years from one that dies in one season.
Daily (After Each Use):
- Detach the air supply.
- Empty the magazine. Storing it loaded weakens the spring.
- Wipe down the exterior with a dry cloth.
- Add 3–5 drops of pneumatic tool oil into the air inlet, reconnect the hose briefly, and fire a couple of shots into scrap to distribute the oil internally.
Weekly (For Active Projects):
- Clean tar and debris from the nosepiece and guide base. The Central Pneumatic manual specifies: Remove tar and dirt buildup with a nonflammable solvent. NEVER use gasoline or other flammable solvents. A citrus-based degreaser works well.
- Check the O-ring on the air inlet for cracks or wear.
Seasonal / Cold Weather:
Cold weather introduces moisture, which freezes inside the tool. The PORTER-CABLE RN175C manual has specific advice: For cold weather operation, use winter formula air tool lubricant or permanent antifreeze (ethylene glycol). It also warns: Do not store tools in a cold weather environment to prevent frost or ice formation on operating valves and mechanisms, which could cause tool failure.
Furthermore, it cautions: Some commercial air line drying liquids are harmful to “O”-rings and seals, do not use these low temperature air dryers without checking compatibility. This is a critical nuance most weekend warriors miss. Your air line antifreeze must be tool-compatible.
Troubleshooting Common Problems
Even with perfect technique, things go wrong. Here’s how to read the symptoms.
| Symptom | Likely Cause | Immediate Fix |
|---|---|---|
| Weak firing / nail not driving | Low air pressure, low CFM, or clogged inlet filter. | Check regulator setting (aim for 90 PSI). Ensure compressor is keeping up. Check/clean filter. |
| Tool fires but no nail comes out | Empty magazine, jammed nail, or worn driver blade. | Check for nails. Clear jam (disconnect air first!). Inspect blade for damage. |
| Nail jams repeatedly | Wrong nail size/angle, debris in track, or damaged magazine. | Verify nail specs (0.120″, 15°). Clean track thoroughly. Inspect magazine for burrs. |
| Air leaking from tool | Damaged O-ring, loose housing, or cracked body. | Tighten housing screws. Identify leak source; likely requires O-ring replacement. |
| Tool won’t fire (pneumatic) | Stuck trigger mechanism, frozen valve (cold weather), or missing O-ring. | Disconnect air. Work trigger to free it. Thaw tool if frozen. Inspect internal valve. |
| Tool won’t fire (cordless) | Dead battery, locked trigger, or stalled motor. | Charge battery. Check trigger lock. For DEWALT DCN45RN: Remove battery, wait 3 seconds and reinsert to reset electronics. |
For cordless models like the DEWALT DCN45RN, battery care is part of troubleshooting. The manual is clear: Do not store tool with battery pack installed. And: Battery packs should not be stored completely depleted of charge. A battery stored dead might not wake up.
Pneumatic vs. Cordless: The On-Roof Reality
This choice changes your entire setup. A pneumatic nailer like the PORTER-CABLE RN175C (5.34 lbs) is often lighter than a cordless model like the DEWALT DCN45RN (6.8 lbs), but it tethers you to a compressor and hose. A cordless model like the DEWALT DCN45RN (6.8 lbs) trades that hose for a battery, offering complete freedom of movement at the cost of weight and periodic recharging.
The trade-off is in logistics, not just power. On a complex roof with many hips and valleys, dragging a hose is a significant hassle. On a wide-open, simple roof, the hose is less of an issue, and the pneumatic tool will outlast any battery. Your decision on how to use a roofing nailer should factor in roof complexity and access to power for charging. For a full breakdown of the pros and cons, see our guide comparing roofing and framing nailers, as the considerations are similar.
Roofing nailer vs. Framing nailer (key differences)
Roofing nailers and framing nailers are built for completely different jobs. A roofing nailer is designed specifically for attaching asphalt shingles and roofing felt. It drives shorter nails with a wider head, typically in lengths from 3/4 inch to 1-3/4 inches, and they are often collated in coils or sticks at a specific angle to fit the magazine. A framing nailer, in contrast, is for structural wood construction, driving much longer nails to join studs and joists. Using the wrong tool for roofing can damage shingles and won’t provide the correct holding power. Always use the nailer specified for the material you are fastening.
Using a shingle guide / gauge (pros/cons)
A shingle guide, or gauge, is a simple tool that clips onto the edge of your roof to help maintain straight, consistent courses of shingles. The main advantage is speed and uniformity; it eliminates the need to measure and chalk every row, which can be a significant time-saver on a large roof. However, relying solely on a guide has drawbacks. It assumes your starter course is perfectly straight, and any error will compound down the roof. It can also be less flexible on complex roofs with hips, valleys, or dormers where manual layout is often necessary. For simple, large roof planes, a gauge is excellent, but always double-check your alignment periodically.
Types of roofing nailers (coil vs. Stick)
Roofing nailers come in two main magazine types: coil and stick. Coil nailers hold nails wound in a round coil, offering a high capacity, often 120 nails or more, which means fewer reloads. Stick nailers hold nails in a straight magazine. The choice often comes down to balance and nail preference. Coil nailers can feel slightly bulkier due to the side-mounted magazine, while stick nailers may have a more streamlined profile. Both types drive the same range of nail lengths, typically from 3/4 inch to 1-3/4 inches. Your decision may be influenced by the specific nail collation required by your shingle manufacturer or simply which tool feels more comfortable for all-day use on a slope.
Frequently Asked Questions
Can I use a roofing nailer for fencing or siding?
You can, but it’s not ideal. Roofing nails have large, galvanized heads designed to hold down asphalt. For fencing, you’d want a siding or fencing nailer that uses shorter, ring-shank nails for greater holding power in lateral loads. Using the wrong nail for the job leads to premature failure.
How do I clear a jammed nail?
Safety first: Disconnect the air hose or remove the battery. Open the magazine and remove any remaining nails. You’ll usually need a pair of needle-nose pliers to pull the jammed nail strip backwards out of the drive channel. Never use excessive force or try to drive through a jam, you’ll damage the driver blade. For persistent jams, consult the guide on nail gun safety and disassembly for detailed instructions.
What size air compressor do I really need?
Match the CFM, not just the tank size. As the table above shows, roofing nailers can demand 4–4.5 CFM. Your compressor’s delivered CFM at 90 PSI must meet or exceed that. A 20-gallon compressor often delivers around 4–5 CFM, making it the absolute minimum. For comfortable, sustained work without waiting for the compressor to catch up, a 30-gallon or larger model is a wise investment. Our review of the best air compressors dives into the specs.
Why does my nailer “spit” oil or moisture?
This is a sign your air system isn’t dry enough. The moisture filter/separator on your compressor is overwhelmed or needs draining. Water in the air line mixes with the oil in the tool and is blown out as a mist. Drain your compressor tank daily and ensure your in-line filter is functioning. In cold weather, this moisture can freeze inside the tool, causing failure.
The Bottom Line
A roofing nailer turns a brutal, slow job into a manageable one, but it demands respect for its mechanics. The sequence is essential: match the compressor’s CFM, set the pressure to 90 PSI, load the correct 15° nails, test-fire on scrap, and adjust the depth wheel before touching the roof. The moment you skip a step, like forgetting to oil a pneumatic model, is the moment you start the clock on a costly repair.
The real skill in how to use a roofing nailer isn’t in firing fast; it’s in reading the nail head depth and knowing whether to turn the depth wheel or adjust the regulator. That judgment call, made a hundred times a day, is what separates a clean, durable roof from a leaky one. Everything in the manual, from the seven-year warranty on the PORTER-CABLE (while SENCO and Benchmark offer five-year warranties) to the cold-weather antifreeze warning, is written to protect that outcome. Follow it.
