
How to Clear a Jammed Nail Gun: Step-by-Step (Safely)
This post contains affiliate links. As an Amazon Associate, we earn from qualifying purchases.
To clear a jammed nail gun, you must first disconnect all power, remove the battery or unplug the air hose, before touching the jam. Then, unload any unjammed fasteners from the magazine, locate the jam release mechanism (often a latch or screws near the nose), open it, and use needle-nose pliers to remove the bent or stuck nail. Reassemble, reload, and test-fire into scrap wood. The process varies slightly by brand, but that safety-first step is universal.
Forget it for a second, and you risk turning a simple fix into a serious injury. This guide walks through the exact steps for how to clear a jammed nail gun, from the essential safety rule to the brand-specific latches you need to find, and what to do when the basic steps fail.
What follows: the universal safety procedure that every manual agrees on, a step-by-step walkthrough for the most common jam, a breakdown of model-specific mechanisms, and the troubleshooting steps to take when a jam keeps coming back.
Key Takeaways
- Disconnect all power first, air hose or battery, before you touch anything. This is the safety rule stated by Harbor Freight, DeWalt, and NuMax manuals, though Ryobi’s instructions for clearing a jam do not explicitly mention disconnecting power first.
- Unload the magazine of any good nails before clearing the jam. This relieves spring tension and gives you a clear view.
- Some jams are cleared by opening a latch or door near the nose; the DeWalt DWFP71917 has a dedicated “jam clearing nose door.”
- If a jam recurs after proper clearing, the cause is usually incorrect fasteners, low air flow, or internal damage requiring professional service.
- Never force a jam. If it won’t clear with gentle prying, stop. A bent drive guide or internal damage needs a qualified technician.
The Universal First Step (Safety)
Disconnect the tool from its power source. This isn’t a suggestion; it’s the instruction printed in bold on page one of every manufacturer’s manual. For pneumatic nailers, that means disconnecting the tool from the air supply. For cordless models, remove the battery.
Before you start: A jammed nail gun is under spring tension and may still have compressed air or electrical charge in its system. Attempting to clear a jam while connected can cause an accidental discharge, sending a nail or metal fragment flying at high speed. Always disconnect first.
The logic is mechanical, not legal. A pneumatic nailer’s firing chamber can hold pressure even after you disconnect the hose. A cordless tool’s capacitor might still hold a charge. Removing the power source is the only way to guarantee the tool is inert. The Harbor Freight, DeWalt, and NuMax manuals all state: disconnect before service, before learning how to clear a jammed nail gun, and before handing the tool to another person.
After disconnecting, the next move is to relieve any remaining pressure. Now you can safely handle the business end.
Step-by-Step: Clearing a Common Nail Jam
Most jams happen in the nosepiece, the nail gets driven sideways, its head catches on the driver blade, or it simply fails to eject. Here’s the universal sequence for that scenario.
-
Unload the Magazine. Slide back the follower or pusher to release tension and remove any unfired nail strips or coils. This gives you room to work and prevents a second jam from occurring as soon as you clear the first. As Ryobi’s guide notes, removing unjammed nails first “relieves pressure on the jammed fastener.”
-
Locate the Jam Release. This is the brand-specific part. Locate the latch, lever, or set of screws near the front of the tool.
- DeWalt DWFP71917 & Similar: Find the “jam clearing nose door.” Pull down, then up on the latch to swing it open.
- For some Ryobi models, you may need to insert a flat-blade screwdriver into the driving mechanism and gently push the firing pin back to expose a jammed nail.
-
Extract the Jammed Nail. With the mechanism open, you should see the stuck nail. Use a pair of needle-nose pliers to grip it firmly and pull it straight out. If it’s wedged, you may need to gently rock it side-to-side. Don’t hammer or punch it from the other side, you risk damaging the driver blade or bending the guide.
-
Inspect and Reassemble. Before closing everything up, look inside the open chamber. Check for any broken nail tips, plastic collation debris, or other obstructions. Then, close the latch or re-tighten the screws securely.
-
Reload and Test. Reload the magazine with the correct nails, reconnect your power source, and test fire two or three nails into a thick piece of scrap lumber. Listen for a solid thwump and check that the nails are driving to the correct depth.
Where this goes sideways: Trying to pull a jammed nail out by hand without pliers. The nail head is often slick, and your fingers will slip, driving the nail tip into your palm. Use the right tool, needle-nose pliers lock onto the shank.
Magazine Jams vs. Nose Jams: Know the Difference
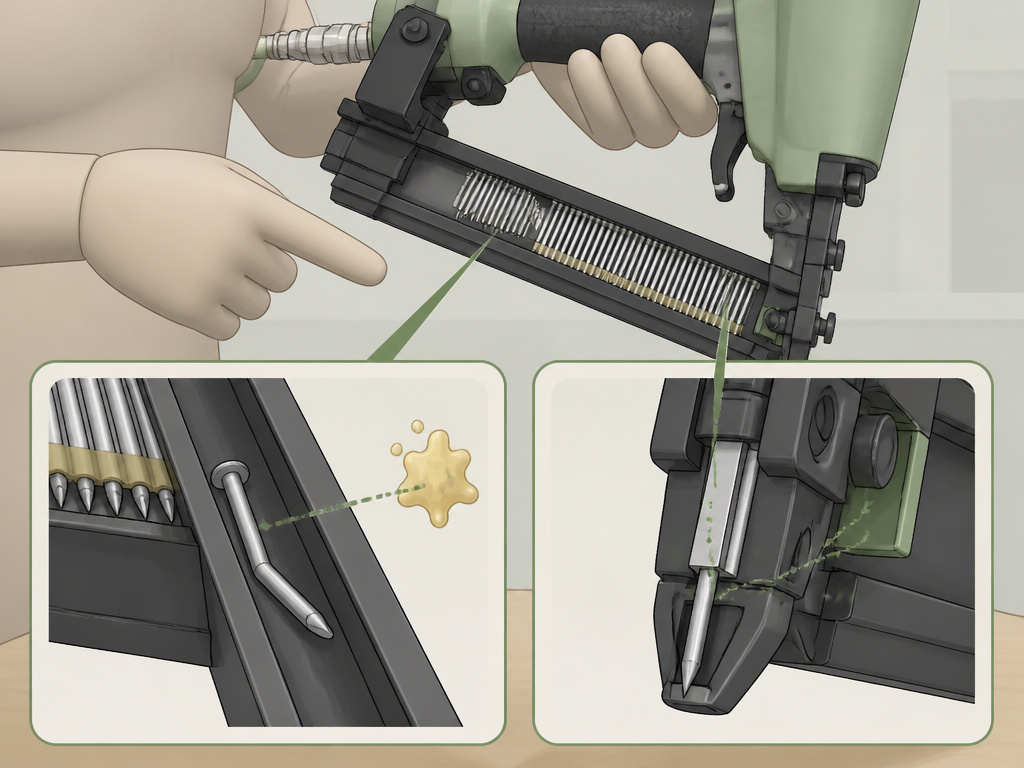
Not all jams are the same. A nail stuck in the magazine feels different from one lodged in the firing nose, and each has a slightly different clearance procedure. Misdiagnosing the jam type is why people think they’ve mastered how to clear a jammed nail gun, only to have it instantly reoccur.
| Jam Location | Common Cause | Symptoms | Clearing Method |
|---|---|---|---|
| Magazine Jam | Bent nail in strip, sticky residue, follower hung up. | Tool cycles but no nail fires; visible gap or misalignment in nail strip. | Open magazine, remove nail strip, clean track with dry cloth, and lubricate as specified by the manufacturer. |
| Nose / Nosepiece Jam | Nail hit a knot or metal, driver blade misalignment, incorrect nail angle. | Tool makes a firing sound but nail doesn’t eject; driver blade may be visibly stuck forward. | Use brand-specific nose door/latch (see Step 2 above). Requires pliers for extraction. |
| Deep Piston Jam | Severe misfire, broken driver blade, internal obstruction. | Tool is completely locked, trigger won’t pull, or you hear a grinding noise. | Stop. This requires disassembly by a qualified technician. Forcing it can destroy the tool. |
A magazine jam often lets the tool cycle normally, you hear the air exhaust but no nail comes out. The fix is usually straightforward: clear the track. A nose jam, however, frequently leaves the driver blade stuck in the extended position, locking the mechanism. That’s when you need to find that specific latch.
I learned this distinction after a frustrating hour on a trim job. The gun kept cycling empty after I “cleared” it. I’d removed a bent nail from the nose but didn’t see a second nail that had buckled inside the magazine track. The pusher was riding over it, so the gun acted empty. Cleaning the entire magazine track was the real fix.
Why Did It Jam? (And How to Stop It Happening Again)
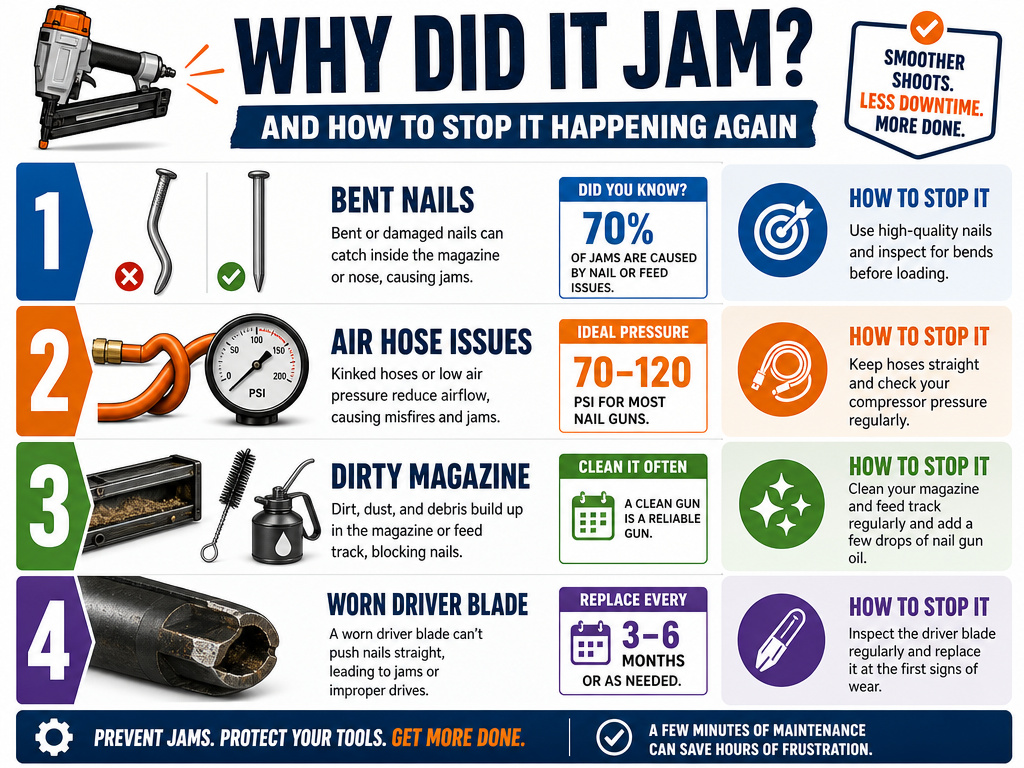
Clearing the jam gets you back to work. Diagnosing why it jammed keeps you working. Here are the four most common culprits, in order of likelihood.
-
Incorrect or Damaged Fasteners. This is the #1 cause. Using nails that don’t match your tool’s specifications for gauge, length, collation angle, or head style will cause jams. The NuMax manual states plainly: “The use of any other type of fasteners will cause the tool to jam.” Similarly, Paslode specifies using only “fasteners that meet Paslode® specifications.” Paslode specifies using only “fasteners that meet Paslode® specifications.” Always buy nails recommended for your specific model, and inspect strips for bends or corrosion before loading.
-
Insufficient Air Flow (Pneumatic Tools). Your compressor might show adequate PSI, but nail guns need consistent air volume (CFM). If the tool is trying to fire faster than your compressor can deliver air, nails won’t drive fully and can jam on the backstroke. The Paslode manual suggests a fix: “use larger air lines (3/8 inch ID minimum) to increase air flow.” Also check for kinks in your hose, a clogged in-line filter, or a compressor tank that’s too small for the job.
-
Dirty or Dry Tool. Sawdust, dirt, and old, gummy oil mix into a paste that gums up the magazine, pusher, and firing mechanism. A tool that cycles without driving a fastener often just needs a cleaning. The Harbor Freight manual’s troubleshooting directs you to “clean and lubricate magazine and pusher” for this symptom. A lack of lubrication increases friction, making it harder for parts to move as designed.
-
Worn or Damaged Parts. This is the least common but most serious cause. A worn driver blade can mis-strike nails. A bent drive guide (the part that directs the nail) will cause every nail to jam. The Harbor Freight manual warns that if the Drive Guide is bent after clearing a jam, “do not use the tool until it is repaired.” Internal wear often requires a professional nail gun rebuild.
Easy to miss: The collation angle. Those plastic strips holding nails together come in specific angles (like 21° or 34°). Loading a strip with the wrong angle into your magazine guarantees a jam. Check the rating plate on your tool or the original nail box.
Cold Weather Operation: A Special Case
Cold changes everything. Rubber O-rings contract and lose flexibility, moisture in your air lines can freeze, and lubricants thicken. The DeWalt DWFP71917 manual has a dedicated cold-weather procedure that prevents a whole category of jams.
If you’re working in temperatures below freezing, follow this sequence before you start your project:
- Drain your compressor tank daily. Moisture in the tank air condenses and freezes in the lines.
- Keep the nail gun indoors or in a warm vehicle until you’re ready to use it.
- Start with low air pressure. Set your regulator to 80 psi or less initially.
- Fire into scrap lumber. Actuate the tool 5 or 6 times into a waste piece to help lubricate the internal O-rings with the lower-pressure air.
- Then, increase to operating pressure. Turn the pressure up to your normal setting (but never exceed the tool’s maximum pressure, which is 120 PSI for models like the Harbor Freight Brad Nailer, DeWalt DWFP71917, and NuMax 16 GA Finishing Nailer).
Skipping this warm-up is a classic mistake. The first nail you try to drive into your actual workpiece on a cold morning is the one that will buckle and jam because the parts haven’t been cycled loose.
When Basic Clearing Fails: Time to Troubleshoot
You’ve disconnected the power, opened the nose, pulled the nail, cleaned everything, and loaded fresh, correct fasteners. But the next nail jams in the exact same way. Now what? This is where you move from clearing to diagnosing.
First, double-check your air supply. Is your compressor delivering the correct CFM? The NuMax 16 GA Finishing Nailer requires an average air consumption of 1.5 CFM @ 90 PSI. Verify there are no leaks in your hose connections.
Second, perform a thorough cleaning and lubrication. This isn’t just wiping the outside. Disconnect the air, remove all fasteners, and use a dry cloth to wipe down the entire magazine track. Lubricate the tool according to your manual’s instructions. A proper nail gun cleaning routine can resolve persistent feeding issues.
If problems continue, the issue is likely internal. The DeWalt manual states: “If fasteners continue to jam frequently in the nosepiece, the tool should be serviced by an authorized DEWALT service center.” Similarly, Harbor Freight advises service by a qualified technician if a jam cannot be cleared. This could indicate a worn driver blade, damaged O-rings, or a misaligned valve. Forcing a damaged tool will only make the repair more expensive.
How to find your nail gun’s specific jam clearing instructions
Your nail gun’s manual is the definitive source for clearing a jam. Manufacturers design different mechanisms, like specific nose doors or latches, to access a jammed fastener. The manual will show you the exact location and operation of these parts on your model. It also provides the only safe procedure for your tool, including the critical step of disconnecting the air supply before starting any work. Following the model-specific instructions prevents damage to internal components and ensures you don’t force a mechanism that operates differently than you expect. If you’ve lost the physical manual, search online using your tool’s exact model number to find a downloadable copy from the manufacturer’s website.
Frequently Asked Questions
How do I unjam my nail gun if there’s no obvious latch?
Many older or simpler brad nailers require you to remove the front nose piece using a screwdriver or Allen key. Look for two small screws on the sides or top of the nose assembly. Unscrew them (keep them safe), and the nose cone should slide or pivot off, exposing the jammed nail. Always consult your owner’s manual for the specific method.
Why is my nail gun jamming every few nails?
Frequent jamming is almost always a supply issue, not a tool issue. The top three causes are: 1) You’re using the wrong nails (check gauge, length, and collation angle), 2) Your air compressor can’t provide enough CFM for the firing rate, or 3) The magazine is dirty or needs lubrication. Address these before suspecting internal damage.
Can I use WD-40 to lubricate my nail gun?
No. WD-40 is a penetrant and water displacer, not a lubricant. It will gum up and attract dust, making jams worse. Use only pneumatic tool oil or the lubricant specified by the manufacturer. A few drops in the air inlet before each use is the standard method for oiling a pneumatic nail gun.
What should I do if a nail is stuck and I can’t pull it out?
If the nail is wedged so tightly that pliers can’t budge it, stop. Do not use excessive force or tools like hammers. You risk bending the drive guide or breaking the driver blade. At this point, the tool needs professional service. Forcing it turns a simple service call into a major repair.
How can I prevent jams when using a cordless nail gun?
Cordless nail guns jam for the same reasons as pneumatic ones, plus battery issues. Use only manufacturer-recommended fasteners, keep the magazine clean, and ensure your battery is fully charged. A weak battery doesn’t provide enough power for a full drive stroke, which can leave a nail partially driven and cause a jam on the next cycle.
Before You Go
The most important tool for clearing a jam isn’t the pliers or the Allen key, it’s patience. Rushing the safety steps or forcing a stuck component is how minor annoyances become costly repairs or injuries. The sequence is always: disconnect, unload, locate, extract, inspect, test.
If your nail gun jams frequently, the problem isn’t the clearing procedure. It’s your nails, your air, or your maintenance habit. Stock the right fasteners, check your compressor’s specs against your tool’s CFM needs, and add a 30-second cleaning and lubrication step to the end of every project. That’s the real fix.
