
How to Rebuild a Nail Gun: Step-by-Step (With Specifics)
This post contains affiliate links. As an Amazon Associate, we earn from qualifying purchases.
Rebuilding a nail gun requires matching three things: the exact service manual for your model, a genuine parts kit, and the specific reassembly tolerances the factory specifies. Skip any one, and the tool either won’t fire, leaks air, or fails within weeks. The manual isn’t a suggestion; it’s the blueprint.
That blueprint contains numbers you can’t guess. A gap of 4 mm here. A grease weight of 1 gram there. A 30-second window to seat a cap. Get those wrong, and the rebuild is just an expensive disassembly. This is the core of how to rebuild a nail gun.
What follows is the map for how to rebuild a nail gun: how to find your manual, the universal sequence, the brand-specific traps, and the one test that proves you got it right.
Key Takeaways
- The first step is often hidden: on tools like the Metabo HPT NR 3665DA, you must hold the power and maintenance switches for 5 seconds to enter service mode before any disassembly.
- Model-specific fasteners are essential. Using a standard bolt where the manual calls for a Nylock Bolt M5 x 22 can cause magazine misalignment and immediate jams.
- Post-rebuild testing is not optional. Connect to air at 0.7–1.2 MPa, fire five test nails into a safe backstop, and check for consistent depth and zero air leaks at all seals.
- If your nailer leaks air from the exhaust after a rebuild, the O-ring on the piston is almost always the culprit. A rebuild kit is cheaper than a new tool.
- For a high-use pneumatic nailer like the POWERNAIL 445, adding 2–4 drops of light oil every 8 hours is more critical than an annual rebuild. Dry internals wear out ten times faster.
The 5-Second Activation Step Nobody Mentions
You can’t rebuild a modern cordless nail gun by just taking it apart. Many have a maintenance lockout.
The Metabo HPT NR 3665DA service manual states it directly: you must hold down both the power switch and the maintenance switch for at least five seconds to activate maintenance mode. The tool won’t fully disassemble until you do this. I’ve watched a pro waste twenty minutes forcing a cover before finding that note on page 8.
Where this goes sideways: Skipping the activation step on a cordless model. You’ll brute-force the housing off, likely breaking plastic tabs, and find internal components still electronically locked in place. The reassembly will never seat correctly.
That five-second hold is your entry ticket. For pneumatic tools, the equivalent is bleeding all air pressure from the system. The POWERNAIL 445 manual is blunt: disconnect air when servicing. Never work on a pressurized tool.
Universal Disassembly Sequence
Once you’re in, the sequence is the same for most nailers. Follow this order to avoid losing small parts or damaging castings.
- Remove the magazine. This is usually held by 2-4 bolts. On the Metabo HPT, it’s two Nylock Bolts M5 x 22 at the nose and one Nylock Bolt (W/Flange) M5 at the housing. Note each bolt’s location.
- Clear the driver track. Remove any jammed nails or debris. This is often when you first see the condition of the driver blade.
- Detach the housing. This exposes the piston assembly and seals. Look for the main O-ring around the piston—this is the most common source of air leaks.
- Extract the piston assembly. Handle it carefully. The piston head and the attached driver blade are the heart of the tool.
The Model-Specific Fastener Trap
This is where generic advice fails. Your nailer doesn’t use “some screws.” It uses specific fasteners, in specific places, with specific torque.
Take the magazine. On a Senco SN901XP, a design change means removal now needs only a 5 mm hex wrench for one screw; a second screw was eliminated. Use the old two-screw method on a new model, and you’ll strip threads.
The table below shows how a single wrong bolt can stop a rebuild. These specs come straight from OEM manuals.
| Component | Metabo HPT NR 3665DA Spec | POWERNAIL 45R Spec | Risk of Substitution |
|---|---|---|---|
| Magazine to Nose | 2 x Nylock Bolts M5 x 22 | Not Applicable | Magazine wobble, misfeeds, bent nails |
| Access Plate | Not Applicable | 2 x #10-32 socket head cap screws | Plate misalignment, ratchet failure |
| Hook | Nylock Hex. Socket Hd. Bolts M4 x 8 | Not Applicable | Hook detachment, safety hazard |
| ** |
The “Nylock” part matters. A standard M5 bolt will vibrate loose within a day of firing. The nylon insert locks it in place. If you lose one, you must replace it with the exact type.
O-Rings, Seals, and the One Gram of Grease
Air leaks after a rebuild almost always trace to the seals. You replaced them, but did you install them correctly?
O-rings must be lubricated before installation. A dry O-ring pinches and rolls as you seat the housing, creating a micro-tear that leaks within the first ten shots. Use a dab of the grease recommended for the felt pad.
Speaking of grease, the manual doesn’t say “a little.” It gives a weight. For the Metabo HPT, you must impregnate Felt (P) [25] with about 1 g of Molub-Alloy 777-1 grease. Not 0.5 grams, not 2 grams. One gram. Too little, and the felt dries out, losing its damping effect. Too much, and excess grease migrates into the driver path, attracting dust and creating sludge.
The process of cleaning a nail gun before this stage is critical. Any old grease or debris left in the channels will contaminate your new seals instantly. Clean with a degreaser and lint-free cloths.
Rebuild Kit vs. Individual Parts
Should you buy a kit or piecemeal the parts?
- Kit (Recommended for 95% of rebuilds): Contains all major wear items: the main piston O-rings, driver bumper, and often smaller seals. Ensures compatibility.
- Individual Parts (For targeted repair): Only if you’ve definitively diagnosed a single failed part, like a specific Needle Roller. The Metabo HPT manual notes: if replacing only the Piston Ass’y, also replace Needle Roller D4.5. They wear as a pair.
If you’re already inside the tool, the kit is cheap insurance when learning how to rebuild a nail gun. The most common post-rebuild air leak comes from a seal you didn’t think to replace.
Alignment and Adjustment: The 4mm Gap and the Blinking Light
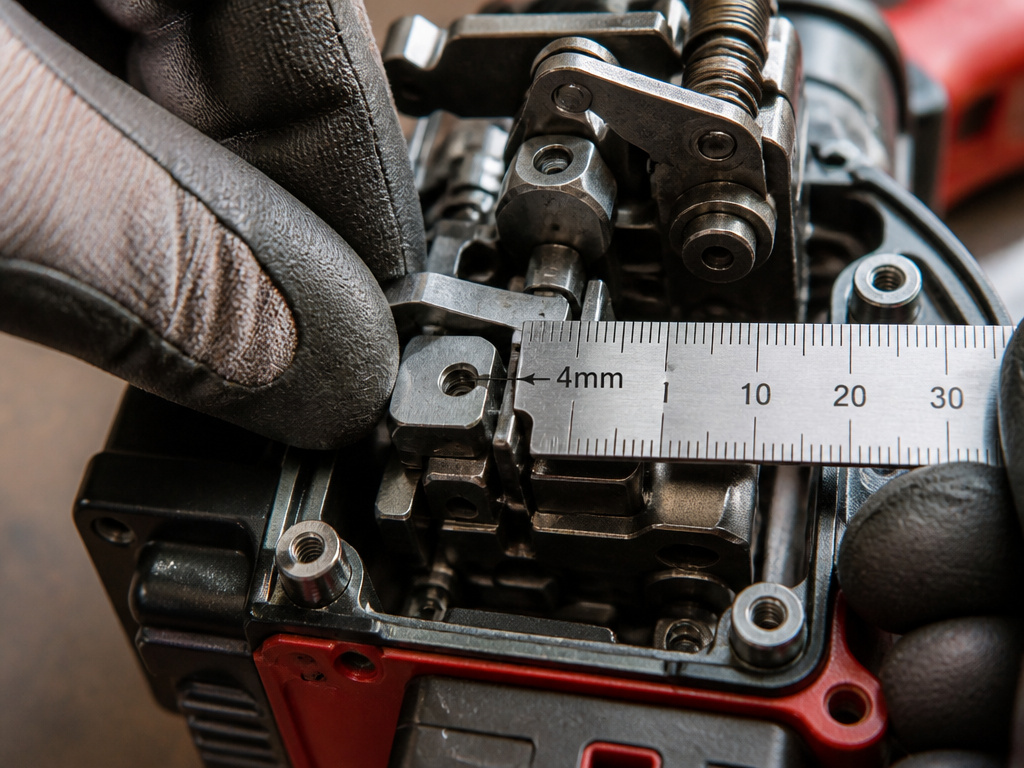
Reassembly isn’t just reversing disassembly. Critical components have alignment marks and gaps you must set.
On the Metabo HPT, the end surface of Pin (A) [34] must align with the notch of the Position Detector [23]. Miss that notch by half a millimeter, and the tool’s sensor fails. The result? An orange LED battery indicator blink error. The nailer is mechanically fine but electronically dead.
Another trap: the Pushing Lever (A). When reassembling, you must create a gap of about 4 mm between it and the Adjuster [42]. Incorrect adjustment here prevents the nailer from driving nails properly. The mechanism binds.
The part nobody mentions: These adjustments require the housing to be mostly assembled, but not fully tightened. You set the gap, check the alignment, then do the final torque on the bolts. Tightening everything first locks the misalignment in place.
For a POWERNAIL 45R, a different alignment is key. When replacing the Driving Blade, you must insert it with the face stamped ‘Front’ facing front of the Nailer. Installing it backwards or upside down will destroy the blade and the ratchet mechanism on the first strike.
Post-Rebuild Testing and Adjustment Procedure
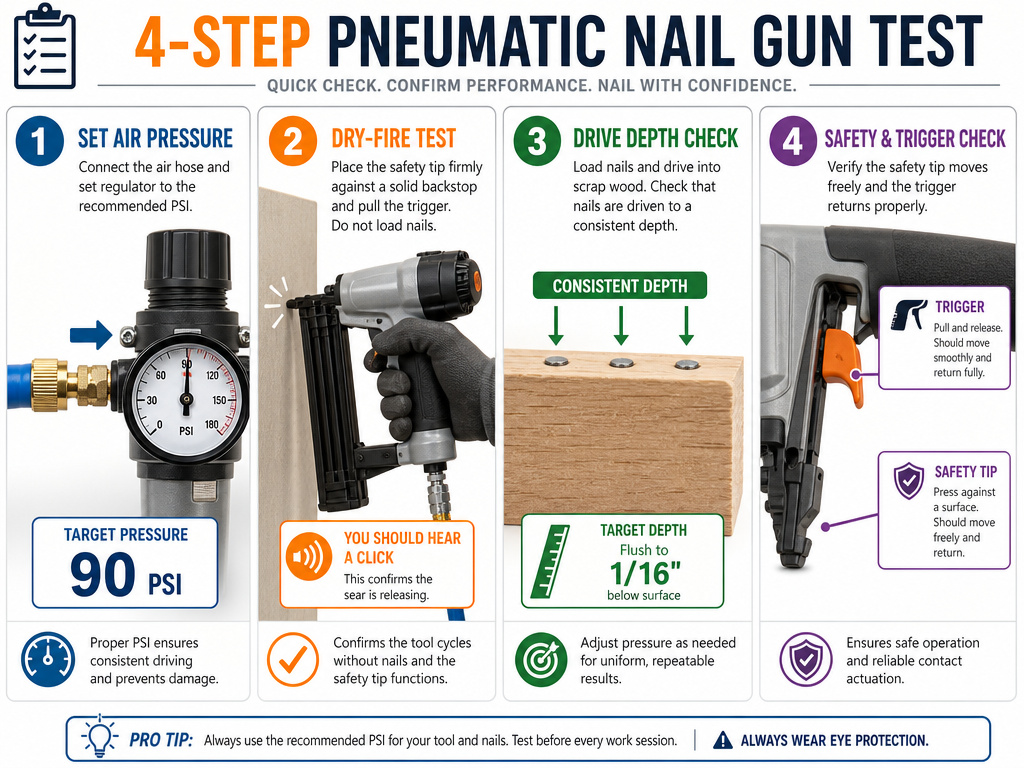
The job isn’t done when the last bolt is tight. You must test under controlled conditions.
- Air Pressure Test (Pneumatic Only): Connect to a regulator set to the manual’s spec. For the Metabo HPT, that’s 0.7 MPa or higher, with a delivery pressure of 0.7 to 1.2 MPa. Listen for leaks. A hiss means a seal isn’t seated.
- Dry-Fire Test (Safe Direction): With no nails, fire the tool several times. The action should be crisp and consistent. A sluggish return often means residual grease in the air chamber or a misaligned piston.
- Live-Fire Test: Load 5-10 nails and fire into a dense scrap wood backstop. Check for consistent depth. If depth is uneven, you now need to adjust depth using the tool’s external dial.
- Function Check: Test the safety mechanism and the trigger modes (sequential vs. Contact, if equipped). Ensure the magazine feeds smoothly.
If the tool passes these tests, your rebuild is successful. If it jams, go back to the clearing a jam procedure—the issue is likely in the magazine or feeder path, not the core rebuild.
Diagnostic Flowchart: Rebuild or Simple Fix?
Should you even do a full rebuild? Use this chart to decide based on symptoms.
| Symptom | Likely Cause | Fix | Severity |
|---|---|---|---|
| Air leaking from exhaust | Worn piston O-ring | Replace O-ring / Full rebuild kit | High |
| Nail doesn’t drive fully (bounces) | Worn driver bumper or dry piston | Replace bumper, lubricate | Medium |
| Tool leaks air around hose connection | Worn inlet O-ring | Replace inlet O-ring | Low |
| Inconsistent firing | Dirty trigger valve or weak spring | Clean valve, check spring | Medium |
| Jams frequently | Worn magazine parts or misaligned feeder | Inspect/replace magazine components | High |
A full rebuild addresses the “High” severity items—the piston, main seals, and driver system. For “Low” or “Medium” items, a targeted repair or cleaning your nail gun is faster and cheaper.
DIY Rebuild vs. Professional Service: The Warranty Clock
When does it make sense to send it out?
DIY Rebuild wins when:
- You have the exact service manual.
- The tool is out of warranty (most are 12 months for labor, though POWERNAIL offers a 10-year body warranty on some models).
- The cost of a professional service approaches 50% of a new tool’s price.
- You’re mechanically inclined and have a clean, organized workspace.
Professional Service is smarter when:
- The tool is under warranty (voided by unauthorized opening).
- It’s a complex cordless model with proprietary electronics.
- You lack the specific press tools or gauges called for in the manual.
- Your time is more valuable than the service fee.
What tools and materials do you need to rebuild a nail gun?
Gather the right tools before you start. You’ll need a cleaner to remove old grease and debris from internal parts. A specific light oil or grease for lubrication is required; one manual mentions using a particular type of grease on a felt component. Have a mallet on hand for tapping parts, but use it carefully as improper use can damage the tool. Small picks or hex wrenches are essential for removing fasteners and small components like needle rollers, which you must take care not to drop into the housing. Always disconnect the power source or air supply before you begin.
Frequently Asked Questions
What are the most common problems with nail guns?
The top three are air leaks from worn O-rings, jams from damaged magazine feeders or misaligned nails, and inconsistent driving depth from a worn driver blade or bumper. Most problems trace back to a lack of regular cleaning a nail gun and lubrication.
Why did my nail gun stop working suddenly?
Sudden stop is often a jam or an electronic fault in cordless models. First, always try to clear a jam. For cordless tools, check the battery and look for error lights (like the Metabo HPT’s blinking orange LED). A sudden air leak points to a ruptured seal.
Can you rebuild any nail gun?
You can rebuild most pneumatic and cordless nail guns if you can source the service manual and parts. Some very cheap, disposable “homeowner-grade” tools are not designed to be serviced—the housings are welded or riveted shut. If you can’t find a manual or a parts diagram, it’s likely not rebuildable.
How long does a nail gun rebuild take?
According to the Metabo HPT NR 3665DA manual, the standard repair time is 10-60 minutes. That’s for a trained technician with all parts and tools at hand. For a first-time DIYer, budget 2-3 hours for disassembly, cleaning, reassembly, and testing. Rushing causes mistakes.
Is it worth rebuilding an old nail gun?
It depends on the model and your skill. Rebuilding a professional-grade nailer from a major brand (like a Senco, Metabo HPT, or DeWalt) is almost always worth it. The internals are quality metal, and a $40 kit restores years of service. Rebuilding a low-cost, big-box store nailer is usually not economical—parts are scarce and the castings are often poor.
Before You Go
One final rule from the manuals that changes everything: Mount the Charge Cap within 30 seconds after feeding compressed air. That’s not a suggestion. It’s a hard deadline to prevent moisture ingress during testing. The factory knows that a thirty-second delay allows contaminants in.
So the sequence is absolute: connect air, test immediately, then seal. Miss that window, and you’re rebuilding again in a month.
If you take one thing from this, let it be the manual. Every torque, every gap, every gram of grease is in there. Your job isn’t to guess. It’s to follow. That’s the difference between a rebuild that lasts and one that fails on the first job.
