
How to Cut Pavers With a Saw: The 5-Step Process
This post contains affiliate links. As an Amazon Associate, we earn from qualifying purchases.
For porcelain or very hard pavers, a wet saw is essential, but sources disagree on the cutting technique: Landmark Ceramics recommends a continuous, one-pass cut to prevent breakage, while other guides suggest a score-and-break method. A key skill to learn is how to cut pavers with a saw correctly.
That mandatory one-pass rule for porcelain is where most DIY guides fall short. They treat all pavers the same, but a 20mm porcelain slab behaves nothing like a standard concrete brick. The manufacturers themselves disagree on the best cutting motion, which leaves you to choose between a score-and-break method and a single-pass plunge.
What follows is a breakdown of the tools, the safety non-negotiables, and the step-by-step techniques for concrete, brick, and stone, including the core question of how to cut pavers with a saw. We’ll also walk through the specific, high-stakes process for cutting porcelain pavers, where a wrong move costs you a $50 tile and a ruined blade.
Key Takeaways
- Cutting generates silica dust, a known carcinogen. A basic dust mask isn’t enough; you need a NIOSH-approved respirator or a wet-cutting method.
- For a clean cut on concrete or brick, use a diamond masonry blade on a circular saw or angle grinder, score both sides to 1/2-inch depth, then snap.
- Porcelain pavers demand a wet saw and a high-quality porcelain-specific blade. Attempting a dry cut or using a basic blade ruins it in one or two passes.
- Always brace small pavers in a vise or against a stop. A shifting paver during the cut is the fastest way to chip the edge or bind the blade.
- After each use, flush your wet saw’s water tubes for one minute. Sediment buildup clogs the spray and overheats the blade on the next project.
The Safety Gear You Cannot Skip
This isn’t scare talk. It’s the math from the manufacturer’s manual and industry data. The MK-1080 paver saw manual states that silica dust from cutting masonry is a known carcinogen and can cause fatal lung diseases like silicosis. A blog citing industry data from 2008 noted that at the time, 10 construction workers died per week from dust inhalation on site.
Your eyes and ears are also on the line. Chips fly.
Here’s your non-negotiable kit:
- Respiratory Protection: A NIOSH-approved respirator (like an N95 or half-face mask with P100 filters). Paper or surgical masks do not filter silica particles.
- Eye Protection: Sealed safety goggles. Safety glasses with side shields are the bare minimum.
- Hearing Protection: Earplugs or over-ear muffs with a high Noise Reduction Rating (NRR).
- Gloves: Heavy-duty work gloves to protect hands from sharp edges and vibration.
- Dust Control: If dry cutting, use an industrial HEPA vacuum attachment. Better yet, use a wet saw. The MK-1080, for example, has a pump that moves 170 gallons of water per hour to suppress dust.
Before you start: Silica dust causes cancer. Use a NIOSH respirator, not a dust mask. Wear sealed goggles—concrete chips at 3,450 RPM will embed in an eyeball. Secure loose clothing and tie back long hair.
Choosing the Right Saw and Blade
The “right” saw is the one that holds the paver steady and matches the material. A wobbly angle grinder on a loose brick is an invitation to the emergency room.
| Saw Type | Best For | Key Limitation |
|---|---|---|
| Circular Saw | Straight cuts in concrete/brick pavers on a bench. | Depth of cut. |
| Angle Grinder | Curves, notches, or cutting pavers in-place. | Control. It’s a one-handed tool with a fierce kickback. |
| Wet Tile Saw (Table) | Porcelain, natural stone, or any project where dust is a concern. | Portability and cut length. Most have a limited cross-cut capacity. |
| Dedicated Paver Saw (e.g., MK-1080) | High-volume, deep, straight cuts in all materials. | Cost and size. It’s a specialty tool you typically rent. |
The blade is more important than the saw when you compare a how to cut pavers with a saw guide. A diamond masonry blade is the only correct choice. The Bob Vila guide stresses that if you’re cutting stone, the blade must be labeled for stone, not just brick or concrete. For porcelain, the Landmark Ceramics guide is brutal: a basic blade will be ruined after one or two cuts.
The arbor size must match your saw—for example, the MK-1080 uses a 5/8 inch arbor.
How to Prepare and Secure the Paver
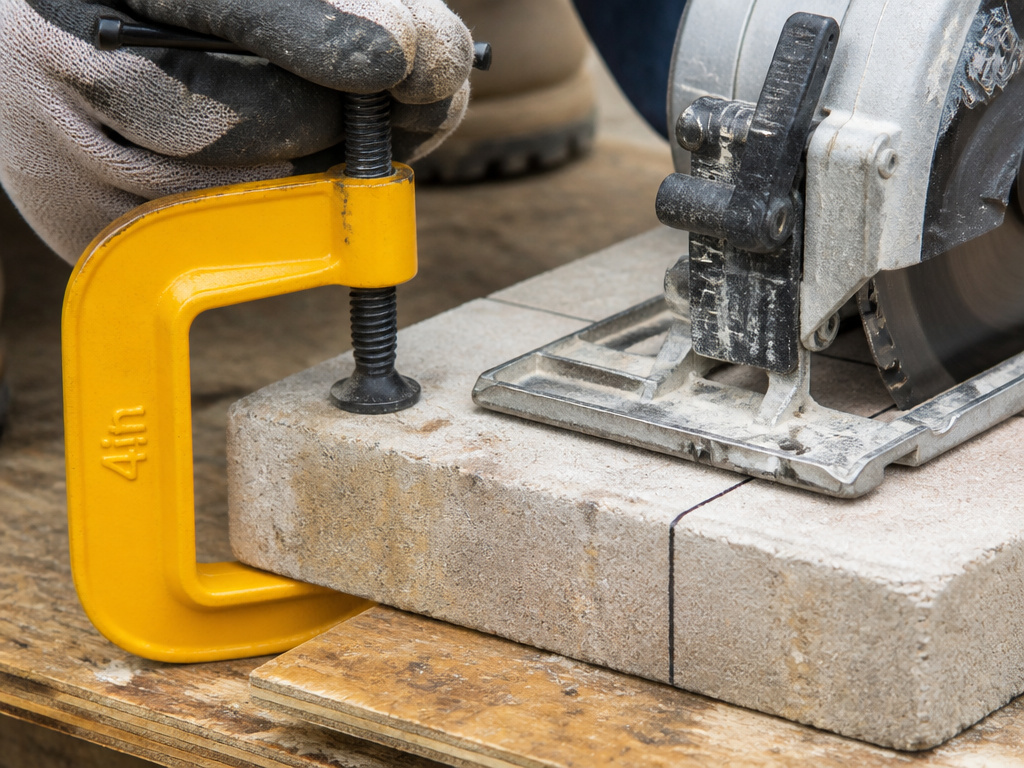
A moving paver ruins the cut and the blade. The rule from Pavingexpert is simple: if the unit can move at all, brace it. Small block pavers and patio flags should always be braced.
- Mark Relentlessly. Use a pencil or chalk. For a straight cut, wrap the line around the front, back, and both sides. This gives you a visual guide to follow from every angle. If the surface is shiny, apply masking tape and mark on that.
- Choose Your Workspace. A stable, flat surface is key. The ground, a sturdy workbench, or a sheet of plywood on sawhorses all work.
- Secure It. For a circular saw or angle grinder, clamp the paver to your work surface. Use C-clamps or a dedicated vise. For a wet tile saw, use the built-in fence and hold-downs. The goal is zero movement.
Where this goes sideways: Cutting a paver that’s just sitting on the ground. The vibration walks it, the blade binds, and you’re left with a chipped, uneven edge and a stalled saw.
The 5-Step Process for a Clean, Straight Cut
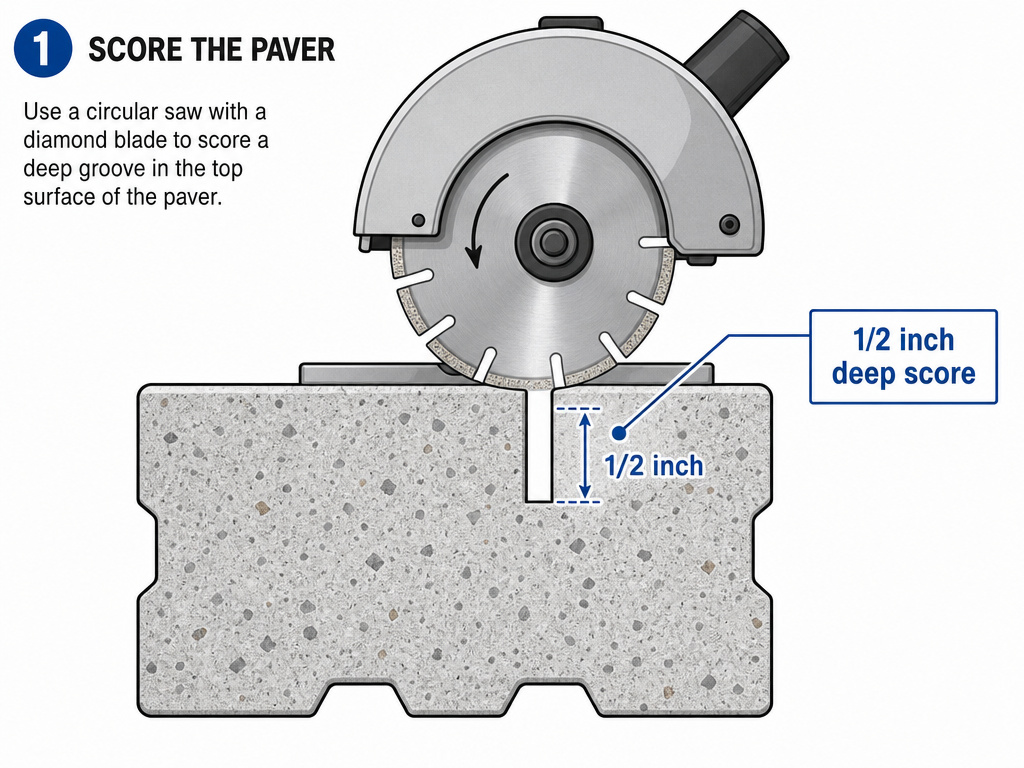
This method works for concrete and brick pavers using a circular saw or angle grinder. It’s a score-and-break technique that minimizes dust and gives you control.
For a score-and-break method on concrete or brick pavers, Bob Vila recommends setting the blade to cut 1/2 inch deep. This creates a deep score line without overworking the blade or kicking up excessive dust. Cutting deeper than needed increases friction and heat.
Step 2: Score the Front. Align the saw blade with your marked line. Start the saw and let it reach full speed before contacting the paver. Using light pressure, guide the saw along the entire line. Don’t force it. You’re scoring, not plunging through.
Step 3: Flip and Score the Back. Turn the paver over. Carefully align the blade with the marked line on the opposite side. Repeat the scoring cut. You now have a deep groove on both faces.
Step 4: Snap the Paver. Move the paver to the edge of your work surface, aligning the scored line with the edge. For smaller pavers, a sharp, downward blow with your hand may snap it. For thicker ones, place a brick-set chisel in the groove and tap with a hammer. It should break cleanly along the scored line.
Step 5: Dress the Edge (If Needed). The broken edge may have a slight burr. Use the edge of your diamond blade or a masonry rubbing stone to lightly smooth it. Don’t overdo it; you just want to remove any sharp protrusions.
How to Cut Porcelain Pavers
Porcelain is a different beast. It’s incredibly hard and dense. Landmark Ceramics states that cutting 20mm porcelain is “very different than cutting standard thickness tiles.” The standard score-and-break method will shatter it.
You must use a professional wet saw and a high-quality blade specific for porcelain. The water isn’t a suggestion; it’s critical to cool the blade and minimize ceramic powder.
Here’s the practical synthesis for DIYers:
- Set Up a Wet Saw. Ensure the water pump is working and spraying directly on the blade at the cut point.
- Use a Porcelain Blade. Install a continuous-rim, porcelain-rated diamond blade.
- Make a Shallow Scoring Pass (Optional). If you’re nervous, you can make a very light, 2-3mm deep scoring groove first, as Landmark Ceramics suggests as an alternative method.
- Make the Final Cut in One Pass. Do not stop halfway. With steady, even pressure, feed the paver through the blade in a single, smooth motion. Let the blade do the cutting; forcing it generates heat and increases chip-out.
Common mistake: Stopping mid-cut on porcelain. The blade heats up, the porcelain stresses, and when you restart, it often chips or cracks along the cut line.
Saw Maintenance and Blade Care
A clean saw is a reliable saw. The MK-1080 manual is explicit: clean the machine after each use and never spray water around the electric motor or switches.
After a wet cutting session:
- Flush the System. Run clean water through the blade guard tubes for one minute to clear sediment and prevent clogs.
- Clean the Table. Remove slurry and debris from the cutting table and tray.
- Lubricate Pivot Points. Apply light machine oil to any friction points, like the cutting head pivot shaft. DO NOT OIL THE MOTOR.
- Check the Blade. Inspect for wear or diamond segment damage. A dull diamond blade can sometimes be resharpened by making several passes through an abrasive material like a soft cinder block—with plenty of water.
How to Make Multiple Passes for a Deeper Cut
For cuts deeper than your blade can handle in one go, a step-cutting method is required. The manual for a common paver saw explicitly lists STEP cutting as a permitted operation, describing it as making cuts with incremental depth adjustments. To do this, mark your line clearly on all sides of the paver. Make your first pass at a partial depth, then raise the blade, advance the material, and lower it to the same depth for the next segment. Repeat this process, gradually increasing the cut depth with each full pass along the line until you cut through. Always use abundant water to cool the blade and control dust during this multi-step process.
How to Cut Curves or Radii with a Saw
Cutting a smooth curve requires a different approach than a straight line. You cannot simply turn the paver against the blade on a stationary saw. Instead, use the blade like a pencil to trace the curve. For a handheld angle grinder, this means carefully guiding the spinning blade along your marked line, making a series of small, connected straight cuts or gently sweeping motions to approximate the curve. For a bench saw, you slowly rotate the paver itself against the fixed blade, feeding it at a consistent pace. In both cases, brace the paver securely so it cannot shift, and make the cut in one continuous, controlled motion where possible to avoid chipping.
Cutting in Place vs. On a Bench: Pros and Cons
Cutting pavers where they are laid saves moving heavy materials and can be faster for long, straight runs in a finished patio. However, you must absolutely brace the surrounding pavers to prevent movement during the cut, as any shift can ruin the cut or damage the blade. For smaller units like block pavers, a bench saw is often the better choice. A bench saw holds the paver firmly in a vise or clamp, providing superior stability and safety for precise cuts. This secure setup is crucial for the controlled, one-pass cutting motion recommended for hard materials like porcelain, where a steady feed rate is key to a clean finish and preventing breakage.
Frequently Asked Questions
What is the best tool to cut pavers with?
For most DIYers cutting concrete or brick, a circular saw with a diamond blade is the best balance of power, control, and cut quality. For porcelain or natural stone, a wet tile saw is required. For high-volume work, a dedicated paver saw like the MK-1080 is the professional choice.
Can you cut pavers with a regular circular saw?
Yes, but only with the correct blade. You must swap out the standard wood-cutting blade for a diamond masonry blade. Using a wood blade will destroy it instantly and likely shatter the paver.
How do I cut pavers without a saw?
For a small number of soft clay brick pavers, you can use a hammer and chisel. Score a 1/16-inch deep groove along all sides with a cold chisel, then place a brick-set chisel in the groove and strike to split it. This is impractical for concrete or stone.
Why does my blade keep binding or overheating?
Binding is usually caused by a shifting paver or forcing the cut too fast. Overheating is from a lack of water (on a wet saw) or a dull blade. Stop, ensure the paver is clamped, check your water flow, and let the blade cool. A new blade should be broken in with slow, light cuts for the first few passes.
Before You Go
The difference between a clean install and a hack job comes down to respecting the material. Concrete and brick forgive a little; porcelain does not. If you remember nothing else, remember this: silica dust is a carcinogen, and water is your friend.
For your next project, if you’re moving from pavers to a slab, our guide on cutting concrete with a circular saw covers the deeper cuts and reinforcement you might hit.
