
How to Use a Bench Buffer to Polish Metal: Step-by-Step
This post contains affiliate links. As an Amazon Associate, we earn from qualifying purchases.
To use a bench buffer to polish metal, you follow a three-stage progression: start with a coarse compound and firm pressure, then a medium compound with lighter pressure, and finish with a fine compound under very light pressure. The buffer must be bolted to a bench, the wheel must rotate correctly at the top, and your hands must stay in the safe contact zone below the spindle. Skipping any stage or breaking the safety rules can ruin the finish, overheat the metal, or throw the workpiece at speeds over 80 mph.
That speed and pressure recipe isn’t a suggestion. It’s the physical boundary between a controlled finish and a runaway accident. The Surface Feet Per Minute (SFPM) formula tells you exactly where that boundary is for your wheel and motor, and it’s the single most ignored number in the manual. Understanding how to use a bench buffer to polish metal correctly depends on respecting this limit.
What follows is the exact sequence from the manufacturers’ manuals, including where they disagree on how to use a bench buffer to polish metal, laid over the zone diagram every buffer’s safety label should have but doesn’t. You’ll get the three-step polish, the two mandatory tools for small parts, and the one wheel maintenance trick that stops contamination cold.
Key Takeaways
- Always secure the buffer to a workbench and verify the wheel’s rotation direction; Foredom and Eastwood advise the top should spin toward you, while Sealey defines a safe contact zone between 7 and 8 o’clock.
- Maintain your workpiece in the safe contact zone between the 7 and 8 o’clock positions on the wheel’s face.
- Dedicate specific buffing wheels to specific compounds to prevent cross-contamination and embedded scratches.
- Follow the three-stage polish progression (initial, intermediate, final) with decreasing pressure and speed each step.
- Wear appropriate hand protection; Eastwood mandates tight-fitting leather gloves, while Sealey advises safety gloves. Also wear a face shield and a dust mask, as buffing wheels eject material at over 80 mph.
Before You Start: The Non-Negotiable Safety Rules
This isn’t about being careful. It’s about geometry and physics. An Eastwood manual states buffing motors spin over 3,000 rpm and can eject material at speeds of up to 80 mph. Your reflexes are not that fast.
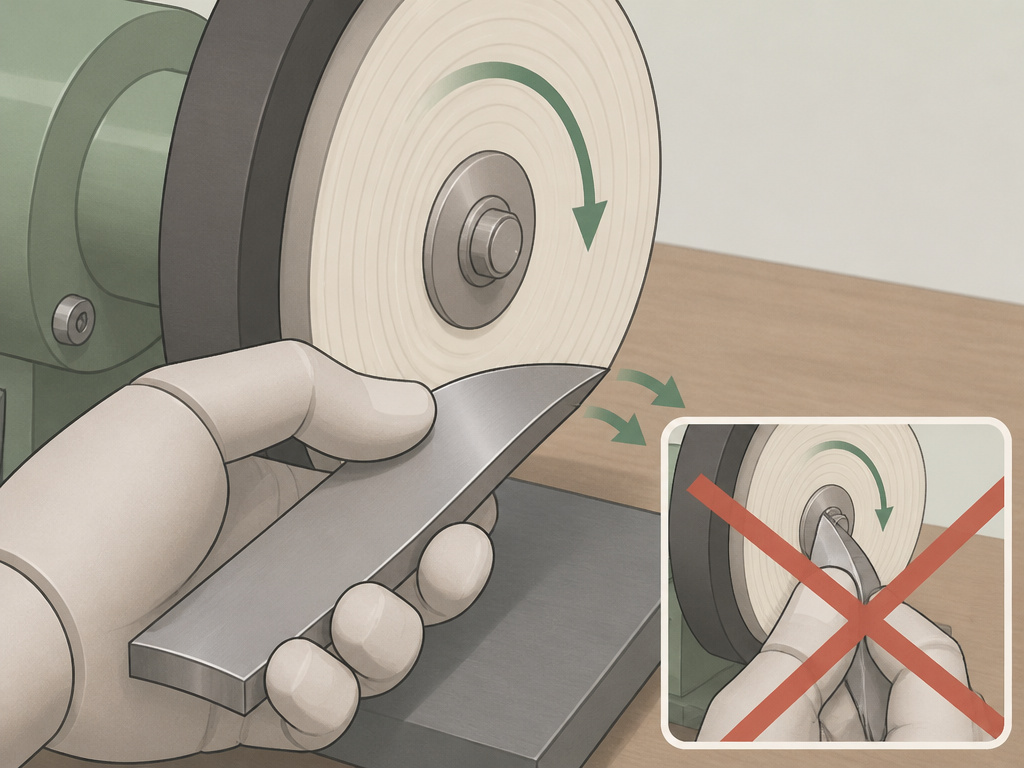
The part nobody mentions: Your hands go between the 7 and 8 o’clock positions on the wheel face. Contact outside the 6 to 9 o’clock quadrant risks the workpiece being snatched and thrown.
According to the Sealey manual, that’s the safest contact position. The Foredom and Eastwood guides agree the wheel’s top should rotate toward you. This aligns the rotation so the wheel pushes the workpiece down into your support hand, not up and out of your grip.
- Eye/Face Protection: Safety glasses or a face shield. Not optional.
- Respiratory Protection: A properly fitting dust mask. The fine metal and compound dust is a lung hazard.
- Hand Protection: Here’s a source conflict. Eastwood mandates tight-fitting leather gloves. The Sealey manual says to wear safety gloves. Leather is the consensus pick for its heat resistance and grip if a workpiece gets hot.
- Workspace: Bolt the polisher securely to a workbench using its base holes. Maintain ample clear space around it. Ensure the four motor ventilation paths are clear.
Understanding Your Bench Buffer & Wheels
You’re not just spinning a wheel. You’re managing surface speed, pressure, and a dedicated tool path. First, we should clarify this point.
A bench buffer and a bench grinder are cousins, not twins. A grinder uses rigid abrasive wheels for shaping; a buffer uses compliant cloth or felt wheels with applied compounds for finishing. You can convert a grinder, but you need the right spindle adapters and a lower RPM. For this guide, we assume a dedicated buffer like a Sealey BB1502 or BB2002.
The Surface Feet Per Minute (SFPM) is the speed of the buffing wheel’s outer edge. It determines cutting efficiency and heat generation. The formula is: SFPM = (wheel diameter in inches) x (motor RPM) x 0.262.
That formula, from the Foredom guide, is your control lever. A smaller wheel on the same spindle runs slower. This matters because cutting compounds need higher SFPM, while final polishing needs lower speeds to avoid burning the finish.
Choosing & Mounting Buffing Wheels
Your choice of wheel is as specific as your choice of sandpaper grit. You need a separate wheel for each stage of compound.
| Wheel Type | Best For | Common Grit/Compound Pairing |
|---|---|---|
| Coarse Cotton (Closely-stitched) | Initial cut, removing scratches | Emery, coarse greaseless compounds |
| Fine Cotton (Loosely-stitched) | Intermediate coloring & polishing | Tripoli, medium polishing compounds |
| Felt or Sisal Buff | Final finishing, high-luster | Rouge, fine finishing compounds |
Mounting is critical. As per the Eastwood guide, sandwich the wheel securely between flange washers. The Sealey manual specifies placing a spacer over the axle shoulder, then the wheel between clamp rings, secured with the hexagon nut. Tighten it enough to grip without crushing the wheel, rotation will naturally tighten the nut further. The stitching orientation doesn’t affect performance.
For small pieces that are hard to hold, the Foredom guide recommends using hand vises or wedge clamps. Never hold a small part with your fingers near the wheel.
The Step-by-Step Polishing Process (3-Stage Progression)
Here is the sequence, adapted from the BuffPro/Nuvite three-step instructions. It assumes you’ve already cleaned the metal and removed any deep scratches with sanding or filing.
Stage 1: Initial Cutting & Compounding
This stage removes fine scratches and prepares the surface.
- Apply Compound: Apply 1-2 lines of compound, each about 7 inches long, to the wheel, and spread it over an area approximately 24 to 36 inches square. The Eastwood guide advises gently touching the compound stick to the wheel face for 1-2 seconds, slightly below the centerline.
- Spread Compound: With the buffer at its lowest speed, spread the compound evenly over your work area.
- Polish: Increase the buffer speed. The BuffPro/Nuvite guide specifies 5-6 on the speed control dial for initial polishing. Apply firm pressure.
- Work the Area: Keep the workpiece moving in long, overlapping passes. Continue until the polish is mostly gone, typically 2-3 passes.
- Clean: Wipe the surface down with a rag and mineral spirits to remove all residue before moving to the next stage.
Where this goes sideways: Using the same wheel for the next compound stage without cleaning the metal first. The coarse compound left on the part will scratch it under the finer wheel, embedding grit you’ll never get out.
Stage 2: Intermediate Polishing
This stage begins to develop the shine and remove marks from the first stage.
- Switch to a dedicated, cleaner wheel meant for intermediate compounds.
- Apply your chosen intermediate compound (like a Nuvite C-grade) using the same 1-2 line method.
- Increase speed to 3-4 on the speed control dial.
- Apply medium pressure, lighter than the initial stage.
- Make 1-2 passes until the compound disappears.
- Wipe clean with mineral spirits.
Stage 3: Final Finishing
This stage brings up the full mirror luster.
- Switch to your finest, dedicated finishing wheel.
- Apply a very small amount of fine finishing compound (like Nuvite S-grade).
- Set the speed to a maximum of 1-2 on the speed control dial. This low speed is crucial to avoid generating heat.
- Apply very light pressure. Let the wheel and compound do the work.
- Use only 1-2 up-and-down motions.
- Wipe clean with a fresh, soft cloth.
Technique: Pressure, Angle, and Motion
This is where feel takes over from the manual on how to use a bench buffer to polish metal. The conflicting advice on pressure is instructive. BuffPro says “firm pressure” for initial cutting. Eastwood says “use minimum pressure against the wheel.” They’re both right for their context.
Firm pressure during the initial cut stage ensures the compound bites into the metal surface. Minimum pressure is the rule for every other stage, especially final finishing, to avoid overheating. Use firm pressure for initial cutting, medium pressure for intermediate polishing, and very light pressure for final polishing.
The correct angle is mandatory. Always present the workpiece so the wheel runs off the edge, never into an edge. Feeding an edge into the rotation can catch and violently kick the piece back toward you. For flat surfaces, keep the workpiece flat to the wheel. For edges, tilt the piece so the rotation sweeps off the side.
Your motion should be smooth, continuous, and overlapping. Never stop the buffer in one spot on the workpiece, the friction will generate intense heat in seconds, discoloring the metal or damaging the finish.
Troubleshooting Common Bench Buffing Problems
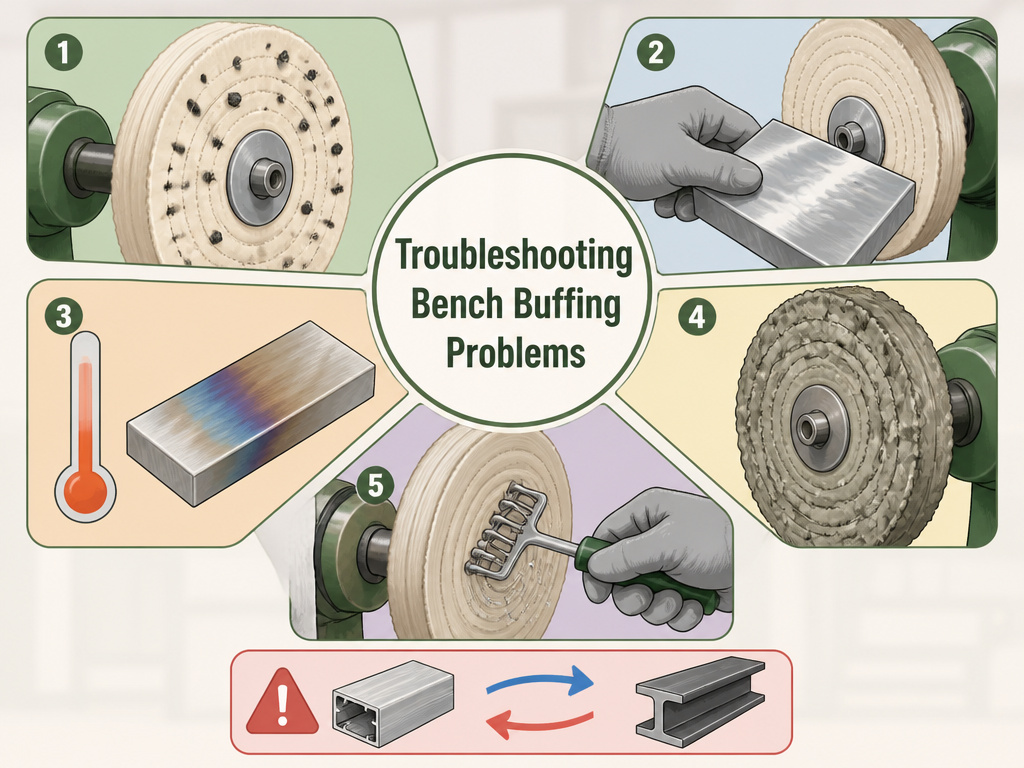
Even following the steps, things go wrong. Here’s how to diagnose the usual suspects.
| Problem | Likely Cause | Fix |
|---|---|---|
| Swirl Marks or Fine Scratches | Contaminated wheel (coarse grit in fine wheel), skipping grit stages, or not cleaning between stages. | Use dedicated wheels. Follow the grit progression. Clean the workpiece with mineral spirits after each stage. |
| Uneven, “Wavy” Finish | Uneven pressure, holding the piece in one spot too long, or a warped/worn wheel. | Maintain even, light pressure and keep the piece moving. True up or replace the wheel. |
| Workpiece Overheating (Discoloration) | Speed too high, pressure too great, or dwelling in one spot. | Reduce speed (especially for final polish), use lighter pressure, keep the workpiece moving. |
| Compound “Caking” on Wheel | Applying too much compound, using a compound incompatible with wheel type. | Apply compound sparingly (1-2 sec contact). Use a wheel rake to clean the wheel. |
| Poor Cutting Action | Wheel is glazed (loaded with metal/compound), SFPM too low, or compound is spent. | Dress the wheel with a buffing wheel rake to open the surface. Check your SFPM. Reapply compound. |
Easy to miss: Galvanic corrosion. The Sealey manual warns to avoid polishing dissimilar metals (like aluminum and steel) with the same buffing wheel. The transferred metal particles can react and corrode the next piece you work on.
Buffer & Wheel Maintenance
A buffer is a simple machine, but neglect guarantees poor results. After each use, especially when changing buffing compounds, you need to clean your setup.
- Clean the Wheels: Use a wheel rake or a stiff brush to remove loaded metal and old compound. For a deep clean, specialized solvents can break down grease-based compounds. Our guide on how to clean buffing wheels walks through the best methods.
- Inspect the Wheels: Look for tearing, uneven wear, or hard glazed spots. A worn wheel won’t run true and will give an uneven finish.
- Motor Maintenance: Keep ventilation paths clear. If the motor fails to start after heavy use, worn motor brushes might be the cause, as noted in an Eastwood manual.
- General Check: Ensure all bolts are tight, the power cord is intact, and the tool is stored in a dry place.
Understanding buffing wheel types helps here, knowing whether you have a sisal, cotton, or felt wheel tells you how it should wear and when it’s truly done.
How to Attach a Buffing Wheel
Mount the buffing wheel securely between flange washers or clamp rings. Place a spacer over the axle shoulder first, then sandwich the wheel between the clamp rings, and secure the assembly with the hexagon nut. Tighten the nut enough to grip the wheel firmly without crushing it; the rotation of the wheel during operation will further tighten the nut. Ensure the top of the wheel is set to rotate toward you and down. This orientation is critical for safe control, directing any force downward and away from your body.
How to Clean Metal Before Polishing
Thoroughly clean the metal surface before it touches the buffing wheel. Any dirt, grease, or previous polishing compound left on the workpiece will contaminate the wheel, embedding debris that can scratch the metal during the next stage. Use a solvent like mineral spirits to wipe down the surface and remove all oils. For small pieces, secure them with hand vises or wedge clamps during cleaning to ensure you can handle them safely and reach all areas. A clean start prevents cross-contamination and is the only way to achieve a true, scratch-free finish.
Frequently Asked Questions
Can I use a bench grinder as a buffer?
Yes, but with caveats. You need to ensure the RPM is appropriate (often lower than grinding RPM), and you must use the correct spindle adapters to mount buffing wheels. Our article on using a bench grinder covers its primary functions, but the conversion requires specific, safe accessories.
What’s the difference between polishing and buffing?
Polishing generally refers to the earlier stages that remove material and scratches using abrasives. Buffing is the final stage that uses very fine compounds to bring up the shine and luster. In practice, the terms are often used interchangeably, but the process is a progression from one to the other.
What goes first, buffing or polishing?
You polish first to prepare the surface, then buff to finish it. It’s a continuum: initial polishing (cutting), intermediate polishing (coloring), final buffing (finishing).
How do I polish intricate or hard-to-reach areas?
Bench buffer is for external, convex surfaces. For intricate work, inside curves, or small details, you need a flexible tool. A rotary tool with small polishing attachments is the right choice for those jobs.
The Bottom Line
Using a bench buffer correctly is a dance with three partners: the right wheel, the right compound, and the right pressure for each stage. Bolt it down, gear up in leather and a face shield, and keep your hands at 7 o’clock. The machine’s manual gives you the steps, but your attention gives you the control.
One rule to consider is retiring wheels that have become contaminated or worn from multiple compounds. The cost of a new wheel is trivial compared to the hours you’ll spend trying to salvage a finish ruined by embedded, cross-contaminated grit. Start clean, follow the progression, and let the wheel’s rotation do the work, your job is just to guide the metal through the safe path it creates.
