
Rotary Tool Speed Settings Guide
This post contains affiliate links. As an Amazon Associate, we earn from qualifying purchases.
Rotary tool speed is set by first matching the material’s hardness and melting point, then adjusting for the accessory size and task. For common materials, Dremel and other manufacturers recommend high speeds (above 20,000 RPM) for hardwoods, metals, and glass, and low speeds (15,000 RPM or less) for plastics, polishing, and wire brushing. The exact setting depends on your specific tool model, as a Dremel 8220’s “15” setting corresponds to 13,000–17,000 RPM, while a Harbor Freight model’s lowest setting is 8,000 RPM.
That gap between a numbered dial and the actual revolutions per minute is where most guides stop. They tell you “low for plastic, high for metal,” but they don’t explain why a Harbor Freight manual insists you always start at the lowest RPM, while Dremel’s guide for the 8220 says most jobs can be done at the highest setting. Both statements are in their official manuals. The difference isn’t a mistake, it’s a clue about motor design and real-world safety that changes how you should use any rotary tool, corded or cordless. This is the core insight a rotary tool speed settings guide must provide.
What follows is a breakdown of speed rules grounded in eight different manufacturer manuals, a comparison table to cut through conflicting advice, and a diagnostic section for when your work starts melting, chattering, or burning. You’ll leave knowing not just what number to dial, but why that number works and how to adjust it on the fly without breaking your tool or your project, thanks to a detailed rotary tool speed settings guide.
Key Takeaways
- Set speed by material first: high RPM for hard materials (wood, metal, glass), low RPM for soft, low-melting-point materials (plastic, polishing).
- Always consult your specific model’s manual; a Dremel 8220’s “15” equals 13,000–17,000 RPM, while a generic “high” might mean 35,000.
- Never change speed while the tool is in contact with your workpiece unless your tool’s manual explicitly states it is safe to do so; this rule varies by brand.
- Inspect carbon brushes every 40-50 hours of use; worn brushes (under 3mm) cause power loss and can permanently damage the motor.
- For cordless tools, expect real-world RPM to drop under load; the no-load speed on the box is a best-case scenario, not a guarantee.
The Core Rule: Material First, Then Accessory
Forget the dial for a second. The first decision is always the material in front of you. Is it hard and dense, or soft and prone to melting? Manufacturer charts all agree on this hierarchy, even if their starting speed recommendations differ.
Before you start: A rotary tool spins at up to 35,000 RPM. Always wear ANSI Z87.1-approved safety glasses. Never remove the guard. Secure small workpieces in a vise or clamp. The bit can grab and spin the piece, or your hand, in a fraction of a second.
The principle is simple, as any rotary tool speed settings guide will confirm: hard materials need high speed to cut cleanly; soft materials need low speed to avoid heat damage. Dremel’s manuals state wood and iron or steel should be cut at high speed. For plastics and other materials that melt at low temperatures, they explicitly say to use low speeds. This isn’t just about efficiency, it’s about preventing a ruined project. Run a plastic trim piece at 30,000 RPM, and you’ll smell a sharp, chemical burn before you see the melted, gummy edge.
The other half of the rule is the accessory. A large-diameter sanding drum has more surface area and creates more friction than a tiny engraving bit. That’s why the Aircraft Spruce and The Home Depot manuals for WEN tools include a universal warning: “As a general rule, larger attachments should be used at a lower speed.” A big accessory at high speed can vibrate out of control, overheat, or shatter.
| Material | Recommended Speed | Why This Speed | Common Tasks |
|---|---|---|---|
| Plastic, Acrylic | Low (8,000–15,000 RPM) | Prevents melting from friction heat. | Cutting, trimming, smoothing edges. |
| Polishing (Felt Wheel) | Low (≤15,000 RPM) | High speed flings compound off the wheel and burns the material. | Polishing metal, plastic, bringing up a shine. |
| Wire Brushing | Low (≤15,000 RPM) | Prevents wires from breaking off the brush at high centrifugal force. | Cleaning rust, deburring metal, surface prep. |
| Hardwood, Metal, Glass | High (20,000–35,000 RPM) | High speed maintains cutter sharpness and prevents chatter. | Cutting, carving, drilling, engraving. |
| Grinding (Stone) | Medium-Low (10,000–20,000 RPM) | High speed generates excessive heat, causing the stone to glaze over or disintegrate. | Sharpening, shaping, removing material. |
How to Adjust Speed on Different Rotary Tool Models
You know what speed to use. Now, how do you set it? This is where the “guide” part gets specific. A dial numbered 1–10 doesn’t mean the same thing on every tool.
On a Dremel 8220, the numbers correlate to specific RPM ranges. Setting “5” means 5,000–7,000 RPM. Setting “30” means 28,000–35,000 RPM. This is detailed in the Dremel 8220 manual. On a Harbor Freight Rotary Tool (Model 68696), the dial is variable, with the lowest speed being 8,000 RPM and the highest hitting 35,000 RPM. The manual for that model adds a crucial, specific warning: “Do not change the speed while the Rotary Tool is working. Remove Tool from workpiece before adjusting speed.”
Here’s the conflict. The Kogan manual agrees with Harbor Freight: “Do not change the speed while the tool is operating.” Who’s right? Both are, for their tools. Many Dremel models have electronic feedback systems that allow for smooth speed changes under load. Many budget tools do not. The safe rule of thumb is to follow your specific manual. If you don’t have it, adopt the stricter rule: stop, adjust, then restart.
The “Start Low” vs. “Start High” Debate
This is a perfect example of where sources disagree, and you need to know both sides. The Harbor Freight manual is adamant: “Always start work at the lowest RPM setting (8,000 RPM).” The Dremel 8220 manual states the opposite: “Most jobs can be accomplished using the tool at the highest setting.”
Where this goes sideways: Assuming one rule applies to all tools. If your generic rotary tool lacks a soft-start circuit, kicking it on at full speed can cause the accessory to jerk or jump. If you’re using a delicate bit in a Dremel with electronic monitoring, starting too low can make it chatter and snap.
The compromise is procedural. For any new tool, do a test run on scrap. Start at the mid-point of the speed range. Feel and listen. If the tool strains or the accessory vibrates, increase the speed. If the material shows signs of melting or burning, decrease it. This method is mentioned in the Aircraft Spruce manual: “The best way to determine the suitable speed is to test on a scrap piece of similar material.”
Speed Settings for Common Tasks (Beyond Cutting)
Most searches are for cutting metal or wood. But rotary tools spend half their life grinding, sanding, and polishing. The speed rules shift here.
Polishing and Buffing: This is a unanimous low-speed operation. Dremel, WEN (via Aircraft Spruce and The Home Depot manuals), and Kogan all state that polishing with felt wheels or bobs requires speeds at or below 15,000 RPM. The reason is control. High speed turns polishing compound into a projectile and overheats the surface, leaving a cloudy finish. For polishing metal with a rotary tool, start at the low end of your tool’s range as detailed in this polishing guide.
Grinding and Sharpening: Here, moderate speed is key. Manufacturer guides often note that grinding stones should be used at low speed to prevent them from becoming too hot and deteriorating. You want enough RPM to remove material, but not so much that you glaze the stone’s surface. Think 10,000–20,000 RPM, and let the stone’s grit do the work, don’t push.
Wire Brushing: This has a hard ceiling. Dremel’s manuals are explicit: “Do not exceed 15,000 rpm when using wire brushes.” At higher speeds, centrifugal force can snap wires loose, turning them into dangerous, high-velocity projectiles. All brushing applications require this lower speed.
Drilling: This is a high-speed task. Whether you’re drilling metal, wood, or glass, you want the RPMs up. The Kogan manual groups drilling with cutting as a high-speed action. This ensures a clean hole and prevents the bit from grabbing and stalling the motor.
Troubleshooting Speed-Related Problems
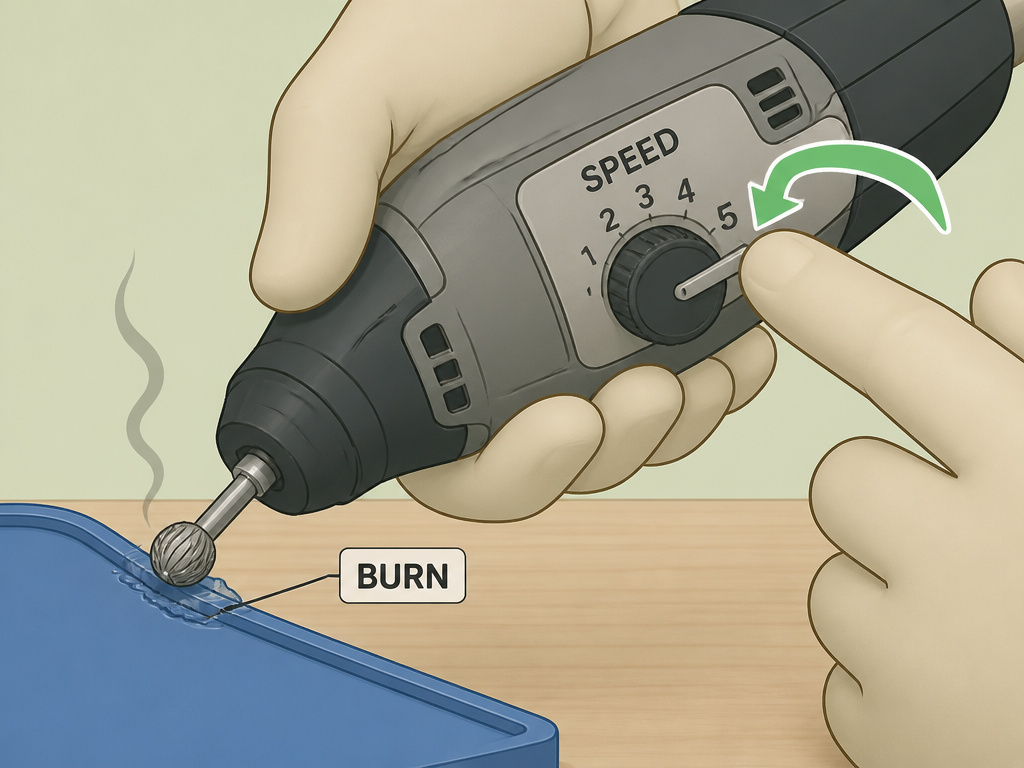
Your speed is set correctly, but something’s wrong. The material is burning, the bit is chattering, or the motor sounds strained. Here’s how to diagnose it.
Problem: Melting or Burning Plastic/Smell
- Likely Cause: Speed too high.
- Fix: Drop the speed immediately. Refer to your manual’s low-speed range. For plastics, the Aircraft Spruce manual advises “slow speeds… to prevent damaging the material.”
- Why: Friction generates heat. Plastic has a low melting point. Even a slightly high RPM creates heat faster than the material can dissipate it.
Problem: Vibration or Chatter (Especially with Cutting Bits)
- Likely Cause: Speed too low, or a dull bit.
- Fix: Increase the speed. Dremel’s manual includes a specific diagnostic: “If a high speed steel cutter starts to vibrate, it usually indicates that it is running too slowly.”
- Why: A cutting bit needs enough rotational force to cleanly slice through material. Too slow, and it bounces off the surface instead of biting in.
Problem: Tool Slows Down Under Pressure or Sounds Labored
- Likely Cause: Overloading the tool, or voltage drop (for corded tools).
- Fix: Ease up on the pressure. Let the tool do the work. For corded tools, check your extension cord; a long, thin cord can cause voltage drop, which the Bosch manual notes will “slow the RPM of the tool.”
- Why: Rotary tools are high-speed, low-torque devices. Pushing hard doesn’t cut faster, it bogs the motor, generates heat, and wears out the carbon brushes.
Common mistake: Changing accessories without checking the collet. A loose collet causes wobble, vibration, and inaccurate work. The Kogan manual recommends you “periodically check the tightness of your collet chuck, especially during prolonged use of the same accessory.”
Maintaining Your Tool for Consistent Speed Performance
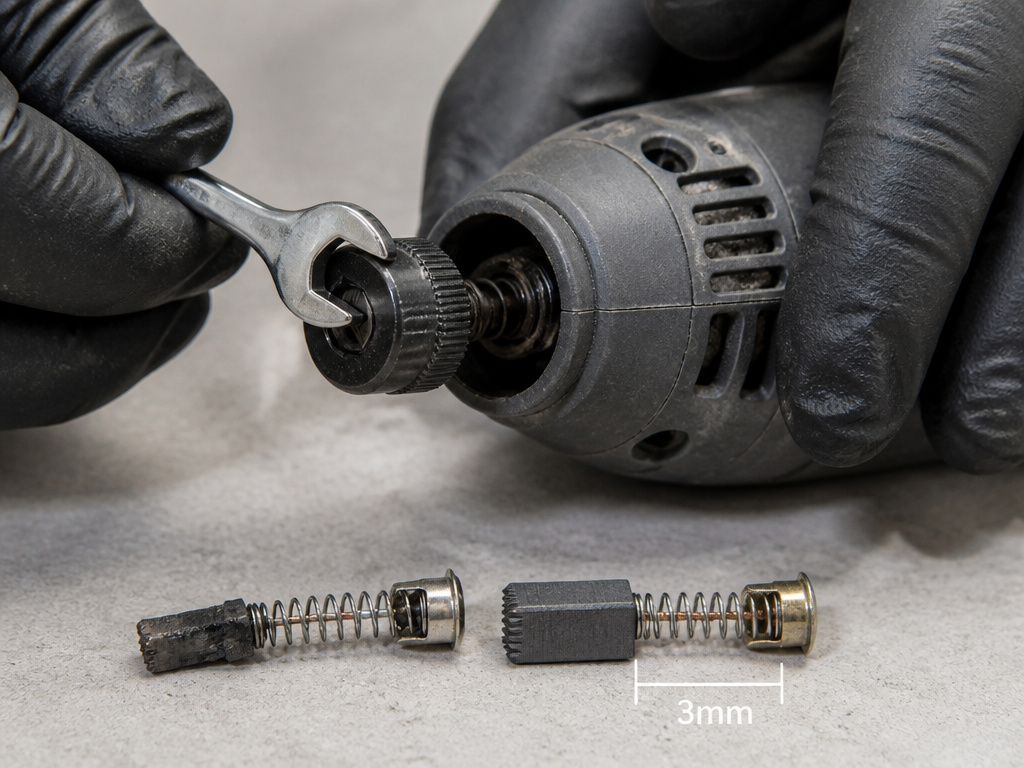
A well-maintained tool holds its speed. A neglected one will lose power and overheat. The most critical maintenance task is inspecting the carbon brushes, the small carbon blocks that transfer electricity to the motor’s armature.
Dremel’s manual for the 3000/4250 models specifies: “Inspect the brushes for wear every 40-50 hours of use.” It also states to replace them “if a brush is less than 3mm long.” Using the tool with worn brushes damages the motor’s commutator, leading to permanent failure. The process is simple: unplug the tool, remove the brush caps with the wrench, pull out the springs and brushes, inspect, and replace if needed.
The other key maintenance is keeping the tool clean. Dust is the enemy. The Harbor Freight manual instructs: “Periodically blow dust and grit out of the motor vents using dry compressed air.” It adds a vital safety note: “Wear ANSI-approved safety goggles and NIOSH-approved breathing protection while doing this.” Clogged vents cause the motor to overheat, which can trigger thermal protection shutdowns on better tools or simply cook the windings on cheaper ones.
What speed should I use for cutting metal?
Cutting iron or steel should be done at high speed according to manufacturer guidelines. This principle generally extends to other dense metals like aluminum. Using a high speed helps maintain a clean cut and prevents the tool from bogging down. If you notice a high-speed steel cutter starting to vibrate, this is often a sign it is running too slowly and needs more power. Always begin at the speed recommended by your tool’s manual, some advise starting at the lowest RPM, while others state most jobs can be done at the highest setting, then adjust as needed for the actual cutting. Never change the speed setting while the tool is in contact with the workpiece.
What do collet sizes mean for my accessories?
Collets are the small chucks that grip your bits and accessories in the rotary tool’s shaft. Their size, measured in inches or millimeters, dictates which shank diameters they can hold. Common collet sizes include 1/8 inch (3.2 mm), 1/16 inch, and 3/32 inch. You must match the accessory’s shank size precisely to one of your tool’s available collets for a secure fit. Using an undersized accessory in a large collet will cause wobbling and can be dangerous. Periodically check the tightness of your collet chuck, especially during prolonged use, to ensure the accessory remains firmly locked in place.
Frequently Asked Questions
How do I adjust the speed on my Dremel?
Most Dremel models use a rotary dial or a sliding switch on the body of the tool. Turn the dial or slide the switch to a higher number for higher speed, a lower number for lower speed. Consult your specific model’s manual for the exact RPM each setting represents; for example, on a Dremel 8220, setting “20” equals 18,000–23,000 RPM.
What is the best Dremel speed for cutting metal?
For cutting iron or steel, Dremel recommends high speed. On a tool like the Dremel 8220, this would be settings “25” (23,000–27,000 RPM) or “30” (28,000–35,000 RPM). Always use a cutting disc designed for metal, not a grinding disc, and refer to a guide on how to cut metal with a rotary tool for technique.
What is the speed range of the Dremel rotary tool?
It varies by model. The corded Dremel 3000 runs at a fixed 33,000 RPM. The Dremel 4250 runs at 35,000 RPM. The cordless Dremel 8220 has a variable range from 5,000 RPM at its lowest setting to 35,000 RPM at its highest. Always check the specifications for your specific model number.
Is there a PDF guide for rotary tool accessories?
Yes, most manufacturers provide PDF manuals online that include accessory speed charts. Dremel includes them in the “Operating Speeds” section of its manuals. You can often find these by searching for your tool’s model number followed by “manual PDF.” For a general overview of rotary tool bits and their uses, our accessory guide breaks it down.
Can I use a flex shaft at high speed?
Yes, but with caution. A flex shaft attachment introduces more points for vibration and friction. When using a flex shaft attachment for rotary tools, it’s wise to stay at the middle of your speed range for control (see the flex shaft pros and cons guide). The Dremel manual for the 8220 notes that when using a new flexible shaft, you should “keep it in a vertical position for two minutes with the tool running at high speed” to distribute the lubricant inside.
The Bottom Line
Rotary tool speed isn’t a mystery. It’s a direct equation: hard material + small bit = high RPM; soft material + large bit = low RPM. The numbers on the dial are just a reference, your real guides are the sound of the motor (a steady whir, not a labored groan) and the condition of your workpiece (clean cuts, no melting).
One rule overrides all others: if your tool’s manual says “do not change speed while operating,” obey it. That’s the line between a useful adjustment and a broken gearbox. For everyone else, the electronic feedback in modern tools makes variable speed control a live dial you can tweak as you work (learn more about variable speed control).
Start your next project at the speed your manual recommends, but treat that as a baseline. Your ear and your nose are the final judges, if something smells hot or sounds wrong, stop. Dial it back. That pause is cheaper than a new tool or a trip to the clinic.
