
How to Finish Wood on a Lathe: The Three Layers Explained
This post contains affiliate links. As an Amazon Associate, we earn from qualifying purchases.
To finish wood on a lathe, follow this sequence: sand thoroughly up to at least 800 grit, choose a finish based on the item’s use (oil for food-safe, shellac for decorative, lacquer for durable), apply it while the piece is spinning, and then buff the cured finish to your desired sheen. The lathe’s rotation lets you apply finishes quickly and evenly, eliminating sags and dust.
That sequence sounds straightforward, and it is. But the distance between a decent finish and a professional one is hidden in the details between those steps, the sanding speed that ruins your paper, the oil choice that never dries, the buffing compound that leaves a ghostly white haze on dark wood. Knowing how to finish wood on a lathe is key. Those are the points where a project succeeds or fails, and they’re almost never in the spec sheet.
What follows is the walk-through most guides skip: a universal workflow from raw turning to final polish, the specific lathe speeds and grit progressions from woodturners’ associations, and the diagnostic fixes for when your understanding of how to finish wood on a lathe goes sideways.
Key Takeaways
- The Central Virginia Woodturners recommend sanding at 500 to 700 rpm, while the Gulf Coast Woodturners recommend 800-1000 rpm for buffing.
- Always sand in the 6 to 9 o’clock position on faceplate work; centrifugal force throws a grabbed cloth or paper away from you.
- Never use White Diamond buffing compound on dark, porous woods like Walnut; it leaves a permanent white residue in the pores.
- For food-safe items like bowls, use mineral oil, 100% tung oil, or certain linseed oils; always check boiled linseed oil for toxic added driers.
- A sanding sealer can be mixed from 60% lacquer and 40% lacquer thinner, it fills grain and creates a uniform base for the top coat.
The Three Layers of a Good Finish
Think of a finish in three distinct jobs. The first layer is preparation: sanding, filling grain, and sealing. The second is protection: the actual film or oil that soaks in and shields the wood. The third is presentation: buffing and polishing that film to the shine you want. Miss a layer in how to finish wood on a lathe, and the job looks amateurish. Get them right, and the wood does the talking.
A light coat of lacquer thinner, applied under bright light, will make scratches and tool marks visible. Do this before application of the finish, to check the effectiveness of your sanding.
That’s from the Central Virginia Woodturners guide. It’s a pro trick. After you think you’ve sanded perfectly, wipe the piece with thinner. The wood will flash-dry, and every hidden scratch will glare back at you under a work lamp. It’s a brutally honest inspection that saves you from applying finish over a flawed surface.
Preparation: Sanding, Filling, Sealing
Your finish is only as good as the surface underneath it. A glossy coat over tool marks just makes shiny tool marks.
Start your sanding at 150 or 240 grit, depending on how smooth your tool work left the surface, following a proper sanding progression. The goal is to remove all visible rings and ridges. Then move up through the grits without skipping more than one step. Skipping grits leaves deeper scratches that the next, finer paper can’t reach.
Here’s where speed matters. The Central Virginia Woodturners recommend sanding at 500 to 700 rpm. Go faster, and you’ll generate heat that glazes the wood and loads the paper with melted pitch. You’ll also feel the paper getting hot against your fingers, a sure sign you’re burning through it. A piece of sponge or leather between your fingers and the paper protects against that heat.
| Sanding Stage | Goal | Common Mistake |
|---|---|---|
| Initial (150-240 grit) | Remove all tool marks | Starting too fine, leaving deep scratches |
| Intermediate (320-400) | Refine the surface | Skipping grits, creating a “scratch cocktail” |
| Final (600-800+) | Polish the wood cells | Sanding at high RPM, burning the surface |
Wet-sanding can save a piece where dry sanding fails, especially on tricky end grain. Dampen the wood with the same oil you plan to use as the final finish and sand to create a slurry. The slurry acts as a lubricant and a mild filler. Just know that raising the grain with water means you must let the piece dry completely and then lightly re-sand with the final grit once it’s dry.
Filling pores is optional but critical for a glass-smooth surface on open-grained woods like oak or ash. The traditional approach uses rotten stone for dark woods and pumice for light woods, mixed with oil. For a modern shortcut, a sanding sealer (like a 60% lacquer, 40% lacquer thinner mix) seals the surface so your top coat doesn’t sink in unevenly.
Protection: Choosing and Applying the Finish
This is the “it depends” part everyone finds overwhelming. Simplify it by asking one question: what will this item endure? Your answer slots you into one of four finish families.
For food-safe items (salad bowls, cups): You need a non-toxic, renewable oil. Mineral oil is the simplest. Pure, 100% tung oil is durable but check the label, “pure” tung oil can take weeks to cure. Boiled linseed oil dries faster but often contains metallic driers that are not food-safe; you must verify with the manufacturer.
For decorative objects (pens, bottle stoppers): Durability against handling is key. A friction polish (homemade from equal parts shellac, boiled linseed oil, and denatured alcohol) or a CA glue finish delivers a hard, shiny coat that stands up to pocket wear.
For items with moderate wear (chair legs, table pedestals): You need more film strength. Wiping varnishes (oil-based polyurethane thinned with mineral spirits) or multiple coats of shellac build a protective layer that can handle scuffs.
For high-wear, durable items (kitchen table legs): A sprayed lacquer or catalyzed varnish is the only finish that will hold up to years of shoe kicks and chair scrapes.
Application is where the lathe shines. For oils and wiping finishes, apply the first coat with the lathe off for good penetration. Then, spin the lathe to a moderate speed and hold a folded paper towel or clean rag against the wood. The friction heats and drives off solvents, leaving a smooth, level coat almost instantly. Never use a cloth rag you’ve wrapped around your finger, if it catches, the lathe will win. Use small pieces of paper towel that will tear before they can drag you in.
Presentation: Buffing and Polishing the Final Coat
A finish isn’t done when the last coat dries. It’s done when you’ve polished out any dust nibs and achieved the sheen you want. This step requires patience, you must let the finish fully cure. For polyurethane, that’s at least 24 hours between coats and sufficient time after the final coat before you touch it with abrasives.
Buffing systems like the Beall system use three wheels: Tripoli (for cutting), White Diamond (for polishing), and Carnauba Wax (for final seal). According to the Gulf Coast Woodturners finishing guide, you should run these wheels at 800-1000 rpm. When loading the Tripoli wheel, 5-10 seconds of contact with the abrasive stick is adequate. Overloading gums up the wheel.
Common mistake: Buffing before the finish is fully cured. The wheel will drag and mar the soft surface, forcing you to sand back to bare wood and start over.
For a hand-rubbed luster, you can use abrasive pastes. But heed a critical warning from the Central Virginia Woodturners finishing guide: do not use White Diamond compound on Walnut or any dark, porous wood. The fine white abrasive embeds in the pores and won’t come out, leaving a permanent greyish cast. On dark woods, stick to brown Tripoli or a pure wax.
Lathe Speed and Safety for Sanding
The safe zone isn’t a suggestion. When sanding faceplate work, keep your hands and abrasives between the 6 and 9 o’clock positions. This ensures that if your paper or rag gets grabbed, centrifugal force throws it down and away from you. If you sand above the centerline, that same force can pull the material, and your hand, up and into the spinning workpiece or chuck.
Speed is your control. For sanding, 500-700 rpm is the sweet spot. For applying friction polishes or burnishing oil, a moderate speed generates the right heat. For buffing with a system like Beall’s, 800-1000 rpm is recommended. Always let the finish dictate the pace. Rushing a polyurethane coat at high speed just throws sticky finish everywhere and creates a mess.
If you’re learning to use a wood lathe, this safety habit is as fundamental as wearing eye protection. It turns a potentially dangerous catch into a minor annoyance.
The Art of French Polishing
French polishing is the mountain peak of finishing, immensely rewarding, notoriously labor-intensive. It’s not a product but a technique of building up countless micro-coats of shellac and oil. The Woodturners Guild of Ontario document lays out the marathon timeline: 12 to 15 sessions over two weeks to a month.
The workpiece must first be sanded to at least 600-800 grit. Then, you build a base coat over 6-8 “bodying sessions” using shellac. Allow 3-4 hours between sessions for the shellac to set. After building the base, set the piece aside for 2-3 days to harden. The final polishing sessions use a 1-pound cut of shellac. After the last session, you set the piece aside for 1-2 weeks to fully harden before a final light polish.
Why would anyone do this? The depth and clarity are unmatched by any spray or wipe-on finish. It’s the technique used on fine guitars and heirloom furniture. For a turner, it transforms a simple bowl into a legacy piece. It’s also completely repairable, a new coat of shellac will melt into and repair scratches years later.
Matching Finish to Project Type

This decision table cuts through the noise. It’s the answer to “what should I use?” based on what you’ve made and what it needs to withstand.
| Project Type | Recommended Finish | Why It Works | Dry/Cure Time |
|---|---|---|---|
| Salad Bowl, Cutting Board | Mineral Oil, 100% Tung Oil | Food-safe, renewable, no toxic driers | Oils soak in; tung oil cures in days to weeks |
| Pen, Bottle Stopper, Small Decorative | Friction Polish, CA Glue | High-gloss, durable against handling | Seconds to minutes (friction polish); minutes (CA glue) |
| Vase, Candlestick, Art Piece | Shellac, Wax | Easy application, beautiful warmth, repairable | Shellac dries in minutes; wax sets in hours |
| Chair Leg, Table Pedestal | Wiping Varnish, Oil-Based Polyurethane | Good film strength, resists scuffs | 4-6 hours dry, 24 hours between coats |
| Kitchen Table Base, Child’s Toy | Spray Lacquer, Catalyzed Varnish | Maximum durability, chemical resistance | Lacquer dries in minutes; full cure in days |
The “right sandpaper grit” you start with feeds directly into this choice. Choosing the correct grit is essential. An oil finish shows every sanding scratch, demanding a progression up to 800 grit or higher. A thick film finish like polyurethane can hide minor flaws, so you might stop at 400 grit.
Troubleshooting Common Finishing Problems
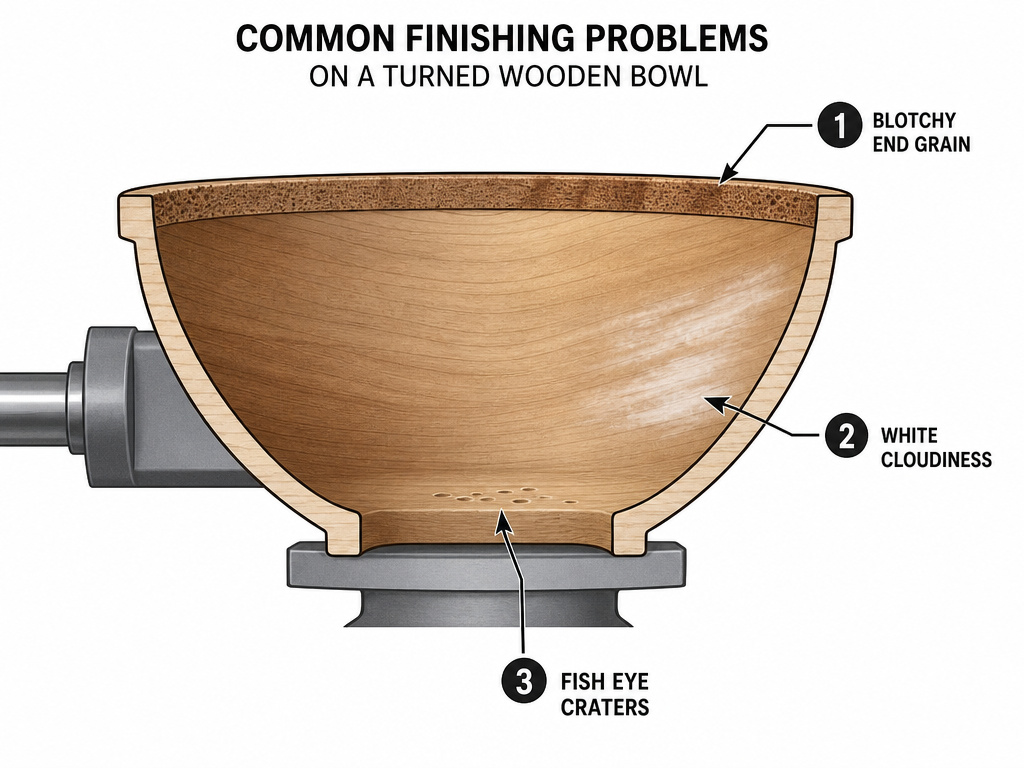
You followed the steps, and something looks wrong. Here’s the quick diagnosis guide.
Blotchy or uneven sheen: The surface wasn’t uniformly sanded. End grain absorbs more finish than side grain, appearing darker. Solution: apply a sanding sealer to the entire piece before the top coat, or pre-treat end grain with a 1:1 thinner/finish mix.
White rings or cloudiness (on shellac or lacquer): Usually caused by moisture trapped under the finish, often from applying over damp wood or in high humidity. Solution: lightly sand the cloudy area and apply a new coat of finish. Sometimes a coat of thinner can re-melt the finish and clear it.
Fish eyes (craters in the finish): Silicone contamination is the usual culprit, hand lotion, furniture polish, or even some sanding sealers. Solution: clean the piece thoroughly with mineral spirits or naphtha, then sand lightly and reapply finish. In severe cases, a fish-eye eliminator additive is needed.
Streaking with friction polish: Applying too much polish at once, or using a dirty rag that’s partially cured. The polish gums up and drags. Solution: use fresh paper towel for each coat, apply thinner coats, and maintain steady pressure.
Gummy, non-drying finish: You might have used pure tung oil, which can take weeks to cure, or applied a new coat over an insufficiently dry previous coat. High humidity also drastically extends drying times for finishes like polyurethane. Solution: be patient. Ensure ventilation and warmth. If it’s still tacky after a week, you may need to strip it and start over.
Where this goes sideways: Applying a water-based finish over an oil-based stain or sealer without proper sealing. The water raises the grain and the underlying oil bleeds through, creating a sticky mess that never fully dries.
This is why you must test your finish schedule on a scrap piece from the same wood. It’s cheaper than ruining a completed project, like a bowl turning project.
What brands or products should I use
Specific brands are less critical than understanding the job each product does. For food-safe items like bowls, use mineral oil, pure tung oil, or certain linseed oils, but always check that no toxic driers have been added. For a durable finish on items subject to scuffs, a lacquer is needed. When applying a buffing compound, avoid using White Diamond on dark, porous woods like walnut as it will leave a white residue. The key is to match the product’s purpose to your project’s use, whether that’s decoration, handling, or wear.
Frequently Asked Questions
What is the easiest finish to apply on a lathe?
For a beginner, a simple oil finish like mineral oil or a commercial “turning finish” like Mylands is the easiest. Apply it with a rag while the lathe spins at a low speed. There’s no build-up to worry about, no runs, and it’s forgiving. For a bit more sheen, a friction polish (equal parts shellac, boiled linseed oil, denatured alcohol) dries in seconds under friction and gives a nice gloss.
Can I use polyurethane on a lathe?
Yes, but it requires a different technique. Apply a thin coat with a rag or brush with the lathe off. Then, spin the lathe at a low speed and hold a clean, dry paper towel lightly against the spinning piece to smooth out the finish and remove excess. You must allow a full 24 hours between coats for it to cure, and buffing should wait at least a week after the final coat.
How do I finish a turned bowl that will hold food?
Use a food-safe, non-toxic finish. The standard is mineral oil, applied generously, wiped off, and reapplied monthly. For a more durable option, pure tung oil (verified to have no additives) is excellent. Avoid standard boiled linseed oil and any film-forming finish like polyurethane or lacquer, as they can chip into food.
Why does my finish look scratched after I buffed it?
You either started buffing before the finish was fully hard, or you used a buffing compound that was too aggressive. If the finish was soft, the buffing wheel dragged and created swirls. If the compound was wrong, it cut through the top coat. Sand out the scratches with a fine grit (1000+), let the finish cure further, and rebuff with a lighter touch and a finer compound.
Before You Go
The one rule that reframes all the others: sanding is not a separate chore. It’s the first and most critical coat of your finish. A perfectly applied gloss over a 400-grit surface is a shiny disappointment. A simple oil over an 800-grit surface can look like glass. Your time is better spent on the sanding sequence than on any fancy finishing product.
For your next project, whether it’s learning to turn a pen or tackling a bowl, commit to the full grit progression. Let the piece tell you when it’s ready. Then match the finish to the job, apply it with the lathe’s help, and give it the cure time it demands. That’s the difference between a finished piece and a finished piece of work.
