
How to Use a Milling Machine: Step-by-Step for Beginners
This post contains affiliate links. As an Amazon Associate, we earn from qualifying purchases.
Using a milling machine requires matching three things: the right cutting tool for the operation, the correct speed and feed for your material, and a workpiece secured so rigidly it becomes part of the machine. Skip any one, and you risk a broken tool, a ruined part, or injury. The process is a sequence of setup, measurement, and controlled material removal.
That sequence starts long before the spindle turns. You’ll spend more time making fixtures and measuring than you will cutting metal. The flattest surface on your raw stock becomes your reference point for every other measurement; understanding how to use a milling machine begins here. Machine that away first, and you’re lost.
What follows is the foundation for how to use a milling machine: the essential safety rules from the manufacturer manuals, the step-by-step walkthrough of a basic facing operation, and the specific warnings that turn a dangerous machine into a predictable tool. By the end, you’ll know how to approach your first cut, not just which lever to pull.
Key Takeaways
- Secure mounting is the first cut. A machine that rocks on the bench will chatter, ruin finishes, and break tools. The Harbor Freight 33013 manual mandates a stable, level workbench.
- A drill chuck cannot hold an end mill. Using the included drill chuck for side milling is a guaranteed way to snap a cutter or eject it from the spindle. You need collets or end mill holders.
- Speed kills cutters, feed kills finishes. Let the cutter bite rather than rub.
- Workholding is everything. As the Sherline manual notes, you’ll often spend more time on fixtures than machining.
- Know your machine’s limits.
The Non-Negotiable Safety Setup
Before you touch a handwheel, the machine’s environment decides your safety margin. This isn’t just about wearing glasses; it’s about the floor, the power, and the machine’s own defined boundaries.
The Tormach 1500MX operator’s manual is blunt: you need a continuous slab sufficient to support the machine’s weight, accessories, and additional equipment. The space must be dry, well-lit, and ventilated. For a benchtop mill like the Harbor Freight 33013, the requirement shifts to a stable workbench away from moisture and dust, with enough room for the table to travel fully. Both manuals agree on one physical cue: if the machine can rock, even slightly, your first project becomes leveling the feet.
Before you start: The spinning cutter throws hot, sharp chips in a wide arc. Safety glasses are mandatory, but so is proper clothing, no loose sleeves, gloves, or jewelry that can be pulled into the spindle. Long hair must be tied back.
Power is the next checkpoint. The Harbor Freight 33013 runs on a standard 120V, 60Hz, 4.5A circuit. Trying to run either on undersized wiring or a shared circuit with other high-draw tools will trip breakers and can damage the machine’s motor drivers. Check your manual for the exact electrical requirement before you plug it in.
Finally, know what your machine is not for. The Tormach manual explicitly states its intended use excludes machining materials that are abrasive, flammable, toxic, or produce fine particulates. That list includes magnesium, beryllium alloys, and fiberglass (G10). Your benchtop mill has similar, if less formal, limits. Pushing past them isn’t brave; it’s how you start a fire or fill your lungs with something you can’t get out.
| Safety Standard | Haas Automation Compliance | Tormach 1500MX Compliance | What It Means for You |
|---|---|---|---|
| OSHA 1910.212 | Compliant | Compliant | The federal “general requirements” rule for all machines, covering point-of-operation guarding. | | Setup Mode Limits | Not Specified | Max 700 RPM, 2 m/min feed with doors open | When doors are open for setup, machine capabilities are severely restricted for operator safety. |
Head, Spindle, Table, and Controls
You don’t need to memorize every part, but you must speak the language of the three axes and the one spinning component that does the work. The truth is, if you can’t identify the quill from the knee, you’re not ready to make chips.
On a vertical mill, the head houses the motor and the spindle. The spindle is the tapered shaft that holds your cutting tool. The table moves in the X (left-right) and Y (in-out) axes. The knee moves the entire table assembly up and down (Z-axis) for major height adjustments, while the quill is a smaller, hand-cranked sleeve within the head for fine depth control during drilling or precise milling.
The spindle taper is the critical interface. Common tapers for hobbyist machines are R8 (used on the Harbor Freight 33013 and many Bridgeport clones) and BT30 (used on the Tormach 1500MX). You cannot mix them. An R8 tool holder will not fit a BT30 spindle, and forcing anything here damages the precision mating surfaces permanently.
Your controls are simple: a lever or switch for spindle direction (forward, reverse, stop), a dial or pulley system for speed selection, and handwheels for moving the table and quill. Each handwheel is calibrated, often in small increments such as thousandths of an inch. A full turn moves the table a specific distance, which varies by machine. Learning to read these dials is more fundamental than relying on a digital readout (DRO) from day one. It builds the feel for how much material you’re actually removing.
Clamps, Vises, and Making the Part Stay Put
If your workpiece moves, everything else is a waste of time. The forces in milling are side-to-side and upward, not just downward like in a drill press. Your workholding must counteract that.
A dedicated milling machine vise is the first and best investment. As the Sherline manual points out, a drill press vise is not designed for these forces. A milling vise has a movable jaw that pulls downward as it tightens, locking the part against the solid base. This prevents the workpiece from lifting during a cut. For your first projects, a milling vise of an appropriate size for your machine is a versatile choice.
I learned this the hard way trying to face a block of aluminum in a cheap drill press vise. Halfway through the cut, the part lifted, the end mill dug in, and snapped with a sound like a gunshot. The block shot across the shop. A $150 milling vise would have saved a $40 end mill and a change of pants.
For larger or irregular shapes, you clamp directly to the table using T-slots. You use step blocks, clamps, and studs to secure the work. The rule here is to clamp as close to the workpiece as possible, and support any overhang to prevent vibration and deflection.
| Workholding Method | Best For | Critical Tip |
|---|---|---|
| Milling Vise | Rectangular blocks, repetitive parts. | Always tap the part down with a soft hammer after tightening to seat it fully. |
| T-Slot Clamps | Large plates, odd shapes, castings. | Use a parallel or step block under the clamp’s heel to avoid tilting the clamp. |
| Double-Sided Tape | Extremely thin, flat parts where clamps aren’t possible. | Only for very light finishing cuts. Not for real milling. |
| 4-Jaw Chuck | Round stock needing milling operations. | Mount the chuck to an angle plate or sub-plate first for stability. |
End Mills, Collets, and Why a Drill Bit Doesn’t Work
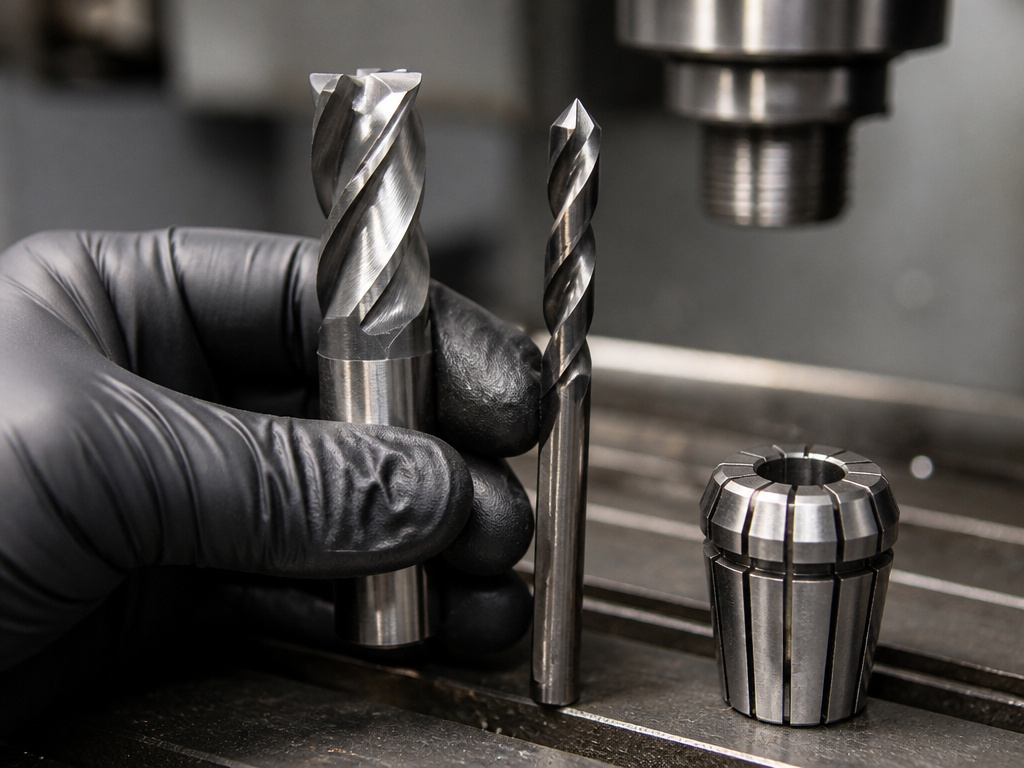
The Harbor Freight 33013 manual could not be clearer: “DO NOT USE A DRILL BIT IN PLACE OF AN END MILL.” A drill bit is designed to cut only at its pointed tip, plunging straight down. The side flutes are not strong enough to withstand the lateral forces of milling. Trying it will snap the bit, likely damage your workpiece, and could eject shrapnel.
For milling, you use end mills. They cut with their sides and often their ends. They are held by collets or end mill holders that fit your spindle’s taper (R8 or BT30). The included drill chuck is only for drilling operations.
- Collets are shorter, offering more vertical clearance under the spindle. They grip the entire shank of the tool uniformly. They’re less expensive but can wear out over time.
- End Mill Holders are longer and more rigid, letting the cutter get closer to the table. They secure the tool with a setscrew against a flat on the shank.
Choosing the right end mill comes down to material and operation. For aluminum and other soft metals, a 2-flute end mill is standard. The larger flute space allows for better chip evacuation. For steel and brass, a 4-flute end mill is better, providing a smoother finish because each flute takes a smaller cut. Always opt for center-cutting end mills for versatility, they can plunge like a drill and mill from the side.
Where this goes sideways: Overtightening the drawbar that holds your collet or holder. The Harbor Freight manual warns to make it “snug in the spindle threads, but do not overtighten.” Cranking it with a cheater bar can strip the threads inside the spindle. That’s a several-hundred-dollar repair. Hand-tight, plus a firm additional turn with the wrench to make it snug, is enough.
Tramming, Squaring, and Touching Off
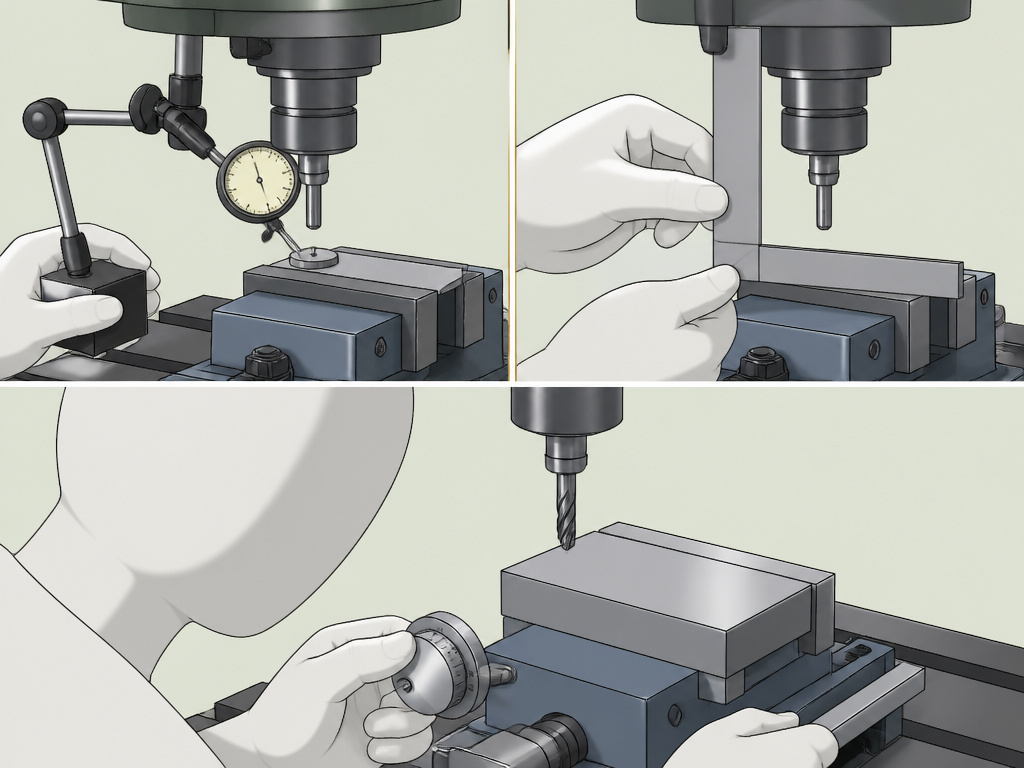
Your machine must be true before your cuts can be accurate. Tramming is the process of aligning the spindle so it is perfectly perpendicular to the table in both the X and Y axes. If the spindle is tilted, you’ll mill a surface that isn’t flat, it will have a slight dome or valley.
You tram using a dial indicator mounted in the spindle. Sweep it in a circle on a known flat surface (like a surface plate) on the table. Adjust the head’s tilt bolts until the indicator reads the same at all points. The Sherline manual notes their dial indicators are calibrated in .001 inch or .01 mm for this exact purpose. Don’t skip this. An untrammed mill can’t make a square part.
“Touching off” is how you set your zero point. You jog the spinning cutter slowly until it just kisses the edge of your workpiece, then set that position as X0 or Y0 on your dials. For the Z-axis, you lower the tool until it just touches the top of the part. There’s a specific feel and sound, a light tick as the tool makes contact, leaving a faint witness mark without taking a real cut. Getting this wrong by even .005 inches means your first pass is either cutting air or digging in too deep.
This is where the real work happens. They’re right.
Your First Cut: A Step-by-Step Facing Operation
Facing is the ideal first operation: you take a rough block of material and mill one flat, smooth surface to use as your primary reference. It uses a face mill or a large diameter end mill, and the cut is straightforward. Follow this sequence.
- Secure and Align the Workpiece. Clamp your material in the vise. Use a dial indicator against the side of the block to ensure it’s parallel to the X-axis of the table. Tap it with a soft mallet to adjust.
- Install and Secure the Tool. Insert a face mill or a 1/2-inch end mill into an appropriate R8 or BT30 holder. Tighten the drawbar snugly.
- Set Spindle Speed and Direction. For aluminum, set the spindle speed to the middle of the machine’s RPM range. Ensure the spindle direction is set to forward (clockwise, when viewed from above).
- Establish X and Y Zero. Touch off the tool on the left edge and front edge of your block. Set your dials to zero.
- Set the Z-Axis Depth. With the spindle off, lower the tool until it just touches the top of the material. Zero your Z-axis dial. Then, raise the quill and lower the knee to set your cut depth, for a facing pass on aluminum, a light cut depth is safe.
- Start the Cut. Start the spindle. With the quill locked, engage the X-axis feed by turning the handwheel at a steady, moderate pace. You should hear a consistent cutting sound, a smooth, sharp hiss. If you hear a chattering brrrrap, stop. The tool is vibrating instead of cutting.
- Feed Across and Step Over. Feed the table across the entire length of the part (X-axis). At the end, stop the feed, raise the tool, move it over in the Y-axis a portion of the cutter’s diameter, and take another pass in the opposite X direction. Repeat until the entire surface is faced.
Common mistake: Taking the entire cut depth in one pass. The Harbor Freight manual explicitly says to “make your cut in several progressive passes.” Trying to remove 1/8 inch at once will overload the motor, deflect the tool, and leave a terrible finish. Two light passes beat one heavy pass every time.
If you see lines or chatter marks, your speed is too high, your feed is too slow, or the workpiece isn’t held tightly enough. Remember the Sherline rule: if the tool chatters, reduce speed and increase feed.
Material Matters: What to Cut (and What to Avoid)
Your choice of material is a bigger variable than your choice of tool. Start with the easy stuff. The Sherline manual’s advice is golden: “Work with aluminum, brass, plastic or cast iron whenever possible.”
6061 Aluminum is the universal starter metal. It’s relatively soft, machines cleanly, and produces manageable chips. Brass is even easier, producing small, broken chips and a beautiful finish. Delrin (Acetal) plastic is excellent for learning; it cuts like butter and doesn’t require coolant.
When you need steel, choose wisely. The manual recommends 12L14 “lead-loy” steel, developed for machinability. It’s about the best material for machining steel parts. Avoid mystery steel from old car parts or hardware stores, it’s often case-hardened or alloyed in ways that will rapidly dull your cutters.
Skip this if: You’re just starting out. Avoid exotic materials like stainless steel, titanium, or tool steel. As the Sherline guide notes, they offer “machining difficulty and poor milling cutter life.” You’ll burn through expensive tooling while learning fundamentals that are better practiced on aluminum.
Also, respect your machine’s rated limits. The Tormach 1500MX is intended for materials below 60 HRC (Rockwell hardness). Trying to mill a hardened tool steel block or a file is a fast way to ruin an end mill. Its manual also prohibits machining magnesium (a fire hazard), composites like G10 fiberglass (abrasive and toxic dust), and graphite (conductive dust that can short electronics).
Maintenance and What “Clean” Really Means
A clean machine is an accurate machine. Chips and coolant residue attract moisture and cause rust. Grit in the ways causes wear and slop in your movements. Maintenance isn’t optional.
After every session, brush or vacuum all chips off the table, saddle, and ways. Never use an air hose to blow chips, it forces abrasive grit into the precision bearings and ways. Wipe down all exposed metal surfaces with a light oil (like WD-40 or a dedicated way oil) to prevent rust. This is especially crucial if you use water-based coolant.
Check the gibs periodically. Gibs are the adjustable strips that take up slack between the sliding parts (like the table and saddle). If you feel excessive play or looseness when you reverse direction on a handwheel, the gibs may need adjustment. This is a delicate process, tighten just enough to remove the play while ensuring the table still moves smoothly without binding.
Lubricate according to your manual. Many benchtop mills have oil ports on the saddle and knee for manual oiling before use. The Tormach 1500MX has a centralized lubrication system that must be kept filled with the specified grease. Running the machine dry guarantees premature and expensive wear.
Finally, listen to your machine. A new, high-pitched whine from the spindle could indicate a bearing issue. A new clunk when reversing table direction suggests a loose leadscrew or nut. Catching these sounds early is the difference between a simple adjustment and a major repair. Trust the feel. If something doesn’t sound or move right, stop and figure out why.
Types of milling machines
The three main categories are vertical, horizontal, and CNC. In a vertical mill, the spindle that holds the cutting tool is oriented up and down, much like a drill press. This is the most common type for general workshop use. A horizontal mill has its spindle oriented sideways, which is often better for heavy cutting and certain types of gear work. CNC mills are controlled by a computer, which follows a programmed set of instructions to move the table and spindle automatically. CNC mills like the Tormach 1500MX are intended for general-purpose machining in educational, hobby, light production, prototyping, R&D, and secondary operations. Regardless of type, the workpiece must be solidly secured for safety and accuracy.
Using power feed
Power feed automates the movement of the machine’s table, providing a consistent rate during a cut. This leads to a better surface finish and reduces operator fatigue on long passes. When engaging power feed, always ensure the workpiece is clamped securely and that there is sufficient travel in the direction of the cut to avoid a crash at the end. On CNC machines, the feed rates are programmed. For manual machines with a power feed unit, set the desired rate before starting the cut. Never engage power feed while the cutter is in contact with the workpiece; start the feed motion just before contact. If the tool chatters, a common fix is to reduce the spindle speed and increase the feed rate.
Frequently Asked Questions
Can you use a milling machine as a drill press?
Yes, absolutely. A milling machine is a superior drill press because the table moves precisely in X and Y, allowing you to position holes with extreme accuracy using the dials. Just remember to use a drill chuck and drill bits, and treat it like a drilling operation, no side loading.
What is climb milling vs. Conventional milling?
In conventional milling, the cutter rotates against the direction of the feed. The tooth starts with zero cut thickness and increases, which can lift the workpiece slightly. In climb milling, the cutter rotates with the direction of feed. The tooth starts with its maximum cut, which pulls the workpiece into the table, offering a better finish on rigid setups. On older machines with backlash, climb milling can cause the workpiece to be pulled violently into the cutter, so conventional is safer for beginners.
How do you calculate speed and feed?
Full formula involves surface feet per minute (SFM) and chip load. For a beginner, use a baseline. For a 1/2-inch 2-flute end mill in 6061 aluminum: try a moderate RPM and a conservative feed rate, adjusting based on the sound of the cut. Let the sound be your guide, a smooth hissing is good; chattering or squealing means adjust.
Why does my end mill keep breaking?
The three most common reasons are: 1) Using a drill chuck instead of a collet, causing tool vibration and slippage. 2) Taking too deep a cut or feeding too fast for the machine’s rigidity. 3) Using a dull tool. A dull end mill requires more force, deflects more, and snaps. Start with light passes and sharp tools.
Is a digital readout (DRO) necessary?
No, but it’s a tremendous quality-of-life improvement. Learning on manual dials builds fundamental skill, but a DRO eliminates mental math, reduces errors, and speeds up setup. It’s an upgrade worth making after you’re comfortable with the basics, not a prerequisite to start.
The Bottom Line
Using a milling machine isn’t about brute force; it’s about precision, preparation, and patience. The machine rewards a methodical approach and punishes haste. Your first project in learning how to use a milling machine shouldn’t be a complex engine part, it should be facing a block of aluminum square and flat. If you can do that consistently, you’ve mastered 80% of the skill.
One rule to walk away with: if you’re ever unsure, make a lighter cut. No manual, video, or forum post can replace the feedback from the machine itself, the sound of the cut, the feel of the handwheel, the look of the chips. That’s the real teacher. Start there, go slow, and the precision will follow.
