
How Does an Impact Driver Work: The Two-Phase Mechanism
This post contains affiliate links. As an Amazon Associate, we earn from qualifying purchases.
An impact driver works by converting the continuous rotation of its motor into rapid, short bursts of rotational force through an internal hammer-and-anvil mechanism. The motor spins a weighted hammer, which cams back against a spring until it slips free and slams into a set of lugs on the output anvil. This impact delivers a high-torque rotational pulse to the bit, repeating up to 4,200 times per minute to drive screws and nuts with far less physical effort than a standard drill.
Most explanations stop at “hammer hits anvil.” The shop-floor truth is that this simple mechanism splits the job into two distinct phases, and missing that distinction is how people burn out motors or break fasteners. To avoid this, you must understand how does an impact driver work.
What follows is a walk through the actual mechanical dance—the two-phase operation, what the specs on the box really measure, and the concrete differences that separate an impact driver from a drill or an impact wrench. You’ll know exactly what’s happening inside the tool the next time you hear that rapid tat-tat-tat.
Key Takeaways
- The hammer-and-anvil mechanism only engages under load, splitting work into a low-torque screwing phase and a high-torque tightening phase.
- Torque builds over time during the tightening phase; for tools like the Bosch AdvancedImpactDrive 18, maximum torque is achieved after an impact duration of 6–10 seconds.
- Impact drivers are not designed to be used as drills; manuals from RYOBI and an unspecified Home Depot model explicitly warn against using them to drill holes, as the hammering action can destroy standard bits.
- For critical fasteners, always check final torque with a mechanical wrench; actual torque varies with thread condition and battery charge.
- Use only impact-rated bits with a 1/4″ hex shank; standard bits can shatter on the first impact.
The Two Phases: Screwing In and Tightening
The Bosch manual for the AdvancedImpactDrive 18 / PDR 18 LI states the working procedure is divided into two phases: screwing in and tightening. This isn’t marketing—it’s the fundamental description of how the tool manages force.
The impact mechanism is activated as soon as the screwed connection runs tight and load is therefore put on the motor. The impact mechanism then converts the power of the motor to steady rotary impacts.
In the first phase, you’re essentially using a compact drill driver. The motor spins the output shaft directly, and the internal hammer is carried along without engaging the anvil. This is the “screwing in” part, where you’re sinking a screw through soft material or running a nut down a clean bolt. It’s quiet, smooth, and controlled.
The second phase begins the moment the fastener meets real resistance. Now the motor is under load. The hammer, driven by a cam or set of ramps, cocks back against a spring. It then slips free and rotates just enough to slam its lugs into the matching lugs on the output anvil. That impact transfers a massive rotational pulse to the bit. The hammer resets, and the cycle repeats up to several thousand times a minute. This is the “tightening” phase, and it’s where the tool earns its name.
The beauty of this system is mechanical advantage, which is central to how does an impact driver work. You’re not fighting the fastener with the steady, limited torque of your own arm and a direct-drive motor. Instead, you’re delivering a series of sharp rotational blows. Each impact helps overcome static friction and thread tension without transferring the same reactive force back into your wrist. It’s why you can drive a 3-inch lag bolt into a stud with one hand while a standard drill would require you to lean into it with your full body weight.
Where This Goes Sideways: Overtightening and Overload
The force of the impact driver can break the fastener, a key part of the how does an impact driver work question. That’s not a suggestion; it’s a direct warning from an unspecified manufacturer’s manual sold at Lowes. Unlike many drills, an impact driver typically does not have a built-in mechanical clutch to disengage at a set torque. It will keep hammering until you release the trigger, something gives way, or electronic overload protection intervenes.
The problem is this. That “something” could be the screw head, the bolt, or the tool’s own motor. Many modern impact drivers have electronic overload protection; for example, the Bosch AdvancedImpactDrive 18 and RYOBI PSBID01 include such systems. The Bosch manual notes that if the tool is overloaded or the permitted battery temperature is exceeded, the electronics will switch off until things cool down. The RYOBI PSBID01 has a similar system: the Li-ion battery pack automatically shuts off the tool if forced or overloaded. To reset it, you release the trigger; if it still doesn’t work, you remove and reinsert the battery.
Impact Driver vs Drill: It’s About the Mechanism
This is the most common point of confusion. You can’t just swap an impact driver for a drill. The manuals are blunt about it. The Home Depot manual states: “The impact driver is not designed to be used as a drill.” The RYOBI manual says the same thing: “Do not use the impact driver as a drill.”
Why? It’s all in the mechanism. A drill delivers smooth, continuous rotation. An impact driver delivers rotational pulses. If you put a standard twist drill bit in an impact driver and try to drill a hole, those sudden pulses will concentrate stress on the bit’s flutes. The bit isn’t designed to handle that kind of shock loading and can break. For drilling, you need the steady force of a drill or a hammer drill, which is a different mechanism entirely for masonry.
| Aspect | Impact Driver | Standard Drill/Driver |
|---|---|---|
| Primary Function | Driving screws, nuts, bolts | Drilling holes, driving screws (with clutch) |
| Torque Delivery | Intermittent, high-torque impacts | Smooth, continuous rotation |
| User Feedback | Reactive torque is minimal; loud tat-tat-tat sound | Reactive torque can twist wrist; steady whine |
| Bit/Bore Compatibility | 1/4″ hex impact-rated bits only | 3-jaw chuck accepts round-shank drill bits & hex bits |
| Best For | Long fasteners, high-torque applications, removing stuck fasteners | Precision drilling, screw driving where overtightening is a risk |
The truth is, I see people using a drill-bit adapter in their impact driver all the time. I see people using a drill-bit adapter in their impact driver all the time. It almost guarantees a broken bit. The adapter introduces play, and the hammering action can find weak points in the bit or adapter. If you need to drill, use a drill.
The Specs That Matter: RPM, IPM, and What They Measure
When you look at a spec sheet, you’ll see two key numbers: RPM (Revolutions Per Minute) and IPM (Impacts Per Minute). They measure different things, and confusing them leads to wrong expectations.
- RPM is the rotational speed of the motor before the impact mechanism engages. It’s the speed during that initial “screwing in” phase.
- IPM is the maximum rate at which the hammer can strike the anvil when the mechanism is fully engaged in the “tightening” phase.
A model sold at Home Depot lists a no-load speed of 0-2,900 RPM and an impact rate of 0-4,200 IPM. The Makita TD002G breaks it down by mode: Max impact mode runs 0-3,700 RPM / 0-4,600 IPM, while a Soft impact mode runs 0-1,100 RPM / 0-1,400 IPM. The IPM is often higher than the RPM because the hammer can cycle faster than the motor rotates under load.
Common mistake: Assuming higher IPM means more torque. It doesn’t. IPM is the frequency of blows, not their force. Torque is determined by the mass of the hammer, the force of the spring, and the design of the cam. A tool’s torque is determined by factors like hammer mass and spring force, not solely by its IPM rating.
Modern impacts offer multiple speed and impact settings for control. A common feature is a self-tapping mode, designed to reduce screw stripping. The Home Depot manual explains it: the driver starts fast to drive the fastener through the workpiece and then slows the speed to finish. This is a smart electronic assist, but it’s still an impact mechanism at its core.
How Impact Driver Torque Works (and Why It’s Unreliable)
An impact driver’s torque isn’t a single number you can set. It’s a curve. The Bosch manual provides the crucial detail: “Maximum torque is achieved after an impact duration of 6–10 seconds.”
For tools like the Bosch AdvancedImpactDrive 18, you pull the trigger, and torque builds as impacts stack up. After an impact duration of 6–10 seconds, maximum torque is achieved. The manual adds that after this duration, “the tightening torque is increased only minimally.” Continuing to hammer after maximum torque is achieved increases heat generation and risks damage, as the Bosch manual notes the torque increases only minimally beyond that point.
| Time (Seconds) | Torque Accumulation | User Action |
|---|---|---|
| 0-3 | Torque builds rapidly as impacts overcome initial friction. | Hold tool steady, let it work. |
| 4-10 | Nearing maximum torque for the joint and conditions. | Listen for change in sound; be ready to release. |
| 10+ | Plateau reached; minimal torque increase, maximum heat generation. | Release trigger. Further impacting risks fastener or tool damage. |
This is why the same manual, and the Harbor Freight manual, insist: “The actually achieved tightening torque is always to be checked with a torque wrench.” The Harbor Freight text is explicit: “The amount of actual torque will vary depending on the cleanness and condition of the threads and other factors.” If you’re building a deck or working on a vehicle, final-torque with a manual wrench isn’t optional—it’s how you ensure the joint is safe.
Choosing and Using the Right Bits and Accessories
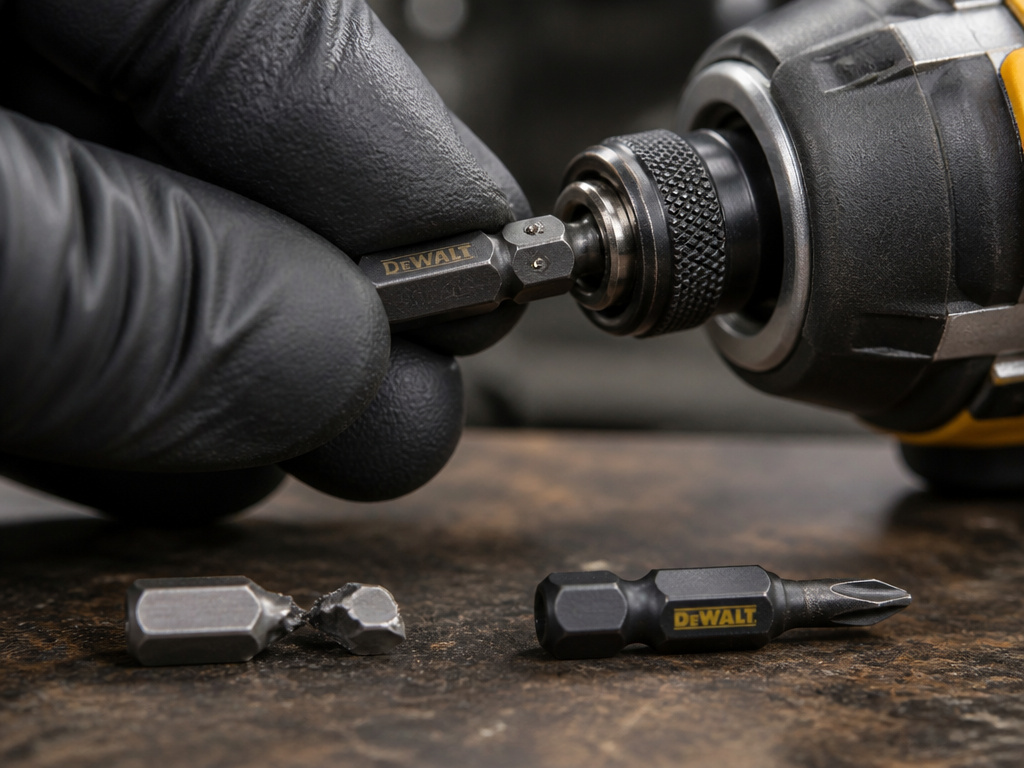
The collet is a 1/4-inch hex quick-change system. It only accepts bits with a 1/4″ hex shank. The Bosch manual is specific: “Use only screwdriver bits with ball catch (DIN 3126-E6.3).” This standard refers to the retention dimple on the side of the bit shank. It’s not just about fit; it’s about safety. A bit without positive retention can fly out under the violent reversals of the impact cycle.
- Impact-rated bits: These are made from tougher, more ductile steel (often S2 alloy) and are heat-treated to withstand the shock loads. They are a must.
- Standard bits: Made from harder, more brittle steel. They will snap. Don’t use them.
- Socket adapters: Use impact-rated socket adapters. A standard chrome adapter can crack under impact loads.
When using an impact driver, the right accessory is the difference between a job done in seconds and a trip to the store for a new bit. I learned this the hard way early on, snapping what I thought was a “good” bit on the first stubborn bolt. The fragments can be dangerous, and it was a loud, expensive lesson. Use only impact-rated bits with the tool.
Manual vs. Powered Impact Drivers
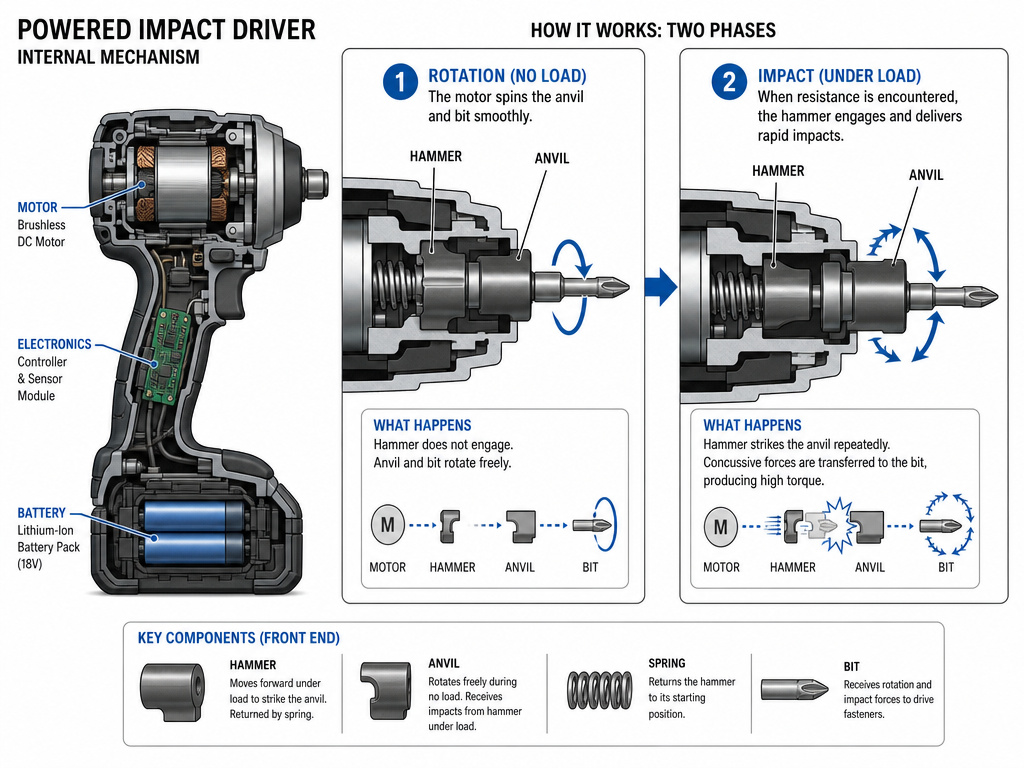
The core job is the same: driving fasteners. A manual impact driver is a hand tool you strike with a hammer to break loose a stubborn screw. A powered impact driver uses a motor and a battery. Its internal mechanism works in two phases. First, it spins the bit to screw in the fastener. Then, when the connection runs tight and puts load on the motor, the impact mechanism activates. This creates a series of concussive, rotational blows to deliver high torque for tightening. The powered tool handles this entire cycle, replacing your arm and a hammer with consistent, rapid impacts.
Frequently Asked Questions
Can I use an impact driver as a regular drill?
No. Manufacturer manuals from RYOBI and others explicitly warn against it. The hammering action is not designed for drilling and will likely break standard drill bits. Use a drill for drilling holes.
Why would I use an impact driver instead of a drill?
Use an impact driver when you need high torque with low physical effort, like driving long screws into dense wood, driving lag bolts, or removing rusted nuts. The impact mechanism greatly reduces the reactive torque felt by the user, making it easier on your wrists.
What do RPM and IPM mean on an impact driver?
RPM (Revolutions Per Minute) is the rotational speed of the motor during the free-spinning “screwing in” phase. IPM (Impacts Per Minute) is the maximum rate at which the internal hammer strikes the anvil during the “tightening” phase. A higher IPM doesn’t necessarily mean more torque.
Do I need special bits for an impact driver?
Yes. You must use impact-rated bits with a 1/4″ hex shank. They are made from tougher steel to withstand the shock loads. Standard bits can shatter dangerously.
Before You Go
The real secret to an impact driver isn’t just the raw power—it’s understanding the two-phase rhythm. Listen to it. The initial whirr is the motor doing the easy work. The moment you hear that first sharp crack, the hammer has engaged. From there, torque builds; for some tools, maximum torque is achieved within a matter of seconds.
If you remember one thing, make it this: for any joint where failure means danger or damage, put down the impact driver once the fastener is snug and finish with a calibrated torque wrench. The tool gets you 95% of the way there with incredible speed and ease. That last 5% is where precision lives, and that’s a job for your hands and a simple, reliable tool. That’s the difference between assembling something and building it right.
