
How to Change a Circular Saw Blade: Step-by-Step
This post contains affiliate links. As an Amazon Associate, we earn from qualifying purchases.
To change a circular saw blade, disconnect all power, engage the arbor or spindle lock, loosen the center bolt, remove the outer washer and old blade, clean the mounting surfaces, install the new blade with teeth facing the direction of rotation, replace the washer, tighten the bolt, and disengage the lock.
That last point about thread direction is where people get hung up, and it’s not their fault. You’ll find two DeWALT saws in the same lineup with opposite instructions. This isn’t a matter of guessing; it’s printed in the manual, and getting it wrong means you’re tightening when you think you’re loosening. Knowing how to change a circular saw blade correctly depends on this detail.
What follows is the full breakdown of how to change a circular saw blade: the universal safety steps that never change, the model-specific quirks that do, and how to handle the common snags like a stuck bolt or a balky spindle lock.
Key Takeaways
- Disconnect ALL power sources, unplug corded saws and remove the battery from cordless ones, before touching the blade. This is the one step you never, ever skip.
- Thread direction is model-specific. The DeWALT DCS570B manual says turn counterclockwise to loosen; the DCS391 manual says turn clockwise to loosen. Always check your saw’s manual first.
- Tighten the clamping bolt to 6–9 Nm, which Bosch defines as hand-tight plus a quarter-turn. Over-tightening strips threads and makes future changes a nightmare.
- The blade teeth must face the rotation arrow on the saw’s guard. Installing it backwards is a fast track to a ruined cut and a dangerous kickback.
- Engage the arbor or spindle lock before loosening the bolt, but never press the lock button while the blade is spinning. That’s a sure way to break the locking mechanism.
Safety First: The Non-Negotiables
This isn’t scare talk. A circular saw blade coasting after a cut still spins at several thousand RPM. Your first move is always to make sure it can’t spin at all.
Start by removing the energy source. For a corded saw, unplug it from the wall. For a cordless model, take the battery pack out. I don’t care if you just used it and the trigger is safe; a battery seated in the tool is a live circuit. The Sharper Image manual for its mini circular saw is explicit: unplug the tool for blade changes. That rule scales up.
Next, gear up. The DeWALT DCS570B manual mandates ANSI Z87.1 eye protection, your everyday glasses don’t count. It also calls for hearing protection (ANSI S12.6) and a NIOSH/OSHA-rated dust mask. Wear gloves when handling the blade itself, as the Bosch manual advises. A fresh blade is sharp enough to slice through a work glove if you’re careless, but the glove protects against nicks from the old blade’s teeth and any debris on the arbor.
Finally, give the lower blade guard a functional check. The DeWALT manual says to verify it moves freely and closes instantly before each use. If it’s sticky or bent, fix that before you even think about the blade. A guard that doesn’t snap back is an accident waiting to happen.
Before you start: A seated battery is a live circuit. Remove it. The blade guard must move freely. Wear ANSI Z87.1 safety glasses, not sunglasses, not readers. Gloves are for handling the blade, not for operating the saw.
The Tools You Actually Need
You can overcomplicate this, but you don’t need to. The tool list is short. Most importantly, you probably already have the main one.
- The Wrench or Hex Key. This almost always comes with the saw. It’s usually stored in a compartment on the saw’s body or tucked into the end of the auxiliary handle. If you lost it, you need to find a replacement that fits snugly. A loose wrench will round off the bolt head. For many modern saws, it’s a hex key (Allen key).
- A Clean Rag. This is for wiping down the arbor shaft, the inner washer (or mounting flange), and the outer washer (or clamping flange). The Bosch manual explicitly says to clean the blade and all clamping elements. Sawdust and pitch buildup here can prevent the blade from seating flush, causing wobble and vibration.
- Your New Blade. Have it ready, with any protective coating removed. Verify the arbor hole size matches your saw (typically 5/8″ or 20mm for 7-1/4″ saws, smaller for compact models).
- A Stable Surface. Place the saw on its side, often on the motor housing, as Bosch recommends. Don’t try to balance it on the shoe; it will tip over.
That’s it. You don’t need a vise, a second wrench, or an impact driver. In fact, an impact tool is a great way to over-torque and damage the threads.
The Universal Rule for Which Way to Turn the Bolt
Here is the single biggest point of confusion, and where generic advice fails. The standard “righty-tighty, lefty-loosey” rule is not universal for circular saws.
The direction to turn the bolt to loosen it is model-specific. For example, DeWALT’s DCS570B uses right-hand threads (turn counterclockwise to loosen), while the DCS391 uses left-hand threads (turn clockwise to loosen).
The only law is your saw’s manual. Let’s look at the conflict in the FACT SHEET:
| Saw Model | Thread Type | To LOOSEN Bolt | To TIGHTEN Bolt | Source |
|---|---|---|---|---|
| DeWALT DCS570B | Right-Hand | Turn Counterclockwise | Turn Clockwise | DeWALT DCS570B Manual |
| DeWALT DCS391 | Left-Hand | Turn Clockwise | Turn Counterclockwise | DeWALT DCS391 Manual |
| Makita 5007N | Right-Hand | Turn Counterclockwise | Turn Clockwise | Makita 5007N Manual |
See the problem? Two DeWALT saws, opposite instructions. The DCS570B uses standard right-hand threads. The DCS391 uses left-hand threads. If you apply the DCS570B rule to a DCS391, you’ll crank the bolt tighter and likely strip the threads.
How do you know? If you don’t have the manual, look for a directional arrow printed on the saw’s blade guard or near the arbor. The bolt loosens in the direction opposite that arrow. If there’s no arrow, assume standard right-hand threads (counterclockwise to loosen) and apply gentle pressure. If it doesn’t budge, try the other direction. Don’t force it.
Step-by-Step: Removing the Old Blade
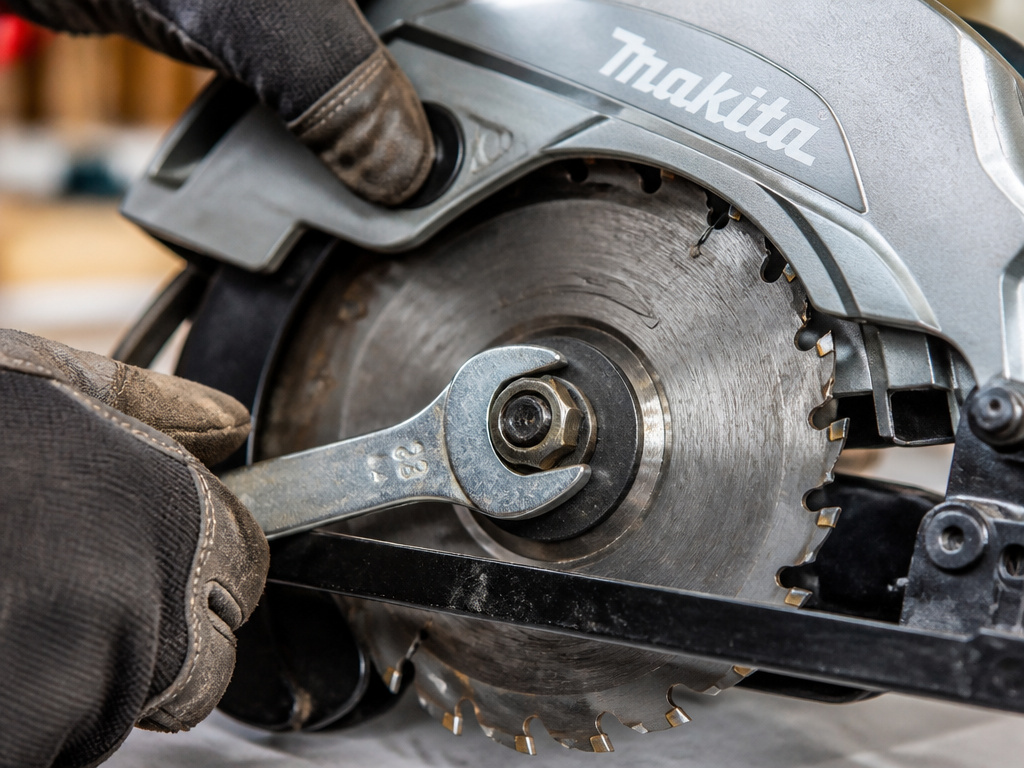
Now, with power disconnected and the right wrench in hand, remove the old blade. This is a five-minute job when you follow the sequence for how to change a circular saw blade.
-
Engage the Lock. Find the arbor lock button or lever. On most saws, it’s a button near the blade housing. Press and hold it. On some models, you may need to rotate the blade slowly until the lock mechanism engages with a soft click. Critical: The Bosch manual warns: “Do not press the spindle lock button while the saw spindle is moving.” Wait for the blade to stop completely.
-
Loosen the Center Bolt. With the lock firmly engaged, fit your wrench onto the arbor bolt. Turn it in the correct direction for your saw (see the table above). It should break free with moderate pressure. If it’s stuck, don’t keep leaning on the wrench, you could break the lock. Stuck bolts are discussed next.
-
Remove the Bolt and Outer Washer. Once loose, spin the bolt off by hand. Set it and the outer washer (clamping flange) aside in a place where they won’t roll away. Keep them together; the washer often has a specific orientation.
-
Retract the Guard and Remove the Blade. Carefully pull back the lower blade guard. You’ll now see the blade sitting on the arbor shaft against the inner washer. Grab the blade by its body (not the teeth!) and slide it straight off. Place the old blade somewhere safe.
Where this goes sideways: Forcing the wrench when the arbor lock isn’t fully engaged. You’ll hear a grinding ratchet sound, that’s the lock mechanism skipping. Stop immediately, release the lock, re-engage it firmly, and try again. Doing this repeatedly rounds off the locking pawl.
What If the Bolt is Stuck?
A stuck arbor bolt is usually caused by one of three things: over-tightening, corrosion, or sawdust packed into the threads.
- First, ensure the arbor lock is fully engaged. Sometimes you need to rotate the blade a few degrees to seat the lock perfectly.
- Apply a penetrating oil like Liquid Wrench or PB Blaster to the bolt threads. Let it soak for 10-15 minutes.
- Use a longer wrench or a piece of pipe over the handle for more force. Do not use an impact driver, the sudden torque can shear the bolt or destroy the arbor lock.
- As a last resort, the Sharper Image manual for its mini saw has a specific trick: if the spindle lock is blocked, loosen the clamping flange with the hex key and turn the blade back and forth manually. This can reset the lock and free the bolt.
If it still won’t budge, it might be time to take it to a service center. A stripped arbor is a much more expensive problem than a service call.
Installing the New Blade Correctly
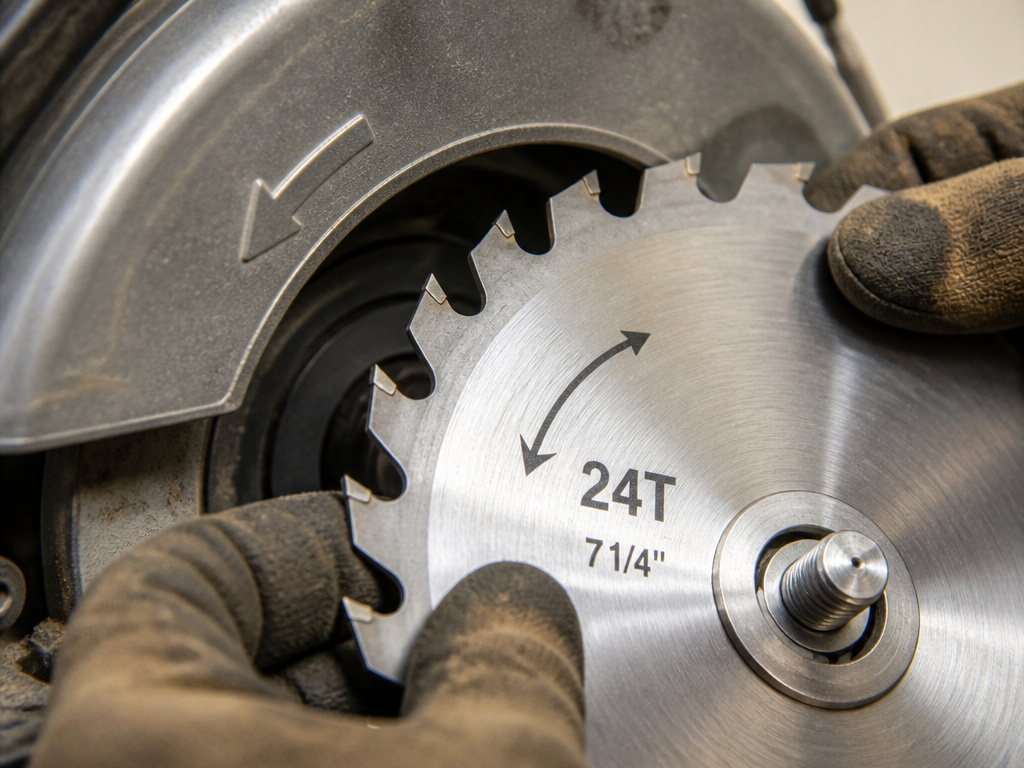
This is where cut quality and safety are decided. Rushing here undoes all your careful work.
-
Clean Everything. Wipe the arbor shaft, the inner washer (mounting flange), and the outer washer with your rag. The Bosch manual says to clean all clamping elements. A tiny wood chip here creates a wobble.
-
Orient the New Blade. This is the most important visual check. Look for the rotation arrow on the new blade. Now, find the rotation arrow stamped on the saw’s blade guard. The blade’s teeth must point in the same direction as the guard’s arrow. Almost always, this means the teeth at the front of the saw (where it contacts the wood) point upward toward you. Installing it backwards makes the saw fight to cut, produces burning and ragged edges, and dramatically increases kickback risk.
-
Slide the Blade On. Retract the guard again and slide the new blade onto the arbor, pressing it flush against the inner washer. Ensure it’s seated all the way; it should not wobble.
-
Replace the Washer and Bolt. Slide the outer washer on, then thread the bolt on by hand. Ensure the washer is oriented correctly (some are dished); it usually goes with the raised center facing out.
-
Tighten the Bolt. Re-engage the arbor lock. Use your wrench to tighten the bolt. How tight? The Bosch UniversalCirc 18V-53 manual gives us a rare, specific number: 6–9 Nm of torque, which it describes as “hand-tight plus ¼ turn.” Don’t crank it with all your strength. A properly tightened bolt won’t come loose during use, but you should still be able to remove it later with the wrench.
-
Final Check. Release the arbor lock. Rotate the blade by hand to ensure it spins freely and doesn’t rub against the guard. Give the lower guard a flip to confirm it snaps back over the blade.
Special Cases: Mini Saws and Worm Drives
The process is fundamentally the same, but the details shift.
Mini/Cordless Compact Saws: Models like the Sharper Image Mini Circular Saw use a smaller blade and often a hex-key bolt. The spindle lock is usually a button you press. The manual warns never to use that lock to stop a moving blade, as it will jam the mechanism. The principle of unplugging and cleaning is identical.
Worm Drive Saws: These have the motor aligned behind the blade, and the arbor often has a diamond shape instead of a round one. Some blades come with a diamond knockout in the center. If yours doesn’t, you need a blade specifically designed for a worm drive arbor. The bolt thread direction is almost always standard (counterclockwise to loosen). The extra weight and gear drive mean the bolt can be on exceptionally tight from the factory; apply force carefully.
Choosing the Right Replacement Blade
Putting a 40-tooth finish blade on to rip a 2×4 is a mistake. The saw will labor, the cut will burn, and you’ll think your motor is dying. Match the blade to the job.
The DeWALT DCS391 manual recommends specific blades for its 6-1/2″ saw:
- DW9155 (18 teeth): General purpose cutting.
- DW9154 (24 teeth): Smooth wood cutting.
- DW9153 (90 teeth): For plywood and veneers (non-carbide).
For a 7-1/4″ saw, you have more options. More teeth generally means a smoother cut in plywood and finish lumber. Fewer teeth generally means faster, more aggressive cuts in framing lumber. Also, look for the EN 847-1 mark, which Bosch requires. It’s a European safety standard that indicates the blade has been tested for things like vibration and material integrity, a sign the blade meets the EN 847-1 standard regardless of your saw brand.
Easy to miss: Blade diameter. A 7-1/4″ blade will not fit a saw designed for 6-1/2″ blades, and vice versa. The arbor hole size (typically 5/8″ or 20mm) must also match. This info is printed on the blade’s center.
Don’t forget about your old blade. If it’s just dull, you can explore sharpening a circular saw blade as an alternative to replacement. But if it’s chipped, cracked, or has missing carbide teeth, its life is over.
When to Clean Instead of Replacing a Circular Saw Blade
A dull or gummed-up blade doesn’t always need replacing. Pitch and sap from softwoods or resin from composite materials can coat the teeth, making the blade cut poorly as if it were dull. Before you swap it out, try cleaning it. Manufacturer instructions often advise cleaning the blade and all the clamping elements during a change. Use a dedicated blade cleaner or a solvent safe for the blade’s materials, scrubbing with a stiff brush. Wear protective gloves during this process. A thorough cleaning can restore cutting performance and extend the blade’s life, saving you a replacement.
How to Store and Maintain Circular Saw Blades
Proper storage keeps your blades sharp and ready. After cleaning, ensure the blade is completely dry to prevent rust. Store blades in their original packaging or a dedicated blade case to protect the teeth from damage and prevent accidental contact. Keep them in a dry, stable environment away from moisture and extreme temperatures. When handling blades, always wear protective gloves to avoid cuts. Regularly inspect stored blades for any signs of rust, warping, or missing carbide tips. This simple maintenance ensures you have a reliable, sharp blade available for your next project.
Frequently Asked Questions
Which way do you turn the bolt to loosen a circular saw blade?
There is no single answer. You must check your saw’s manual. For example, turn the bolt counterclockwise to loosen a DeWALT DCS570B, but turn it clockwise to loosen a DeWALT DCS391. The direction is typically opposite the blade’s rotation arrow.
How tight should the circular saw blade bolt be?
Tighten the bolt securely, but avoid extreme force. The Bosch UniversalCirc 18V-53 manual specifies a torque of 6–9 Nm, which is hand-tight plus about a quarter-turn. Over-tightening can strip threads and make the blade impossible to remove later.
What is the arbor lock and how do I use it?
The arbor lock (or spindle lock) is a mechanism that locks the blade shaft in place so you can loosen the center bolt. Press and hold the lock button, usually located near the blade, after the blade has completely stopped spinning. Never engage the lock while the blade is moving.
Can I use any 7-1/4″ blade on my saw?
Not exactly. The blade must have the correct arbor hole size (usually 5/8″ for 7-1/4″ saws) and be rated for a RPM at or above your saw’s maximum speed. Also, ensure the blade is intended for your material, a framing blade for lumber, a fine-tooth blade for plywood.
How do I know when it’s time to replace a saw blade?
Look for visible signs: chipped or missing carbide teeth, a cracked blade body, or significant rust. Performance signs include burning the wood even with a slow feed rate, the saw laboring and bogging down, or cuts that are excessively rough and torn.
The Bottom Line
Changing a blade is a basic skill, but the details matter. Power off first, every time. The bolt’s thread direction isn’t a guessing game, when in doubt, find your manual. Tighten to a firm, sensible torque, not a Herculean crank. And always, always make sure those teeth are facing the right way.
One final, underrated tip: after you change the blade, take two minutes to correctly set the saw depth for your next cut. The blade should only protrude slightly past the bottom of your material. That’s the sweet spot for clean cuts, minimal kickback, and keeping your motor from straining. Do those two things together, and you’re not just swapping metal; you’re setting up for your next perfect cut.
