
How to Install Crown Molding With a Nail Gun: Step-by-Step
This post contains affiliate links. As an Amazon Associate, we earn from qualifying purchases.
Installing crown molding with a nail gun requires matching four things: the head type (finish vs. Brad), the nail length (2-inch for most), the nail placement (into studs and joists), and the correct joint method for your corners. A finish nailer drives 2-inch nails for general attachment, while a brad nailer with 1-inch nails is best for outside corners. This is the core of how to install crown molding with a nail gun.
That sequence, finish nailer first, brad nailer second, solves the one problem every new installer hits when learning how to install crown molding with a nail gun: you need enough nail length to reach framing, but you also need a way to pin two pieces together neatly at corners without splitting. The brad nailer is the tool that joins the mitered edges of an outside corner, holding them tight while the glue sets.
What follows: the exact nail placement sequence (it’s not just top and bottom), the three sources of confusion on nail length (and which to trust), the joint method the pros use when walls aren’t square, and the one step nobody mentions that prevents callbacks after a few years of knowing how to install crown molding with a nail gun.
Key Takeaways
- Buy 10% more lineal feet of molding than your room measures for waste and miter joints. (Lowes)
- Let wood molding acclimate inside the room for at least a week, not just 24 hours, to prevent gaps from seasonal movement. (This Old House Magazine)
- Use two nail guns: a finish nailer with 2-inch nails for general attachment and a brad nailer with 1-inch nails and glue for outside corners. (The Royal Wood Shop, Ask The Builder)
- Drill pilot holes wherever the molding is prone to split, especially near ends. (Home Depot)
- For a seamless look on long walls, splice pieces over a stud with a 30-degree scarf joint, not 45 degrees. (Lowes)
Before You Start
Before you start: A nail gun drives a fastener with enough force to penetrate drywall, wood, and your hand. Always wear safety glasses, keep your free hand clear of the muzzle, and unplug the air hose when loading or clearing a jam. Set the compressor to the PSI specified in your nail gun’s manual. Check for wiring or pipes behind walls with a stud finder’s deep-scan mode before nailing.
Marking and Measuring
Measure each wall length and add them together for total lineal feet. Then add 10%. That’s the Lowes rule for waste, and you must follow it, because a 45-degree miter cut eats more material than a straight cut, and you will miscut at least one piece. Mark the wall where the bottom edge of the crown will sit using a scrap piece as a gauge, then snap a chalk line around the room. This line is your guide for keeping everything level, especially if your ceiling dips or waves.
Now, find and mark your studs and ceiling joists. Studs are generally 16 inches apart for 2×4 walls and 24 inches for 2×6 walls. Ceiling joists might be 12, 16, or 24 inches on center. (The Royal Wood Shop) Mark these locations just below your chalk line. You’ll be nailing into them.
Acclimating and Prepping the Wood
Here is a clarification. Most guides say 24 hours. A note in This Old House Magazine says a week. Who’s right? For dimensional stability, the week-long camp wins. Keeping wood inside the room for seven days allows its moisture to match the room’s humidity. Wood that goes up after a day in a dry house will shrink when winter humidity drops, opening visible gaps at the joints. Coat all sides with primer or stain before you install, it’s easier now, and it disguises any small gaps that do appear later.
I learned this the hard way on a dining room job. The client wanted it done in a weekend. We acclimated the poplar for a day, installed it, painted it. By December, every inside corner had a hairline crack. Not enough to fail, but enough that the painter had to come back and caulk again. Now I tell clients the schedule is seven days for the wood, then one for the install.
Tools and Materials You’ll Need
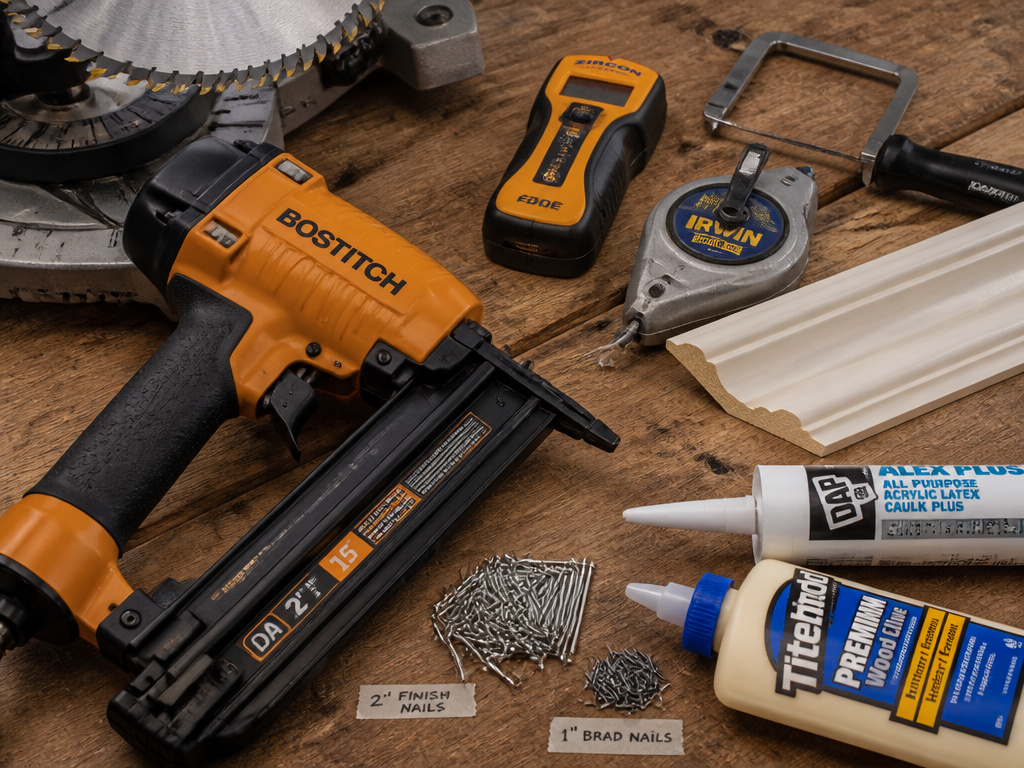
You need more than just a nail gun. Here’s the list that gets the job done without a second trip to the store.
Essential Tools:
- Compound Miter Saw: For accurate angled cuts. A compound miter saw is needed for accurate angled cuts.
- Finish Nailer: Load it with 2-inch finish nails. This is your primary fastener.
- Brad Nailer: A second gun, loaded with 1-inch brads. It’s for outside corners.
- Stud Finder: A model with deep-scan for lathe and plaster walls.
- Coping Saw: For creating coped inside joints.
- Chalk Line & Level: For layout and keeping runs straight.
- Drill/Driver: To pre-drill holes and drive screws for nailing blocks.
Required Materials:
- Crown Molding
- 2-inch Finish Nails and 1-inch Brad Nails
- Wood Glue (for outside miter joints)
- Construction Adhesive (for brick/concrete walls)
- Caulk & Wood Putty
- Nailing Blocks or 2×2 Lumber (if your crown is over 3 inches wide or joists are parallel)
A note on the best nailers for trim: you want a finish nailer that sinks nails consistently without leaving a deep dent, and a brad nailer that’s light enough for one-handed use at awkward angles. The difference between a pro model and a big-box special is how often you’re clearing jams when you’re 8 feet up a ladder.
Cutting Crown Molding: Upside Down and Backwards
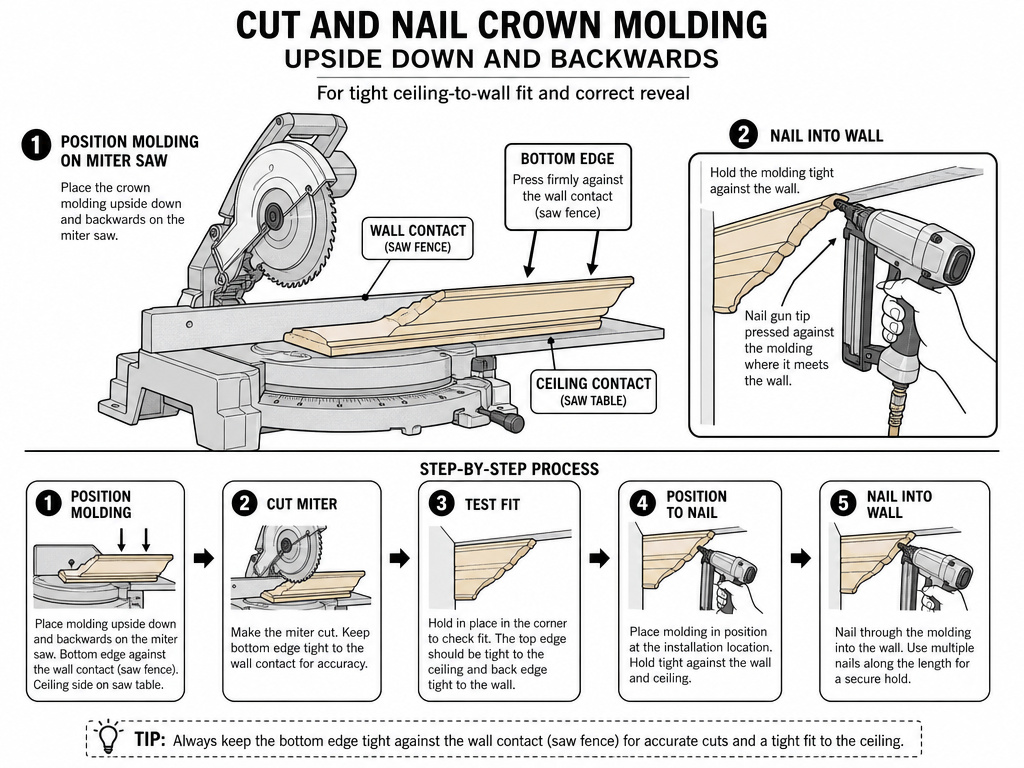
The phrase “upside down and backwards” is the key. Place the crown on the miter saw with the bottom edge (the part that sits against the wall) against the fence. The piece sits on the saw table exactly as it will on the wall, but inverted. (Lowes, Home Depot) Your saw’s miter angle will be opposite the corner direction: swing left for a right-hand corner.
For standard 90-degree corners, you’ll cut 45-degree miters. The confusion starts with inside versus outside cuts. According to Lowes, for an inside corner, cut the moulding at a 45-degree angle across the face, and for an outside corner, cut at a 45-degree angle across the back side. The diagrams in your saw’s manual are worth studying for ten minutes before you make the first cut.
If your crown’s spring angle isn’t listed on the standard chart (like a 38/52), use the Bosch Miterfinder (boschtools.com) to calculate the correct miter and bevel settings. Guessing and testing wastes more wood than that 10% waste allowance covers.
What about long walls? You’ll need to join two pieces. Sources disagree on the best angle. Lowes recommends opposing 30-degree angles spliced over a stud. This Old House and Home Depot suggest a 45-degree scarf joint. The 30-degree joint gives more gluing surface and is less likely to show a line if the pieces move. Use the 30-degree method.
Where Do You Put the Nails?
A proper nail holds the crown in two places: the bottom edge secures to a wall stud, and the top edge secures to a ceiling joist. Start in a corner, nailing into a stud at the bottom and a joist at the top. (Lowes)
That’s the theory. In practice, joists often run parallel to the wall, giving you nothing to nail into at the top. This is where two techniques save the install.
First, the X-nail. When there’s no joist, shoot one nail angled up into the drywall ceiling, then a second nail angled down from the opposite direction. This creates a mechanical lock in the drywall that holds surprisingly well for the life of the molding.
Second, install a nailing block. If your crown is over 3 inches wide, consider adding a continuous backer. Rip a 2×4 to match the crown’s spring angle and screw it to the wall studs. Or, for spot support, cut a 2×2 with a 45-degree bevel and screw it into the corner. (Home Depot) This gives you solid wood to nail into anywhere along the run.
Nail spacing matters. The Royal Wood Shop suggests keeping nails more than 2 1/2 inches down from the ceiling. (The Royal Wood Shop) Nail into the higher, more prominent profiles of the crown, it’s easier for the painter to fill and sand a flat surface than a deep crevice.
Dealing With Corners: Coped vs. Mitered
Corners are where your cut crown molding skills are tested. There are two joint types, each for a specific corner.
Inside Corners: Use a Coped Joint
Most pros cope inside corners because walls are rarely perfectly square. A coped joint hides imperfections.
- Cut the first piece with a straight butt end into the corner.
- Cut the second piece with a 45-degree miter on the end.
- Use a coping saw to cut along the profile line revealed by the miter, removing the back material. The front profile remains.
- The coped piece fits over the profile of the first piece, creating a tight joint that can flex with the wall.
Outside Corners: Use a Mitered Joint with Glue and Brads
Outside corners demand precision because the joint is visible from two angles.
- Cut both pieces with 45-degree miters.
- Apply wood glue to the mitered faces.
- Hold the pieces together and fire 1-inch brad nails through the face of one piece into the end grain of the other. (The Royal Wood Shop) This is the job for your brad nailer, a finish nail would likely split the thin edge.
- Wipe away excess glue immediately.
This is the moment the brad nailer vs finish nailer choice becomes obvious. The brad’s small head and thin gauge pin the joint without blowing out the wood, while the finish nailer does the heavy holding a few inches away.
Installing the Molding
Start with an inside corner. Apply a bead of caulk in the corner before setting the first piece, it fills any gaps behind the molding. (Tom Silva via This Old House) Position the piece so its bottom edge aligns with your chalk line. Shoot a 2-inch finish nail into a bottom stud and another into a top joist or nailing block.
Work your way around the room, cutting and fitting each piece. For long runs, use your 30-degree scarf joint over a stud. When you get to an outside corner, remember to glue and brad-nail the miter before you nail the assembly to the wall.
A common issue is the nail not sinking deep enough, leaving a proud head. This is where knowing how to adjust nail gun depth is crucial. Turn the depth dial or knob on your nailer until the head is driven just below the wood surface, deep enough for putty to hide, but not so deep it craters the wood.
If you’re working alone, temporary braces are a lifesaver. Screw a small block of wood to the wall to act as a shelf that holds one end of the molding while you position and nail the other.
Finishing Up: Caulk, Putty, and Paint
Once the last piece is nailed, the real magic happens. Run a bead of paintable latex caulk along the top edge where the crown meets the ceiling and along the bottom edge where it meets the wall. This covers any gaps from wavy surfaces. Use a damp finger to smooth the bead.
Fill all nail holes with a non-shrinking wood putty. Let it dry completely, then sand smooth with fine-grit sandpaper. If you stained the wood pre-installation, use a colored wax filler stick for minor scratches.
Finally, touch up with your paint or final coat of finish. Use a small, angled brush to cut in clean lines.
How to Use a Crown Molding Jig or Cutting Method
To cut crown molding, you must position it on your saw just as it sits on the wall. Many guides suggest placing the molding upside down and backwards against the saw fence, with the bottom edge against the fence. For inside corners, the bottom of the crown will be the longest edge. This upside-down method helps visualize the cut. If you are using a specialized jig or support system, it will hold the molding at this correct spring angle for you, eliminating guesswork. Always make practice cuts on scrap pieces first to verify your setup before cutting your good material.
Frequently Asked Questions
Can you install crown molding with just a brad nailer?
You can, but you shouldn’t for the main attachment. A brad nailer’s 1-inch nails don’t have the length or holding power to secure crown molding through drywall and into framing reliably. They are perfect, however, for assembling outside corner miters where a finish nail would split the wood.
What size nails should I use for crown molding?
Sources disagree on nail size for general attachment: This Old House and The Royal Wood Shop recommend 2-inch finish nails, while Home Depot recommends 6d or 8d finish nails depending on molding thickness. This length is necessary to penetrate the typical wall assembly: 1/2-inch drywall, a 3 1/2-inch stud, and at least 1/2-inch thickness of crown molding. (The Royal Wood Shop) For outside miter joints, use 1-inch brad nails with glue.
Where should the nails go in crown molding?
Nails should go into wall studs at the bottom edge and ceiling joists at the top edge. Drive nails into the higher, flatter profiles of the molding for easier filling. If a joist isn’t present, use the X-nail technique or install a nailing block.
What is the easiest way to install crown molding?
The easiest method is to use manufactured corner blocks (like SlideFit from Lowe’s). You install the blocks in the corners, then simply cut your molding pieces to length with straight cuts and install them between the blocks. This eliminates all complex miter and cope cuts.
How do I handle uneven walls or ceilings?
Use a chalk line to establish a perfectly level reference line around the room, ignoring the ceiling’s dips. Install the molding to this line. The gap between the molding and an uneven ceiling will be consistent and can be filled with caulk, which is less noticeable than a wavy molding line.
The Bottom Line
A successful crown molding install comes down to three anchored facts: let the wood sit for a week, use a 2-inch nail in a finish nailer for holding and a 1-inch brad for corners, and always cope your inside joints. Rushing the acclimation can cause the wood to move later, opening gaps at joints.
If you’re doing this project solo, your first purchase should be a sturdy platform. A wobbling ladder guarantees a bad cut. Your last step should be to countersink nails properly so the putty has a clean surface to grip, not a crater. Everything in between is just measuring twice and keeping the bottom edge against the fence.
