
How to Install Door Casing With a Finish Nailer
This post contains affiliate links. As an Amazon Associate, we earn from qualifying purchases.
Installing door casing with a finish nailer requires matching three things: the correct nail gauge and length for the job, a consistent reveal line around the jamb, and a strategic nailing pattern that holds the trim flat without splitting the wood. For standard 2 1/4-inch wood casing, you’ll use shorter nails like 1-inch finish nails or 6d finish nails into the jamb (sources differ) and longer 2-inch nails angled into the wall framing, with nail heads set 1/16 inch below the surface. This is the core of how to install door casing with a finish nailer.
That specific nailing schedule, different nails for the jamb versus the wall, is the core answer to how to install door casing with a finish nailer and what keeps the casing from bowing or pulling loose over time. The jamb is typically made of softwood. The wall behind the drywall is a stud. You need two different fastener strategies to bridge that gap cleanly.
What follows is the sequence that works for a mitered corner installation for how to install door casing with a finish nailer: marking the reveal, cutting the head piece, attaching the sides, and finishing with the right fillers. We’ll also cover how to adjust the nail gun’s depth drive for a perfect set and when you might want a brad vs finish nailer for lighter trim work.
Key Takeaways
- Mark your reveal line a consistent 1/4 inch from the door jamb’s inner edge on all sides, as recommended by Bob Vila, Home Depot, THISisCarpentry, and RESO INC; Engineer Fix notes a typical range of 1/8 inch to 3/16 inch.
- Use shorter nails (1-inch or 6d) for the jamb and longer nails (2-inch or 8d) for the wall framing; mixing them up lets the casing sag.
- Set nail heads 1/16 inch deep before filling, as specified by Home Depot; THISisCarpentry, discussing hand-nailing, suggests setting nails when they are 1/8 inch to 1/4 inch proud of the casing.
- Test your nail gun’s depth setting and pressure on scrap wood first; a poorly adjusted tool will either leave nails proud or punch through the casing face.
- Always wear safety glasses; a finish nail can deflect off a knot or hidden screw and travel in an unpredictable direction.
Marking the Reveal Line: The Crucial First Step
The reveal line is the foundation. It’s the uniform gap you create between the inside edge of the door jamb and the inside edge of the casing. Get this wrong, and even perfect cuts will look off.
Many guides, including Bob Vila, Home Depot, THISisCarpentry, and RESO INC, specify a 1/4-inch reveal, while Engineer Fix notes a typical range of 1/8 inch to 3/16 inch. You measure and mark this distance from the inner part of the door frame on the top and both sides. Some sources, like Engineer Fix, note a typical range of 1/8 inch to 3/16 inch, but the 1/4-inch standard is the one you’ll find in most professional instructions.
Draw reveal lines on the jamb 1/4 in. Back from the inside edge. A pair of scribes will do the job, but a marking gauge speeds up the task. . THISisCarpentry
Why does this matter? It’s not just visual. That quarter-inch of exposed jamb gives the door hinges clearance to operate without binding against the trim. It also creates a defined shadow line that makes the door look intentional and framed, not just slapped on. A consistent reveal hides minor imperfections in the jamb or the wall.
Common mistake: Measuring and marking each side independently without a story pole or gauge. Your eyes are terrible at judging a consistent 1/4 inch over a seven-foot span. Use a combination square, a trim gauge, or even a piece of scrap wood cut to 1/4 inch as a physical spacer. Mark the line lightly with a pencil. If you’re installing multiple doors, take the time to mark them all at once, it’s faster than resetting your tools five times.
The Right Nailer and Nails for the Job
This is where forum threads show the most confusion. You have a finish nailer. Is it the right one? Here is a clear point.
A finish nailer (typically 15-gauge or 16-gauge) is the correct tool for door casing. It shoots nails with a small head that can be easily concealed with filler. The thicker gauge provides the holding power needed for a substantial trim piece that might get bumped. A brad nailer (usually 18-gauge or higher) is for thinner, more delicate trim like quarter-round or shoe molding. Its nails are thinner and have less holding strength.
For attaching casing to the jamb, sources recommend different fasteners:
- Bob Vila specifies 1-inch-long finish nails for the inside portion (into the jamb).
- The Home Depot PDF and Engineer Fix call for 6d finish nails (about 2 inches long) for the same task.
- THISisCarpentry suggests 18-gauge brads or pin nails every 8 to 12 inches into the jamb.
The disagreement here is about technique, not outcome. The 1-inch nail (Bob Vila) is just long enough to bite into the jamb but won’t risk protruding out the other side. The 2-inch 6d nail (Home Depot) gives a deeper bite. The 18-gauge brad (THISisCarpentry) is the lightest touch, minimizing wood splitting.
For the outer edge of the casing, where you’re nailing through the trim and drywall into the wall stud, everyone agrees you need more length. THISisCarpentry is explicit: “To reach through the casing and the drywall, and penetrate the studs at least 3/4 in., use longer, 2 in. 15 ga. Nails.” The Home Depot PDF says to use 8d finish nails (about 2.5 inches long) spaced 12 to 16 inches apart.
| Attachment Point | Recommended Nail (Source) | Typical Length | Purpose |
|---|---|---|---|
| Casing to Door Jamb | 1″ finish nail (Bob Vila) | 1 inch | Secure trim to frame without blow-through |
| Casing to Door Jamb | 6d finish nail (Home Depot) | ~2 inches | Deeper hold in the jamb |
| Casing to Wall Stud | 2″ 15-ga nail (THISisCarpentry) | 2 inches | Penetrate drywall & secure into framing |
| Casing to Wall Stud | 8d finish nail (Home Depot) | ~2.5 inches | Maximum holding power into the stud |
My take? For a beginner, follow the Home Depot method: 6d nails into the jamb, 8d nails into the wall. It’s simple, and the nails are easy to find. If you’re using a 16-gauge finish nailer, you’ll be shooting nails that match these specs. If you own an angled finish nailer versus a straight one, the principle is the same, just make sure you’re using the correct length of finish nail for your specific tool’s magazine.
Cutting and Fitting the Mitered Corners
You start with the head piece. This seems backwards, but it lets you fit the side pieces perfectly to it.
Measure the distance between your reveal marks at the top of the door. This is the rough opening width. To get the cut length for your head casing, you add the width of your casing material twice, plus a bit for the miter. The Home Depot PDF gives the formula: rough opening width + 1/2 inch. You mark this length on your board, then cut a 45-degree angle at each end.
Dry-fit the head piece against your reveal marks. The short point of the miter should extend slightly beyond the bottom corner of the top jamb to ensure the side casing has material to mate against. This ensures the side casing will have material to mate against. Don’t nail it yet.
Now, hold a side casing piece in place, tight against the head piece. Mark where the bottom of the head casing’s miter touches the back of the side piece. That’s where you cut your 45. The goal is a tight, closed corner with no gap. This is the moment you learn if your miter saw is perfectly calibrated. A hair off, and you’ll see daylight in the joint.
Where this goes sideways: Assuming your walls are perfectly plumb and your floor is perfectly level. They aren’t. You may need to “spring” a piece, bend it slightly as you nail it to follow an out-of-plumb wall. Or, you might need to cheat your miter angle a degree or two off 45 to close a gap. This is why you dry-fit everything before the first nail flies.
Easy to miss: The sequence for gluing. Clamp the joint with spring clamps for pressure while the glue sets. If you nail first and then try to inject glue into the seam, it won’t wick in and the joint will be weak.
The Nailing Pattern That Keeps It Flat
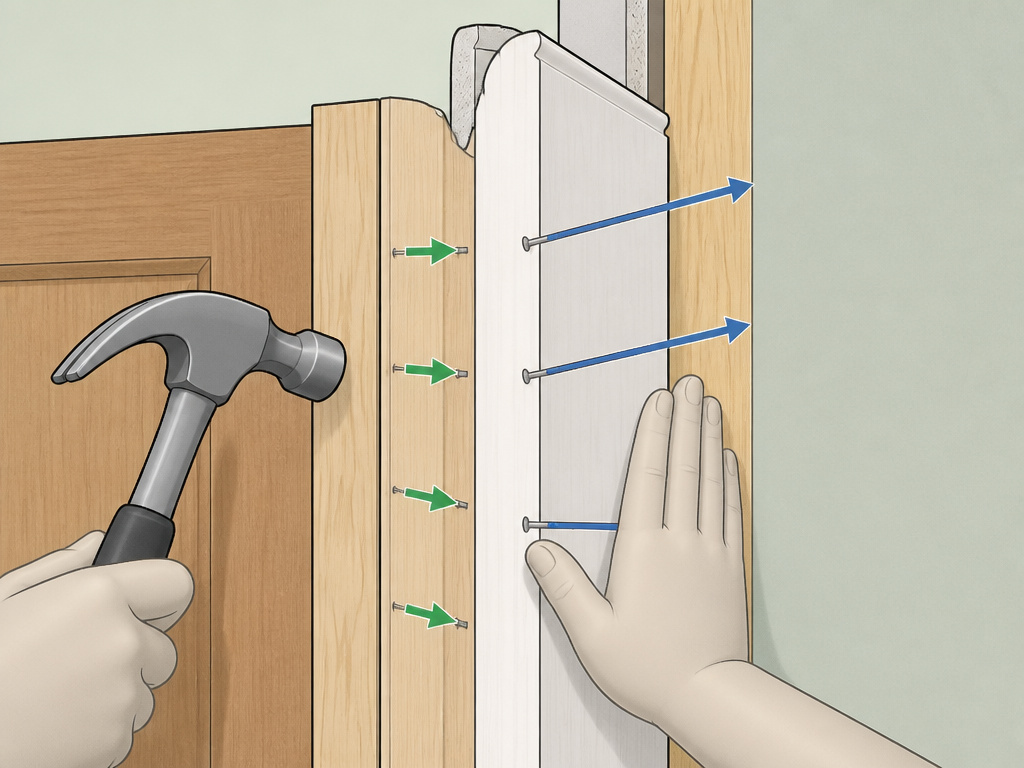
Nailing is not random. You have two distinct nail lines: one into the soft jamb, one into the hard wall stud. Their placement and spacing prevent the casing from curling away from the wall.
Into the jamb: Space nails every 8 to 12 inches (THISisCarpentry) or at each reveal mark (Home Depot). Start slightly down from the top miter to avoid splitting. Use your shorter nails here (1-inch or 6d). The sound changes when you’re nailing into the jamb, it’s a softer, dull thump compared to the sharper crack of hitting a stud.
Into the wall stud: This is your structural hold. Space nails 12 to 16 inches apart (Home Depot) along the outer edge of the casing. Angle the nail gun slightly so the nail drives into the stud, not straight back. You’re listening for that solid crack. If you just get a thud, you’re in empty drywall cavity. Find the stud.
Here’s the physical sensation you’re after: when you press the nose of the nailer against the casing, you should feel the trim is tight to the wall. If there’s a gap, push the casing flush with your other hand as you fire. Don’t rely on the nail to pull the wood in, it will either bend or not set fully.
Skip this if: You’re working with MDF or pre-primed casing. For pre-primed, your depth setting is critical. A nail set too deep will rupture the primed surface, creating a much bigger patch job. A scrap test piece is your best friend.
Setting Nails and Finishing Strong
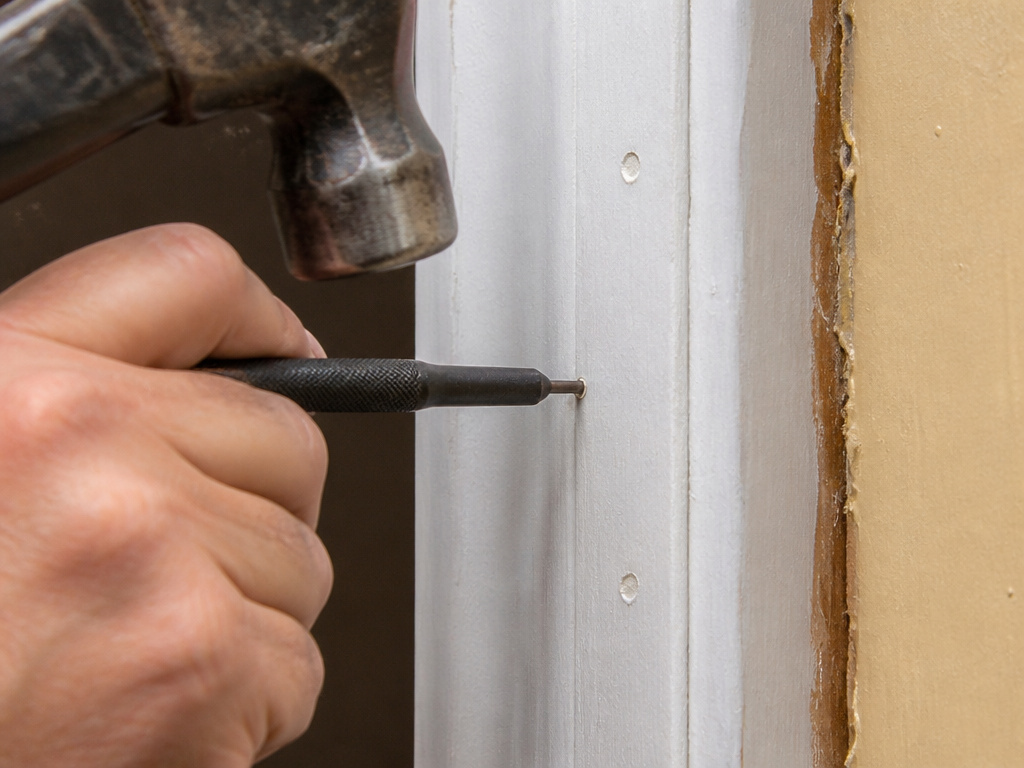
After the casing is secured, you have a forest of nail heads sitting proud. Now you set them.
The Home Depot PDF is specific: “Use a nail set to set all of the nail heads 1/16 inch below the casing surface.” THISisCarpentry, discussing hand-nailing, says to set nails when they are “1/8 inch to 1/4 inch proud of the casing.”
The 1/16-inch target is for a machine-driven nail. It’s deep enough to hold a filler but not so deep that it craters the wood. The technique is simple: place the tip of the nail set on the head of the nail, give it one or two firm taps with a hammer. You’ll feel it stop sinking. That’s it.
Common mistake: Skipping the nail set and just trying to hammer the nail head flush. You’ll almost always miss, marring the wood with hammer marks. You’ll definitely regret this on stained wood. The nail set costs three dollars. Use it.
For filling, use a stainable wood filler for natural wood, or a paintable acrylic filler for painted trim. Overfill the hole slightly, let it dry completely, then sand it flush. On pre-primed casing, use a paintable caulk that remains flexible on the top miter joint, as this area is prone to slight seasonal movement.
Safety and Troubleshooting Your Nailer
This is the part most DIY guides gloss over, but it’s what wastes a Saturday morning.
Safety first: Wear safety glasses. A finish nail can hit a knot, a hidden screw in the wall, or the edge of the jamb and deflect sideways or back at you. Keep your free hand well away from the front of the tool.
Troubleshooting: If your nails aren’t sinking deep enough, you need to adjust the depth setting or increase air pressure. If they’re sinking too deep and punching through the face of the casing, decrease depth or pressure. If the nailer jams, disconnect the air hose first, then follow the manufacturer’s steps to clear it, never look down the nosepiece while clearing a jam.
A nailer that “double-fires” or doesn’t fire at all often has a dirty or worn driver blade or O-ring. These are wear items. Knowing how to maintain your finish nailer is as important as knowing how to use it.
How to install casing on an uneven wall
Walls are rarely perfectly flat, which can leave gaps behind your casing. The key is to focus on getting the casing piece plumb and flush against the door jamb at your reveal line first. Attach it securely to the jamb with your finish nails. Any gap that appears between the casing’s outer edge and the wall surface is common. You can often flex the casing slightly to close small gaps as you nail it into the wall studs. For larger, persistent gaps, the solution is to fill them after installation with a paintable caulk, which will create a clean, finished line once painted.
Frequently Asked Questions
What size finish nails should I use for door casing?
For standard wood casing, sources recommend different nails for the jamb: Bob Vila suggests 1-inch finish nails, while Home Depot suggests 6d (2-inch) finish nails. For the wall studs, use longer nails like 8d (2.5-inch) finish nails. This follows the Home Depot installation guide. Some pros use shorter 1-inch nails for the jamb to prevent blow-through.
Where exactly do you nail door casing?
You nail in two lines. The first line is along the inside edge of the casing, driving nails every 8-12 inches into the door jamb. The second line is along the outer edge of the casing, driving longer nails every 12-16 inches, angled into the wall studs behind the drywall.
Can I use a brad nailer for door casing?
You can, but it’s not ideal. An 18-gauge brad nailer shoots thinner nails with less holding power. It’s acceptable for temporarily tacking pieces or for very light, thin trim. For full-size door casing, a 15-gauge or 16-gauge finish nailer is the recommended tool for a secure, long-lasting installation.
How do I fix a gap in a mitered corner?
Small gaps can be filled with colored wood putty or caulk that matches the finish. For a better fix on painted trim, apply glue to the miter, clamp it tightly, and then reinforce the joint from behind with a biscuit or a glued spline. Sometimes, shaving a tiny amount off one side of the miter with a hand plane can close the gap.
Before You Go
One rule I enforce in my own shop: test your nailer’s depth and pressure on an off-cut of your actual casing material before you touch the door. The difference between a perfect set and a ruined piece of trim is about two turns of a depth dial. That test takes 90 seconds. Fixing a row of blow-through holes or proud nails takes an hour.
If you’re deciding between tool purchases, remember that a 15 gauge nailer offers more holding power for heavier trim, while a 16-gauge is more versatile for general finish work. Your first door might take an afternoon. Your tenth will take an hour. The process doesn’t change, but your confidence with the right tool for the job does. Start with a closet door in a spare room, it’s the perfect practice run.
