
How to Remove Rust With a Sandblaster: Step-by-Step
This post contains affiliate links. As an Amazon Associate, we earn from qualifying purchases.
You direct a stream of abrasive media, like sand, aluminum oxide, or crushed glass, at high speed against the rusty metal surface. This scours away corrosion and mill scale, leaving behind a clean, textured surface ready for protective coating. According to a 2025 industry technical bulletin, you must coat that surface with a primer or sealer within four hours of blasting to prevent flash rusting, a rapid re-oxidation that ruins your work. This is the core of how to remove rust with a sandblaster.
The blasting itself is mechanical and aggressive, stripping everything down to bare metal, which is the essence of how to remove rust with a sandblaster. Your job is to control the aggression, pick the abrasive for the steel you’re working on, and move fast from blasting to sealing. Miss the deadline and you’re looking at a dull orange bloom across your clean surface that you’ll have to strip all over again.
What follows: a breakdown of the three main surface cleanliness standards (and the one you’ll use most), a five-step process for first-time blasters, and the specific post-blast sequence that locks in your work before the four-hour clock runs out.
Key Takeaways
- Blast to a near-white metal finish (SSPC-SP 10/NACE No. 2), which allows staining on only 5% of the surface, for the best coating adhesion on critical structural repairs.
- Seal a sandblasted surface with a zinc-rich primer within four hours, or flash rusting will begin and force a complete re-prep.
- Use an air compressor with a moisture trap and oil separator; wet air causes media to clump and instantly clog your blast gun.
- Mask every adjacent surface, wiring, hoses, trim, and mechanical parts, as abrasive media will destroy them.
- Worn or contaminated blasting media leaves embedded residue and fails to create a surface profile; inspect and replace it regularly.
What “Clean” Actually Means: The SSPC/NACE Standards
The goal isn’t just “no rust.” It’s a defined surface condition that primers can grip. The Society for Protective Coatings (SSPC) and NACE International publish the standards that matter here. They grade cleanliness by the percentage of staining allowed.
Commercial blast cleaning (SSPC-SP 6/NACE No. 3) allows staining or shadows on no more than 33 percent of each unit area of surface. Near-white metal blast cleaning (SSPC-SP 10/NACE No. 2) reduces that allowance to just 5 percent staining. White metal blast cleaning (SSPC-SP 5/NACE No. 1) permits none.
You’ll hear these terms tossed around in forums when discussing how to remove rust with a sandblaster. For rust removal on a vehicle frame or structural steel, you’re typically aiming for near-white metal. That 5% staining tolerance means almost all the rust, mill scale, and old coating is gone, but you’re not obsessing over the last faint shadow in a deep pit. Commercial blast (33% staining) is often enough for non-critical, hidden areas or when you’re applying a thick, encapsulating coating. White metal is for critical marine or chemical service, overkill for most shop projects.
I see a lot of DIYers blast until the metal looks bright and shiny, then call it done. That’s a visual check, not a standard. The MKTech Abrasives Handbook warns that a shiny surface can be a warning sign, fine abrasion can polish rust or scale rather than remove it. You need to feel the surface profile with your hand: it should have a uniform, gritty texture, like 80-grit sandpaper. If it’s smooth in spots, the rust is still there under a polish.
Choosing Your Weapon: Media, Pressure, and Machine
This is where most first-timers waste money and create a mess. A cheap, undersized blaster with the wrong media is an exercise in frustration.
The Media Dictates the Job. General-purpose silica sand is cheap and cuts fast, but it fractures into fine dust that poses a serious Silicosis risk, you need a serious respirator, not a dust mask. For automotive work, I lean toward aluminum oxide or crushed glass. They’re harder, last longer, and create a more consistent profile. For cleaning aluminum or thin sheet metal without warping it, plastic or walnut shell abrasive media is the better choice.
Pressure is Not Your Friend. Cranking the PSI up might seem like it’ll work faster. It won’t. It just accelerates media consumption, heats the metal, and increases the risk of distortion. The RepairCert NZ bulletin notes that inexperienced operators easily damage sheet-metal surfaces with excessive pressure. Use a pressure appropriate for the material and media to avoid damage, starting at a moderate level. Your air supply is the other half of the equation. You need a compressor that can deliver sustained CFM, fitted with both a moisture trap and an oil separator. The SSPC standards explicitly require clean, dry compressed air, wet air is the single biggest cause of clogs.
Machine Type Sets Your Scope. A portable pressure blaster like a unit from TP Tools is fine for spot work on a chassis. For consistent results on larger parts or when containment matters, a proper sandblast cabinet is a better choice. It recycles the abrasive, controls the dust, and provides a clear view of the workpiece. A cheap “portable” blaster that can’t maintain pressure will leave you with a half-done job and a bin full of wasted abrasive.
Before You Blast: The Non-Negotiable Prep Work
Skipping prep guarantees a bad outcome. This isn’t the fun part, but it’s what separates a clean repair from a contaminated one.
First, degrease. Oil and grease will smear under the abrasive, creating a microscopic barrier no primer will stick to. The MKTech handbook is clear: remove them using a cleaning process before oxide removal where they would interfere. Use a dedicated bio-solvent degreaser, not just brake cleaner.
Second, mask everything. I mean everything. Tape over every bolt hole, threaded fitting, brake line, and wire harness. Cover rubber bushings, glass, and any adjacent painted surface you want to keep. Abrasive media gets everywhere and acts like microscopic cutting tools. The RepairCert bulletin adds that mechanical and electrical components, and trim items such as plastic covers, are easily damaged.
Finally, set up your environment. You need a well-ventilated area, preferably with a downdraft floor or at least a heavy tarp to collect spent media. This stuff is a nightmare to clean up from bare concrete. Wear a NIOSH-approved respirator for particulate, heavy gloves, a full face shield, and a heavy work coat. This isn’t optional; follow a complete sandblasting safety guide. The process is very dusty, messy, and noisy, and the health risks are real.
The 5-Step Sandblasting Process (Including the Timer Nobody Sets)

Now for the main event. Follow this sequence and you’ll avoid the common stalls.
1. Load and Test the System. Fill your blaster’s pot with dry, clean media. Before you point it at your workpiece, open the valve and blast into a scrap bucket for a few seconds. You’re checking for consistent flow and listening for the hollow sputter that means moisture is in the line. If you get that, stop. Your air isn’t dry enough.
2. Establish Your Stance and Distance. Stand comfortably, bracing yourself against the hose’s pull. Hold the nozzle at a consistent, moderate distance and angle to the surface. Starting too close heats and warps the metal; starting too far away wastes media and loses cutting power.
3. Work in Controlled, Overlapping Passes. Don’t hover in one spot. Use a smooth, side-to-side sweeping motion, overlapping each pass by about 50%. You’re looking for a consistent color change from rust-colored to the light grey of bare steel. On thick steel, you’ll hear the abrasive impact change from a dull thud to a sharper ping as you break through to clean metal.
4. Inspect for Profile, Not Just Color. After a section looks clean, run your gloved hand over it. It should feel uniformly rough. If you feel smooth patches or see a polished sheen, hit it again with a fresh, perpendicular pass. The MKTech Abrasives Handbook warns that worn or contaminated media can leave embedded residue and fail to create the right profile.
5. Extend the Blasted Area. Don’t just stop at the edge of the rust. Extend the blasted area past the visibly affected zone to ensure all corrosion is removed and provide a clean bonding surface. This ensures you’ve removed all corrosion and provides a clean bonding surface for the new coating to feather into.
Where this goes sideways: Blasting with media that has absorbed moisture. It clogs the gun instantly, creating a frustrating, non-productive mess. Store media indoors in sealed containers.
What to Do After Blasting: The 4-Hour Clock
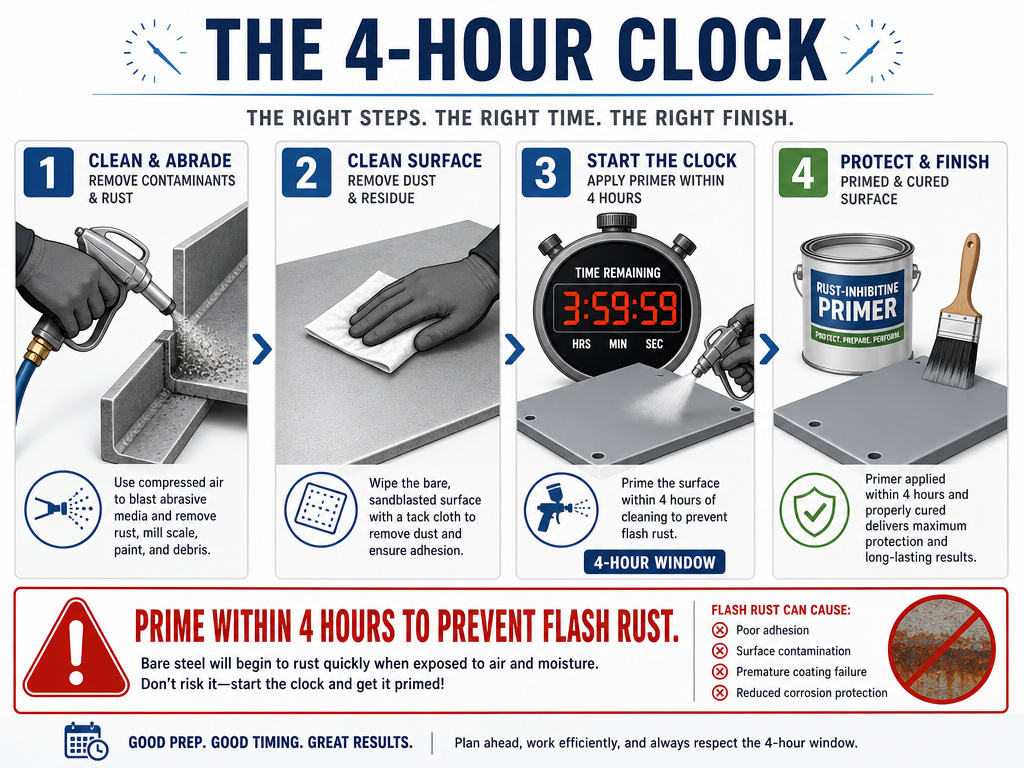
The blasting was the hard part, but the next steps are the most critical. A bare steel surface is chemically eager to rust. Flash rusting can start in minutes in humid conditions.
1. Remove All Trapped Media. This is a colossal pain but absolutely essential. Use compressed air, a stiff brush, and a vacuum to get media out of every crevice, bolt hole, and box section. The RepairCert bulletin states trapped sand will retain moisture when wet, which can cause further corrosion. If you’re working on a chassis, tip it and bang on it.
2. Final Clean with a Tack Rag. After removing all loose abrasive, wipe the entire surface with a solvent-dampened lint-free rag or a dedicated tack cloth. This picks up the last dust and oils from your hands.
3. Prime Immediately. This is where the four-hour timer starts. The RepairCert Technical Bulletin states the generally acceptable industry standard is that coating should take place no more than four hours after the blasting process to prevent flash-rusting. I set a timer on my phone. For maximum corrosion protection on steel, use a zinc-rich primer. The bulletin notes that zinc-rich primers bond well to sandblasted surfaces, especially when coarser blasting media is used. Apply it according to the manufacturer’s specs.
4. Topcoat According to Schedule. Once the primer has fully cured (check its datasheet), apply your chosen topcoat, whether it’s a durable enamel, epoxy, or rubberized undercoating. The primer is the corrosion fighter; the topcoat is the weather shield.
I learned this the hard way on an old truck frame. I blasted it clean on a Friday afternoon, figured I’d prime it Saturday morning. The humidity rolled in overnight. By morning, a uniform orange haze covered everything. I had to wire-wheel the entire frame back to bare metal, a full day of work wasted. Now the primer can sits opened next to the blaster.
Common Sandblasting Problems and How to Fix Them
Things will go wrong. Here’s how to diagnose and recover.
| Problem | Likely Cause | Fix |
|---|---|---|
| Inconsistent flow / clogging | Moisture in air line, worn nozzle, damp media. | Install/check moisture trap, ensure media is bone-dry, inspect nozzle for wear. |
| Media consumption too high | Pressure too high, holding nozzle too far, using soft/friable media. | Reduce PSI, decrease working distance, switch to harder abrasive like aluminum oxide. |
| Surface looks polished, not rough | Media is worn out or too fine, blasting angle too shallow. | Replace media, use coarser grit, adjust nozzle to a steeper angle (closer to 90°). |
| Flash rust appearing before priming | High humidity, bare steel exposed too long, contaminated surface. | Work in lower humidity if possible, prime immediately, ensure surface is oil/grease-free before blasting. |
| Warping on thin sheet metal | Excessive pressure, focusing heat in one spot. | Lower the pressure significantly, use non-metallic media (plastic, walnut), and keep the nozzle moving constantly. |
If clogging is a constant battle, your air compressor setup is the first place to look. An undersized compressor that cycles constantly pulls in moist air. A compressor with a large tank and a refrigerated dryer is a significant investment, but it’s the foundation of consistent blasting.
Sandblasting vs. Other Rust Removal Methods
Sandblasting is powerful, but it’s not always the right tool. Here’s how it stacks up.
Vs. Grinding: Using an angle grinder with a wire wheel or flap disc is precise and generates less dust, but it’s slow for large areas, leaves a smoother profile, and can work-harden the steel if you’re not careful. Grinding is for localized spots; blasting is for large, complex surfaces.
Vs. Chemical Rust Converters: Chemicals like phosphoric acid convert rust to a stable compound. They’re good for light surface rust where you can’t generate dust. But as the MKTech handbook notes, a rust converter is used only where the selected coating system permits a defined residual rust condition. They don’t remove anything, so loose scale and salts remain. Blasting removes everything.
Vs. Needle Guns / Scalers: These are fantastic for tight spaces, welds, and where containment is key (no media to recover). They leave a profile similar to blasting but are brutally slow on large, flat areas. They’re a complementary tool, not a replacement for a sandblaster for metal on a big job.
The RepairCert bulletin sums it up: sandblasting is the most effective, and cost-effective, method of removing corrosion (especially heavy pitting) from the underside of a vehicle. For an entire chassis or large structural piece, nothing else matches its speed and thoroughness.
Frequently Asked Questions
Will a sandblaster remove all rust?
Yes, a sandblaster will remove all loose and adherent rust, mill scale, and old coatings, leaving bare metal. The key is achieving the correct surface standard (like SSPC-SP 10) and ensuring you remove all trapped abrasive media afterward to prevent new corrosion points.
What is the best blast media for rust removal on steel?
For general steel, aluminum oxide is a top choice, it’s hard, durable, and creates an excellent profile for coating adhesion. For a balance of cost and performance, crushed glass is also very effective. Avoid reused silica sand that has absorbed moisture, as it leads to constant clogs.
Will rust come back after sandblasting?
Rust will come back rapidly if the bare steel is not protected. Flash rusting can begin within hours, or even minutes in humid conditions. To prevent this, you must apply a protective primer, like a zinc-rich coating, within the four-hour window specified by industry standards after blasting.
Can I reuse sandblasting media?
You can, but with major caveats. Media breaks down over time, becoming finer and less effective. More importantly, if it absorbs any moisture, it becomes useless and will clog your system. If you reuse media, it must be thoroughly dried and screened to remove fine dust and contaminants. For critical work, fresh media is always more reliable.
Is sandblasting safe to do at home?
It can be done at home with extreme caution. The primary risks are inhalation of silica dust (causing Silicosis), eye injury from flying media, and hearing damage from the noise. You must use a NIOSH-approved respirator, full face shield, heavy gloves, and hearing protection. Always work in a well-ventilated area and contain the media as much as possible.
The Bottom Line
Removing rust with a sandblaster is a powerful, fast technique, but it’s a system, not just a tool. The machine, the media, the air supply, and the post-blast routine all have to work together. The one rule that overrides everything else: get that primer on within four hours. If you can’t commit to that timeline because of weather or interruptions, break the job into smaller sections you can complete start-to-finish in one session.
Everything here assumes you’re blasting to a near-white metal standard and following the SSPC/NACE specs for clean, dry air. If your setup can’t deliver that, if your compressor is too small or you’re trying to blast with damp, reused sand, you’re better off choosing a different method, like grinding or chemical treatment, for that particular project. A job done right with a slower method beats a job botched quickly with the wrong sandblaster guide.
Your first few attempts will be messy and you’ll go through more media than you think. That’s normal. Focus on the sequence: prep, blast, clean, prime. Do that, and you’ll turn a rusty relic into a solid, protected piece ready for years more service.
