
How to Use a Sandblaster: Step-by-Step
This post contains affiliate links. As an Amazon Associate, we earn from qualifying purchases.
Using a sandblaster requires matching three things: the right protective gear, a clean, dry air supply, and a compatible abrasive. The blast pressure, which must be set within the specific range for your blaster and media, drives the abrasive to strip rust, paint, or corrosion from a surface. Understanding how to use a sandblaster is essential for this process.
That pressure range hides a critical variable. A Shop Fox M1115 manual lists 65–125 PSI as its operating range, but a Foredom Wolf Sand Blaster caps glass bead media at 60 PSIG. Cross those numbers and you blow out a nozzle, waste media, or etch the workpiece deeper than intended. Your first layer of setup when learning how to use a sandblaster is not the hose, it’s the manufacturer’s spec sheet for your specific blaster and media.
What follows: a walk through the non-negotiables, the respirator, the sealed environment, the dry air, then the step-by-step sequence that actually gets work done when you learn how to use a sandblaster. The last sections cover the edge cases that break standard guides: what to do in 90% humidity, why your shutdown order matters, and how to spot a clog before it stops your project cold.
Key Takeaways
- Always wear a NIOSH-approved respirator, silica dust causes permanent, progressive lung damage, and a dust mask is not enough.
- Match your air compressor’s CFM output to your blaster’s requirement; a Shop Fox M1115 needs 6–25 CFM, while undershooting this starves the gun of power.
- Manufacturers disagree on depressurization after use: the Shop Fox M1115 manual instructs depressurizing after each use, while the Comco MicroBlaster MB1000 is designed to remain pressurized for an entire work shift.
- Procedures for disconnecting vary: the Shop Fox M1115 manual says to close the air supply valve and discharge the tank before disconnecting, while the Dustless Blasting DB150 manual warns that turning the compressor off first causes backflow.
- Media that has gotten wet can clump instantly, jamming the gun and creating a non-productive, gritty mess.
The Safety Gear You Cannot Skip
Forget the work for a second. A running sandblaster creates an aerosol of fine particulate, silica, metal dust, old paint chips. Inhaling that mixture isn’t just uncomfortable; it’s a one-way ticket to silicosis, a lung-scarring disease with no cure. The Occupational Safety and Health Administration (OSHA) and the National Institute for Occupational Safety and Health (NIOSH) treat this as a controlled hazard for a reason.
Your kit is essential. Start with a NIOSH-approved respirator fitted with P100 filters. A paper dust mask is a placebo here. Next, a sealed blast hood with a replaceable lens, not safety glasses. You need a full seal keeping grit out of your eyes, ears, and hair. Thick, abrasive-resistant gloves and coveralls round out the uniform. The Shop Fox M1115 manual is blunt: always wear this gear when using or cleaning the sandblaster. Every time.
Common mistake: Skimping on the respirator because the job is “quick.” Silica exposure is cumulative, and a five-minute blast without protection still deposits irreversible contaminants in your lungs.
Securing your workpiece is the other half. Blast pressure can launch a loose piece of metal or wood. Clamp it down. Always blast in a contained area, ideally a dedicated cabinet or a curtained booth, to control the spread of abrasive dust. Check your cabinet for leaks before each use and replace worn nozzles, hoses, and gloves immediately.
Choosing and Handling Your Abrasive Media
Not all grit is created equal. Your choice of blasting media dictates the finish, the speed, and the safety of the job.
| Media Type | Best For | Pressure Limit (Foredom Wolf Example) | What Happens If You Pick Wrong |
|---|---|---|---|
| Aluminum Oxide | Stripping tough coatings, etching metal | Do not exceed 87 PSIG | Too aggressive on soft metals (aluminum, thin steel) will warp or deeply pit the surface. |
| Glass Bead | Cleaning, polishing, creating a satin finish | Do not exceed 60 PSIG | On thick rust, it just polishes the corrosion—you’ll burn through media with no progress. |
| Crushed Glass | Rust removal, surface prep | Check blaster manual | Angular cuts faster than round beads but can be too rough for delicate substrates. |
| Plastic/Soda | Cleaning softer metals, fire restoration | Low pressure (often <50 PSI) | On heavy mill scale, it’ll barely scratch the surface, wasting hours and media. |
Match the media to your substrate. Aluminum oxide is the go-to for steel. Glass beads leave a brighter, satin finish on tools. For auto body work or removing coatings from aluminum without damage, plastic media or baking soda is the safer bet, but you must consult your blaster’s manual for the correct pressure.
Here’s the part nobody mentions: moisture kills media. If your abrasive media absorbs humidity, it clumps in the hopper and jams the feed line. The Comco MicroBlaster manual warns that powder left sitting in an unpressurized machine overnight can absorb moisture and cause flow problems. Store media in a sealed container. If you’re working in high humidity, something the Shop Fox manual explicitly calls out as a problem, you may need to reduce the abrasive load in the tank and empty the water trap more often.
Setting Up Your Air Compressor and Blaster
Your blaster is only as good as its air supply. Two specs matter: PSI (pressure) and CFM (volume). Get either wrong and the gun sputters or the compressor burns out.
The compressor for sandblasting must meet your blaster’s minimum CFM requirement. For the Shop Fox M1115, that’s 6–25 CFM. A compressor delivering less than your blaster’s required CFM will not keep up; the pressure will drop, the media flow will stutter, and you’ll be waiting more than blasting. For larger pressure-feed blasters, the air demand is higher, and you will need a larger, more powerful compressor.
Dry air is critical. Water in the air line mixes with abrasive in the tank, creating a cement-like slurry that clogs everything. Every quality manual stresses this. The Comco MicroBlaster MB1000 sets a hard limit: maximum moisture in the air supply is 200 PPM, maximum oil is 10 PPM. This is why you install a filter/regulator and a refrigerated air dryer if you’re running a shop. For a sandblast cabinet, the built-in filter helps, but it starts with dry air coming in.
Where this goes sideways: Connecting a new blaster with old, moist air lines. The lines hold condensation that the new filter can’t catch, and the first tank load turns to mud, jamming the gun within minutes.
Make the connections in this order:
- Position the blaster and air compressor on stable, level ground.
- Attach the air hose from the compressor to the blaster’s inlet, threading it hand-tight plus a quarter-turn with a wrench.
- Connect the blast hose to the gun and the pressure pot or cabinet.
- Install your chosen nozzle into the blast gun, hand-tight.
Before you fill the tank, do a pressure check with the gun pointed in a safe direction and the safety on. Listen for leaks, a hiss means a fitting isn’t tight.
The Step-by-Step Operating Procedure
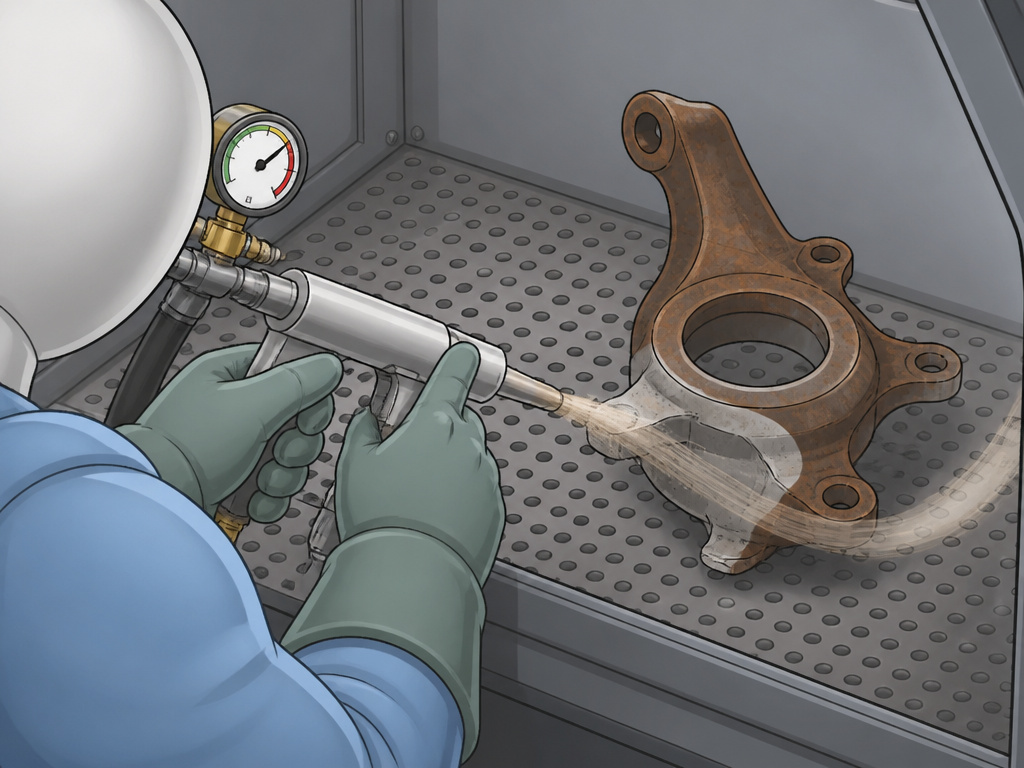
With safety gear on and the system connected, you’re ready to load and blast. The sequence here prevents most common clogs and injuries.
- Depressurize and Load. Ensure the blaster is off and disconnected from air. Open the fill port. Pour in your dry abrasive, filling to the manufacturer’s line, the Shop Fox M1115 holds 80 lbs. Or 3/4 full. Never overfill. Close and seal the port.
- Pressurize the System. Open the main air supply valve slowly. Let the tank pressure stabilize at your target PSI (e.g., 80 PSI for general work). Watch the gauge for steady pressure.
- Test the Gun. With the nozzle pointed into the cabinet or at a safe backstop, engage the trigger briefly. You should see a steady, even stream of abrasive. If the flow is weak or pulsating, stop, you likely have a clog or insufficient air volume.
- Blast with Technique. Hold the nozzle at the distance recommended for your specific blaster and media. Use a smooth, side-to-side sweeping motion. Overlapping passes ensure even cleaning. Don’t linger in one spot; you’ll cut too deep.
- Monitor Media and Pressure. Keep an eye on the pressure gauge. A sudden drop usually means a clog in the line or the nozzle. Refill the abrasive before the tank runs completely empty to avoid sucking air into the feed line.
This procedure assumes a dry, sealed system. The Foredom Wolf Sand Blaster manual adds a critical wait step: after blasting, wait at least 10 seconds before opening the cabinet lid to let airborne particulates settle.
What about removing rust with a sandblaster? The technique is the same, but media choice is key. Aluminum oxide or crushed glass cuts through rust fast. For a car frame, you might start at a pressure within your blaster’s operating range and move closer. For a delicate tool, use a lower pressure appropriate for your media and blaster, such as the 60 PSIG limit for glass beads on a Foredom Wolf Sand Blaster, and increase your distance. The job dictates the settings.
Troubleshooting Common Sandblaster Problems
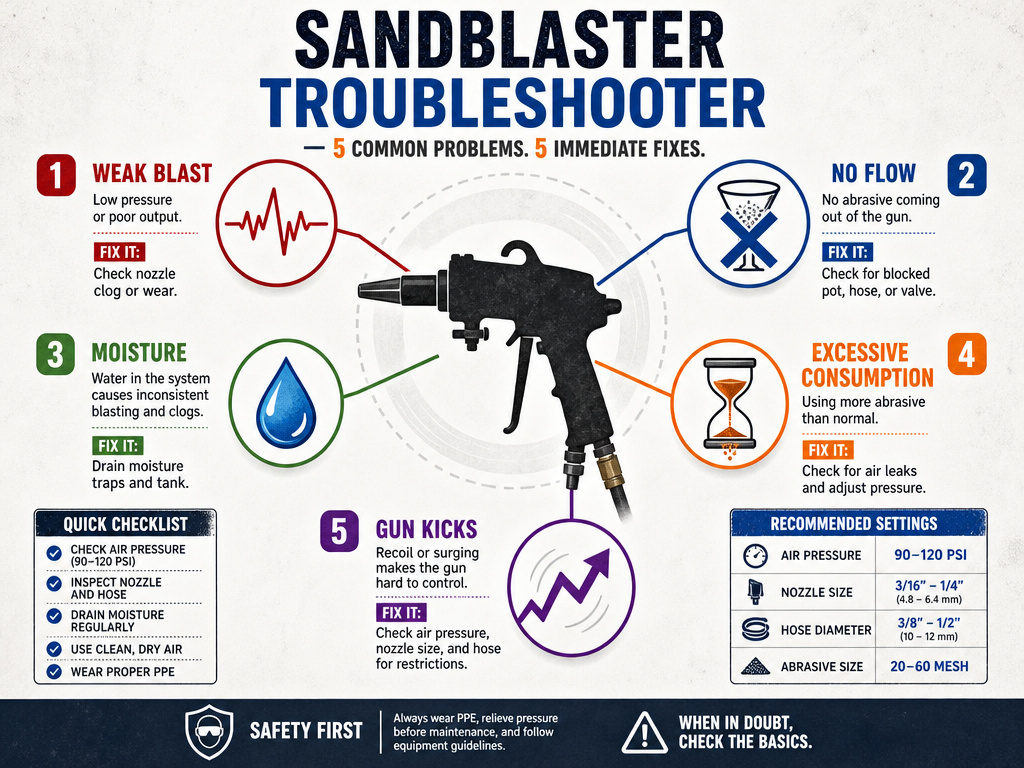
Even with perfect setup, things go wrong. Here’s how to diagnose the usual suspects.
| Problem | Likely Cause | Immediate Fix | Long-Term Solution |
|---|---|---|---|
| Weak or pulsating blast | Low CFM from compressor, clogged nozzle, wet media. | Stop. Check compressor output and nozzle for blockage. | Ensure compressor meets blaster CFM needs; store media in airtight containers. |
| No abrasive flow | Empty media tank, clogged pickup tube, incorrect pressure. | Depressurize, check tank level, inspect pickup. | Regularly flush pot (monthly, per Dustless Blasting DB150 manual); use a filter drier. |
| Moisture in blast stream | Water in air lines, saturated media, high humidity operation. | Drain all moisture traps; replace media if damp. | Install a refrigerated air dryer; in humidity >90%, reduce abrasive load (Shop Fox manual). |
| Excessive media consumption | Pressure too high, nozzle worn oversized, leaking hose/connections. | Reduce pressure 10 PSI; inspect nozzle diameter. | Replace worn nozzles (Comco nozzles last 8–35 hrs); check and tighten all fittings before each use. |
| Blast gun kicks or hose whips | Sudden release of a clog, pressure spike. | Release trigger, point gun safely, depressurize system to clear. | Install an in-line pressure regulator; never use media with large, irregular chunks. |
A clog is the most frequent stoppage. If nothing comes out of the nozzle, the Dustless Blasting manual advises putting the machine in blowdown mode, then removing the nozzle to check for a rock or debris. It’s a five-minute fix if you catch it early.
Manufacturers offer different guidance for high humidity: the Comco MicroBlaster recommends an environment with less than 40% relative humidity, while the Shop Fox M1115 manual provides instructions for operating when humidity is 90-100%. In a damp shop, you’re fighting physics; a better air dryer is the only real answer.
Maintenance, Storage, and When to Rent
A sandblaster is a simple machine, but neglect breaks it. Your maintenance checklist is short and specific.
After Each Use:
- Depressurize the tank (unless your manual, like the Comco MB1000, says otherwise).
- Drain the moisture trap on your air filter.
- Visually inspect hoses, gloves, and lens for wear.
Monthly:
- Flush the pot out. The Dustless Blasting DB150 manual says once a month or so to prevent abrasive buildup on the walls.
- Empty the dust collector. The Comco manual says monthly, or weekly in high-use facilities.
- Inspect wear items like nozzles, elbow inserts, and seals. The DB150 manual notes these last an average of 400 hours dry-blasting or 2000 hours wet-blasting.
Winter Storage:
- Open all ball valves on the unit. The DB150 manual states this prevents moisture from freezing and expanding inside valves, which can cause damage.
- For wet blasting systems, add rubbing alcohol to the water tank at a 1:100 gallon ratio at 32°F, up to a 1:20 ratio if needed.
Let’s be real. For a one-off project like stripping a single set of patio furniture, renting a quality sandblaster for DIY often beats buying a cheap unit. You get a maintained, powerful machine without the long-term storage hassle. When evaluating a rental, test the air compressor they provide matches the blaster’s needs, and inspect the hoses and nozzle for wear before you leave the shop. Buying makes sense if you have recurring projects or a dedicated shop space. A good cabinet blasting setup is a permanent workshop asset.
Types of Sandblasters: Cabinet, Pressure Pot, and Siphon
Sandblasters come in a few main types, each suited for different jobs. A cabinet blaster is a sealed unit with built-in gloves and a viewing window, designed to contain the media and dust. You must keep the cabinet lid closed during blasting and wait for airborne dust to settle before opening it. A pressure pot system uses a pressurized tank to push abrasive directly to the nozzle, offering more power for larger tasks. A siphon or suction blaster uses air flow to draw abrasive from a non-pressurized hopper, which is simpler but often less aggressive. Your choice depends on the size of your workpiece, the aggressiveness needed, and whether containing the mess is a top priority.
Frequently Asked Questions
What do you need to run a sandblaster?
You need three core components: the blaster itself (cabinet or pressure pot), an air compressor that meets the blaster’s specific CFM and PSI requirements, and a supply of dry, compatible abrasive media. Crucially, you also need a NIOSH-approved respirator, sealed blast hood, gloves, and a contained work area.
Can you paint directly after sandblasting?
No. After sandblasting rust or paint, the surface is perfectly clean but also active. It will begin to oxidize (flash rust) within minutes in humid air. You must wipe it down with a degreaser, then apply a primer or direct-to-metal paint immediately. The surface will begin to oxidize quickly after blasting, so you must apply a primer or paint immediately.
Why does my sandblaster keep clogging?
Clogs almost always trace to moisture. Either your compressed air isn’t dry enough, your abrasive media absorbed humidity during storage, or you’re operating in high ambient humidity without compensating. The fix is to improve air drying, store media in sealed buckets, and in damp conditions, reduce the abrasive load in the tank.
Is it okay to reuse sandblasting media?
You can reuse media for light cleaning jobs, but never for critical surface prep. Used abrasive breaks down into finer, less effective particles and becomes contaminated with the material you blasted off (paint, rust). Reusing it on a new project can embed old contaminants into the fresh surface. For paint prep or coating removal, always use new media.
Before You Go
The one rule that reframes everything: dry air beats every other variable. A cheap blaster with bone-dry air will outperform a premium unit fed by a damp compressor. Your first equipment upgrade should always be an air filter/dryer, not a more expensive gun.
If you only take away one action, make it this. Before your next blasting session, check the moisture trap on your air system. If you can drain water from it, your air isn’t dry enough. Fix that first. Everything else, media choice, technique, pressure settings, follows from a clean, dry supply. A blaster is just a delivery system. What you deliver, and how you deliver it, decides whether you finish the job or fight the machine all afternoon.
