
How to Use a Workshop Air Filtration System: Step-by-Step
This post contains affiliate links. As an Amazon Associate, we earn from qualifying purchases.
To use a workshop air filtration system, you must place it correctly, set the fan speed for your specific dust type, and run it on a timer before and after work. Sources differ on the primary function: IGM Tools states air filters are not a replacement for dust extractors and are for minimizing airborne dust, while AirBench Ltd describes its system as recirculating filtered air within the workplace. Set the fan speed based on the particle type: 50–75% for fumes, 50–100% for light dusts, and 75–100% for heavy dusts.
That 50–100% range isn’t a guess. It comes straight from the manufacturer’s manual for units like the AirBench, and it’s tied directly to the weight of the particles you’re creating. Light sanding dust needs a different pull than heavy planer chips. If you set it incorrectly, you waste power and allow the most hazardous fine dust to reach your lungs long before the air gets to the filter. The manual explains how to use a workshop air filtration system correctly.
What follows is the setup most guides skip when explaining how to use a workshop air filtration system: the electrical safety check, the one tool that tells you a filter is failing before you see dust, and the exact maintenance schedule that keeps a system certified for professional use under regulations like COSHH.
Key Takeaways
- Ensure the unit is installed on a flat and level floor capable of carrying its weight, and do not block the air exhaust outlet.
- Set the fan speed based on particle weight: 50–75% for fumes, 50–100% for light dusts (sanding), and 75–100% for heavy dusts (milling, jointing).
- Use a timer to run the system after you finish working to clear residual airborne dust.
- Replace HEPA or cartridge filters when the filter pressure gauge needle enters the red zone; this indicates low airflow from a loaded filter.
- An air filtration system is a secondary cleaning device; you still need a dedicated dust collection system at each power tool to capture chips at the source.
Where to Place Your Air Filtration Unit
Head height is the wrong place. You mount it high because heat rises, and with it, the cloud of fine dust you can’t see. The goal is to pull that dirty air from the ceiling, clean it, and push the filtered air back down at floor level to create a circular current. For a standard rectangular shop, a corner opposite your main workbench is ideal.
Common mistake: Mounting the unit directly above a table saw or sander. This creates a short-circuit. The heavy chips and direct blast from the tool overload the filter instantly, while the fine dust cloud drifts away untouched. Place it downstream of your main airflow, not in the firing line.
The manufacturer IGM Tools notes that open doors can completely change the air flow. If your garage shop has a main door you open frequently, don’t mount the unit right beside it. The cross-breeze will pull unfiltered air across the shop and out the door, bypassing your system entirely. For an oddly shaped shop or one with two distinct rooms, using two smaller filters is better than one large unit struggling to pull air around a corner.
How to Set the Correct Speed and Run Time
You don’t just turn it on high and leave it when learning how to use a workshop air filtration system. Different debris requires different airspeeds for effective capture. The AirBench manual provides the only concrete numbers I’ve seen: for fume extraction, run at 50–75% power. For light dusts like sanding, 50–100%. For heavy dusts from milling or jointing, 75–100%.
Here’s why. Lower speeds let fumes spend more time in a carbon filter, allowing for better adsorption. For heavy dust, you need the higher suction to keep the larger particles moving into the collection chamber before they fall out of the airstream. A variable speed controller is essential.
Fume: 50-75% | Light Dusts: 50-100% | Heavy Dusts: 75-100% Source: AirBench Ltd FPW/FPT Manual.
For run time, use a simple wall timer. Turn the system on before you start work to pre-clean the air. The critical part is leaving it on for 2-3 hours after you leave the shop. That lingering cloud of ultra-fine dust takes time to circulate and be captured. A system running only while you work is only doing half its job.
The Filter Gauge Is Your Best Friend
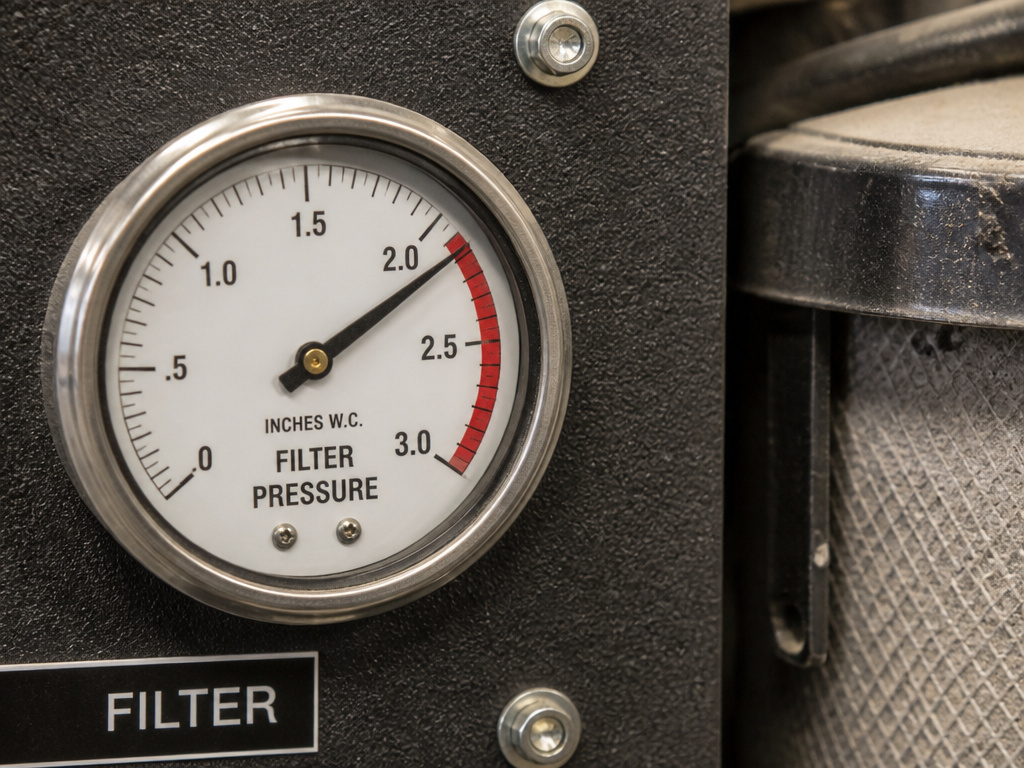
Ignore the calendar. A filter doesn’t need changing every six months; it needs changing when it’s full. The only reliable way to know that is the filter pressure gauge on the front of most commercial units like the AirBench or JET systems.
When the filter is clean, airflow is high and the gauge needle sits comfortably in the green zone. As the filter loads with dust, airflow drops. The resistance increases, and the needle climbs into the red zone. That red zone is your signal. It means airflow is now too low for the system to be effective, and the fan motor is straining.
A heavily loaded filter can negatively impact performance. Once that needle is steady in the red, it’s time for maintenance. This is a sourced, physical metric, not a guess. The Harvard T.H. Chan School of Public Health DIY guide confirms that a soiled filter hurts performance, which is why checking gauges is part of a proper safe workshop routine.
A Realistic Maintenance Schedule
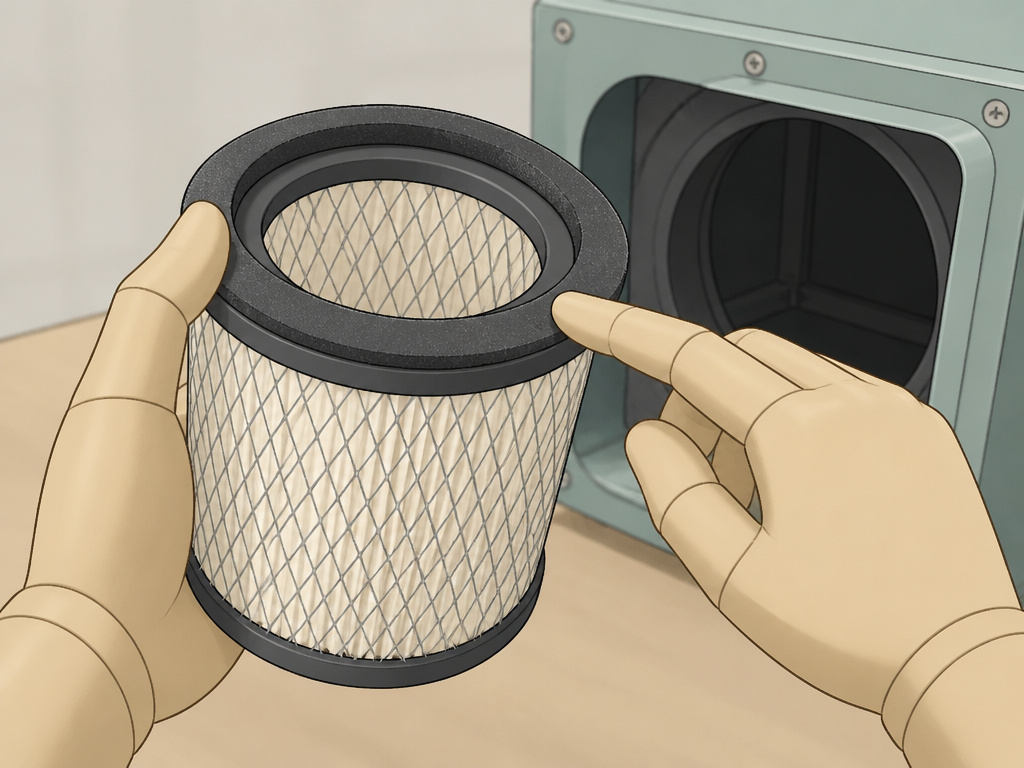
Beyond watching the gauge, a few simple checks prevent big problems. These aren’t my suggestions; they’re compiled from manufacturer service manuals.
| Task | Frequency | What Happens If You Skip It |
|---|---|---|
| **Clear any blocked holes in the filter surface at least monthly, or as routine, to maintain proper airflow. | ||
| Check filter seals | Every filter change | Dust bypasses the filter, shoots straight into the fan chamber, and sandblasts the impeller. |
| Clean fan chamber | Every 6 months | Accumulated debris unbalances the fan, causing a low-frequency vibration that shakes mounting bolts loose. |
| Tighten electrical connections | Annually | Loose connections arc, heat up, and are the most common cause of electrical failure in shop equipment. |
The filter seals are especially critical. They are simple foam or rubber gaskets that sit behind the filter cartridge. Every time you change or remove a filter, run your finger around the seal. If it’s cracked, brittle, or compressed, replace it. A broken seal turns your precision air filter into a very expensive box fan blowing dust around.
Is Your Shop Too Big for One Unit?
Maybe. You can calculate the rough capacity you need. The formula from IGM Tools is: (Shop Length x Width x Height) x (Air Exchanges per Hour) / 60. The example calculation from IGM Tools uses 6 air exchanges per hour.
For example, your shop might be 7m long, 4m wide, with a 3m ceiling (about 23′ x 13′ x 10′). You want 6 air changes per hour.
(7 x 4 x 3) x 6 / 60 = 8.4 m³/min
That’s your base airflow need. The example calculation from IGM Tools for a 7m x 4m x 3m workshop with 6 air exchanges per hour includes multiplying by 1.3, yielding 10.92 m³/min.
8.4 x 1.3 = 10.92 m³/min
So, you need a unit rated for at least 11 cubic meters per minute. If your calculated need is near the top of a unit’s rated capacity, size up. A system running at max blast is loud and wears out faster. This math is why for a 10-11 m³/min need, a JET AFS-500 might work, but the AFS-1000B is the smarter choice—it meets the requirement on its lowest, quietest setting.
Air Filtration vs. Dust Collection: The Critical Difference
This is the single most important point. A workshop air filtration system is not a dust collector. IGM Tools states it bluntly: “Air filters do not replace dust extractors.” Their purpose is to keep airborne dust to a minimum, not to act as a primary dust collector.
Think of it this way. Your shop vac vs dust extractor or central dust collection system is for the big chips and the visible plume coming off your table saw. It captures maybe 80% of the mess right at the source. The remaining 20% is the fine, inhalable dust that stays suspended in the air for hours. The air filtration system’s only job is to get that 20%.
If you try to use a ceiling-mounted filter as your primary dust control method, you will fail. It can’t generate enough suction at the tool, and you’ll clog a $200 filter with $2 worth of chips in a week. They are complementary systems. One captures, the other cleans.
Electrical and Safety Setup You Can’t Ignore
This isn’t just plugging in a lamp. These are high-draw inductive loads (fans) that need a dedicated circuit. For example, the AirTower requires a standard 3ph 16A supply using the provided plug. Trying to run that on a shared 15A household circuit with your table saw is asking for a tripped breaker at best, a melted outlet at worst.
Before first use:
- Check the outlet. Ensure it’s the correct voltage and amperage. If it’s in a garage or basement, it must be GFCI-protected.
- Inspect the cord. Look for cracks, cuts, or damaged plugs. A fan motor pulling startup current through a damaged wire gets hot. Fast.
- Secure the mounting. Whether it’s wall brackets or ceiling chains, use hardware rated for the unit’s weight plus vibration. A 50-pound unit shaking loose from drywall anchors is a serious hazard.
When performing maintenance, the rule is simple: always unplug the unit. Not just turn it off—unplug it. Reaching into a fan chamber to clear debris when the unit is plugged in is how accidents happen. The Harvard DIY guide also advises using gloves and a mask when handling used filters, as they are concentrated with whatever you’ve been sanding or cutting.
Troubleshooting Weak Airflow or Noise
The system was working, now it’s not. Don’t just turn it up. Diagnose.
Problem: Gauge is in the red, but airflow feels weak.
- Likely Cause: The primary filter is loaded and needs cleaning or replacement.
- Fix: Service the filter. For a permanent HEPA filter, use compressed air from the clean side to blow dust out into a trash bag. For a disposable filter, replace it.
Problem: A persistent humming or rattling vibration.
- Likely Cause: Debris has entered the fan chamber and is touching the impeller, or the fan mounts have loosened.
- Fix: Unplug the unit. Open the fan chamber access panel and remove any wood chips, screw, or debris. Check and tighten all fan housing bolts.
Problem: System turns on but no airflow.
- Likely Cause: The fan motor capacitor has failed, or a wiring connection has come loose.
- Fix: This is an electrical repair. If you’re not comfortable testing a capacitor and wiring, this is the point to call a technician.
Remember, these systems are simple: a fan, a filter, and a motor. The problem is almost always a blockage, a loose part, or a worn-out component. Start with the easiest fix first.
Using Household Air Purifiers in a Workshop
Household air purifiers are not substitutes for workshop filtration systems. Their primary function is to clean ambient air in living spaces, not to capture the high volume of fine dust generated by woodworking or metalworking. A heavily loaded filter will quickly lose effectiveness. If you must use one, ensure it uses a true HEPA filter to capture the smallest particles. Always turn the device off before checking or replacing the filter, and wear gloves and a mask when handling a soiled one. Remember, these units are not designed for workshop conditions and will not provide the air exchanges needed to keep airborne dust at a safe minimum.
Frequently Asked Questions
Do you leave the air purifier on 24/7?
No. Run it on a timer for 2-3 hours after you finish work to clear residual dust, then let it turn off. Running it constantly in an empty shop wastes electricity and puts unnecessary wear on the fan motor. The goal is clean air while you’re working and shortly after, not a perpetually sterile empty room.
What is the best air filtration system for a small workshop?
For a small shop (under 300 sq ft), a single, well-placed unit like a JET AFS-1000B or a similar air filtration unit is sufficient. Focus on placement and correct speed settings over raw power. A smaller, quieter unit you actually use is better than a massive one you avoid because it’s deafening.
What is the best air filter for a workshop?
For fine wood dust, a true HEPA (High-Efficiency Particulate Air) filter is the benchmark, removing more than 99% of all particle sizes. For general shop use, a high-quality cartridge filter is often a practical choice. The “best” filter is the one with the highest efficiency you will consistently maintain and replace.
How to properly use an air filter?
Proper use means integrating it into a complete system. Use a primary dust collection for small shops at every tool. Position your air filter to complement that airflow. Set its speed for your task. Monitor its pressure gauge. And service it based on that gauge, not the calendar. It’s a tool, not an appliance you set and forget.
Before You Go
One rule that reframes everything: if your primary dust collector isn’t capturing the majority of debris at the source, an air filter will be less effective at maintaining air quality. The filtration system is your cleanup crew, not your front line. Invest first in good shop vacs and shrouds for your tools, sealed ducting, and a good collector. Then add the air filter to handle what escapes.
Your first action should be to find the filter pressure gauge on your unit. If it doesn’t have one, order a simple manometer that can measure static pressure—it’s the only way to know your filter’s status without guessing. Clean air isn’t a luxury in a workshop; it’s the foundation of seeing your work clearly and breathing easy for decades to come.
