
How to Set up a Workshop Dust Collection System
This post contains affiliate links. As an Amazon Associate, we earn from qualifying purchases.
To set up a workshop dust collection system, you match your collector’s CFM and static pressure to the total airflow demand of your tools, design an efficient duct layout with sized piping, and ensure every connection is sealed and grounded. The process breaks into planning, sizing, installation, and connection phases, with static electricity control as an essential safety step.
That matching step is where most systems fail before a single pipe is clamped. A collector rated for 1000 CFM doesn’t deliver that to your sander’s 2-inch port 30 feet away, friction, elbows, and undersized ducting eat that power long before it reaches the tool. Understanding how to set up a workshop dust collection system is key because it works when every component, from the main trunk to the last flex hose, is sized to move the required volume of air with minimal resistance.
What follows is the walk-through on how to set up a workshop dust collection system: how to calculate your real CFM needs using the port-size chart, sketch a layout that minimizes long runs, choose between metal and flex duct, and wire in blast gates so you’re not sucking air from an empty room. We’ll also cover the static electricity rule that keeps your shop from becoming a hazard and the one upgrade that makes filter cleaning a quarterly job instead of a weekly chore.
Key Takeaways
- Calculate total system CFM by adding the needs of all your tool ports using the manufacturer’s chart, a 4″ port needs ~395 CFM, a 6″ port needs ~884 CFM.
- Keep flexible hose runs under 10 feet; the internal ridges create massive airflow resistance and reduce suction performance.
- Ground your entire duct system to prevent static electricity buildup, a fire and explosion hazard cited in every major manufacturer’s manual.
- Place your highest-CFM machines like planers and jointers closest to the dust collector to maintain strong suction where you need it most. Note that while Ducting Systems advises placing machines requiring the largest CFM closest, Grizzly and South Bend Tools suggest placing machines that produce the most sawdust nearest.
- Use blast gates at every machine branch; isolating unused tools keeps airflow strong at the active station and is critical for single-stage collector efficiency.
The Non-Negotiables: Collector Power and System Goals
Your dust collector isn’t a vacuum. It’s an air pump central to how to set up a workshop dust collection system. Its job is to move a specific volume of air (CFM) against the resistance (static pressure) created by your ductwork. Choosing one based on horsepower alone is a classic mistake. A 2HP collector with high CFM but low static pressure might starve a tool at the end of a long duct run, while a 1.5HP model with better pressure characteristics could serve the same shop flawlessly.
Look at the spec sheet for the actual numbers. For example, the Grizzly G0862 (2 HP) moves 1023 CFM at 1.2″ of static pressure, while its 3 HP brother moves 1941 CFM at 2.9″ SP. That higher static pressure rating on the 3HP model means it can push air through more duct, more elbows, and a clogged filter before performance tanks. For a small shop with short, straight runs, the 2HP unit is ample. For a sprawling basement shop with two dozen feet of pipe and several bends, the 3HP’s extra pressure head is the difference between clean air and dust clouds.
Before you start: Wood dust is combustible. All dust systems MUST be grounded to avoid a buildup of static electricity in the ductwork or filter, per the Ducting Systems/Nordfab manual. An ungrounded system can generate a spark capable of igniting fine dust. Also, ensure your collector is on a dedicated circuit matching its amperage requirements to prevent tripped breakers and motor strain.
Planning Your Shop Layout on Paper First
Grab some graph paper or use a free online workshop planner. This isn’t about aesthetics; it’s about calculating feet of pipe and identifying obstruction headaches before you buy a single clamp. Sketch your shop’s footprint, marking permanent obstructions: support columns, water heaters, electrical panels, low ceiling joists.
Now, place your machines. Here’s where the manuals offer slightly different advice. The Ducting Systems guide advises placing machines requiring the largest CFM closest to the dust collector. Grizzly and South Bend Tools suggest placing machines that produce the most sawdust (like planers and sanders) nearest the collector. In practice, these usually point to the same tools. Your 15″ planer with a 5″ port (needing ~614 CFM) is both a high-CFM and a high-sawdust machine.
Finally, decide where the collector itself lives. An exterior wall or corner is typical, but consider noise and debris disposal. A cyclone or two-stage unit like the Grizzly G0440 needs headroom for the cone. A single-stage collector dumping into a bag needs floor space you can access to empty it. If noise is a concern for neighbors or household, an insulated closet or exterior shed location is worth the extra ductwork.
How Do You Size Your Ductwork?
This is the core math that decides whether your system breathes or chokes. You size ducts from the farthest tool back to the collector, adding CFM at each junction. The gold standard for this is the CFM chart published by Ducting Systems and Nordfab.
| Dust Port Diameter | Approximate CFM Required |
|---|---|
| 1 inch | 24 CFM |
| 2 inches | 98 CFM |
| 3 inches | 220 CFM |
| 4 inches | 395 CFM |
| 5 inches | 614 CFM |
| 6 inches | 884 CFM |
| 7 inches | 1203 CFM |
| 8 inches | 1570 CFM |
Start at your farthest machine. For example, it could be a miter saw with a 2.5″ port (needing ~150 CFM). The branch duct serving only that saw can be 2.5″ duct, but you’ll likely round up to standard 3″ pipe. When that branch hits the main trunk line, you add its CFM to the flow already in the trunk.
Here’s a concrete walk-through. Assume your trunk already carries 615 CFM (from other tools) and is a 6″ duct. You now want to connect a table saw with a 4″ port (~395 CFM). Normally, you’d add the flows: 615 + 395 = 1010 CFM, requiring a 7″ duct. But here’s the critical rule from the ducting guide: If the machine can be isolated with a blast gate, you do not need to add its CFM to the main trunk line size calculation. With a closed blast gate at the table saw, the trunk still only carries 615 CFM. That existing 6″ line is fine. This is why blast gates aren’t optional, they let you use smaller, cheaper main ducting.
Begin at the machine that is farthest away from your collector and work your way back towards the filter. Determine the appropriate diameter for the CFM requirements at the first machine. Continue on to the second machine, adding CFM at each junction, until your main trunk is equivalent in diameter to the size of the collector inlet.
Choosing Components: Metal, Flex, and Blast Gates
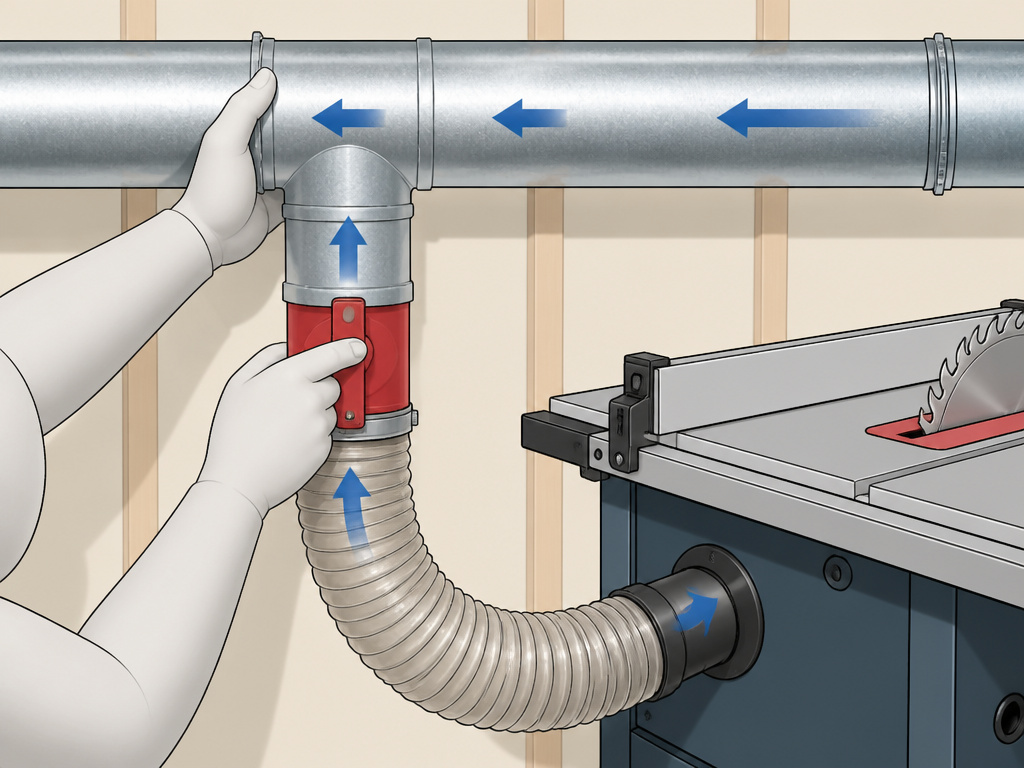
With your sizing map done, you pick the physical parts. Each choice trades cost for performance and ease.
Metal Ducting (Snap-Lock or Spiral Pipe): This is for your main trunk and long branch lines. It’s smooth-walled, minimizing friction and static pressure loss. Snap-lock pipe is easier for DIY; spiral pipe is more rigid. Both should be grounded. A cyclone dust collector often pairs well with a full metal duct system; see our review of the best cyclone dust collectors.
Flexible Hose: Use it only for the final drop to the tool, the last 3 to 6 feet. Never use it for long runs. The Northern Tool manual is blunt: “Avoid using more than 10′ of flexible hose on any ducting line. The ridges inside flexible hose greatly increase pressure loss, which reduces suction performance.” I keep flex hose under 6 feet whenever possible. That corrugated interior sounds like a gentle rumble when air moves through it, but it’s stealing your CFM.
Blast Gates: These are the on/off switches for your system. Metal gates are durable but pricey; plastic gates work fine for most home shops. Install one at the start of every branch line. The right blast gates make the difference between a smart system and a loud, inefficient one; choosing effective blast gates for dust collection is key.
Fittings: Use 45-degree elbows instead of 90s where you can. Two 45s spaced apart create a gentler turn than one sharp 90. If you need a 90, use a long-radius elbow. Every fitting adds resistance; the South Bend Tools manual notes that directional changes should be kept to an absolute minimum.
Connecting Your Tools and Final Steps
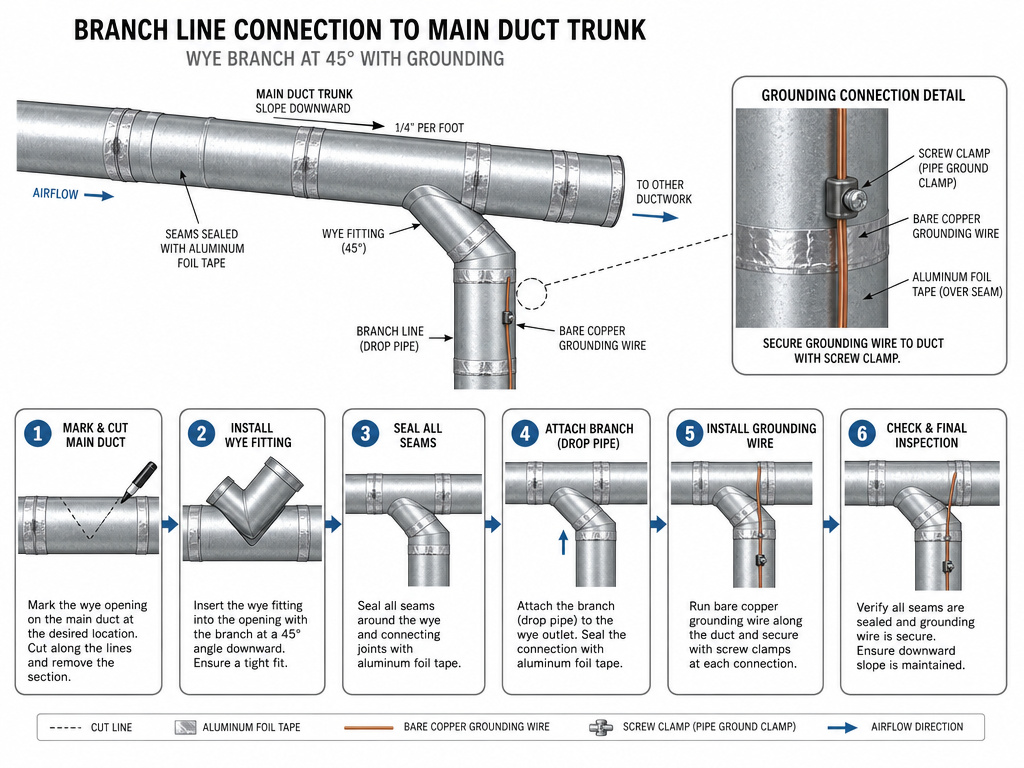
Now for the hands-on work: hanging pipe, making connections, and wiring it all together.
- Mount the Main Trunk. Use sturdy strapping or plumber’s tape, supporting pipe every 6-8 feet to prevent sagging. Maintain a slight slope back toward the collector so any condensation or debris can drain.
- Install Branches and Drops. Branch lines should tee off the main trunk at a 30-45 degree angle, not 90 degrees, to maintain airflow. Use wye fittings, not tees.
- Ground the System. This is not optional. Run a bare copper wire (often 14 AWG) along the entire duct run, securing it with screw clamps at each section so it contacts the metal. Connect one end to a known earth ground, like your electrical panel’s ground bus. All flexible hose must also be grounded; use hose with an embedded wire.
- Connect the Tools. You’ll need reducer fittings. A machine with a 4″ port connected to a 4″ drop hose is ideal. Avoid reducing more than one pipe size at the tool, a 6″ hose reduced to a 2.5″ port creates a massive bottleneck. For tools like sanders that need high static pressure more than high volume, consider a dedicated shop vac instead of tying them into the main low-pressure system; some are designed specifically for dust collection systems.
- Seal Every Joint. Use aluminum foil tape (not duct tape) on all seams and connections. Leaks suck in air you’ve paid to move, reducing suction at your tools.
After everything is clamped, taped, and grounded, do a power-on test with all blast gates closed. Then open one gate at a time at your farthest tool. Listen. You should hear a solid rush of air. Hold a small piece of paper near the tool’s port; it should get pulled firmly against the hood. If it doesn’t, check for leaks, a stuck blast gate, or an overlong flex hose run.
The 80/20 Upgrades: Cyclones and Filtration
Once the basic system runs, two upgrades deliver outsized returns: a cyclone separator and a better filter.
A cyclone separator (like a Dust Deputy or a built-in unit like the Grizzly G0440) mounts before your collector. It spins incoming air, throwing heavier chips and dust into a barrel before the air hits the main filter. The result? Your filter stays clean for months instead of weeks, and suction stays strong. It’s the single best upgrade for a single-stage collector. For a deep dive on this, see our comparison of single stage vs two stage systems.
Filtration is your health guard. The stock bag on many collectors may have a filtration rating less fine than a canister filter. Fine, hazardous dust is under 5 microns. Upgrade to a canister filter with a fine media; the Grizzly cyclone models, for example, have a filtration rating of 0.2 – 2 Micron. More filter surface area (measured in sq. Ft.) is better, it clogs slower. The South Bend Tools manual advises replacing the canister filter after one year of regular use, but with a cyclone pre-separator, you may extend the time between filter replacements.
Noise and Shop Vac Integration Strategies
Dust collectors are loud, 79 dB for a Grizzly G0862, 85 dB for a cyclone. For basement or attached-garage shops, noise matters.
- Build an Enclosure: A simple stud-and-MDF box lined with mass-loaded vinyl or acoustic foam can cut noise dramatically. Ensure the enclosure has ample ventilation so the motor doesn’t overheat.
- Remote Start: A wireless remote lets you turn the collector on/off from your work station, so you’re not walking back and forth.
- Integrate a Shop Vac: Your big collector is for high-volume, low-pressure chips from saws and planers. Your orbital sander needs high static pressure to pull fine dust. Don’t try to run both from one system. Use a separate, well-sealed shop vac with a HEPA filter for sanding stations. This approach of using the right tool for the right job is covered in our guide on how to control dust from power tools.
Tool-Specific Dust Collection Needs
Different tools have vastly different air volume requirements. A tool like a planer produces large chips and requires a high volume of airflow, corresponding to a larger dust port size. A sander, creating fine dust, needs effective capture but may have a smaller port. To calculate the need for any tool, start by identifying its dust port size. The required airflow is determined by the size of that port; if a machine has multiple dust ports, the total is the sum of all of them. Place machines requiring the largest airflow closest to the dust collector for best performance.
Frequently Asked Questions
What size dust collector do I need for a 2-car garage shop?
Add up the CFM of the tools you’ll run simultaneously. A typical mid-size shop with a table saw (4″), planer (5″), and jointer (4″) has tools requiring significant airflow. Since you’ll use blast gates, your collector needs to handle your single largest tool (like a planer at ~614 CFM), plus overhead for duct loss. Since you’ll use blast gates, your collector only needs to handle your single largest tool, plus some overhead for duct loss. A 2 HP collector like the Grizzly G0862 moves 1023 CFM at 1.2″ static pressure, which may be suitable for many shops depending on duct layout and tool requirements. For a full list of options, see our picks for best dust collectors for home workshops.
Can I use PVC pipe for dust collection?
You can, but you must ground it thoroughly because plastic builds extreme static charges. Many woodworkers prefer metal for its inherent grounding and fire resistance. If you use PVC, run a bare copper wire inside the entire length, making contact at every joint.
How often do I need to empty the collection bin?
It depends on your use. The key is to not let it fill past 3/4 full. A full bin restricts airflow and can cause the motor to overwork. A 35-gallon drum on a Grizzly G0440 will need emptying based on use; do not let it fill past 3/4 full. With a clear bag or drum, you can see the fill level.
Is a dust collection system worth it for a hobbyist?
Yes, absolutely. Beyond the obvious clean-up benefit, it’s a health investment. Inhaling fine wood dust is linked to respiratory issues and certain cancers. Even a simple, single-machine system is better than nothing. Starting with a collector that meets your machine’s CFM requirements is the first step toward a full dust collection system for wood shops.
What’s the difference between a dust collector and a shop vac?
It’s about volume vs. Pressure. A dust collector moves a high volume of air (CFM) at low pressure, perfect for catching big chips from table saws. A shop vac moves less air but at much higher static pressure, which is needed to pull fine dust through a sanding pad. They are complementary. Our article on dust collector vs shop vac breaks this down in detail.
The Bottom Line
Setting up a dust collection system is a project that pays back in breathing room, literally. The math of CFM and static pressure isn’t just theory; it’s the difference between a system that works and an expensive, noisy fan. Follow the port-size chart for your calculations, keep flex hose short, and never, ever skip the grounding wire.
Start with a plan on paper, then build your main trunk. A system for three or four machines can be a weekend project. If your shop is still evolving, remember that a well-planned safe home workshop setup always includes dust control from the outset. The goal isn’t perfection on day one. It’s a system you can adapt, one that captures the dust at the source so you can focus on the work, not the cleanup.
