
Wet Saw vs Dry Tile Cutting: Which Method Wins?
This post contains affiliate links. As an Amazon Associate, we earn from qualifying purchases.
A wet saw uses a water-cooled diamond blade to cut tile and stone, producing a slurry and a clean edge, while dry tile cutting uses an air-cooled blade on a grinder or cutter, generating dust and heat. For dense materials like porcelain and natural stone, a wet saw is the professional standard. For quick cuts on ceramic tile in dry environments, a dry method can work.
The core difference is a fundamental trade-off between blade life, cut quality, and your work environment, which is the essence of wet saw vs dry tile cutting. Water cools the diamond matrix, preventing the glass-like binder from melting and the diamonds from tearing out. Dry cutting heats that binder until it glazes, turning a sharp blade into a blunt, burning wheel in minutes on the wrong material.
What follows is a breakdown of how each method actually works, the specs that matter, and the one material rule that decides the wet saw vs dry tile cutting choice for most DIYers. We’ll walk through the tools, the safety gear you can’t skip, and how to read a manufacturer’s manual when it contradicts the product’s name.
Key Takeaways
- While sources like Defusco Industrial Supply state granite, quartzite, marble, and full-body porcelain all require a wet saw, other sources like MK Diamond’s blade manual suggest dry blades can handle ‘most ceramic, masonry, stone and concrete.’
- Dry cutting requires a HEPA-rated vacuum and a respirator; silica dust from tile and stone is a regulated health hazard, not just a nuisance.
- Always verify the electrical safety device, the DeWalt D24000 manual mandates a GFCI, while the Flex CS 40 WET uses a PRCD. Test it before every use.
- Blade arbor size is not universal; popular 4-5 inch saws use a 20mm arbor (Makita, Flex, Alpha), but some, like the QEP 22400Q, require a 5/8-inch arbor.
- For a small bathroom with ceramic tile, a manual snap cutter is often faster and cleaner than setting up any power saw.
The Core Difference: Water vs. Air
Wet cutting cools the blade and suppresses dust, creating a slurry. Dry cutting relies on air cooling and blade design to manage heat, producing airborne dust that must be contained. The water isn’t just for cleanup, it’s a heat sink that preserves the diamond blade’s cutting edge.
The sound tells you everything. A wet saw cutting porcelain has a steady, low hum with the splash of water. A dry cutter on the same tile emits a higher-pitched whine and the gritty hiss of abrasive dust hitting the floor. That high-pitched sound comes from friction creating intense heat where the blade meets the hard material. Excessive heat can cause the metal binder in a diamond blade to soften, and the diamonds themselves can fracture or pull out.
Water keeps the cut zone below 200°F. It also turns the cut debris into a heavy, wet slurry that falls straight down. This is why wet saws are integral to OSHA Table 1 compliance for masonry saws, as noted in the Makita XCC01Z specs. They control the silica hazard at the source.
Dry methods shift the hazard from wet slurry to airborne dust. A blade rated for dry cutting has a different bond formulation and segment spacing to shed heat, but it still generates respirable crystalline silica. Without a vacuum attached directly to the tool, you are creating a health violation in your own workspace. It’s not just messy; it’s a documented lung hazard.
How a Wet Saw Actually Works
A pump circulates water from a reservoir to a nozzle aimed at the blade’s base. The water does three jobs:
- Cools the diamond grit and metal bond.
- Lubricates the cut, reducing drag.
- Weighs down the cut debris, forming a slurry.
The tool’s design assumes water contact. The DeWalt D24000 manual explicitly warns: “Never use saw with salt water or a conductive fluid.” and “Do not run the pump dry.” The motor and electrical components are sealed, but submersible pumps can burn out in seconds without water.
How Dry Cutting Works
An air-cooled blade depends on airflow from its own rotation and open segment gaps to carry heat away. The Alpha AWS-110 product page states it “can also be used for dry applications,” but this comes with a caveat. You must use a blade specifically rated for dry cutting and keep passes light to avoid heat buildup. It’s a race against thermodynamics.
Material Matters Most: The One Rule That Decides
This is where online advice on wet saw vs dry tile cutting gets fuzzy. One blade manufacturer says dry cutting works for “most” masonry, while an industrial supplier draws a hard line. Your material choice decides everything.
| Material | Wet Saw Recommended? | Dry Cutting Possible? | Key Reason |
|---|---|---|---|
| Porcelain Tile | Required | Not Recommended | Extreme density glazes dry blades, causes chipping. |
| Granite / Marble | Required | Not Recommended | Natural stone is abrasive and brittle; heat causes cracking. |
| Ceramic Wall Tile | Ideal | Yes, with caution | Softer body cuts easier; heat management is possible for few cuts. |
| Concrete Pavers | Ideal | Yes, for thin pavers | Abrasive material wears blades fast; water extends blade life significantly. |
| Glass Tile | Required | No | Heat causes thermal shock and breakage; water is non-negotiable. |
The disagreement in our sources is instructive. MK Diamond’s blade manual suggests dry blades can handle “most ceramic, masonry, stone and concrete.” Conversely, Defusco Industrial Supply’s analysis states flatly that “Granite, quartzite, marble, and full-body porcelain all require a wet saw.”
I side with the supplier’s hard line for anyone doing more than a couple of cuts. The risk involves both a bad edge and the potential destruction of a $80 blade in three minutes on a porcelain tile. The blade will overheat, the steel core will warp, and the diamonds will shed. You’ll smell the sharp, acrid scent of burnt metal and resin. At that point, the blade is trash.
Common mistake: Trying to dry-cut porcelain because a YouTube video made it look easy. The video likely edited out the three ruined blades and the cloud of dust. For a full tile job, the wet saw setup time is cheaper than replacement blades.
Why Porcelain Demands a Wet Saw
Porcelain is sintered at extremely high temperatures, making it nearly as hard as mild steel. A dry blade creates intense localized heat. This heat does two things: it thermally shocks the tile, causing micro-cracks that lead to chipping, and it melts the softer metal matrix holding the diamonds in the blade. Once glazed, the blade rubs instead of cuts, generating more heat in a vicious cycle.
The DeWalt D24000 is marketed with a “Powerful 1.5 HP motor [that] cuts through dense porcelain” for a reason. It’s the water doing the work, not just the motor.
Tool-by-Tool Breakdown: From Handheld to Stationary
You have more than two options. The spectrum runs from manual snappers to benchtop saws, and your project size dictates the fit.
Wet Tile Saws
These are dedicated tools with a water reservoir, a pump, and a sliding table or cart.
Benchtop Models (e.g., DeWalt D24000, QEP 22400Q):
- Best For: DIYers, remodelers, contractors doing indoor jobs.
- Capability: The D24000 cuts up to 3-1/8 inches deep and handles tiles up to 25 inches rip, 28 inches plunge. The QEP 22400Q has an unlimited rip capacity but a 3/4-inch depth limit.
- Setup: Requires a water source (a bucket or hookup) and a GFCI-protected outlet. Plan for setup and leveling time before starting your cuts.
- Portability: The D24000 weighs 69 lbs; you can carry it, but it’s a two-trip load. The QEP model is lighter, meant for small spaces.
Handheld Wet/Dry Saws (e.g., Makita XCC01Z, Flex CS 40 WET, Alpha AWS-110):
- Best For: Pros doing showers, countertops, or masonry; cutting in-place or on vertical surfaces.
- Capability: The Makita XCC01Z cuts 1-9/16 inches at 90°. The Flex CS 40 WET has a maximum cut thickness of 41mm (about 1-5/8 in) at 90°. The Alpha AWS-110 cuts 1-1/4 inches (32mm).
- Key Feature: They’re portable. The cordless Makita XCC01Z runs on a battery and has an integrated water line. The Flex and Alpha are corded.
- Safety Note: The Flex manual specifies it is “for cutting tile and marble, not for cutting metal, wood and plastic.” Its PRCD (Portable Residual Current Device) must be tested each use.
Dry Tile Cutting Tools
This category includes angle grinders, dedicated dry-cut saws, and manual tools.
Angle Grinders with Diamond Blades:
- Best For: Quick notches, cutouts, or field adjustments where a wet saw is impractical. This is the classic dry cutting tile method.
- Limitation: Extremely dusty, difficult to cut straight lines, high risk of chipping and gouging.
- Blade Choice: You must use a dry-cutting diamond blade with adequate segment spacing. Using a wet saw blades on a grinder is dangerous and will ruin the blade.
Manual Tile Snappers (Score-and-Snap Cutters):
- Best For: Straight cuts on ceramic wall tile (up to about 3/8″ thick). Unbeatable for speed and zero mess.
- Reality Check: They cannot cut porcelain, stone, or make L-shaped cuts. The breaking capacity is limited.
Dedicated Dry-Cut Saws (e.g., iQTS244):
- Best For: High-volume production cutting of ceramic tile in a controlled, indoor shop with industrial dust collection.
- Specs: Dedicated dry-cut saws for high-volume production are pro-grade systems designed to capture dust at the source.
- DIY Relevance: Low. This is pro-grade equipment. The Harbor Freight “Dry_Cut Tile Saw” manual warns “use wet blades,” which is an example of the disagreement between product naming and manufacturer-recommended operation in this category.
Safety & Setup: The Non-Negotiables
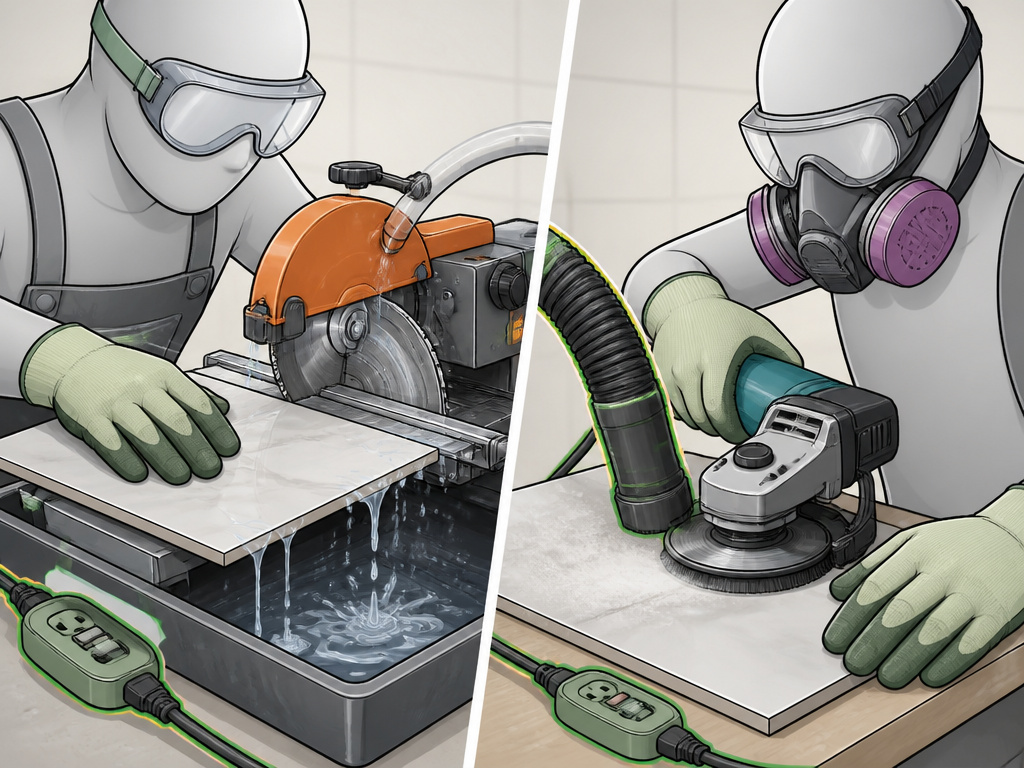
Ignoring these steps turns a simple tool into a liability. The manuals are not suggestions.
Wet Saw Safety Protocol
- Electrical Protection: Plug the pump and saw into a GFCI outlet. The DeWalt D24000 manual mandates this. The Flex CS 40 WET uses a built-in PRCD, test it before each use by pressing the button.
- Eye and Lung Protection: “ALWAYS USE SAFETY GLASSES,” states the DeWalt manual. Also use a “face or dust mask if cutting operation is dusty.” The Flex manual adds goggles, ear protection, and light-weight breathing protection.
- Water Management: Use clean, fresh water. Never use salt water. Ensure the pump is submerged before turning it on.
- Workspace: Wet slurry is slippery. Contain it with trays and have absorbent mats ready.
Dry Cutting Safety Protocol
- Dust Control: This is the highest priority. You need a HEPA-rated vacuum attached directly to the tool. A shop vac without a HEPA filter will pump fine silica dust back into the air.
- Respiratory Protection: A basic dust mask is insufficient. Use a NIOSH-approved N95 respirator or better for silica dust.
- Hearing and Eye Protection: Grinders and saws are loud. Wear earmuffs and sealed safety glasses.
- Workspace: Dry cutting is a messy, hazardous process best done outdoors or in a well-ventilated, empty garage. Cover everything you don’t want coated in fine dust.
Making the Choice: A Project-Based Flowchart
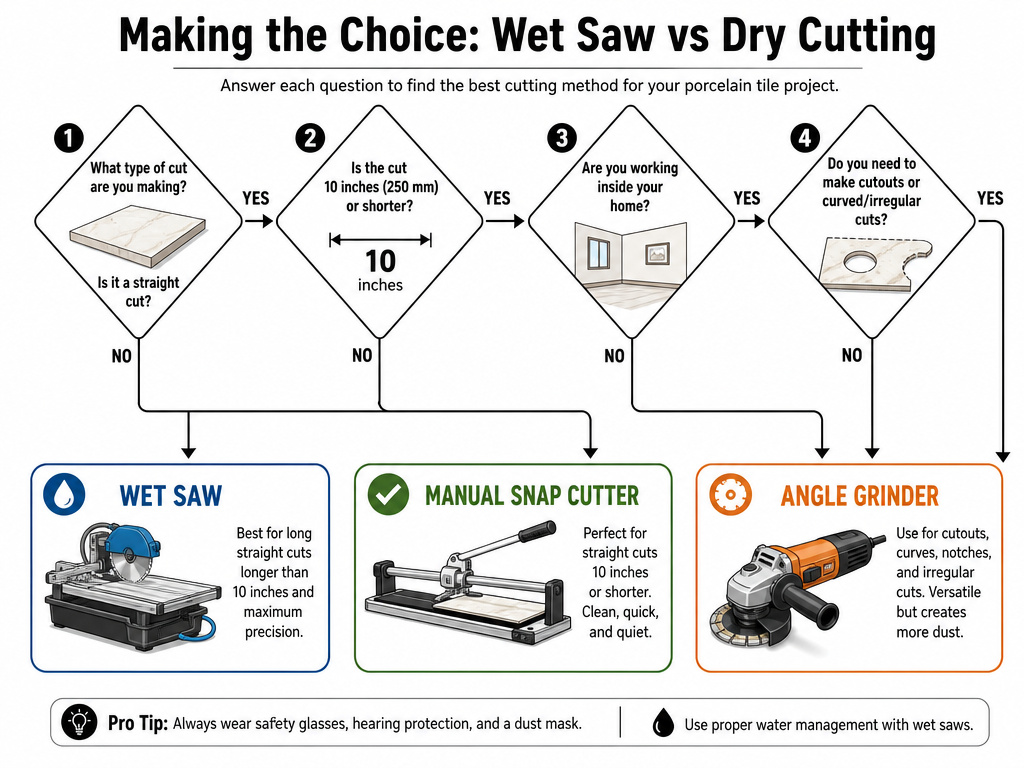
Ask these questions in order:
- What material am I cutting?
- Porcelain, Stone, Glass → Use a wet saw. Decision over.
- Ceramic, Thin Pavers → Proceed to question 2.
- Are most of my cuts long, straight lines?
- Yes → Consider a manual snap cutter. It’s faster and cleaner than any power tool for this specific task.
- No → Proceed to question 3.
- Where is my workspace?
- Finished interior, bathroom, kitchen → Use a wet saw. The contained slurry is manageable; dust is not.
- Garage, driveway, outdoors → Proceed to question 4.
- How many cuts am I making?
- Fewer than 10 notches/curves → A grinder with a dry blade and a vacuum can work.
- More than 10 cuts, or any rip cuts → Use a wet saw. The setup time is worth the blade life, cut quality, and clean air.
For the majority of DIY tile projects, a bathroom floor, a kitchen backsplash, the answer is a benchtop wet tile saw. It’s the only tool that cleanly, safely, and reliably handles the mix of materials and cuts you’ll encounter. Renting one is a smart option if you’ll never use it again.
Wet saw vs manual tile cutter
A wet saw uses a diamond blade cooled by water to grind through tile, while a manual snap cutter scores the surface and applies pressure to break it along the line. Some models, like the Flex CS 40 WET, are designed for commercial use in industry and trade, specifically for cutting tile and marble. It produces a cleaner, more versatile cut, especially on hard materials like porcelain. A manual cutter is limited to straight cuts on softer, more uniform tiles. The sound of the cut is an indicator: a wet saw has a steady hum with water splash, while a dry operation emits a higher-pitched whine and the hiss of abrasive dust.
Cost of wet saws and dry cutters
The initial purchase price is just one part of the cost. Wet saws require a water pump and an electrical setup, including a GFCI protected receptacle or a PRCD that must be tested before each use. They also need a continuous supply of clean water, and you must never run the pump dry. Maintenance involves keeping the water system clean and replacing diamond blades. For a dry cutter or a small handheld saw, costs are lower upfront and there’s no water system to manage, but you must factor in dust extraction for dry cutting to protect your lungs, as recommended by safety guidelines.
Frequently Asked Questions
Is it better to cut tile wet or dry?
For cut quality, blade life, and safety, wet cutting is better. Dry cutting is a compromise for convenience or necessity when water is unavailable or the cut count is very low. For all dense materials, wet cutting is required.
Is it better to use a tile cutter or wet saw?
Manual tile cutter (snapper) is better for straight cuts on ceramic wall tile. It’s instant, quiet, and dust-free. A wet tile saw is better for porcelain, stone, diagonal cuts, notches, and complex shapes. They are complementary tools, not direct competitors.
Is it better to cut tile face up or face down?
On a wet saw, almost always cut with the finished face up. The blade rotates upward through the material, so any minor chipping occurs on the bottom, hidden edge. The exception is some natural stone, where cutting face-down prevents splintering. On a snap cutter, you score the glazed, finished face.
Will a wet tile saw cut porcelain tile?
Yes, a wet tile saw is the prescribed tool for cutting porcelain tile. Models like the DeWalt D24000 and handheld units like the Alpha AWS-110 are specifically powered and designed to cut porcelain tile by keeping the diamond blade cool. Attempting this with a dry method will fail.
Before You Go
The wet saw vs. Dry cutting debate collapses once you pick up the first tile. If it’s porcelain, stone, or glass, your path is set: you need water. The only real choice is which wet saw fits your budget and space. For a small ceramic project, a snap cutter might be all you need. But the moment you step into harder materials or complex cuts, the wet saw’s value is undeniable.
One final, practical tip: before you rent or buy any saw, check the arbor size and have the right blade on hand. The common 20mm standard (Makita, Flex, Alpha) isn’t universal, and the 5/8-inch arbor on saws like the QEP 22400Q needs a different blade. Having the right blade is more important than having the most expensive saw.
