
What Is Nail Gauge? The Thickness Number Explained
This post contains affiliate links. As an Amazon Associate, we earn from qualifying purchases.
Nail gauge is a measurement of a nail’s shank thickness. The gauge number follows an inverse scale: a higher number means a thinner nail, and a lower number means a thicker, stronger nail. Common gauges range from thick single-digit gauges for framing down to thin 23-gauge pin nails, with each gauge suited to specific holding power and material-splitting needs.
That’s the technical answer. The practical one is that gauge is the single most important spec for matching a nail to its job. To understand this, you must first know what is nail gauge. It decides whether your trim stays put or your framing holds weight.
This guide explains the numbers, the reason for the backwards scale, and the practical uses of nail gauge. You’ll learn how gauge relates to penny size, which gauges fit which nail guns, and the material exceptions that flip the standard advice.
Key Takeaways
- Gauge measures thickness on an inverse scale: a 16-gauge nail is thicker than an 18-gauge nail.
- The most common finish and trim nail gauges are 15, 16, and 18; pin nails run 21 to 23 gauge.
- For structural framing, you drop to thick, low-gauge nails for maximum holding power.
- Always match the gauge marked on your nailer tool — forcing a different size jams the mechanism.
- Treated lumber and hardwoods often require stainless steel fasteners, regardless of gauge, to prevent corrosion and streaking.
The Gauge Rule You Must Not Forget
You hold a 16-gauge nail in one hand and an 18-gauge nail in the other. The 16-gauge is visibly thicker. That’s the rule: the gauge number goes down as the thickness goes up.
This trips up everyone at first. We’re used to bigger numbers meaning more of something. Not here. The system comes from the wire-drawing process used to make nails centuries ago. The wire was pulled through progressively smaller holes, called draws. The number of draws determined the final thickness, and that count became the gauge. More draws meant a thinner wire, hence a higher gauge number.
The gauge of a nail refers specifically to the diameter of its shank—the long, smooth (or ringed) section below the head. It is expressed as a whole number, and its measurement is standardized in thousandths of an inch or millimeters.
That standard is codified. For example, the Paslode 3.1 Ring Galvplus NR20 nail has a shank diameter (Ds) of 3.10 mm, with its tolerance governed by the European standard EN10218-2. This precise numbering allows engineers to calculate load-bearing capacity using frameworks like EUROCODE 5.
Gauge vs. Penny (‘d’): Untangling the Two Systems
You’ll see nails labeled “16d” or “10d”. This is the penny system, which indicates length, not thickness. The ‘d’ stands for penny, a holdover from when nails were sold by the hundred for a certain number of pennies.
While penny size tells you length, the answer to what is nail gauge explains that each penny size corresponds to a typical gauge. This is where it gets messy, because it’s a convention, not a hard rule. A 16d common nail is usually an 8-gauge nail about 3.5 inches long. But a 16d box nail or sinker nail will be a thinner gauge for the same length.
| Penny Size | Common Gauge | Shank Diameter (in.) | Typical Length |
|---|---|---|---|
| 6d | 11.5 | 0.113″ | 2″ |
| 8d | 10.25 | 0.131″ | 2.5″ |
| 10d | 9 | 0.148″ | 3″ |
| 16d | 8 | 0.162″ | 3.5″ |
Where this goes sideways: Assuming a penny size guarantees a specific thickness. A 16d finish nail will be a much thinner 15 or 16 gauge. Always check the gauge printed on the box.
The penny system is useful for rough framing where length is the primary concern. For finish work, cabinetry, or trim, you ignore the ‘d’ and focus purely on the gauge and length. For a deep dive on the historical system, our guide on penny nail sizes walks through every size.
The Gauge Decoder: From Fractions to Force
To move from abstract numbers to the workbench, you need a conversion chart. This table translates gauge numbers into the actual shank diameters you’ll measure, using data from the National Nail Pro-Fit Collated Fasteners gauge chart.
| Gauge | Shank Diameter (inches) | Shank Diameter (mm) | Category | |———–|—————————–|————————-|———————–| | 8 | 0.162 | 4.114 | Framing / Heavy Duty | | 10 | 0.135 | 3.342 | Framing / Siding | | 11 | 0.120 | 3.061 | Siding / Sheathing | | 12 | 0.105 | 2.680 | Siding / Sheathing | | 15 | 0.072 | 1.828 | Finish Nails | | 16 | 0.062 | 1.587 | Finish / Trim Nails | | 18 | 0.047 | 1.206 | Brad Nails | | 21 | 0.032 | 0.812 | Pin Nails | | 23 | 0.025 | 0.635 | Pin Nails |
Notice the jump between 15 and 16 gauge. That difference in thickness is why a 15-gauge nail has noticeably more holding power for door jambs or thick trim than a 16-gauge nail. It’s also why they are not interchangeable in a nail gun.
This is the core trade-off. A thicker, lower-gauge nail (like an 8-gauge) displaces more wood fibers, creating a stronger mechanical grip. A thinner, higher-gauge nail (like a 23-gauge) leaves a nearly invisible hole but offers minimal holding power on its own—it’s purely for tacking while glue dries.
If you’re deciding between two close gauges for a project, our comparison of 15 vs 16 gauge details exactly where each one wins.
Gauge in the Real World: From Framing to Finish
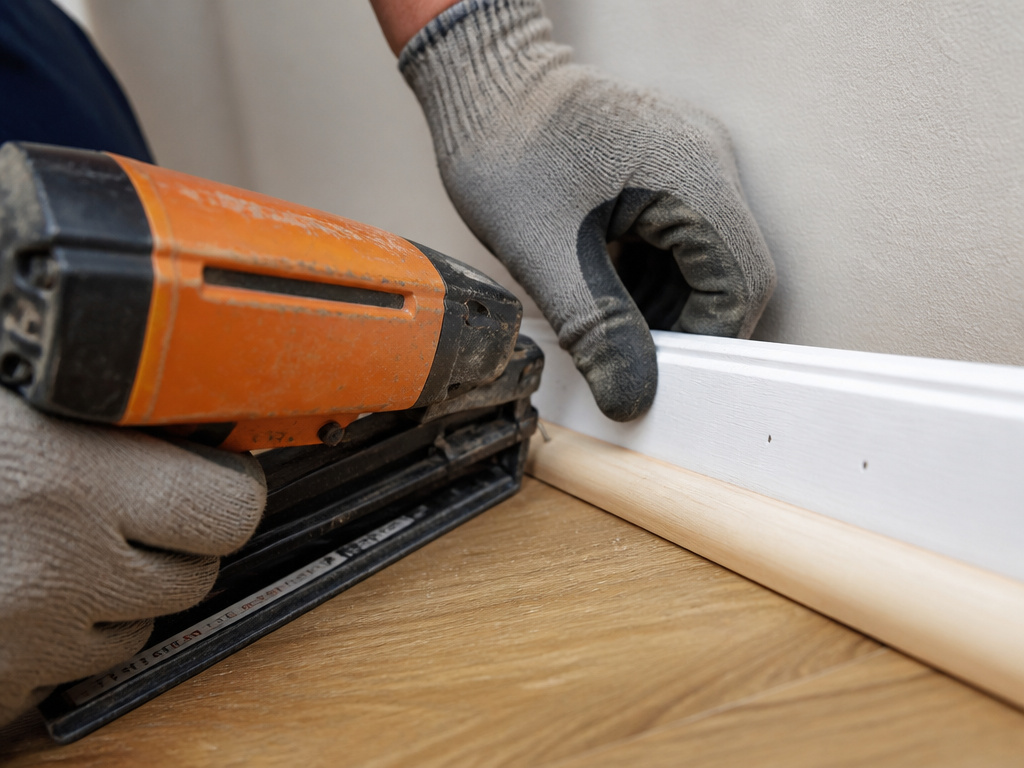
Now, where do you use these numbers? We can match gauge to job.
- Framing (6-10 Gauge): This is structural work—walls, floors, roof rafters. You need the holding power of a thick shank. These are almost exclusively driven by pneumatic framing nailers. The nails are often ring-shanked or screw-shanked for insane withdrawal resistance.
- Sheathing & Siding (11-14 Gauge): A middle ground. Thick enough to hold plywood or siding securely, but designed to minimize splitting in sheet goods. Coil nailers often use these gauges.
- Finish & Trim (15-16 Gauge): The workhorses of interior carpentry. A 15-gauge finish nailer handles door and window casings, baseboards, and built-ins. Both leave a hole that needs filling.
- Brad Nails (18 Gauge): The finesse option for attaching thin trim, shoe molding, and decorative pieces. The hole is small, often not needing filler. Holding power is low, so it’s often used with glue. This is the classic choice for a brad nailer vs finish nailer debate.
- Pin Nails (21-23 Gauge): These are glorified staples. A 23 gauge pin nailer fires headless pins that leave a hole the size of a sewing needle. Use them to hold delicate moldings, veneer, or miters perfectly in place for the 30 minutes it takes the glue to set. They provide zero structural strength.
Choosing the wrong gauge has immediate consequences. I learned this early on trying to install quarter-round with a 16-gauge nailer. The thicker nail split the delicate molding every third shot. Switching to an 18-gauge brad nailer made the job silent and clean. The tool chooses the gauge, not the other way around.
When Gauge Isn’t Enough: Material and Coating Rules
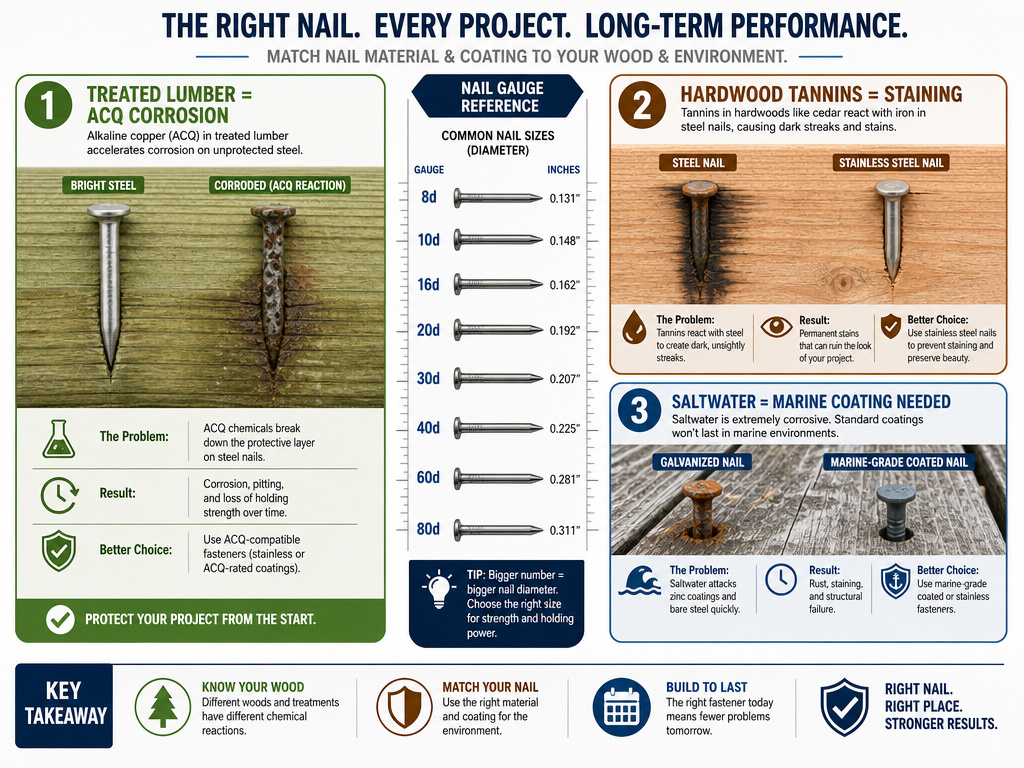
Gauge tells you thickness. It says nothing about the nail’s chemistry, and that’s what fails first in many projects. The National Nail Pro-Fit guide flags three specific scenarios where material overrides gauge.
- Treated Lumber: Modern pressure-treated wood contains Alkaline Copper Quaternary (ACQ) and other corrosive preservatives. Bright (uncoated) steel or even standard galvanized nails can corrode to nothing in a few years. You need hot-dipped galvanized or, better yet, stainless steel fasteners.
- Hardwoods (Cedar, Redwood, Oak): The tannins in these woods react with steel, creating dark, streaky stains that bleed through finishes. The fix is stainless steel nails.
- Saltwater Environments: Any exterior project near the coast needs a serious barrier. A standard zinc coating won’t last. Look for nails with a marine-grade coating or stainless steel.
Easy to miss: The treated lumber under your composite decking still needs corrosion-resistant fasteners. The visible cap may be safe, but the substructure is not.
In these cases, picking the right gauge is your second step. Your first step is finding a nail in that gauge made from the right material. This is why buying the cheapest box of “exterior” nails often costs you more in the long run.
How to Find the Gauge: Reading the Box and the Tool
You have a strip of nails or a loose handful. How do you know the gauge?
On the Strip or Coil: Look for small, stamped printing. It will usually say the gauge, length, and sometimes coating. For example, “16GA x 2-1/2″ GALV” means 16-gauge, 2.5-inch long, galvanized.
On the Nailer Tool: The gauge is almost always molded into the housing or printed on a label near the magazine. This is a fixed requirement. A tool marked “18GA” will only properly feed and drive 18-gauge nails. Forcing a 16-gauge nail into an 18-gauge gun will jam it solid, and a 23-gauge pin will rattle and misfire.
On the Product Box: This is your best source. The product box will list Gauge, Length, Count, Coating, and often the compatible penny size. This is where you confirm the details before you buy. Confusion between similar gauges is common, which is why we have guides like what is a 23 gauge pin nailer to clarify their specific role.
For a successful trim job, this pre-check is everything. Our article on nails for baseboard starts with gauge and length before anything else.
16 Gauge vs 18 Gauge Nails
Choosing between a 16 gauge and an 18 gauge nail comes down to the thickness and holding power needed. A 16 gauge nail has a shank diameter of 0.062 inches (1.587 mm), while an 18 gauge nail is thinner. This difference means the 16 gauge nail is stronger and provides more resistance to bending, making it suitable for heavier trim work where greater holding strength is required. The 18 gauge nail, being finer, is better for lighter trim, attaching thin moldings, or any application where minimizing wood splitting or visible holes is a priority.
Frequently Asked Questions
Which is thicker, 16 or 18 gauge nails?
16-gauge nail is thicker than an 18-gauge nail. Remember the inverse rule: the lower the gauge number, the thicker the shank. A 16-gauge nail has a shank diameter of about 0.062 inches, while an 18-gauge nail is thinner.
What is the most common nail gauge?
For finish carpentry and trim work, 16-gauge is the most common and versatile nail gauge. It offers a strong balance of holding power and a relatively small hole. For finer work and smaller trim, 18-gauge brad nails are extremely common.
Can I use different gauge nails in my nail gun?
No. Nail guns are designed to feed and drive one specific gauge of nail. Using the wrong gauge will cause misfeeds, jams, and can damage the tool. Always match the nail gauge to the gauge marked on your nailer.
How does gauge relate to holding power?
Holding power increases as the gauge number decreases (i.e., as the nail gets thicker). A thick 8-gauge framing nail grips wood fibers far more tenaciously than a thin 18-gauge brad nail. For any project where strength is critical, you choose the lowest (thickest) gauge appropriate for the material to avoid splitting.
What gauge nail should I use for trim?
The final choice often comes down to the nailer types you have available.
Before You Go
Gauge isn’t a suggestion. It’s a mechanical specification that dictates compatibility and performance. Start every nail-buying decision by finding the gauge—on your tool, in your project plans, or on the fasteners you’re replacing.
Keep one chart handy, either printed in the shop or saved on your phone. When a source gives you a penny size, cross-reference it to the typical gauge, but always verify with the numbers on the box. And for any wood that’s treated, naturally durable, or exposed to the elements, let the material’s requirements choose the coating first; the gauge comes second.
That’s how you move from guessing to knowing. You match the thickness to the task, and you’ll never split another piece of trim or wonder why your nails keep jamming.
