
How to Prevent Power Saw Kickback: Step-by-Step Safety
This post contains affiliate links. As an Amazon Associate, we earn from qualifying purchases.
To prevent power saw kickback, you need a sharp, correct blade, all safety devices (riving knife, spreader, anti-kickback pawls) installed and aligned, proper workpiece support, and a stance to the side of the blade path. OSHA notes kickbacks happen more often during ripping, and using a push stick for narrow cuts is critical.
That alignment, between a sharp blade and a perfectly positioned riving knife, is where kickback either happens or doesn’t. A blade that’s even slightly dull or a safety device that’s out of line can turn a controlled cut into a violent reaction. Understanding how to prevent power saw kickback is therefore fundamental to safe operation.
What follows is the system: a pre-cut checklist drawn from OSHA and manufacturer manuals, the specific maintenance that matters, the edge cases where standard advice fails, and the one move that stops a kickback once it starts.
Key Takeaways
- Kickback is most likely during ripping cuts, where the blade teeth catch the wood grain and can throw the workpiece back at you.
- Always use a push stick for ripping widths of 2″ to 6″, and an auxiliary fence plus push block for cuts narrower than 2 inches, per the 1191VSRK manual.
- A riving knife or splitter must be thinner than the blade’s kerf and perfectly aligned; even a slight misalignment creates a pinching point.
- Dull, dirty, or damaged blades are a primary cause; clean pitch with a gum remover and sharpen or replace blades immediately when they show wear.
- If the sawblade stalls or jams in the workpiece, turn the saw ‘OFF’ before removing the workpiece and checking blade/fence alignment.
The 4-Step Pre-Cut Safety Check
Before you even turn the saw on, run through these four points. Missing one is how a “quick cut” becomes an emergency room visit.
1. Verify Every Safety Device Is Present and Functional.
This isn’t a suggestion. OSHA states a worker should not operate equipment if the guard, spreader, anti-kickback fingers, or rip fence is not functioning properly. On a table saw, that means the riving knife is installed, the anti-kickback pawls are sharp and free to move, and the blade guard is in place. For a circular saw, it means the lower guard retracts smoothly and snaps back. If anything is missing or broken, stop. This is your first and most important line of kickback control.
2. Match the Blade to the Cut and Check Its Condition.
Using a crosscut blade for a rip cut, or a framing blade for fine work, increases binding risk. More critically, inspect the blade. Is it sharp? Is it clean, or is it gummed up with pitch? Is it round and balanced, or does it have a cracked tooth? OSHA’s guidance is clear: remove any cracked, damaged, dull, or improperly tensioned blades from service immediately. A clean, sharp blade cuts cleanly; a dirty or dull one tears and grabs.
3. Assess the Workpiece and Support It.
Is the wood straight, or is it twisted or warped? The manual for the 1191VSRK saw explicitly says to avoid ripping a twisted workpiece or one without a straight edge to guide along the fence. Is the lumber clear of knots, nails, or ice? OSHA flags poor-quality lumber, frozen, knotty, or with embedded nails, as a kickback risk. Finally, support the workpiece fully, both before and after the blade, to prevent sagging that can pinch the blade.
4. Plan Your Stance and Your Exit.
OSHA’s final tip in its woodworking machine hazards guide is simple: whenever possible, stand to the side of the blade path once the board is fed through. Never position your body directly behind the workpiece. This way, if kickback does occur, the flying stock misses you. Have a clear path behind you, and know where you’ll step if you need to move quickly.
Common mistake: Assuming the factory alignment is still perfect. The riving knife can shift from a bumped workpiece or sawdust buildup. Check it with a straightedge against the blade before every major ripping session.
Why Kickback Happens (And Why Ripping Is Riskier)
Kickback is simple physics. The blade spins toward you at thousands of RPM. If the workpiece pinches the blade, because the wood warps, the fence isn’t parallel, or the back of the cut closes in, the blade’s teeth act like a catapult, hurling the stock back along the fence line.
OSHA’s data point is crucial here: kickbacks occur more often when cutting parallel to the wood grain (ripping) than when cross-cutting. During a rip, the blade is essentially splitting the wood fibers apart. Those fibers can close in behind the blade, especially in green or stressed wood, creating that fatal pinch point. A crosscut severs fibers across their length, which is a cleaner, less binding action.
The mechanism explains why the riving knife is essential. This fin of metal sits just behind the blade and keeps the kerf, the cut channel, open behind the blade, preventing the wood from pinching the blade’s backside. The 1191VSRK manual gives a precise spec: the riving knife must be thinner than the kerf “by approximately two thicknesses of standard 20 lb. Copy paper on each side.” That tiny gap is the difference between a smooth pass and the blade grabbing the wood.
Essential Safety Devices and How to Use Them
These are integral parts of the saw. If your saw didn’t come with them, or you lost them, you need to source replacements before making another rip cut.
| Device | Its Job | Critical Check |
|---|---|---|
| Riving Knife / Splitter | Keeps the kerf open behind the blade to prevent pinching. | Must be perfectly aligned with the blade, both vertically and horizontally. |
| Spreader | Sits atop the riving knife; prevents the workpiece from squeezing the blade during the cut. | Should move freely and not interfere with the workpiece’s passage. |
| Anti-Kickback Pawls | Toothed fingers that dig into the workpiece if it tries to move backward, stopping it cold. | Teeth must be sharp. Dull pawls will skip over the wood. |
| Blade Guard | Covers the blade to prevent contact and helps contain debris. | Must be clear of sawdust and move without sticking. |
| Push Stick / Push Block | Extends your hand’s reach, keeping fingers away from the blade during narrow cuts. | Must be sturdy, with a good hook or grip to control the workpiece. |
Consider the push stick. The manual for the 1191VSRK model gives exact rules: for ripping widths of 2″ to 6″, a push stick should be used. For ripping widths narrower than 2″, an auxiliary fence and push block are recommended. I keep a stack of homemade plywood push sticks by my saw. They cost pennies, and using one is a habit that removes your fingers from the equation entirely. For a deep dive on technique, see our guide on safe push stick use.
The guard and splitter assembly is often removed for “convenience” on dado stacks or non-through cuts. Here, OSHA has a specific rule: when guards cannot be used (during rabbeting or dadoing), you must provide combs, featherboards, or suitable jigs for holding the stock. A featherboard clamped to your fence or table applies forward and downward pressure, keeping the workpiece tight against the fence and table, which dramatically reduces the chance of it twisting into the blade.
Maintenance That Actually Prevents Kickback
Most talk about saw maintenance focuses on smooth operation, but the real goal is how to prevent power saw kickback. For kickback prevention, it’s about eliminating the variables that cause grabbing and binding.
Blade Care is Paramount.
OSHA connects blade condition directly to kickback: “Sharpening blades prevents kickback.” A sharp blade produces a clean cut with less resistance. A dull blade tears and heats up, causing the wood to warp and pinch. The 1191VSRK manual adds to clean your blades with a gum and pitch remover. That built-up resin creates drag and can overheat the blade, affecting its temper and straightness. Immediately clean saws to which gum has adhered.
Alignment is Not a Set-and-Forget Task.
The relationship between the blade, riving knife, and fence is dynamic. Sawdust inside the cabinet, a bumped fence, or thermal expansion can shift things. The 1191VSRK manual instructs you to frequently blow out any dust that may accumulate inside the saw cabinet and the motor. That dust can push components out of alignment. Before a major project, check that the fence is parallel to the blade along its entire length, and that the riving knife is in line with the blade. A misaligned fence will force the workpiece against the blade, guaranteeing a pinch.
Don’t Neglect the Anti-Kickback Device.
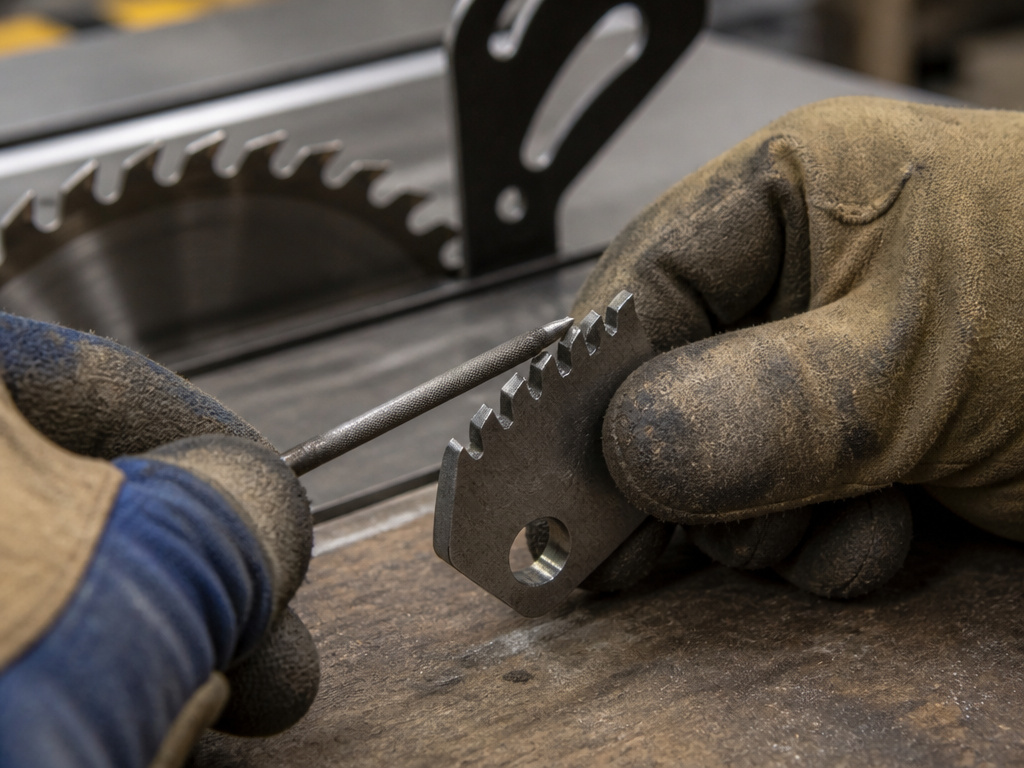
Those little pawls have a job to do. The manual is explicit: “Make sure the teeth of the Anti-Kickback Device are always sharp.” It even tells you how: use a small round file (Smooth Cut). Dull pawls are just for show. When the workpiece kicks back, they need to bite in and stop it. It’s a five-minute maintenance task that most people never do.
Where this goes sideways: Letting sawdust build up inside the saw cabinet. It doesn’t just make a mess. It can push the internal mechanism, including the trunnions that hold the blade, out of alignment over time. You’ll notice more vibration first, then binding cuts.
The Right Techniques for Every Cut
Your technique is the final layer in how to prevent power saw kickback. The best devices won’t save you from a fundamental mistake.
For Ripping:
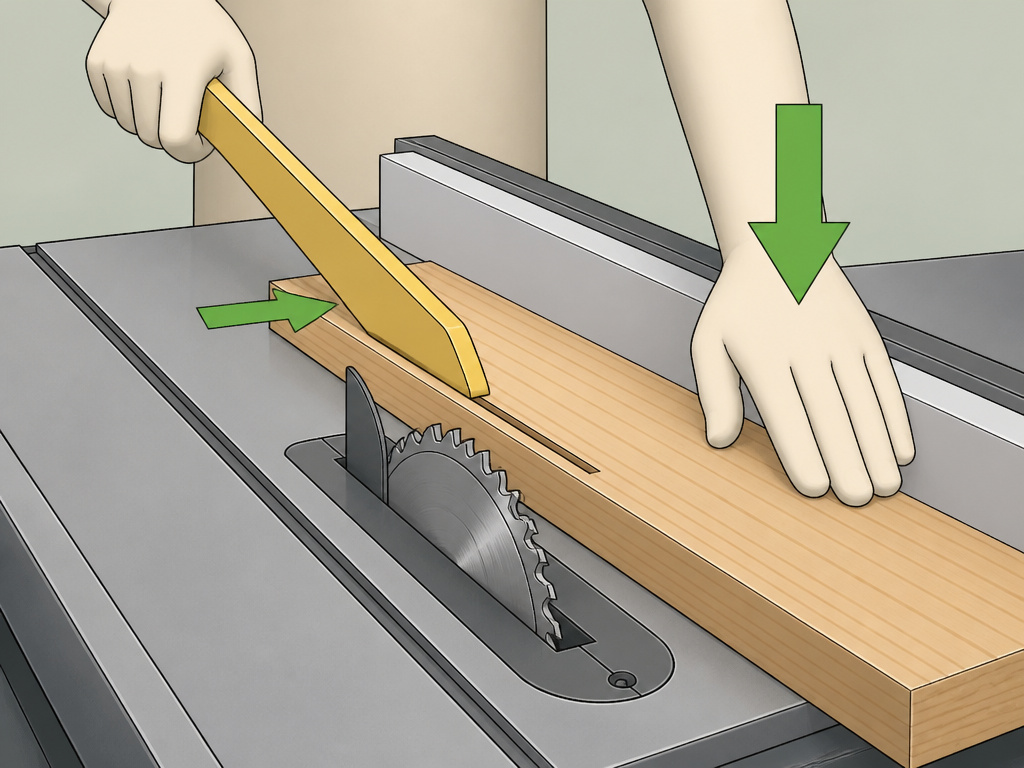
Use a push stick for any cut where your hand will be within 6 inches of the blade. Maintain firm, downward pressure on the workpiece against the table, and forward pressure against the fence. Do not release the workpiece until it is pushed completely past the blade and the riving knife. If the workpiece binds or the saw motor bogs, do not try to force it or pull it back. Hold it still, turn the saw off, and wait for the blade to stop completely before moving anything.
For Cross-Cutting:
Use a miter gauge or crosscut sled, not the rip fence. Using the rip fence as a length stop for a crosscut is a classic kickback scenario, the cutoff piece can get trapped between the blade and the fence and become a projectile. The 1191VSRK manual warns against “gang crosscutting”, lining up more than one workpiece and pushing them through together, as it can cause binding and loss of control.
If the Blade Stalls:
This is a critical moment. The manual says: “If the sawblade stalls or jams in the workpiece, turn the saw ‘OFF’ before removing the workpiece and checking blade/fence alignment.” Your instinct might be to yank the piece back. Fight it. A stalled blade is a loaded spring. Turning off the saw removes the driving force. Then you can safely assess why it bound, usually a misaligned fence or a warping workpiece.
Edge Cases and Advanced Scenarios
Sometimes, the standard rules don’t apply. Here’s what to do when you’re off the map.
Working with “Bad” Wood.
OSHA calls out frozen lumber or lumber with many knots or foreign objects (like nails) as a kickback risk. You can’t always choose your material. When you have to rip a knotty board, go slower. Expect more resistance and potential vibration. Consider making a scoring pass with a very shallow blade depth first to establish a clean kerf, then complete the cut.
Non-Through Cuts (Dados and Rabbets).
As mentioned, you often must remove the guard and riving knife for these cuts. This is when featherboards and jigs become mandatory. Use a featherboard to clamp the workpiece down and against the fence. For a dado across a wide panel, consider using a sled that fully supports the workpiece and bridges the saw table.
Using a SawStop or Saw with an Electric Brake.
Technology like SawStop’s flesh-sensing technology is revolutionary for contact injuries, but the manuals are clear: it minimizes, but does not prevent, kickback. You still need a riving knife, sharp blades, and good technique. Also, if such a saw is operated in a bypass mode (to cut wet wood, for example), the safety system is disabled entirely. Never assume technology replaces fundamental power tool safety.
What to Do During a Kickback Event
Prevention is the goal. But if you feel the saw grab and the workpiece start to ride up, you have a split second to react.
- Hold Firm. Do not let go of the workpiece. A loose piece becomes a missile. Maintain forward pressure if you can do so safely.
- Turn the Saw Off. Your free hand should hit the power switch immediately. This removes the driving force.
- Do Not Stand Up. Stay in your controlled stance, to the side of the blade path. The workpiece may still be ejected, but you are out of the line of fire.
- After the Blade Stops, assess. Is the workpiece damaged? Is the blade okay? Check your alignment before proceeding.
This sequence assumes you’ve followed all other precautions, like using a push stick. If you were feeding a narrow piece with your hand over the blade, the outcome is already determined. That’s why the pre-cut checks matter.
Letting the Saw Reach Full Speed Before Cutting
Never begin a cut before the blade has reached its full operating speed. A blade spinning at less than full power can catch or bind in the material, which is a primary cause of kickback. This is especially critical when ripping, as kickbacks occur more often when cutting parallel to the wood grain. Ensure the motor has reached its maximum RPM and the blade is cutting cleanly before you feed the workpiece. A sharp, clean blade that is properly secured and in good condition will also help the saw reach and maintain the necessary speed for a safe, controlled cut.
Frequently Asked Questions
How do I check if my riving knife is aligned?
Raise the blade to its highest point and set the bevel to 0°. Place a straightedge along the blade, not touching the teeth. The riving knife should be perfectly in line with this plane, both from a top-down view and from the front. Refer to your saw’s manual; many have a specific alignment procedure.
Can a dull blade really cause kickback?
Absolutely. A dull blade requires more force to push the workpiece through. This extra force can cause the wood to flex and pinch the blade. Also, a dull blade heats the wood, which can cause it to expand and close the kerf behind the blade. Sharpening is a kickback prevention step, not just a quality-of-cut issue.
What’s the difference between a riving knife and a splitter?
Splitter is a static fin that sits behind the blade. A riving knife is attached to the saw’s arbor assembly, so it moves up and down and tilts with the blade, always maintaining the optimal position right behind the teeth. A riving knife is the modern, safer design.
I have an old saw without a riving knife. What should I do?
First, see if a retrofit kit is available from the manufacturer or a third party. If not, you must be hyper-vigilant. Ensure every other condition is perfect: razor-sharp blade, perfectly parallel fence, impeccable workpiece support, and always use a push stick. Consider upgrading the saw itself; a riving knife is that important.
How often should I replace a blade to prevent kickback?
There’s no set hour count. Look for burning marks on the wood, requiring significantly more push force, a visible dulling of the teeth, or chipping. The moment you suspect the blade is dull, change it. The moment you suspect the blade is dull, change it. It’s cheaper than an injury.
The Bottom Line
Kickback prevention is a system of layers: the right sharp blade, the correctly aligned safety devices, the proper support for the wood, and the disciplined technique that keeps your body out of harm’s way.
Using a push stick for narrow cuts is a critical safety threshold. Inside that distance from blade to hand, a push stick is your finger’s life insurance. Build the muscle memory to reach for it every single time, even for “quick” cuts. That habit, more than any other, is what separates a confident woodworker from a statistic.
All the advice here comes straight from OSHA and manufacturer manuals, the primary sources. The specifics, like the two-sheets-of-paper clearance on the riving knife or the push-stick width rules, are what a generic “be careful” article misses. Your saw is a system. Keep every part of that system in spec, and it will serve you safely for years. Let one part slide, and the physics take over.
