
Keyed vs Keyless Drill Chuck: Which Should You Buy?
This post contains affiliate links. As an Amazon Associate, we earn from qualifying purchases.
In the keyed vs keyless drill chuck choice, a keyed chuck uses a toothed gear and key for maximum holding power on tough materials, while a keyless chuck uses a hand-tightened sleeve for fast bit changes in lighter work. For a home workshop doing mixed materials, a keyless chuck saves time. For a machine shop drilling steel, a keyed chuck is the best answer.
That grip-versus-speed trade-off is the whole decision. The rest is about matching your specific material, bit size, and tolerance for a lost key against the need to swap tools every thirty seconds.
What follows: the mechanical guts of each chuck type, a head-to-head table on strength and wobble, the proper tightening method that stops slippage, and the one field test that reframes the runout debate. By the end, you’ll know which chuck belongs on your drill press, your cordless drill, or your lathe.
Key Takeaways
- Keyed chucks win on steel. Their keyed scroll mechanism delivers the consistent, high-torque retention needed for drilling, tapping, or reaming in tough materials where a slipping bit ruins the work.
- Keyless chucks win on convenience. The hand-tightened sleeve changes bits in seconds, ideal for environments like woodworking or DIY where you switch sizes often.
- Runout is not a given. For best concentricity, arbor fit and clean seating matter more than chuck type, according to industry analysis. A dirty, worn arbor makes any chuck wobble.
- The key is a single point of failure. Losing the chuck key halts work with a keyed model. A keyless chuck’s weakness is variable grip strength that depends on user force and can slip under heavy load.
- Match the chuck to the machine. A drill press or mill doing precision metalwork needs a keyed chuck. A cordless drill for general carpentry is built for a keyless one.
How Keyed vs Keyless Drill Chucks Work (Mechanics That Affect Precision)
The difference involves two completely different ways of turning rotation into clamping force, not just the presence of a key.
A keyed chuck uses a keyed scroll — a spiraled gear inside the chuck body. When you insert the key and turn it, you rotate this scroll, which drives the three jaws in or out in perfect unison. The mechanical advantage is huge. You’re not tightening the jaws with your wrist; you’re using a lever (the key) to turn a finely machined gear. That’s why keyed chucks provide what industry sources call consistent, high-torque retention and repeatable seating under load. The jaws clamp firmly and resist centerline shift.
The keyed scroll mechanism converts key rotation into precise, simultaneous jaw movement, providing a mechanical advantage for superior clamping force.
A keyless chuck throws that gear out. It relies on ramped cams and sleeve torque. The outer sleeve you grip is connected to a set of angled ramps. When you twist the sleeve tight, those ramps push the jaws inward. The grip strength here is direct: it depends entirely on how hard you can twist that sleeve and how well those ramps are machined. As one technical source notes, grip can vary with user force, speed, and heat. Your strength, the chuck’s temperature from friction, and even how fast you’re spinning the drill all change how hard it holds.
That’s the core trade-off. One is a geared, mechanical clamp. The other is a friction-based, hand-powered clamp. Your choice starts there.
Keyed vs Keyless Chuck: A Quick Decision Table
Don’t overthink it. This table breaks down where each type excels and where it fails. Your job is to find your primary use case in the “Best For” column.
| Factor | Keyed Chuck | Keyless Chuck |
|---|---|---|
| Primary Mechanism | Keyed scroll gear, turned with a chuck key. | Ramped cams, tightened by hand on the outer sleeve. |
| Maximum Holding Power | Superior. Ideal for heavy-duty drilling, tapping, or large-diameter bits. | Reduced clamping torque. Not as strong for high-torque drilling in hard materials. |
| Bit Change Speed | Slower. Requires locating and using the key. | Very fast. Hand-tighten and go. |
| Runout & Precision | Generally lower runout, especially in premium models (Jacobs, Albrecht). | Can be low, but arbor fit and cleanliness often govern runout more than chuck type. |
| Common Failure Point | Losing the chuck key halts all work. | Bit slippage under heavy load, or “creep” with heat and speed. |
| Best For | Machine shops, steel, tough materials, small-diameter drills, repeatable tolerances. | Woodworking, DIY, frequent bit changes, cordless drills, environments where speed is key. |
Where Keyed Chucks Earn Their Keep (And Where They Don’t)
You pick a keyed chuck when the job demands uncompromising grip. The sources are clear on the use cases: workshops performing heavy drilling, reaming, or tapping in steel and other tough materials where maximum holding strength is required. That also includes small-diameter drills and heavy cutting where repeatable hole tolerances matter.
The advantage is about consistency, not just raw strength. The keyed scroll doesn’t care how tired your hand is. It applies the same clamping force every time, which means the bit seats the same way every time. This repeatable seating under load allows you to drill to exact depths in metal and prevents the bit from wandering.
The downside is as mechanical as the advantage. You need the key. Every. Single. Time. Lose that little piece of metal and your premium chuck is a paperweight. I’ve watched a full shop floor grind to a halt for twenty minutes on a key hunt. It’s a single point of failure that keyless chucks simply don’t have.
Common mistake: Overtightening a keyed chuck with an impact driver or cheater bar. You can strip the scroll gear or warp the jaws, introducing permanent runout. Use the key by hand, and stop when you feel firm resistance.
For the home gamer, this means a keyed chuck is overkill for a cordless drill you’re using to hang shelves, which is one of many types of drills for different tasks. But for the drill press in your garage that you use to drill metal brackets? It’s the right tool. The holding power directly translates to safety and finish quality.
The Reality of Keyless Chuck Performance
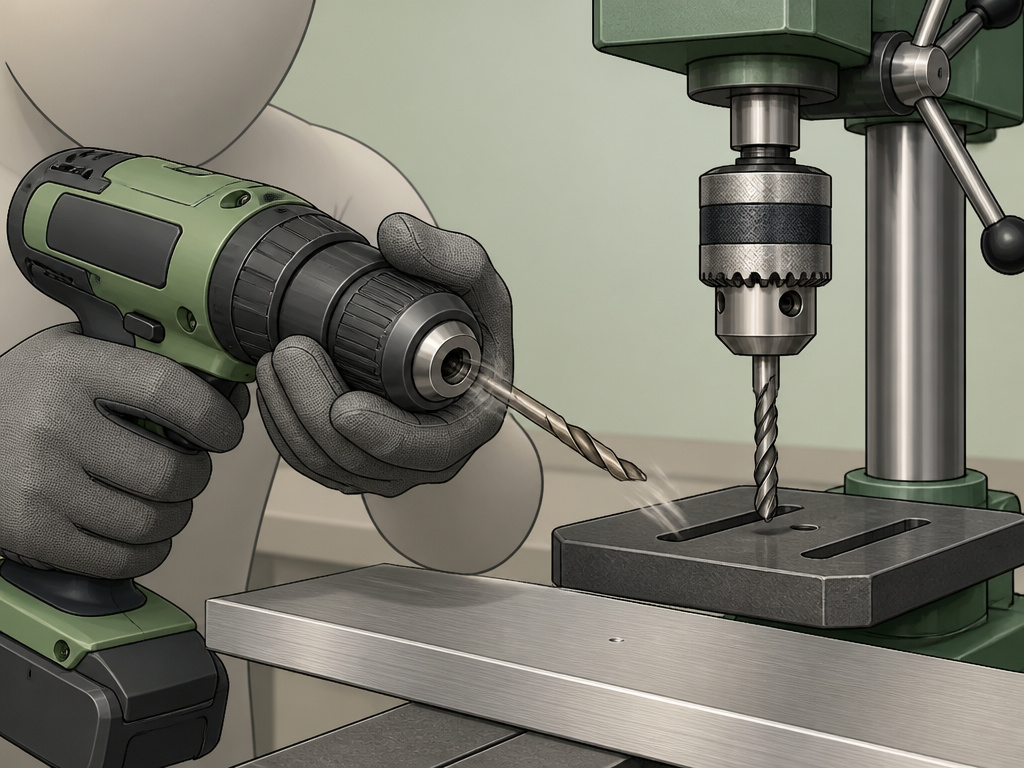
Keyless chucks trade raw power for speed. They’re user-friendly, ideal for environments where operators frequently switch tools or drill sizes. That’s why they dominate the cordless drill world.
But the phrase “hand-tightened” does a lot of heavy lifting. Your grip strength is the limit. If you can’t crank the sleeve hard enough, the chuck can’t hold hard enough. One source notes a risk of bit slippage due to inherent design limitations, especially in hard materials or at high feed pressures, while another argues that with proper setup and maintenance, some perceived weaknesses can be managed.
There’s a technical disagreement here worth noting. One analysis states the reduced clamping torque is an inherent design limitation. Another argues that while grip can vary, arbor fit and clean seating often govern runout more than chuck type. In other words, a keyless chuck on a perfectly fitted, spotless arbor might run truer than a keyed chuck on a dirty, worn one.
The truth probably lives in the middle. The design has a lower ceiling for torque, but poor maintenance will hit that ceiling faster. Keyless chucks can exhibit creep or centerline shift with heat, speed, or variable torque. The fix isn’t a stronger hand; it’s a clean chuck. Grit and grease on the ramps or in the jaws act like ball bearings, letting the bit slide.
So, are keyless chucks safe? For their intended uses—driving screws, drilling wood and plastic, general DIY—absolutely. For trying to push a 1/2-inch bit through stainless steel on a drill press? You’re asking for trouble, and the chuck will tell you by slipping or, worse, spinning the bit violently in the workpiece.
The 3-Step Tightening Method That Stops Slippage
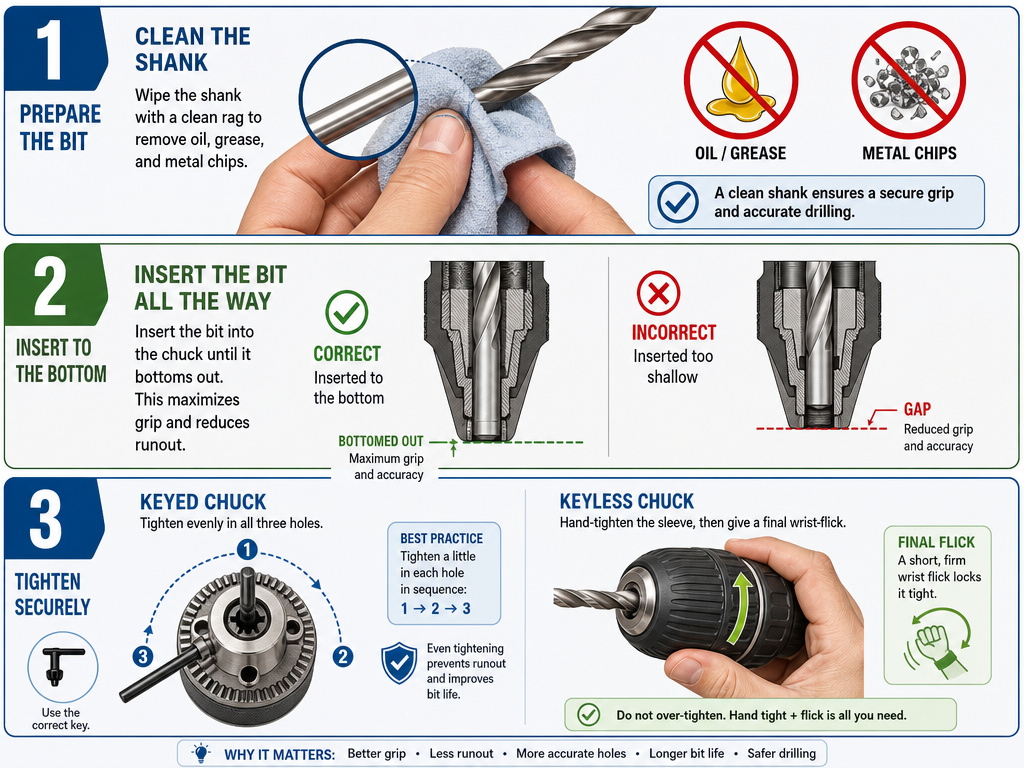
Most slippage results from technique, not a fault of the chuck. Here’s how to tighten both types so the bit stays put.
- Clean the Bit Shank and Chuck Jaws. Wipe off any oil, dust, or metal chips. A bit shank coated in cutting fluid is a lubricated ramp waiting to slide. This is the single most overlooked step, and it’s critical for keyless chucks where cleanliness governs performance.
- Insert the Bit Fully. Push the bit all the way into the chuck until it bottoms out. You want maximum shank engagement. A bit sticking out too far from the jaws acts like a lever, encouraging wobble and slip.
- Tighten with Correct Force.
- For a Keyed Chuck: Insert the key into all three holes, turning each one one full click past hand-tight. This ensures even pressure from all three jaws. Never use a power tool on the key.
- For a Keyless Chuck: Grip the sleeve with your whole hand, not just your fingertips. Turn it firmly until you feel strong resistance. Then, give it one final, sharp wrist-flick to seat it. Relying on finger-tip strength leaves torque on the table.
Skipping step one guarantees grit will grind between the jaws and shank, creating microscopic grooves that increase runout every time you use it, and can even lead to a stuck drill bit. The bit will never seat the same way twice.
Runout, Rigidity, and the Brands That Actually Deliver
Runout is how much the bit wobbles off its true centerline when spinning. Every chuck has some. The question is how much, and what controls it.
The YouTube tests from machinists are revealing. In one, a dial indicator showed a high-quality keyed Jacobs chuck exhibited less flex under load than a premium keyless Albrecht chuck. The keyed design is inherently shorter and stiffer; the rotating body of a keyless chuck is a longer, more flexible lever by design.
But brand matters more than type. A cheap, no-name keyed chuck will have more runout than a premium keyless model. The names that come up repeatedly in real shop talk are Jacobs for keyed and Albrecht for keyless. They’re the benchmarks. Some brands are also noted for offering good accuracy at a lower price point.
Where this goes sideways: Assuming a new chuck will have zero runout. Even premium models need to be “clocked.” Mount the chuck, mark the high spot with a marker, remove it, rotate it 90 or 180 degrees on the arbor, and re-tighten. You can often cut the runout in half by finding its sweet spot.
The arbor—the shank that connects the chuck to your machine—is the other half of the equation. A Jacob’s Taper (JT) or Morse Taper (MT) arbor must be clean and undamaged. A worn or dirty arbor seat will make any chuck, keyed or keyless, wobble. This is why that source insisted arbor fit matters most.
Matching the Chuck to Your Machine and Material
This is the final filter. Your machine’s purpose dictates the chuck.
- Drill Press or Mill for Metalworking: Default to a keyed chuck (Jacobs or equivalent). You need the rigidity and grip for precise, repeated holes in metal. A JT3 arbor is standard for 1/2-inch capacity chucks.
- Cordless Drill for General DIY: The keyless chuck it came with is fine. You’re trading heavy torque for convenience, which matches the tool’s portable, quick-job nature.
- Lathe Tailstock: This is a split decision. For repetitive drilling, a keyed chuck is more secure. For quick center-drill changes, a keyless can be faster. Many machinists keep both mounted on different arbors.
- Woodworking: Keyless is king. You’re rarely pushing the torque limits, and changing between brad point, spade, and Forstner bits constantly is where the keyless speed shines.
What about adapters? You can mount a keyless chuck on an older drill with the proper keyless chuck adapter arbor. Just ensure the arbor’s thread or taper matches your drill’s spindle exactly. A mismatch will destroy runout and safety.
User physical strength requirement
A keyed chuck does not rely on the user’s hand strength. The key acts as a lever to turn a finely machined internal scroll gear, providing a massive mechanical advantage. This allows for consistent, high-torque clamping regardless of the operator’s physical power. In contrast, a keyless chuck depends entirely on the user’s ability to twist the outer sleeve. Its grip strength is a direct result of the force applied by your hand and wrist. This means the holding power of a keyless chuck can vary significantly based on the user’s physical strength and how firmly they can turn the sleeve.
Quality & price spectrum (cheap vs. Premium)
Both keyed and keyless chucks are available across a wide range of quality and price points. Budget models, regardless of type, often use lower-grade materials and less precise machining, which can lead to issues like poor grip, excessive runout, or faster wear. Premium chucks feature superior construction, tighter tolerances, and better heat treatment for durability. For keyed chucks, a high-quality keyed scroll ensures repeatable seating and strong torque resistance. For keyless chucks, well-machined ramped cams and a robust sleeve mechanism are hallmarks of a better design. The fundamental performance characteristics of each chuck type are most reliably realized in their premium versions.
Losing the key (keyed) or bits dropping (keyless)
The classic failure mode for a keyed chuck is losing or misplacing the chuck key, which can completely halt work (learn how to fix a loose chuck if it won’t tighten). Without the specific key, the chuck cannot be opened or tightened. For keyless chucks, the primary operational risk is the drill bit slipping or dropping out during use. This is often due to reduced clamping torque compared to keyed designs, especially under high load or when drilling hard materials. The grip of a keyless chuck can also be affected by heat buildup or inconsistent hand tightening. Keeping the chuck and arbor clean and properly seated is critical for minimizing this risk of bits dropping or creeping during operation.
Frequently Asked Questions
Is a keyed or keyless chuck better?
There is no universal “better.” A keyed chuck is better for maximum holding power and precision in metal. A keyless chuck is better for speed and convenience in woodworking and general use. Choose based on your primary material and workflow.
Which drill chuck is best for metal?
Keyed chuck is best for metal. Its mechanical clamping provides the consistent, high-torque retention needed to prevent bit slippage in hard materials like steel, which is a documented use case from industry sources.
Are keyless chucks safe?
Yes, for their designed purposes. Keyless chucks are safe for woodworking, plastics, driving fasteners, and general DIY drilling. They become unsafe when used for high-torque drilling in hard materials like metal, where the risk of bit slippage and violent spin-out increases.
Should keyless chucks be tightened by hand?
Yes, and then some. Hand-tighten firmly, then apply a final sharp wrist-flick to fully seat the jaws. Never use pliers or a strap wrench on the sleeve, as this can damage the internal cams and permanently affect grip.
Can I put a keyless chuck on my old drill press?
Yes, with the correct adapter arbor. You need an arbor with the thread or taper that matches your drill press spindle (e.g., 1/2″-20 thread or JT33 taper) on one end and the mount for your keyless chuck on the other. Ensure it’s a quality, branded arbor for minimal runout.
Why does my keyless chuck keep slipping?
The three most likely causes are: a dirty bit shank or chuck jaws, insufficient tightening force (using fingertips, not your whole hand), or exceeding the chuck’s torque capacity by drilling too aggressively in hard material. Clean it, tighten it properly, and respect its limits.
The Bottom Line
Stop looking for a single winner. The keyed vs keyless drill chuck question is about matching a clamping mechanism to a job.
If your shop time is measured in seconds per tool change and your materials are mostly wood, buy a keyless chuck and learn the three-finger tightening grip. Your productivity will thank you.
If your holes are measured in thousandths of an inch and your material is steel, buy a keyed chuck, tie the key to the cord of your drill press, and never look back. The holding power is essential.
And when that 20% job comes up, you’ll know it—the chuck will tell you by slipping. That’s your signal to slow down, or to invest in a keyed chuck for that specific machine.
