
Compound vs Sliding Compound Miter Saw: How to Decide
This post contains affiliate links. As an Amazon Associate, we earn from qualifying purchases.
A sliding compound miter saw has a sliding arm that lets the blade move forward and back, dramatically increasing its crosscut width capacity. A standard compound miter saw chops straight down, limited to the width of its blade. For extensive projects like decks or trim work demanding greater precision and the ability to cut longer pieces, a sliding model is often preferable, but a compact compound saw excels for smaller projects and occasional use if your space is tight and your cuts are rarely wider than a 2×6.
That sliding arm changes everything. It’s about cutting wider boards cleanly in one pass without flipping the workpiece. That’s the difference between a frustrating, error-prone process and a smooth, accurate one. This is a key advantage when considering a compound vs sliding compound miter saw.
What follows is a breakdown of the mechanics, the real-world numbers on what each saw can actually cut, and the maintenance and accuracy trade-offs the sales brochures skip. We’ll start with the fundamental question of reach.
Key Takeaways
- The sliding mechanism on a sliding compound miter saw increases its crosscut width capacity, allowing a 12-inch model to crosscut up to 12-16 inches.
- A standard 10-inch compound miter saw is limited to cutting stock about 5-6 inches wide, making it suitable for trim, framing, and smaller projects.
- Sliding saws require specific rail maintenance; their rails need regular cleaning and lubrication every 50 hours of use to prevent binding and inaccuracy.
- For architectural trim, crown molding, and cutting wide shelving, a sliding saw is essential; for repetitive small cuts like blocking, a non-sliding saw is often sufficient.
- Always match your blade tooth count and hook angle to the material, a 40-tooth or 60-tooth carbide blade with a negative hook angle is a safe, controlled starting point for wood.
The Core Difference: It’s About Reach
A compound miter saw can tilt (bevel) and pivot (miter). A sliding compound miter saw does all that, plus the head slides on rails. That slide is the whole game.
Think of it like a circular saw fixed to a track. Instead of being limited to the diameter of the blade, you can push the spinning blade through the wood. This turns a 12-inch blade from a 12-inch cutting limit into a 16-inch one. The difference is the practical one between cutting a 2×8 in one smooth motion and having to awkwardly flip it, hoping your marks line up perfectly on the second cut.
A 12-inch sliding compound miter saw can often crosscut material up to 12-16 inches wide. A 10-inch compound miter saw can crosscut about 5-6 inches wide stock. That extra capacity reduces the need to flip the workpiece, leading to more consistent cuts.
Here’s what that looks like for common lumber dimensions. This is the data point that answers the “will it cut a 4×4?” question definitively.
| Material | 10″ Compound Saw | 12″ Sliding Compound Saw | Verdict |
|---|---|---|---|
| 2×4 (3.5″ wide) | Yes, easily. | Yes, easily. | Either saw handles it. |
| 2×6 (5.5″ wide) | At its limit. A 10″ model can just do it at 90 degrees. | Yes, with room to spare. | Sliding saw is safer and more stable. |
| 2×8 (7.25″ wide) | No. | Yes, in one pass. | Sliding saw required. |
| 4×4 Post (3.5″ thick) | Yes, with a flip. | Yes, often in one pass if the saw has enough vertical capacity. | Sliding saw is faster, compound saw works. |
The ability to cut a 10-inch wide shelf in one pass is the kind of practical advantage that reshapes how you work. You stop planning projects around your saw’s limitations.
What a Sliding Saw Actually Does for Your Projects
For projects like crown molding, baseboards, wide shelving, or breaking down sheet goods for cabinet parts, the sliding saw is the right tool.
For architectural trim and precise cabinet face frame parts, the compound vs sliding compound miter saw question is answered: a sliding model is essential. The wider capacity means fewer flips and more consistent cuts. The alternative is a dance of measuring, marking, cutting, flipping, re-marking, and praying the blade doesn’t wander. I’ve watched DIYers spend more time setting up a cut on a small saw than actually making it.
Conversely, for smaller, repetitive cuts like blocking or small frame components, when you compare a compound vs sliding compound miter saw, a non-sliding model might be sufficient and more compact. If you’re building a shed and need fifty identical 2×4 studs cut to length, a basic compound saw on a stand is faster to deploy and takes up less room in the corner of your garage. The sliding mechanism is just extra weight and complexity you won’t use.
The Trade-Off: Size, Cost, and Complexity
The sliding mechanism adds bulk, weight, and price. A model like the DEWALT DWS779 is a beast, built with linear ball bearings for alignment and a 15 Amp motor. It’s a workshop anchor.
That matters if you’re loading a vehicle for a job site or have a small garage.
Where this goes sideways: Assuming a sliding saw is always more accurate. The rails must be kept clean and perfectly aligned. A speck of sawdust in the wrong spot can introduce a tiny wiggle, which translates to a visible gap in a long miter joint.
The price difference can be significant. You’re paying for the engineering of a smooth, rigid sliding system. For a serious DIYer or pro, it’s worth it. For someone installing trim in one room, that cash might be better spent on a better blade or a stand.
Accuracy and Blade Considerations
Both saws can be precise, but they fail in different ways. A non-sliding saw’s accuracy is mostly about the pivot points and fence staying square. A sliding saw adds the rails as a variable.
I constantly check my miter saw’s 90-degree and 45-degree detents, especially when doing architectural trim. A 1/2 degree error on a miter cut can lead to a noticeable gap in a 4-inch wide piece of trim. On a slider, you also need to ensure the blade path is parallel to the fence along the entire slide. It’s one more thing to calibrate.
The blade is critical. For most general woodworking tasks, a 40-tooth or 60-tooth carbide-tipped blade is recommended. But the hook angle matters more on a miter saw.
Many miter saw blades feature a negative hook angle. The teeth lean slightly backward. This helps prevent the blade from grabbing the workpiece aggressively, leading to safer, more controlled cuts. It stops the saw from trying to “climb” the wood and pull itself forward, which is a real hazard on a sliding model.
Maintenance: Rails Add a Step
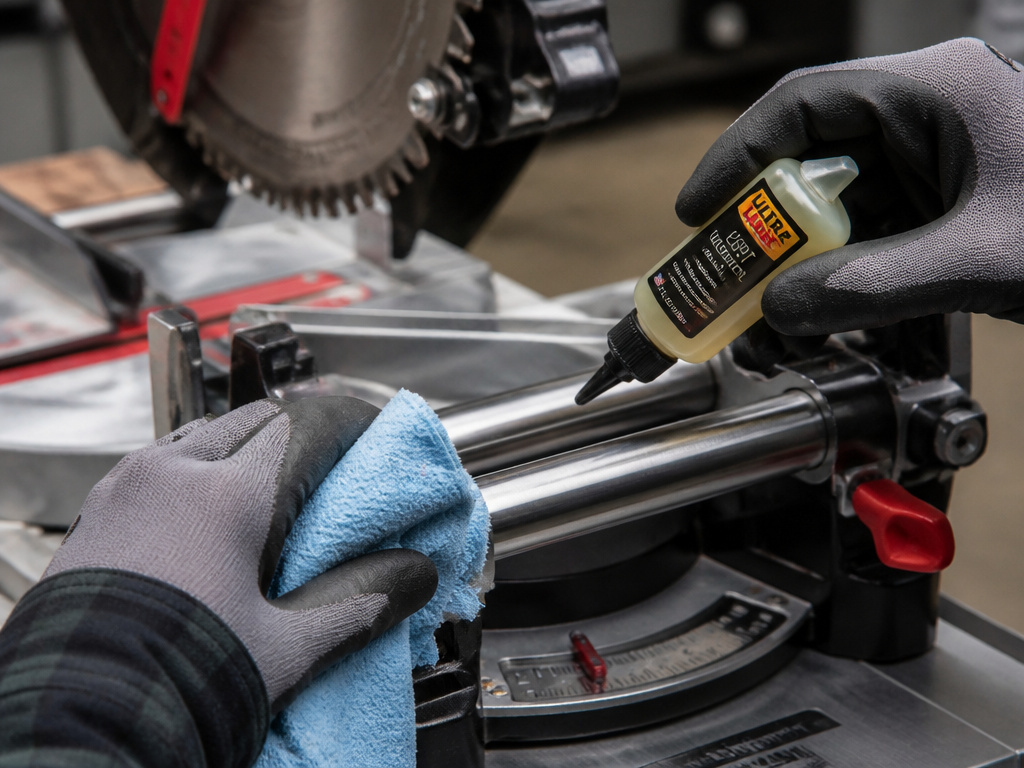
A compound miter saw needs its blade changed, its dust blown out, and its pivots occasionally checked. A sliding compound miter saw has all that, plus the rails.
The manual for a saw like the DWS779 will tell you to clean and lubricate the sliding mechanism with a lubricant recommended by the manufacturer. In the real world, this means every 50 hours of use or so, you need to wipe down the exposed rails with a dry cloth, then apply a light machine oil or specific rail lubricant. If you don’t, sawdust mixes with the grease, forming a gritty paste. You’ll feel it as a rough, jerky slide. Eventually, it wears the rails and introduces slop.
The DWS779’s dust collector captures at least 75% of produced dust. Without one, both types of saw are messy, but the sliding action on a slider can throw dust further. Wear a respirator.
Single vs. Dual Bevel: A Separate Decision
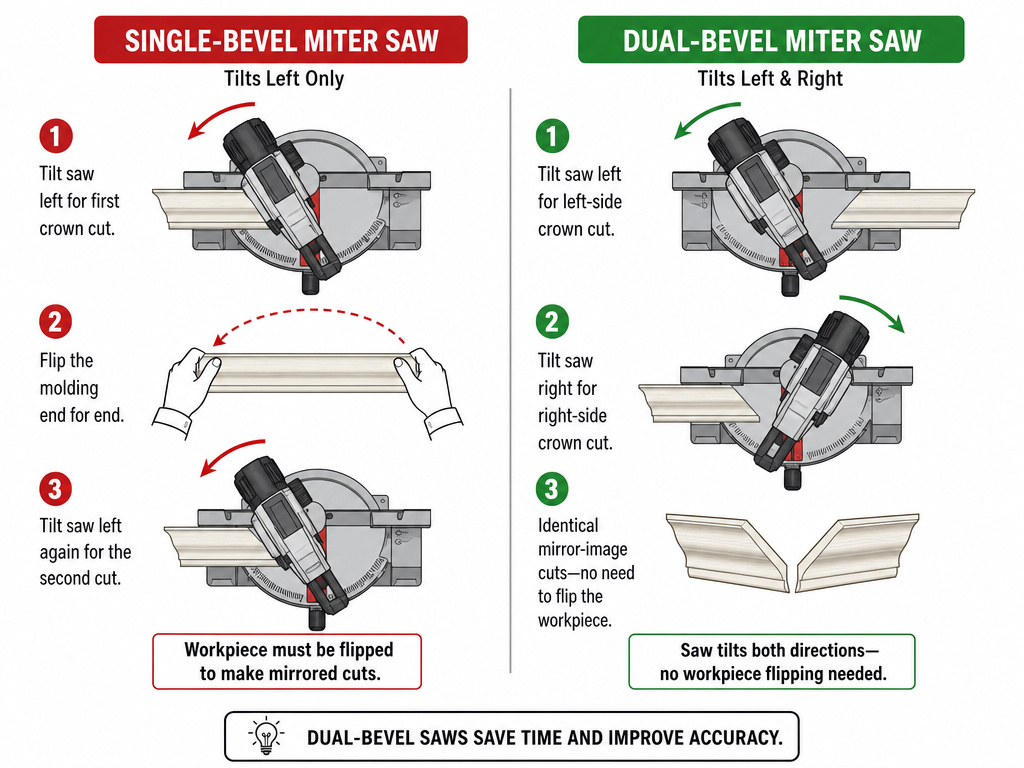
This choice is independent of the sliding function. A single bevel saw, like the Hitachi C10FCH2, tilts in one direction. To make a matching bevel cut on the opposite side of a board, you have to flip the workpiece. This can be confusing and introduces error.
A double bevel saw, like the DEWALT DWS779, tilts both left and right. You set the angle, make all your cuts, then swing the head the other way to do the matching piece without touching the workpiece. It’s a massive time-saver for crown molding or complex frames. For a deeper dive on this specific trade-off, our guide on single vs dual bevel miter saws breaks it down.
So, Which One Should You Buy?
Let’s be straight. Your first question isn’t “sliding or not?” It’s “what’s the widest board I need to cut cleanly?”
If the answer is “rarely over 6 inches,” a 10-inch or 12-inch compound miter saw is a powerful, simpler tool. Look for solid positive miter stops at common angles; for example, one source lists stops at 0, 15, 22.5, 30, and 45 degrees for a Ryobi model, but always check the specific saw’s features. The best compound miter saws today offer tremendous value.
If you see yourself cutting shelving, wide trim, or doing any kind of furniture building, the sliding saw pays for itself in saved frustration. It’s the one tool where buying more capacity than you think you need is almost always the right move. For those ready to step up, the best sliding compound miter saws balance performance and cost.
Still unsure if you need that sliding arm? Consider the blade size itself. A 12-inch blade on a non-sliding saw is still limited by its blade diameter, while a sliding mechanism on any size saw increases its crosscut capacity. Our comparison of miter saw blade size tackles that specific puzzle.
Using a Table Saw or Circular Saw for Wide Cuts
When a miter saw’s capacity is too small, a table saw or circular saw can handle wider boards. A table saw excels at ripping long boards to width and can make crosscuts on wide panels using a miter gauge or sled, though it is less portable. A circular saw offers portability and can cut sheet goods or wide planks with the aid of a straightedge guide. For either tool, secure the workpiece with clamps. These methods often require more setup and careful measurement to achieve the precision a sliding miter saw provides in a single pass. Always consult the manufacturer’s recommendations for your tools and wear appropriate safety gear.
Frequently Asked Questions
Do you really need a sliding miter saw?
You need a sliding miter saw if you regularly need to crosscut material wider than about 6 inches, think shelves, wide trim, or cutting down plywood for cabinets. If your work is mostly framing, basic trim, or cutting 2x4s and 2x6s, a standard compound miter saw is simpler, cheaper, and takes up less space. It’s a tool for specific capacity, not a universal upgrade.
Will a 12-inch sliding miter saw cut a 4×4?
Yes, a 12-inch sliding miter saw will cut a 4×4 post. The vertical cutting capacity of a 12-inch blade is sufficient to cut through a 4×4 post. The sliding action isn’t needed for the thickness, but it ensures a clean, stable cut through the dense wood. A non-sliding 12-inch saw can also do it but may require a slower, more careful cut.
What is the main disadvantage of a sliding miter saw?
The main disadvantages are increased cost, larger footprint, and more required maintenance. The sliding rails add complexity, take up more space behind the saw, and need regular cleaning and lubrication to maintain smooth operation and accuracy. They are also generally heavier and less portable than their non-sliding counterparts.
Can a compound miter saw cut crown molding?
Yes, a compound miter saw can cut crown molding. Crown molding requires a compound cut (both a miter and a bevel angle). Any compound miter saw, whether sliding or not, can make these cuts by tilting the blade and pivoting the table. The advantage of a sliding saw for crown molding is primarily in handling longer, more unwieldy pieces with greater stability, not in making the angle itself.
The Bottom Line
Forget the marketing. The choice between a compound and sliding compound miter saw is a simple equation of width. Map your common cuts against the 5-6 inch limit of a standard 10-inch saw.
If you exceed that limit more than once a season, get the slider. The upfront cost and extra maintenance are worth the capability. If you live inside that limit, buy the better-quality compound saw and spend the savings on a premium blade and a solid stand. Your work will be cleaner for it.
And whichever you choose, remember the foundation: learn how to use a miter saw safely, keep it calibrated, and match your blades for miter saws to the task. The tool enables the cut, but the skill ensures it’s perfect.
