
How to Change a Table Saw Blade: Step-by-Step (Safely)
This post contains affiliate links. As an Amazon Associate, we earn from qualifying purchases.
To change a table saw blade, you need to disconnect power, secure the blade from spinning, loosen the arbor nut, swap blades, and reassemble. The entire process should take under two hours and hinges on matching the blade’s direction of rotation to your specific saw’s design. Getting the blade teeth facing the correct way is critical, the manuals disagree on the wording, but the principle is universal.
That principle is mechanical, not philosophical. The blade must cut on its upward rotation into the workpiece. If you install it backwards, it won’t cut; it will scrape, burn, and likely throw the material back at you. This is why understanding how to change a table saw blade correctly is critical. This is where generic advice like “teeth toward you” falls apart, because “toward you” changes depending on where you’re standing.
What follows is the full breakdown of how to change a table saw blade: the essential safety prep, the tools that actually work, the step-by-step swap, and the calibration checks that separate a safe, accurate cut from a wobbly, dangerous one. We’ll also clear up the manufacturer confusion on blade direction once and for all.
Key Takeaways
- Always disconnect power by unplugging the cord or removing the battery before any work. This is the single step that prevents a trip to the emergency room.
- The arbor nut thread direction depends on your saw’s tilt. Left-tilt saws often have left-hand threads (turn clockwise to loosen); right-tilt saws usually have standard right-hand threads.
- Sources disagree on phrasing: the Home Depot guide states ‘teeth should point towards you,’ while the unspecified brand manual states ‘teeth pointing toward the front of the saw.’ The underlying principle is that the blade’s upward rotation should cut into the wood. This ensures the blade’s upward rotation cuts into the wood, not away from it.
- Check for blade wobble by hand before reconnecting power. Any visible shake means the blade isn’t seated flat or the arbor flange has debris.
- Never cross-cut freehand or against the fence. Always use a miter gauge or crosscut sled, and keep a push stick handy for every rip cut.
Before You Start: The Safety Mandate
This isn’t scare talk. A table saw’s blade spins at high speed. The force involved can turn a minor slip into a life-altering injury in milliseconds. The safety rules aren’t suggestions; they are the operating instructions for a machine that has zero tolerance for error.
Before you start: Disconnect the machine from the power source before installing or removing accessories. Remove adjusting keys and wrenches. Sources specify different eye protection: the unspecified brand manual requires safety goggles complying with ANSI Z87.1, while the Home Depot guide mentions safety glasses and the DeWalt manual also specifies safety glasses.
The DeWalt manual states it plainly: turn the machine off and disconnect it. Don’t just hit the switch. Pull the plug. That physical break is your guarantee against an accidental start. Form the habit of checking that wrenches are clear of the spindle. A forgotten wrench becomes a high-speed projectile.
Protecting your eyes is mandatory. Sawing produces dust and can throw chips. The unspecified brand manual in our sources is adamant: you need safety goggles, not glasses, that meet the ANSI Z87.1 standard. A dust mask is also smart, inhaling fine sawdust is a long-term health hazard many weekend warriors ignore.
Tools You’ll Need (And One You Might Not)
You don’t need a specialty toolkit. For most saws, you’ll use the wrenches that came in the box. If those are missing, a trip to the hardware store is next.
- The supplied wrenches: Most saws include one or two. A long-handled wrench for the arbor nut and a shorter one or a pin spanner to fit into the arbor shaft.
- Adjustable wrench or mechanics wrench: For the arbor nut if the original is lost. An adjustable wrench or mechanics wrench in the correct size will work.
- Scrap wood block: A critical backup. If your saw has no arbor lock, you’ll use this to jam the blade and keep it from spinning.
- Socket set (optional): Helpful for stubborn nuts, but use with caution to avoid over-torquing.
- Telescoping magnet: For the inevitable moment you drop the arbor nut or washer into the saw’s innards. Worth its weight in gold.
The scrap wood block is the unsung hero. The Home Depot guide mentions it: if your saw has no wrenches, push a block against the blade to stop it turning while you loosen the nut with an adjustable wrench. It feels primitive, but it works. Just use a block thick enough that your hand stays well clear of the teeth.
The 7-Step Core Procedure
Follow this sequence. Rushing or skipping steps is how people get hurt or ruin a new blade.
Step 1: Disconnect Power and Clear the Area
Unplug the saw. If it’s cordless, remove the battery. Move the rip fence completely out of the way and remove the miter gauge. You need unimpeded access to the throat.
Step 2: Remove the Throat Plate and Blade Guard
Most throat plates are held by two screws. Remove them and lift the plate out. Next, remove the blade guard assembly. This usually involves loosening a knob or lever. Consult your manual, the mechanism varies by brand. If you have a riving knife, you may need to lower the blade below the table to slide it out.
Step 3: Raise the Blade and Secure It
Crank the blade to its highest position. Now, prevent it from spinning. If your saw has an arbor lock button, engage it. If it came with two wrenches, use one to hold the arbor shaft still. No lock or wrenches? This is where the scrap wood block comes in. Press it firmly against the blade teeth near the front of the table to act as a brake.
Step 4: Loosen and Remove the Arbor Nut
Place your wrench on the arbor nut. Here’s the crucial part: which way do you turn? It depends on your saw’s tilt.
- Right-tilt saws (the motor and blade tilt to the right) typically have standard, right-hand threads. Turn the nut counter-clockwise to loosen.
- Left-tilt saws often have left-hand threads. Turn the nut clockwise to loosen.
If you’re unsure, check your manual. A good rule of thumb: try to turn the nut in the same direction the blade spins during operation. That force tends to tighten it; turning the opposite way loosens it. Once loose, finish unscrewing by hand. Keep hold of the outer washer and the nut.
Step 5: Swap the Blades and Mind the Direction
Lift out the old blade. Brush any sawdust off the arbor shaft and the inner flange. Now, install the new one. This is where sources disagree on phrasing, but not on physics.
| Source | Instruction | What It Means |
|---|---|---|
| Home Depot Guide | “Teeth should point towards you.” | Ambiguous. Could be misinterpreted if you’re at the side of the saw. |
| PartSelect Manual | “Teeth pointing toward the front of the saw.” | Clearer. The teeth at the front of the table (nearest the operator) point downward. |
| Consensus Principle | Teeth point down at the front. | The blade’s upward rotation then brings the teeth into the wood for a clean cut. |
Place the new blade on the arbor. The teeth at the front edge of the table should be angled downward, toward the table surface. Reinstall the washer and nut, threading them on by hand first to avoid cross-threading.
Step 6: Tighten the Nut and Reassemble
Secure the blade from spinning again using your chosen method. Tighten the arbor nut firmly, but don’t throw your whole weight into it, you risk stripping the threads or damaging the arbor. A good, snug fit is all you need. Then, reinstall the riving knife (if removed), blade guard, and throat plate.
Step 7: The Hand-Test and Alignment Check
Before you plug the saw back in, turn the blade by hand through a full rotation. Watch it closely.
Where this goes sideways: Any wobble indicates the blade isn’t seated flat against the arbor flange, there’s debris stuck between them, or the blade itself is warped. A wobbly blade makes terrible cuts and is unsafe.
If it spins true, you’re almost done. Now, check that the blade is parallel to the miter gauge slots, this is a core part of table saw operation. Use a combination square. If it’s off, you’ll need to align the fence so it matches the blade, not the other way around.
Navigating Confusing Manufacturer Instructions
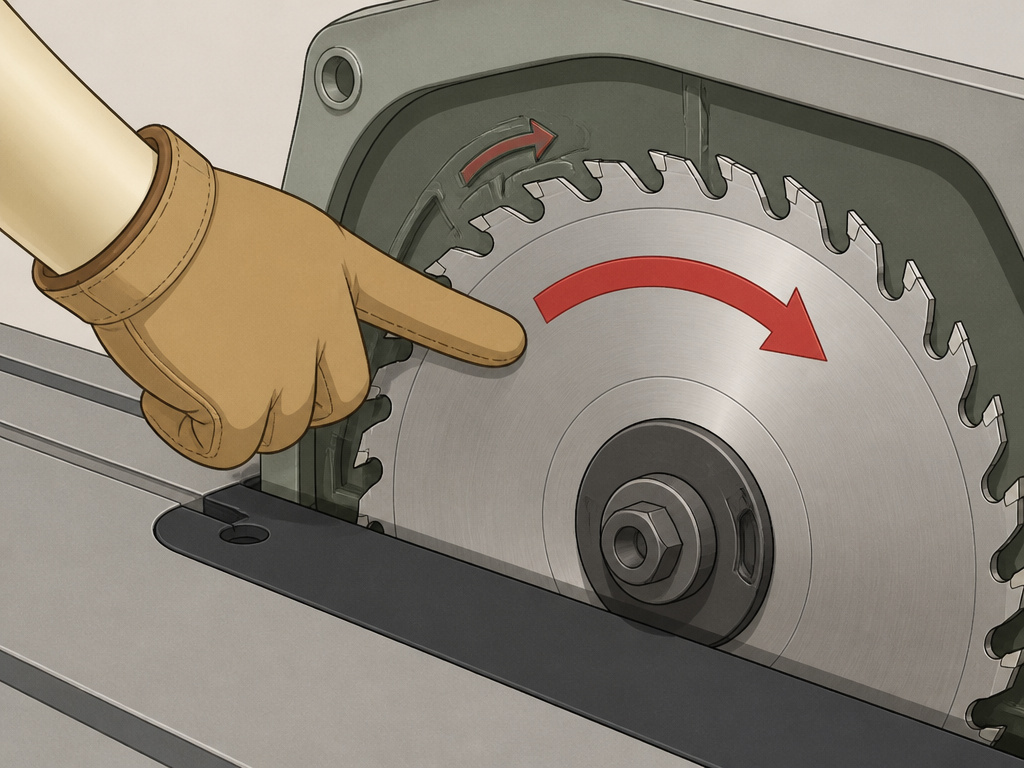
You’ll find conflicting advice, even in official guides. Here is how to clear it up.
The Home Depot guide says “teeth should point towards you.” If you’re standing directly in front of the saw, that works. But if you’re reading it literally while crouched at the side, you might install the blade backwards. The PartSelect manual is more precise: “teeth pointing toward the front of the saw.”
The underlying rule is mechanical, not positional. The blade rotates upward toward the operator at the front of the table. Therefore, the teeth at that front point must be angled down to bite into the wood. If they point up, they’ll skid across the top of the board, burning it and likely causing kickback.
When in doubt, look for an arrow on the blade itself indicating rotation. Match that arrow to the rotation direction marked inside the saw’s blade housing. If all else fails, the “teeth down at the front” rule never fails.
What If the Arbor Nut is Stuck?
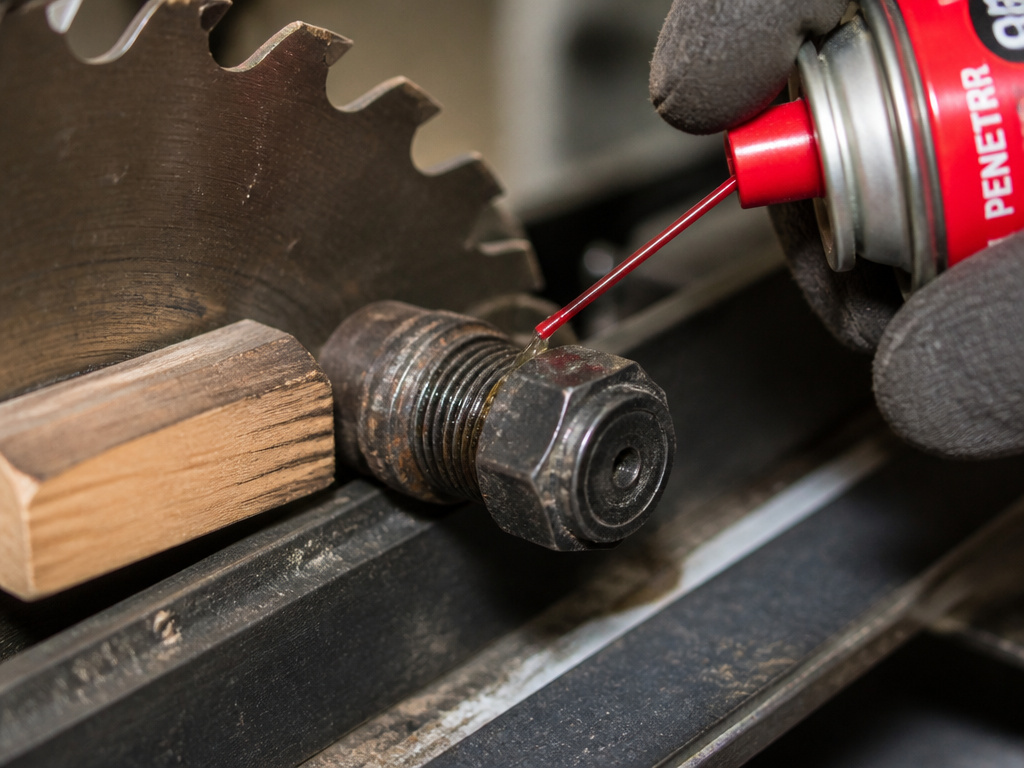
It happens. Sawdust, rust, or overtightening can weld the nut in place. Don’t reach for a cheater bar. The extra force can snap the arbor.
First, apply a few drops of penetrating oil (like Liquid Wrench or PB Blaster) to the threads. Let it soak for 10-15 minutes. Then, with the blade securely blocked, try again with a well-fitting wrench. Sometimes a few light taps on the wrench handle with a mallet can break the corrosion’s grip.
If it still won’t budge, and you’re certain you’re turning the correct direction, you may need to apply heat carefully with a heat gun to expand the nut. This is a last resort and risks damaging plastic components or motor seals. If you’re uncomfortable, it’s a job for a professional tool repair shop.
Post-Installation: The Test Cut and Calibration
Your work isn’t done when the guard is back on. You must verify the saw is cutting accurately and safely.
- Reconnect power and turn the saw on briefly in a well-ventilated area to ensure it sounds normal, no unusual vibration or grinding.
- Make a test cut on a scrap piece of wood. Use a push stick. Listen to the sound. A sharp, properly installed blade cuts with a clean, steady hum. A rubbing or chattering sound means something is wrong.
- Check the cut’s squareness. Crosscut two pieces of scrap and hold their ends together. They should meet perfectly with no gap. A gap means your blade isn’t at a perfect 90 degrees to the table. Adjust the bevel angle.
- Check rip cut alignment. Make a rip cut using the fence. The off-cut should slide freely between the blade and fence without binding. Binding is a sign the fence is not parallel to the blade, a major kickback risk.
This final calibration is what separates a functional tool from a precise one. A saw that isn’t tuned will fight you on every project, diminishing the value of even the best table saw blades you can buy.
When to Change Your Blade
Knowing how to change a table saw blade is one thing; knowing when to change it is another. Don’t wait until cuts are visibly terrible.
- The cut feels harder. You’re pushing the wood through with more force than usual.
- The sawdust turns powdery. Sharp blades produce small chips; dull blades create fine dust.
- Burn marks appear on the wood, even with a steady feed.
- The motor strains or the saw sounds labored.
These are all common signs of a dull blade. A dull blade is more dangerous than a sharp one, it requires more force, increasing the chance of a slip or kickback. Regularly clean your saw blades to remove pitch, which can mimic dull performance. But when cleaning doesn’t restore the cut, it’s time for a replacement or professional sharpening.
How to Use Your Table Saw’s Owner’s Manual
Your saw’s manual is the final authority for your specific model. Before you start, read it thoroughly to learn the tool’s applications, limitations, and possible hazards. If any instructions in a general guide differ from your owner’s manual, you must follow the manual. It contains the exact steps for your saw’s design, including the correct threading for the arbor nut, which depends on whether your saw tilts left or right. The manual also provides critical safety warnings and maintenance procedures that are essential for safe operation. Always disconnect the machine from the power source before installing or removing accessories like the blade.
How to Choose the Right Replacement Blade
Selecting the correct blade is critical for safety and performance. First, confirm the blade diameter. Most table saws use a 10-inch blade, but other sizes exist. Many 10-inch saws can also accept dado stack blades, which are typically 8 inches in diameter. The most crucial specification is the arbor hole size. Never use a blade with a different arbor size than what your saw specifies. A mismatch can cause the blade to be off-center or come loose during operation. Choose a blade type suitable for your cutting tasks, ensuring it is free from warps, bends, or cracks before installation.
Frequently Asked Questions
Are table saw blade nuts reverse thread?
Sometimes. The threading is linked to the saw’s tilt direction to prevent the nut from loosening during operation. Right-tilt saws usually have standard (right-hand) threads (lefty-loosey). Left-tilt saws often have left-hand threads (righty-loosey). Always check your owner’s manual to be certain.
What type of wrench do I need?
Start with the wrenches that came with your saw. If they’re missing, an adjustable wrench or a mechanics wrench in the correct size (often 3/4″ or 19mm for the nut) will work. A block of wood to stop the blade from spinning is essential if you lack an arbor lock.
How do I change a blade without an arbor lock?
Use the scrap wood block method. Lower the blade below the table surface. Place a sturdy block of scrap wood against the teeth. Raise the blade slowly so the teeth bite into the block, locking it in place. With the blade secured by the wood, use your wrench to loosen the arbor nut.
Is changing a table saw blade like changing a circular saw blade?
The principles are similar, disconnect power, secure the blade, loosen the retaining nut. However, the process on a table saw is generally more involved due to the throat plate, blade guard, and often a riving knife. You can review the steps for changing a circular saw blade to see the parallels and differences.
The Bottom Line
Changing a table saw blade is a fundamental maintenance skill. It takes under two hours, demands respect for the machine’s power, and rewards you with cleaner, safer cuts. The core of the job isn’t strength; it’s procedure. Disconnect the power. Secure the blade. Match the blade’s teeth to the saw’s rotation. Check your work by hand before you hit the switch.
The one spec you must never guess is the arbor size. That number is in your manual, and using a blade with the wrong hole is a direct path to a catastrophic failure. Everything else, from choosing a general-purpose blade to a dedicated ripper, flows from knowing you can swap them safely. Get this right, and the saw becomes a predictable partner in your work, not a source of anxiety.
