
How to Resaw With a Band Saw: Step-by-Step Guide
This post contains affiliate links. As an Amazon Associate, we earn from qualifying purchases.
*To resaw with a band saw, you need a coarse, narrow blade (2-3 TPI, 3/8 to 1/2 inch wide), set to high tension so it deflects no more than 1/4 inch sideways, and a guide system adjusted close to the workpiece.* A tall fence and slow, steady feed rate complete the setup for a clean, straight cut through the thickness of the board.
A coarse blade with 2-3 teeth per inch is the key. Its large gullets clear sawdust from deep inside the kerf, which is the single biggest reason blades overheat, wander, and burn wood. Skip this spec, and you fight the machine on every cut. This principle is fundamental when learning how to resaw with a band saw.
What follows is the sequence that works for a 1-horsepower Craftsman saw and a 30-horsepower Baker industrial resaw. This section covers the blade specs that matter, the tension debate, how to set up for a dead-straight cut, and what to do when the blade starts to pull to one side, which are all core to how to resaw with a band saw.
Key Takeaways
- A 3 TPI hook-tooth blade between 3/8 and 1/2 inch wide clears waste best; a thinner 0.022-inch blade like the Wood Slicer reduces motor strain on smaller saws.
- Many experts advise ignoring the saw’s built-in tension gauge as a primary tool; set tension by feel until sideways blade deflection is just 1/4 inch for most saws.
- Always use a featherboard to pin the workpiece against the fence at the point of cut, this stops the board from twisting and causing dangerous kickback.
- Reduce blade tension after a long resawing session to relieve stress on the saw’s frame and wheels, a step most manuals mention but almost everyone skips.
- If your cut starts to curve, do not force the board; stop, back out, and check that your blade guides are adjusted close to the workpiece, as sources recommend a height of no more than 1/8 in. (Fine Woodworking, Craftsman) or 1/4 in. (South Bend Tools).
The Blade That Decides the Cut (Hook-tooth, 3 TPI, and Thickness)
Pick the wrong blade and nothing else matters. The blade is your single point of contact with the wood, and in resawing, that contact is buried deep inside a long, narrow kerf. Sawdust has nowhere to go.
For most resawing, use a hook-tooth blade with 2 tpi to 3 tpi, 3/8 in. To 1/2 in. Wide and 0.025 in. Thick. This coarse blade effectively pulls sawdust out of the kerf, allowing the blade to run cooler and thus cut faster.
A coarse tooth spec (2-3 TPI) is essential. Blades with about 3 teeth per inch have large gullets which can accommodate waste from thick stock. A finer blade, like a 6 or 10 TPI, will clog within the first inch of cut. You’ll smell burning wood, see smoke, and the motor will bog down. The blade isn’t cutting anymore; it’s just rubbing itself hot.
Hook-tooth design matters, too. The South Bend Tools manual states hook tooth blades are excellent for the tough demands of resawing and ripping thick material. The positive rake angle pulls the wood into the cut, making feeding easier and reducing the chance of the blade stalling.
Blade thickness is your secret weapon for underpowered saws. The Highland Woodworking Wood Slicer blade has a band thickness of .022″, 12% thinner than most typical blades. A thinner blade creates less friction in the kerf, so your saw’s motor has an easier time pulling it through dense hardwood. The total kerf width is barely a 1/32″, which also means less wasted wood.
The short version: Start with a 3/8 to 1/2-inch, 2-3 TPI hook-tooth blade. If your saw struggles, switch to a thin-kerf option like the Wood Slicer. For a deep dive on specs, our resawing blade guide breaks it down further.
Tension: The Gauge Lie and the Quarter-Inch Rule
Your saw has a tension gauge. It is, at best, a suggestion. At worst, it’s actively misleading. Factory scales are notoriously optimistic, often reading “correct” when the blade is dangerously loose for resawing.
Fine Woodworking suggests a target blade tension of 15,000 psi. Almost no one has a specialized tension gauge to measure that. So you work backwards from the result.
Method 1: The Scale Hack. The Fine Woodworking fix is simple: set the tension one mark higher on the scale. For a 3/8-inch blade, tension it to the 1/2-inch mark. This brute-force override usually gets you into the right ballpark.
Method 2: The Deflection Test. This is the universal check. With the guides retracted, press your finger against the side of the blade, halfway between the wheels.
- Fine Woodworking says: If it deflects more than 1/4 in., crank up the tension.
- Highland Woodworking refines it: Add tension until sideways deflection is just 1/4″ to 5/16″ on saws with 6″ depth of cut, or about 3/8″ on saws with 12″ depth.
I use the 1/4-inch rule for my saw. It’s a physical feel you learn fast, a firm push should move the blade, but it should feel like it hits a wall of resistance quickly. A floppy blade will deflect significantly and is guaranteed to wander.
| Tension Method | How To | Best For | The Catch |
|---|---|---|---|
| Built-in Gauge | Set to marked width. | Quick reference. | Often reads low; unreliable for resawing. |
| Scale Hack | Set to the next width mark up. | Saw owners without a feel for tension yet. | A blunt fix; may over-tension very light blades. |
| Deflection Test | Press blade sideways; aim for ≤1/4″ movement. | Anyone who wants repeatable, physical verification. | Requires retracting guides fully to test accurately. |
Where this goes sideways: Cranking tension to the absolute max because “more is better.” On lighter saws, this can distort the frame or damage wheels. Tension until the blade is stiff, not until the handle won’t turn anymore.
Once you’re done resawing for the day, do what the manual says but nobody does: reduce the blade tension. This reduces strain on the saw. It takes ten seconds and adds years to your machine’s life. For a dedicated walkthrough, see our guide on setting blade tension.
Setting Up for a Straight Shot (Guides, Fence, and Square)
A tense blade alone still wobbles. The guide system, those blocks or bearings around the blade, is what keeps it on track. Here, a small gap is the difference between a straight cut and a frustrating curve.
Sources disagree on the exact measurement, but the principle is identical: get the guides as close to the work as possible.
- Fine Woodworking & Craftsman: Adjust the upper guides so they’re no more than 1/8 in. above the workpiece.
- South Bend Tools: Adjust upper blade guide height to just clear the workpiece (no more than 1/4″ above).
I set mine to 1/8 inch, following Fine Woodworking and Craftsman’s advice. Why? The closer the guides are to the cut, the less unsupported blade there is to twist and bow under pressure. It’s the difference between holding a long pole at its end versus right near your hand; control is much better.
The fence is your other anchor point. The factory fence on many bandsaws can be too short for resawing tall boards. The top can easily tilt away from the blade. The fix is a tall auxiliary fence. You can clamp a straight piece of wood to your existing fence, or invest in an aftermarket fences designed for the job.
Before you cut your good wood, you must find your blade’s drift. Drift is the blade’s natural tendency to cut at a slight angle, not perfectly parallel to the fence.
- Retract your fence. Take a scrap board and draw a straight line down its face, freehand.
- Turn on the saw and carefully cut along that line, feeding the board without a fence, just following the line. Don’t force it or steer.
- Stop the cut about halfway. The line on your board and the actual kerf will show a slight angle. That’s your drift angle.
Lock a sliding bevel to that angle, then set your fence parallel to it. Your fence is now aligned to the blade’s natural cutting path, not the other way around. This is the single most effective trick for eliminating blade lead.
The Cut: Feed Rate, Pressure, and Stopping a Wander
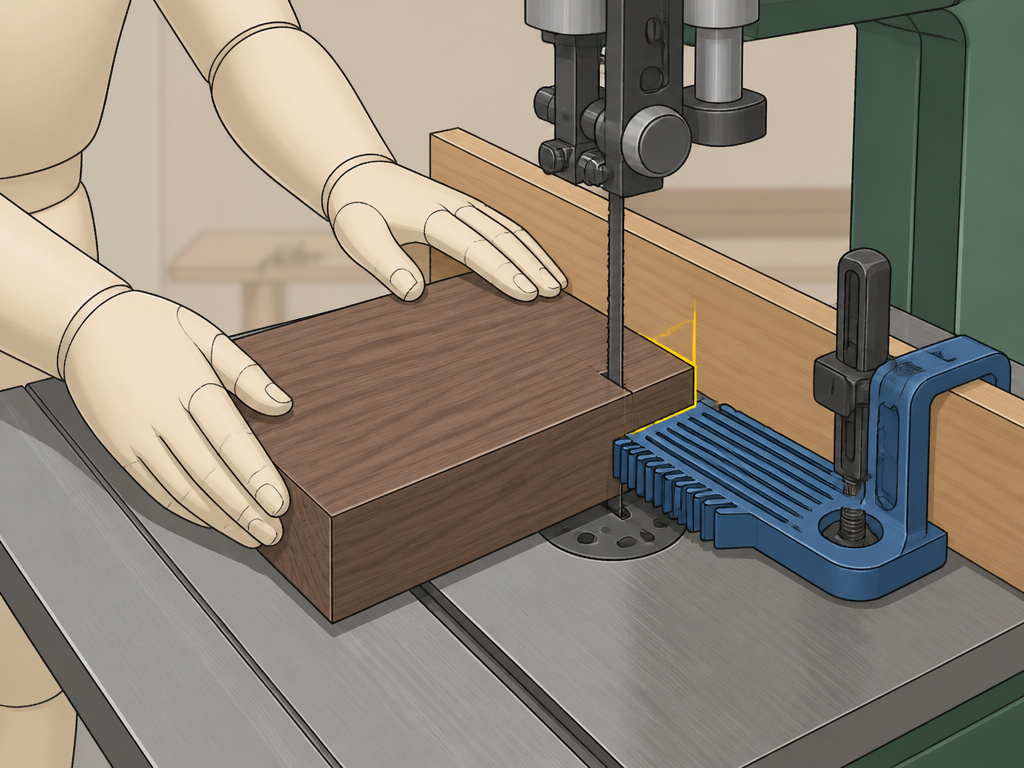
Now you cut. The sound tells you everything. A smooth, steady hum is good. A straining groan or a high-pitched whine means you’re feeding too fast or the blade is dull.
Feed slow. The Baker industrial resaws have a variable feed speed of 0–120 feet per minute. You are not an industrial feed conveyor. Your feed rate is “as fast as the blade will take without complaining.” For dense hardwoods, that’s very slow. For softwoods, it can be faster.
Use a featherboard clamped to the table. This applies consistent inward pressure against the fence. Your hands should control the board, pushing it forward and firmly against the fence. Using a featherboard for side pressure helps prevent the workpiece from rotating into the blade.
A helpful tip: Watch the back of the board where it meets the fence to detect drift early. If a gap appears, your board may be drifting. Do not crank it sideways. Stop feeding, back the board out slightly, and check your setup.
If the blade starts to wander mid-cut, the cause is usually one of three things:
- Guides are too high. Lower them to that 1/8-inch gap.
- Blade is dull. A sharp blade is more likely to track straight. Check out our blade selection guide for replacement options.
- Tension is too low. Re-check the 1/4-inch deflection test.
For cuts thinner than 1/4 inch, some machines have a special procedure. The manual for a generic horizontal resaw states that an internal limit switch prevents blade adjustment closer than 1/4″ to the table, requiring a ‘Blade Memory Function’ to cut from the top. On a vertical bandsaw, you’re likely making a zero-clearance insert instead.
Power and Capacity: Will Your Saw Handle It?
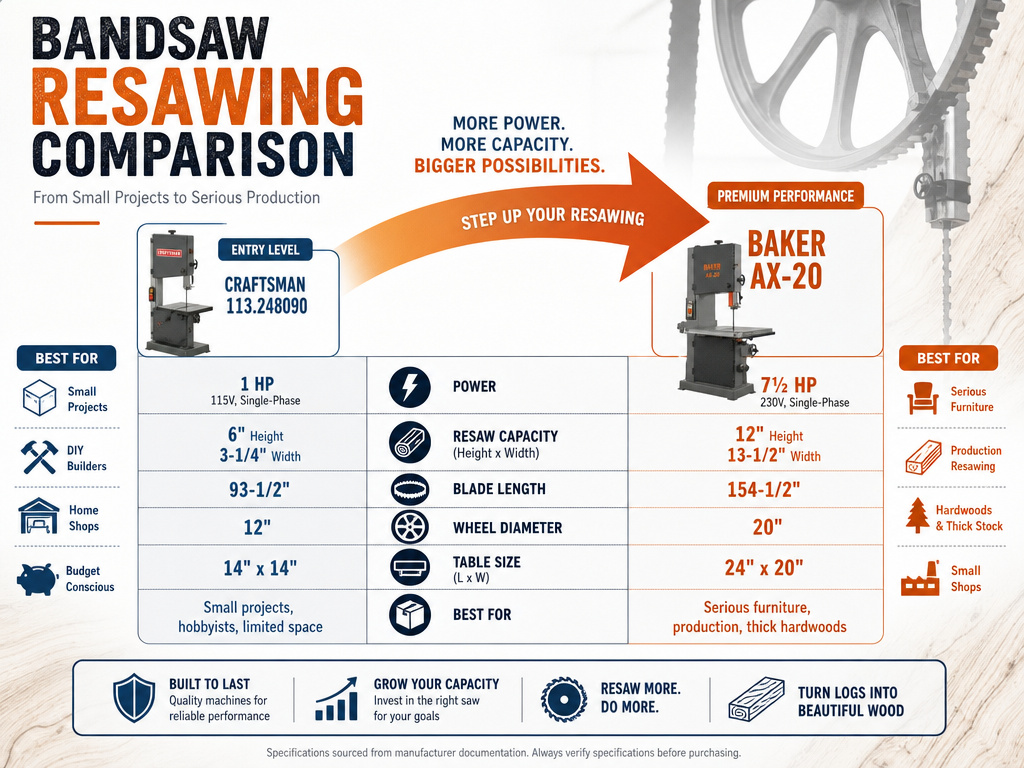
You can’t cheat physics. Resawing 12-inch white oak on a 1 HP saw is a recipe for a burned blade and a tripped breaker. Match your ambition to your machine.
| Saw Model | Motor | Max Resaw Height | Best For |
|---|---|---|---|
| Craftsman (Model 137.224320) | 1 HP, 7 AMPS | 5 in. | Small projects, thin stock, softwoods. |
| South Bend 24″ Bandsaw | 7.5 HP, 1720 RPM | 16 in. | Serious furniture making, large panels. |
| Baker A Band Resaw | 20 HP Electric | 7” x 7” or 10” x 4” | High-volume commercial resawing. |
| Baker AX Band Resaw | 30 HP Electric | 7” x 12” or 16” x 7” | Maximum capacity industrial work. |
Your saw’s power dictates your blade width. A 1 HP motor will struggle to tension a 3/4-inch blade properly. Stick to 1/2-inch or 3/8-inch. The Craftsman manual is honest: its cutting height is 5 inches. That’s your hard limit.
If you’re shopping for more capability, our review of the best bandsaws for woodworking compares models by their real resaw capacity, not just the label on the box.
Frequently Asked Questions
What is the 3-tooth rule for bandsaws?
The 3-tooth rule refers to using a blade with about 3 teeth per inch (TPI) for resawing. This low tooth count creates large gullets (the spaces between teeth) that can hold the large volume of sawdust generated when cutting through thick stock. If the gullets fill up, the blade overheats, burns the wood, and can wander off line.
What size bandsaw do you need for resawing?
You need a bandsaw with enough horsepower and wheel size to tension a wide blade and drive it through thick wood. For most hobbyists, a 14-inch saw with at least 1.5 HP of continuous power can resaw 6-8 inches of softer wood. For consistent 12-inch capacity in hardwoods, use a 17-inch or larger saw with 3+ HP. The physical “resaw height” (distance from the table to the upper guide) listed in the manual is your absolute maximum.
Can you resaw without a fence?
Yes, you can resaw freehand by carefully following a marked line. It requires more skill to keep the cut straight and is generally slower. The freehand method is useful for irregularly shaped pieces or when you need to follow a specific grain pattern. For most straight resawing, a fence is safer and yields more consistent, parallel results.
Why does my blade wander when resawing?
Blade wandering is caused by insufficient blade tension, guides set too high above the workpiece, a dull blade, or incorrectly set blade guides (thrust bearing or side supports). The most common fix is to increase tension until the blade deflects no more than 1/4 inch sideways and lower the upper guides to within 1/8 inch of the wood.
How do I clean up a rough resawn surface?
Bandsaw cut is a rough rip cut. To clean it up, you need a planer or a drum sander. If the board is too thin or delicate for a planer, attach it to a stable carrier board with double-sided tape to send it through safely. Always start with the smoothest cut possible from your bandsaw to minimize the cleanup work.
Before You Go
Resawing well comes down to respecting three numbers: 3 TPI, 1/4-inch deflection, and a 1/8-inch guide gap. Get those right on any saw, from a benchtop model to an industrial beast, and the cut follows.
The one step to take this week isn’t to resaw a prized board. It’s to tension a blade by feel. Unplug your saw, retract the guides, and press on the blade. If it moves more than the width of a pencil, crank the tension. Do that a few times, and you’ll internalize the feel of a blade that’s ready to work. That muscle memory beats any gauge.
Everything above assumes a sharp blade in a tuned saw. If you’re unsure about the basics, our guide on using a bandsaw covers the foundational setup you need before you even think about resawing.
