
How to Rip a Board With a Circular Saw: Step-by-Step
This post contains affiliate links. As an Amazon Associate, we earn from qualifying purchases.
To rip a board with a circular saw, you need three things matched: a rip blade (18-40 teeth), a rigid guide clamped at the correct offset, and support that prevents the kerf from closing on the blade. Set the blade depth about 1/4 inch below the board’s thickness. Without a guide, the cut will wander and significantly increase the risk of kickback.
That guide offset isn’t just a suggestion. It’s the physical measurement between your saw’s blade and the edge of its shoe, typically 1 1/8 inches on most saws. Getting this number wrong by even an eighth of an inch is what turns a clean rip into a ruined board, which is why it’s the first thing to learn for how to rip a board with a circular saw.
What follows: the exact way to measure your saw’s offset, how to choose a blade when sources disagree on tooth count, and the support setup that keeps the board from pinching the blade when you compare a how to rip a board with a circular saw. We’ll also cover when to reach for a different tool entirely.
Key Takeaways
- Set your blade depth to 1/4 inch below the board’s thickness, any deeper increases binding and kickback risk.
- Always use a clamped straightedge or rip fence; freehand ripping is the fastest route to a wandering cut and kickback.
- For most saws, the blade sits 1 1/8 inches from the base edge, measure this once and mark it on your saw.
- Support the board so the offcut can fall free; an unsupported offcut closing the kerf is the leading cause of kickback.
- On narrow rips where your hand would otherwise pass close to the blade, use a push stick to keep your hands a safe distance.
Gear Up: What You Actually Need
You can’t improvise a straight cut. The right tools here aren’t optional; they’re what separates a safe, accurate job from a dangerous mess when learning how to rip a board with a circular saw.
You need a circular saw, obviously. Corded or cordless doesn’t matter as much as a solid, flat base plate. A wobbling shoe guarantees a wandering cut. Next is a rip blade. Here’s where it gets interesting, because my sources don’t fully agree. One says 18-36 teeth, another says 18-24, and a third recommends 24-40. The consistent thread is fewer teeth with big gullets to clear long chips. For a definitive answer, our guide on how many teeth a saw blade should have breaks it down by material and cut type.
The guide is essential. A dedicated rip fence that clips onto your saw’s shoe is great for cuts; some attachments are adjustable up to 24 inches, while others are typically used for widths up to about 6–7 inches. For anything wider, you need a clamped straightedge, a length of straight aluminum extrusion or a factory edge of plywood. This is where building a DIY guide rail pays off forever. You’ll also need two sturdy bar clamps, safety glasses, and hearing protection. Circular saws are very loud, so hearing protection is a must.
Finally, have a push stick ready if you’re ripping anything narrower than the width of your hand. That’s not machismo; it’s the rule.
The distance from the edge of your circular saw’s baseplate to the blade is the “offset.” This measurement, often 1 1/8 inches, must be accounted for when clamping any guide.
Setting Up for a Perfect Cut
This is the stage where patience saves your lumber and your fingers. Rushing setup is how you make a mistake you can’t take back.
First, mark your cut line clearly along the entire length of the board. Use a sharp pencil and a reliable straightedge. Now, measure your saw’s offset. Power off, unplugged, lower the blade guard. Hold a ruler against the blade and measure straight back to the edge of the saw’s shoe. Write this number on a piece of masking tape and stick it to the saw’s body. For most sidewinder saws, it will be 1 1/8 inches. Worm-drive saws often have a different offset, so measure yours.
Now, clamp your guide. If you’re using a rip fence attached to the saw, slide it to the desired width and lock it. For a clamped straightedge, measure your offset distance from the cut line, mark a parallel line, and clamp the guide along that second line. The guide must be perfectly parallel to your cut line. Check it at both ends and in the middle.
Next, set the blade depth. Unplug the saw, retract the blade guard, and place the saw on the board. Loosen the depth adjustment, lower the blade until the teeth protrude about 1/4 inch past the bottom of the board, and lock it.
Finally, support the board on sawhorses. This is critical. The board must be fully supported along its length, with the section you’re cutting off (the offcut) able to fall away freely once the cut is complete. If the offcut is trapped or supported so it sags, it will close the kerf behind the blade and pinch it.
The Step-by-Step Rip Cut
With setup done, the actual cut is the easy part. Follow this sequence and don’t stop mid-cut.
- Position and grip. Stand to the side of the saw, not directly behind it. This stance minimizes your exposure if kickback occurs. Grip the saw firmly with both hands.
- Align and start. Place the saw’s shoe firmly against the guide, with the blade clear of the wood. Start the saw and let it reach full speed. Start the saw and let it reach full speed before beginning the cut.
- Feed steadily. Push the saw forward along the guide at a consistent, moderate pace. Let the blade do the cutting. If the saw bogs down or you smell burning, you’re likely feeding too fast or using the wrong blade. For more on that burning smell, see our breakdown of why a circular saw burns wood.
- Follow through. Cut the entire length in one smooth motion. Do not stop halfway. If you stop, restarting can cause the blade to deflect and ruin the edge.
- Secure the offcut. As you reach the end, the offcut will fall. Be ready for it. Keep both hands on the saw until the blade has completely stopped.
Where this goes sideways: Pushing the saw too fast on a board with pronounced grain. The fence or guide can push against the side of the blade, forcing it to bind and kick back toward you. Let the blade’s teeth pull the saw forward at their own pace.
The #1 Risk: Preventing Kickback
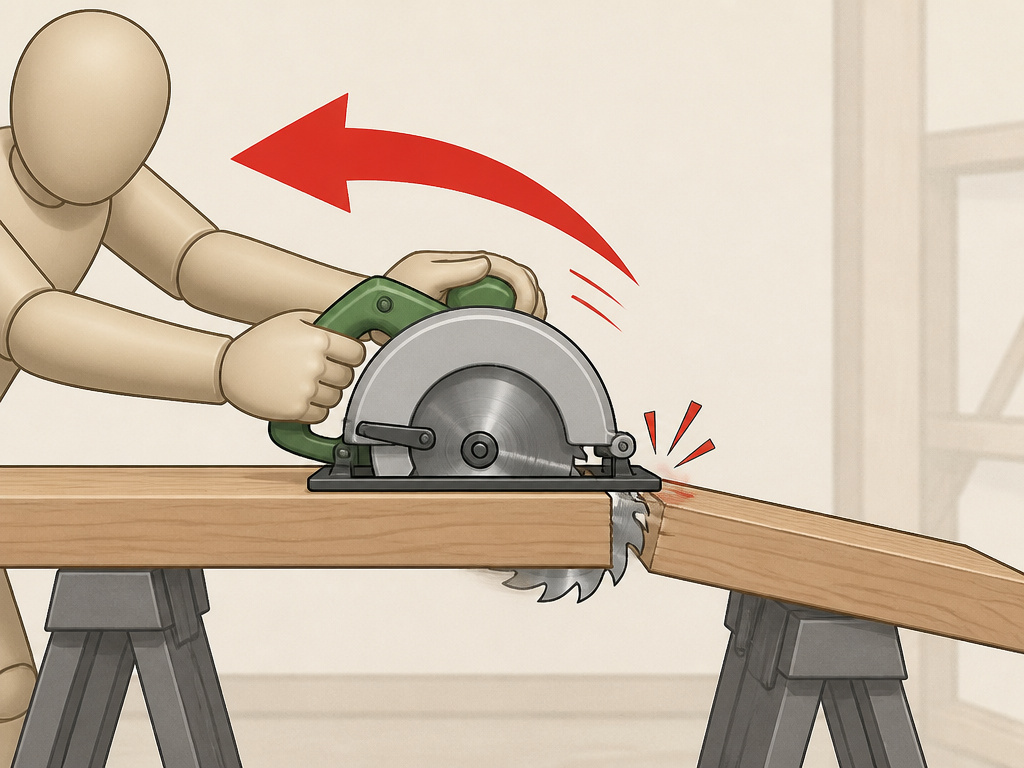
Kickback isn’t just scary; it’s the most dangerous thing that can happen with a circular saw. OSHA’s woodworking safety data states it happens more often during rip cuts than crosscuts. Per OSHA, most kickback during ripping traces back to an unsupported offcut closing the kerf. The saw then gets thrown back toward the operator with tremendous force.
The prevention is in your setup. We’ve covered the big ones: proper blade depth, a clamped guide, and supporting the offcut so it falls free. But there are two subtler triggers.
First, using a crosscut blade. A fine-tooth blade designed for cutting across the grain will bog down, overheat, and increase resistance dramatically. That resistance can twist the saw and initiate a kickback. Second, a warped or twisted board. If the board isn’t flat on your sawhorses, internal stresses can release during the cut, twisting the kerf closed. Always inspect your stock.
For a dedicated deep dive on this critical topic, our guide on how to prevent power saw kickback covers all the angles.
| Kickback Cause | Why It Happens | How to Prevent It |
|---|---|---|
| Unsupported Offcut | The cut piece sags, pinching the blade in the kerf. | Support board so offcut falls free; don’t trap it between sawhorses. |
| Dull or Wrong Blade | A crosscut blade or dull teeth create excess friction and binding. | Use a sharp rip blade (18-40 teeth); change the blade when cuts require force. |
| Forced Feed Rate | Pushing too fast doesn’t let chips clear; blade overheats and binds. | Feed at a steady, moderate pace; listen to the motor. |
| Warped Lumber | Internal stress twists the wood during the cut, closing the kerf. | Check boards for flatness before cutting; avoid severely twisted stock. |
Pro Techniques for Tricky Cuts
The basic rip works for a standard board. But lumber and projects aren’t always standard.
Ripping Plywood and Sheet Goods: The large, flat surface is an advantage and a challenge. Always use a sacrificial board underneath your cut line. This can be a scrap of plywood, MDF, or hardboard. It supports the thin veneers and prevents brutal tear-out on the bottom face. A blade designed for sheet goods, often labeled “plywood” or “fine finish,” will also give you a cleaner edge with less splintering.
Ripping Narrow Strips: This is where safety gets paramount. If the strip you’re cutting off is narrow, your hand may pass too close to the blade. The answer is a push stick. You can buy a push stick or make one quickly from a scrap piece of wood. For strips under 2 inches wide, a jigsaw or bandsaw is the appropriate tool, as a circular saw may not be suitable.
Getting Repeatable Widths: Need multiple identical strips? Don’t measure and mark each one individually. After your first perfect rip, that freshly cut edge becomes your new reference. Unclamp your guide, measure your offset from the new edge, reclamp, and cut the next strip. The first cut sets the standard; every cut after that is a copy.
Dealing with a Wandering Cut: If your saw starts drifting away from the guide, don’t force it back. The blade is likely deflecting, which means it’s dull, the wrong type, or you’re pushing too hard. Stop, reassess, and install a new blade if needed. For foundational technique, review our article on making straight cuts.
When to Use a Different Tool
A circular saw is versatile, but it’s not always the right answer. Knowing when to switch tools saves time and improves results.
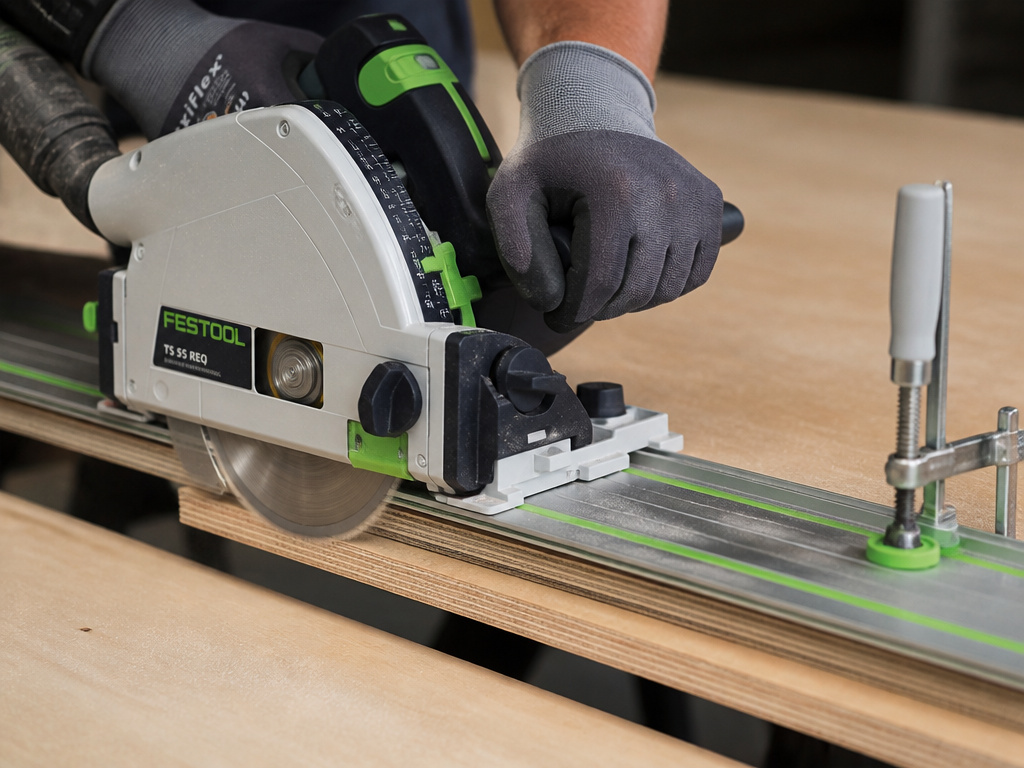
A track saw is the upgrade. It’s more expensive, but for breaking down full 4×8 plywood sheets, it produces a straighter edge in one pass than a circular saw and clamped guide. The integrated rail eliminates setup error. For narrow, curved rips, a jigsaw or bandsaw is the right tool. Trying to steer a circular saw on a slight curve is a recipe for frustration.
And of course, if you have a table saw, use it for repeated rips on manageable stock lengths. The fence system is faster and more repeatable. The circular saw’s kingdom is the job site, the oversized sheet, and the one-off cut where hauling out the table saw isn’t practical. Mastering using a circular saw for rips means you’re never stuck.
When to Use a Circular Saw vs. A Table Saw
A circular saw is your go-to for breaking down large sheets of plywood or making rip cuts on lumber that’s too long or unwieldy for a table saw. Its portability allows you to bring the tool to the workpiece, which is vital for on-site work or when you lack a large workshop. Use a table saw for repetitive, precise rips on smaller stock, as its built-in fence system excels at consistency. A circular saw can handle these jobs with an attached rip fence, but safety is a bigger concern; kickback happens more often during rip cuts, so proper board support is critical. Choose the tool that matches the scale of your material and your need for precision versus portability.
Frequently Asked Questions
Can you rip a board with a circular saw?
Absolutely. A circular saw with a sharp rip blade and a clamped straightedge is a completely viable method for ripping boards. It’s the standard approach for breaking down large sheets of plywood or making rip cuts on lumber that’s too long for a table saw.
What is the best blade for ripping boards with a circular saw?
Look for a blade labeled “rip” or “ripping.” The tooth count should be on the lower side to clear long chips. Sources disagree on the ideal tooth count: one recommends 18-36 teeth, another 18-24, and a third suggests around 24-40 teeth. For clean cuts in plywood, a blade with more, finer teeth designed for sheet goods is better. Our review of the best circular saw blades for wood can help you choose.
How do you keep a circular saw from wandering on a long rip?
You use a guide. The single most important step is measuring the exact distance from your saw’s blade to the edge of its shoe (the offset), then clamping a perfectly straight guide exactly that distance from your cut line. Without a guide, even the steadiest hand will wander over a long cut.
How can I rip a board without a table saw?
Circular saw with a clamped guide is the most accurate power-tool method without a table saw. Other alternatives include a track saw (more accurate, more expensive), a hand saw with a rip tooth pattern (slow, no power needed), or a jigsaw for very narrow or curved rips.
The Bottom Line
Ripping with a circular saw is a fundamental skill that enables a huge range of projects. It comes down to a simple formula: the right blade, a rigid guide set at a measured offset, and support that keeps the kerf open. Get those three elements locked in, and you’ve solved 95% of the problem.
The remaining 5% is recognizing when the formula doesn’t apply. If you’re about to rip a dozen identical 1-inch strips from an 8-foot board, stop. That’s a table saw job. The circular saw excels at the single cut, the oversized panel, and the job-site fix. Use it for that, with the setup discipline it demands, and you’ll get clean, safe results every time. Everything else is just noise.
