
Parts of a Circular Saw Explained: Functions & Diagrams
This post contains affiliate links. As an Amazon Associate, we earn from qualifying purchases.
The parts of a circular saw are the blade, base plate (shoe), motor, blade guard system, handle with trigger, and adjustment levers for depth and bevel. On cordless models, a battery pack powers a brushless motor that spins the arbor. The blade cuts, the shoe guides, and the guard protects, knowing each part’s job is the first step to safe, accurate work.
That split-second between pulling the trigger and the blade hitting wood is where every component earns its keep. The motor must spin up without bogging, the guard must retract cleanly, and the shoe must sit flat. If one part is off, a loose depth lever, a sluggish guard spring, the cut wanders or the saw kicks. This isn’t just a list of names. It’s a map for diagnosing the whine, bind, or drift that tells you something’s wrong before it fails completely. The following is a guide to the parts of a circular saw explained.
What follows is a walk-through of a real saw, using part names from the parts of a circular saw explained in service manuals and diagrams. You’ll see what each piece does, where it commonly fails, and how brands like Milwaukee and Makita design them differently. By the end, you’ll read a parts list like a mechanic’s cheat sheet.
Key Takeaways
- The blade guard system, a fixed upper guard and spring-loaded lower guard, is your primary safety device. A guard that sticks or closes slowly is a failure point that precedes kickback.
- Blade depth should protrude only about a quarter-inch past the material you’re cutting. A deeper setting increases binding, reduces cut quality, and strains the motor.
- The base plate (shoe) must be dead flat. A bent shoe, even slightly, guarantees a crooked cut regardless of how sharp your blade is.
- Brushless motors in cordless saws use electronic commutation for efficiency, but their stator and rotor assemblies are non-serviceable. When they fail, the whole motor assembly gets replaced.
- Torque specs matter. Milwaukee’s service manual specifies 30±3 lb-in on the depth adjust lever; overtightening strips the plastic, while undertightening allows the setting to drift mid-cut.
The Blade: Your Saw’s Business End
The blade is the only part that touches the wood, so everything else exists to position and spin it correctly. Its diameter determines maximum cut depth, its tooth count and shape decide the finish, and its arbor hole must match your saw’s spindle.
The blade assembly consists of the carbide-tipped saw blade, an inner flange, an outer flange, and the arbor bolt that clamps it all onto the spindle. Releasing the trigger engages an electric brake that stops the blade in a fraction of a second.
That clamping force is critical. The flanges distribute pressure evenly so the blade runs true without wobble. If the arbor bolt is loose, the blade can shift, producing a wider kerf that binds and overheats. You’ll hear a rhythmic whump-whump-whump as it spins. Tighten it with the wrench that came with your saw, usually until it’s firm. Don’t hammer on it.
Blade specs are not suggestions.
- Diameter: A 7-1/4″ blade is the North American standard, cutting about 2-1/2″ deep at 90 degrees. The BOMwiki cordless model uses a 184 mm (7-1/4 in) blade.
- Arbor Bore: That’s the hole in the center. Most saws use a 5/8-inch bore (15.875 mm), but some compact models use a smaller 1/2-inch or even a diamond knockout pattern. Match it exactly.
- Tooth Count: A 24-tooth carbide-tipped (TCT) blade, like the one listed in the BOMwiki spec, is for fast, rough cuts in framing lumber. For plywood, you want 40 to 60 teeth for a cleaner edge.
Choosing the right circular saw blades changes the game. A thin-kerf blade on a lower-powered saw cuts deeper and easier because it removes less material.
The Base Plate & Adjustment Levers
The base plate, or shoe, is the saw’s foundation. It’s the flat metal plate that rides on your workpiece. Its sole job is to provide a stable, square reference surface. If it’s bent or warped, your cut will be off, full stop. Most are stamped steel or aluminum, aluminum is lighter and resists rust but can dent.
Two adjustments happen here: depth and bevel.
Depth Adjustment
This controls how much blade sticks out below the shoe. The rule is simple: set it so the teeth extend about a quarter-inch past the bottom of your material. More than that increases friction, kickback risk, and makes the saw harder to control.
- Mechanism: A lever at the rear or side loosens to let the shoe pivot up or down. A scale, often in inches and millimeters, gives a reference.
- The Catch: That lever must lock down tight. The Milwaukee M18 FUEL 10-1/4″ saw service manual specifies a torque of 40±4 kgf-cm (35±4 lb-in) on the depth adjust lever. Hand-tight usually isn’t enough; it needs a firm snap.
Bevel Adjustment
This tilts the shoe (and thus the blade) for angled cuts. A quadrant scale, typically ranging from 0 to 45 or 50 degrees, allows you to set common angles. High-end saws like the DeWALT DCS571B offer a 0° to 57° range, graduated in 1° increments.
- Locking: A separate lever or knob locks the bevel angle. The same Milwaukee manual calls for 22±2 kgf-cm (19±2 lb-in) on the bevel lever. A loose bevel lock is a common culprit for inconsistent angled cuts.
Learning to set the depth and bevel accurately is what separates a ragged cut from a clean one. The numbers on the scale are a start, but always verify with a square on a scrap piece.
The Motor & Power Source
This is the heart of the saw. On corded models, a brushed AC motor converts wall power into spin. On modern cordless saws, it’s almost always a brushless DC motor powered by a lithium-ion battery pack. The difference isn’t just about cords; it’s about efficiency and control.
A brushless motor has two main parts you’ll see in parts lists: the Rotor Assembly (with permanent magnets) and the Stator Assembly (with copper windings laminated in a core). Electronics commutate the motor, they precisely switch power to the windings. This eliminates the friction and sparking of physical brushes, so the motor runs cooler and lasts longer.
| Motor Type | Power Source | Key Parts (Per Service Manuals) | Serviceable? |
|---|---|---|---|
| Brushed | Corded (AC) or Cordless (DC) | Armature, Stator (Field), Carbon Brushes, Brush Holders | Yes, brushes can be replaced. |
| Brushless | Cordless (DC Battery) | Rotor Assembly (magnets), Stator Assembly (windings), PCB (controller) | No. Entire assembly is typically replaced. |
The BOMwiki model specifies a brushless motor where a pinion gear feeds a single-stage helical reduction gear on the arbor, both running on ball bearings. This gearing reduces the motor’s high RPM to the optimal blade speed with more torque. The listed no-load speed is 5,000 rpm.
Where this goes sideways: Storing batteries in extreme cold or heat. DeWALT’s manual states charging below +40°F (+4.5°C) or above +104°F (+40°C) can cause serious damage. For optimal battery health, the recommended charging air temperature is between 65°F and 75°F (18°C and 24°C).
Power needs context. A modern 18V brushless saw has ample power for DIY tasks. I was once convinced corded tools were inherently stronger. A cordless model that out-cut my old corded saw on a framing project proved me wrong. The freedom from a cord often leads to more accurate setups.
The Blade Guard System
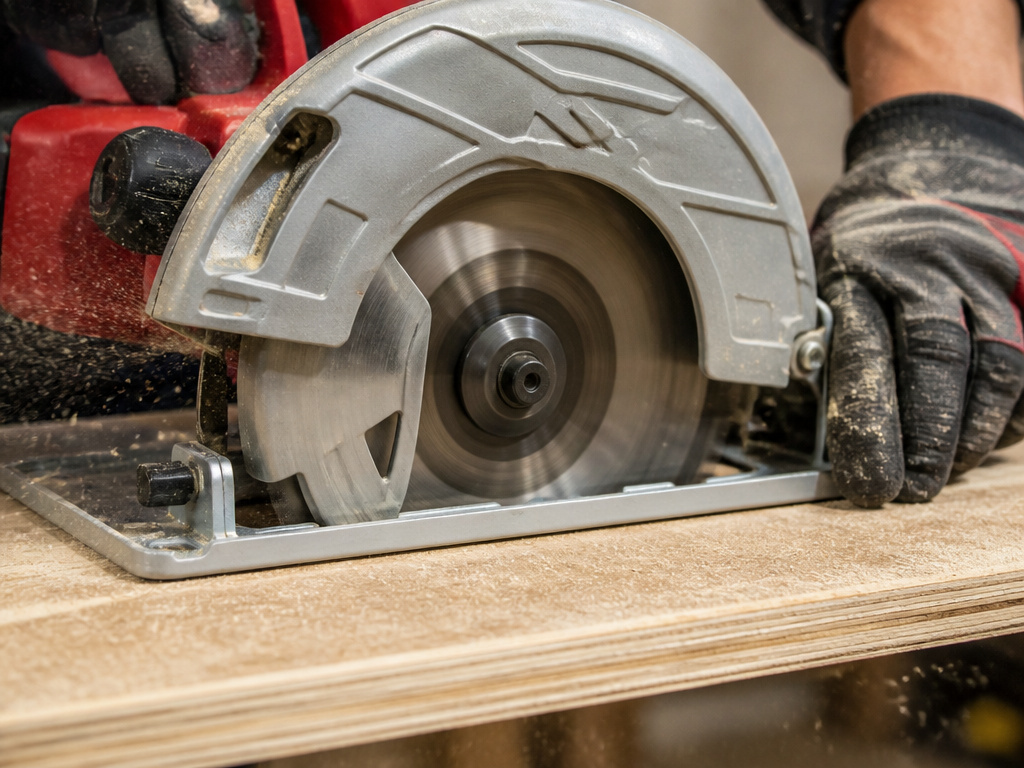
This is the most important safety system on the saw. It’s a two-part shield that covers the spinning blade when you’re not cutting and retracts as you push into the workpiece. It’s not a suggestion.
Upper Guard: This fixed plastic or metal hood covers the top half of the blade. It’s part of the saw’s body and doesn’t move. Its job is to contain debris and prevent your hand from drifting onto the blade from above.
Lower Guard: This is the spring-loaded, retractable part. It’s a curved metal piece that covers the blade’s lower teeth. When you push the saw forward into the wood, the front of the workpiece presses the guard back, letting the blade through. When you finish the cut, the spring snaps it back over the blade.
The RIDGID manual is blunt: “Check lower guard for proper closing before each use. Do not operate the saw if lower guard does not move freely and close instantly. Never clamp or tie the lower guard into the open position.”
A sluggish guard is a major red flag. Gummy sap, sawdust pack, or a bent guard from a drop can slow the return spring. The Milwaukee service guide includes a functional check: with the saw upside down at full depth, retract and release the guard. It must return briskly. If it doesn’t, you’re holding a kickback waiting to happen.
Blade Assembly & Arbor
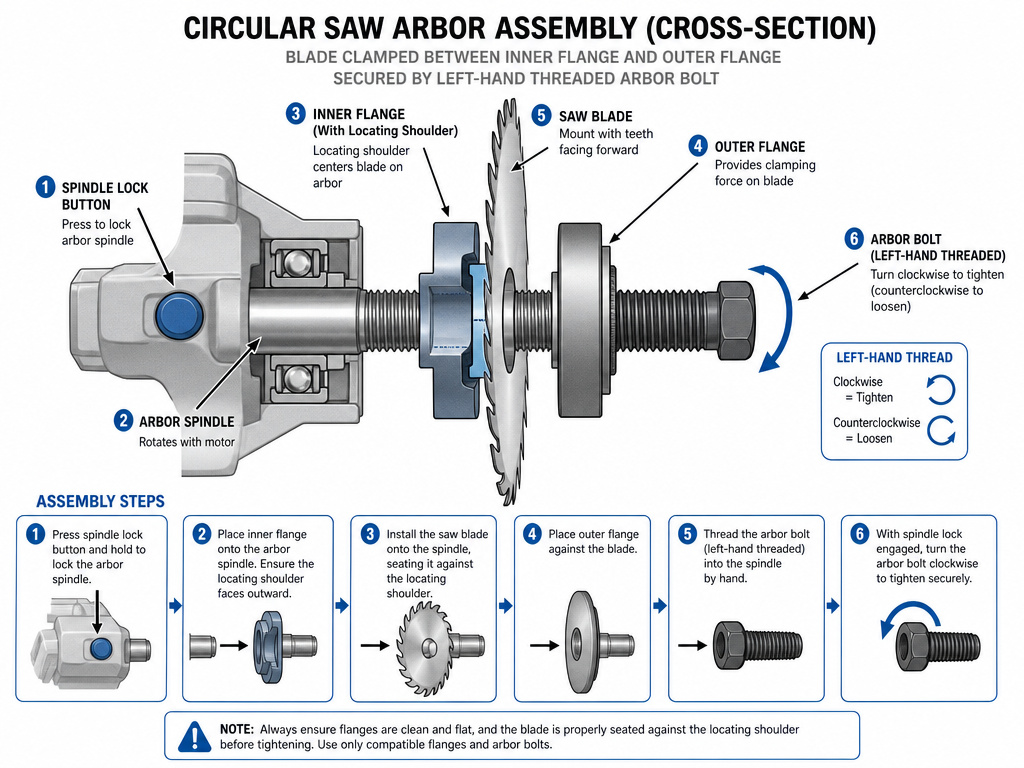
This is the direct drive train from the motor to the blade. Understanding it explains a lot about wobble and how to change the blade safely.
The arbor (or spindle) is the motor shaft that the blade mounts onto. The arbor bolt (or blade screw) threads onto the end of the arbor to clamp the blade between two flanges. Most saws have a spindle lock, a button you press to keep the arbor from turning while you loosen the bolt.
| Part Name | Function | Common Issue |
|---|---|---|
| Arbor/Spindle | Motor shaft that transmits rotation. | Worn bearings cause lateral play and blade wobble. |
| Inner Flange | Sits against the blade, often with a raised center (locating shoulder) to center the blade. | Can become grooved by a overtightened blade, losing its centering ability. |
| Outer Flange | The outer washer that the arbor bolt presses against. | Lost or replaced with an incorrect thickness, leading to poor clamping. |
| Arbor Bolt | The left-hand threaded screw that holds it all together. | Can become cross-threaded or stripped if forced. |
| Spindle Lock | A mechanism to hold the arbor stationary. | The engagement pawl can wear out, making blade changes a two-wrench fight. |
The Milwaukee parts list for the M18 FUEL 7-1/4″ saw shows a Blade Screw (06-75-1012) and separate Inner and Outer Blade Flanges. They are distinct parts for a reason. Using the wrong flange, or forgetting one, means the blade isn’t seated squarely. The resulting wobble isn’t just unsafe; it makes a ragged, burned cut.
Housing, Handle & Trigger
The housing is the saw’s skeleton. On modern tools, it’s often a glass-filled nylon clamshell (as noted in the BOMwiki spec) that holds the motor and forms the main handle. This design is light, tough, and electrically insulating.
The main handle wraps around the motor, with the trigger switch under your index finger. Most have a lock-off button you must depress before the trigger will pull, a safety to prevent accidental starts. The secondary handle (or front knob) gives your other hand a stable forward grip. Never use the tool without holding both.
Switch and Electronics: On brushless saws, pulling the trigger sends a signal to a Printed Circuit Board Assembly (PCBA). This board commutates the motor and manages functions like the electric brake and LED worklight.
The feel of the housing matters. A cheap saw feels hollow and flexes under pressure. A quality housing is rigid, keeping the blade path true to the shoe even when you’re leaning into a long rip cut. That rigidity is why pro models cost more.
Related Systems: Dust, Lights & Accessories
These parts don’t make the cut, but they make the job cleaner, safer, and easier.
Dust Management: Many saws have a dust port on the upper guard, a little nozzle you can attach a vacuum hose to. The BOMwiki model mentions a motor-driven blower that clears chips from the cut line. If your saw has one, use it. Sawdust obscures your line and is a respiratory hazard.
LED Worklight: An LED mounted near the front of the shoe illuminates the cut line just ahead of the blade. It’s a simple but brilliant addition for cutting in shadowy spaces.
Rip Fence: An adjustable guide that clamps to the shoe for making parallel cuts along an edge. It’s a bolt-on accessory that turns a freehand tool into a semi-precision instrument. For consistent work, learning to make straight cuts with a guide is essential.
Riving Knife: This is a thin piece of metal that sits just behind the blade, aligned with the blade’s plane. Its job is to hold the kerf (the cut) open behind the blade to prevent the wood from pinching the blade, which is a primary cause of kickback. Not all DIY-grade saws have one, but it’s a hallmark of safer design.
General maintenance and care
Keeping your circular saw running well means focusing on its moving parts and the blade. Clean sawdust from the motor vents and the blade guard mechanism regularly to prevent buildup that can cause overheating or jamming. Check that the blade is sharp and securely fastened; a dull or loose blade makes the motor work harder and can be dangerous. A few drops of oil on the pivot points for the depth and bevel adjustments will keep them moving smoothly. Store the saw in a dry place to protect its electrical components and prevent rust on the metal surfaces.
Related tools and types of circular saws
Circular saws come in different designs for specific jobs. The standard sidewinder saw has the motor aligned with the blade, offering a compact and lightweight tool for general cutting. A worm drive saw positions the motor at the rear, providing greater torque and a different balance favored for heavy framing. For cutting masonry or metal, you would use a specialized abrasive or diamond blade in a saw designed for those materials. Track saws run on a guide rail for perfectly straight, splinter-free cuts, functioning like a portable table saw.
Frequently Asked Questions
What is the most important safety part on a circular saw?
The blade guard system, specifically the spring-loaded lower guard. It must retract freely when entering the cut and snap back instantly when you lift the saw. A guard that sticks open leaves the spinning blade exposed. Always check its operation before you plug in or insert the battery.
What’s the difference between a left-blade and right-blade saw?
It refers to which side of the saw the blade is on, relative to the motor. A right-blade saw (most common in the US) has the blade on the right, so the main body is to the left of the cut line. This gives a right-handed user a clear view of the cut line. A left-blade saw places the motor weight on the other side, which can be better for certain tasks like cutting sheet goods on sawhorses. The choice affects visibility and chip ejection.
Why does my saw blade keep getting stuck in the wood?
This is usually binding, and the cause is often related to the base plate or the cut itself. First, ensure the shoe is flat and the depth is set correctly (blade protrudes only ~1/4″). Second, the wood can pinch the blade if it sags or if the kerf closes. Using a riving knife helps prevent this. Finally, a dull blade or one cutting against its intended direction (e.g., a rip blade used for crosscutting) will generate excessive friction and bind.
What do the numbers on a circular saw blade mean?
The most critical numbers are the diameter (like 7-1/4″) and the arbor hole size (like 5/8″). You’ll also see the tooth count (e.g., 24T). Other markings indicate the blade type (ATB for Alternate Top Bevel, FTG for Flat Top Grind), the intended material (wood, metal, masonry), and the maximum safe RPM. Always match the arbor hole exactly.
Can I use any 7-1/4″ blade on my circular saw?
Not quite. You must match the arbor hole (5/8″ is standard, but check yours). You also need to consider the blade’s kerf (thickness). A thin-kerf blade on a saw designed for a full-kerf blade might not be clamped securely by the flanges. And always ensure the blade’s maximum RPM rating exceeds your saw’s no-load speed.
The Bottom Line
Knowing the parts of your circular saw turns you from an operator into a troubleshooter. That unfamiliar rattle is probably a loose depth lever. A cut that constantly drifts left likely points to a slightly bent shoe. When you can connect the symptom to the specific component, maintenance stops being a mystery.
For 90% of home projects, a mid-range cordless saw with a brushless motor is the practical choice. Portability beats raw power if it means you’ll use the tool correctly and safely. Invest in two good blades, a 24-tooth for framing and a 60-tooth for finish work, and learn to change a circular saw blade without hesitation.
Finally, respect the guard and the spring that closes it. That piece of stamped metal is the only thing between the spinning teeth and your leg when you’re carrying the saw across the yard. Check it every time you pick the tool up. It’s the one part whose failure has immediate, physical consequences. Everything else just ruins your cut.
