
How to Test a Power Tool Battery With a Multimeter
This post contains affiliate links. As an Amazon Associate, we earn from qualifying purchases.
To test a power tool battery with a multimeter, set the meter to DC voltage, connect the red probe to the positive terminal and the black probe to the negative terminal, and read the displayed number. Compare that reading to the battery’s expected voltage range; for example, a healthy Milwaukee M18 battery reads 20.0V – 21.0V when full and is considered to have a dead cell below 15.0V.
That number tells you the state of charge, but not the whole story. A battery can show a perfect voltage and still fail under load because of high internal resistance or a single dead cell inside the pack. The multimeter is your first diagnostic tool, not the last; for a complete guide, see how to test a power tool battery with a multimeter.
What follows: the exact steps for a safe voltage test, the manufacturer-specific voltage ranges you need to interpret the reading, and how to move from a simple check to a full diagnosis of whether the problem is the battery, the charger, or the tool itself.
Key Takeaways
- Set your multimeter to DC voltage and select a range higher than your battery’s nominal voltage (e.g., 20V for a 12V or 18V pack).
- A Milwaukee M18 battery (often labeled 18V/20V MAX) should read 20.0V – 21.0V when fully charged; a reading below 15.0V often indicates a dead cell and a pack that needs replacement.
- Always disconnect the battery from the tool or charger before testing, and visually inspect terminals for corrosion or damage, dirty contacts can mimic a dead battery.
- If voltage tests fine but the tool still bogs down, the issue is likely high internal resistance; this requires a load test or trying the pack in a different tool.
- For a definitive diagnosis, follow a troubleshooting flow: check battery voltage first, then charger output, and finally the tool’s internal connections.
Before You Start: Essential Safety
Before you start: A multimeter test involves metal probes on metal terminals. Always wear safety glasses. Ensure the battery is disconnected from any tool or charger. Never probe a battery that is physically damaged, swollen, or leaking. If you smell a sharp, chemical odor or see bulging plastic, stop, the pack is a fire hazard and needs proper battery disposal.
Lithium-ion cells store a lot of energy in a small package. Puncturing a cell or shorting the terminals can cause rapid heating, fire, or rupture. Your eyes and hands are the first line of defense. A quick visual inspection can save you from probing a dangerous pack.
How to Measure DC Voltage on a Battery (Step-by-Step)
Ever wondered why your fully charged drill suddenly dies halfway through a deck screw? The battery’s voltage under no load is your first clue. This test takes two minutes and requires only a basic digital multimeter.
Step 1: Set Up Your Multimeter.
Turn the dial to the DC voltage setting, marked with a V followed by a solid and dashed line. Choose a range higher than your battery’s nominal voltage. For a 12V or 18V/20V battery, the 20V range is perfect. For higher voltage batteries, select a multimeter range higher than the battery’s nominal voltage. Insert the black probe into the COM port and the red probe into the VΩmA port.
Step 2: Identify the Battery Terminals.
Locate the positive (+) and negative (-) terminals on your battery pack. On most slide-on packs (Milwaukee M18, DeWALT 20V), they are the two largest, outermost metal contacts. Some brands, like DeWALT, have multiple smaller pins, the main power terminals are still the largest ones. If you’re unsure, consult the tool’s manual.
Step 3: Connect the Probes and Read.
With the battery sitting stable on a non-conductive surface, touch the red probe to the positive terminal and the black probe to the negative terminal. Hold them steady. The multimeter will display a number. This is your battery’s open-circuit, or “resting,” voltage. Write it down.
Step 4: Interpret the Reading (The Basic Rule).
A reading within 1-2 volts of the battery’s “max” voltage (e.g., ~20V for a 20V MAX pack) means it’s charged. A reading significantly lower, say, 15V on that same 20V pack, means it’s deeply discharged or damaged. The next section gives you the exact ranges.
If you get a reading of “0.00” or “OL” (overload), double-check your meter settings and probe contact. Dirty terminals can block the connection entirely. Clean them with a dry cloth or a tiny amount of isopropyl alcohol on a cotton swab, let them dry, and retest.
Interpreting Voltage Readings: What the Numbers Actually Mean
A number on a screen is useless without context. Is 11.5V on a 12V battery good or bad? Knowing how to test a power tool battery with a multimeter is only half the answer; it depends on the chemistry and the manufacturer’s design. We can use specific ranges from service data to clarify this.
For common lithium-ion power tool batteries, the nominal voltage on the label (12V, 18V, 20V MAX) is a marketing convention. The actual voltage you’ll measure is higher when charged. Here are the verified ranges for two major brands:
| Battery Model | Fully Charged (No Load) | ~50% Discharged | Critically Low / Depleted | Trouble Indicator (Dead Cell) |
|---|---|---|---|---|
| Milwaukee M12 (12V) | 12.0V – 12.6V | 11.0V – 11.5V | Below 10.0V – 10.5V | Below 9.0V |
| Milwaukee M18 (18V) | 20.0V – 21.0V | 18.0V – 19.0V | Below 16.0V – 16.5V | Below 15.0V |
| DeWALT 20V MAX | ~20.0V – 21.0V | ~18.0V – x19.0V* | Below ~16.0V* | Below ~15.0V* |
*DeWALT does not publish exact discharge thresholds in the provided sources.
Why these gaps matter. A Milwaukee M18 battery reading 17.5V isn’t just low, it’s in the “critically low” zone. If it won’t take a charge back to 20V, you likely have a single dead cell dragging the whole pack down. That’s a common failure mode a simple voltage test can flag.
Where this goes sideways: Assuming a “20V” battery is dead at 18V. Lithium-ion chemistry has a flat discharge curve; it holds near its max voltage for most of its capacity, then drops quickly at the end. An 18V reading on a 20V MAX pack means it’s almost empty, not halfway.
Brand-Specific Checks and Terminal Identification
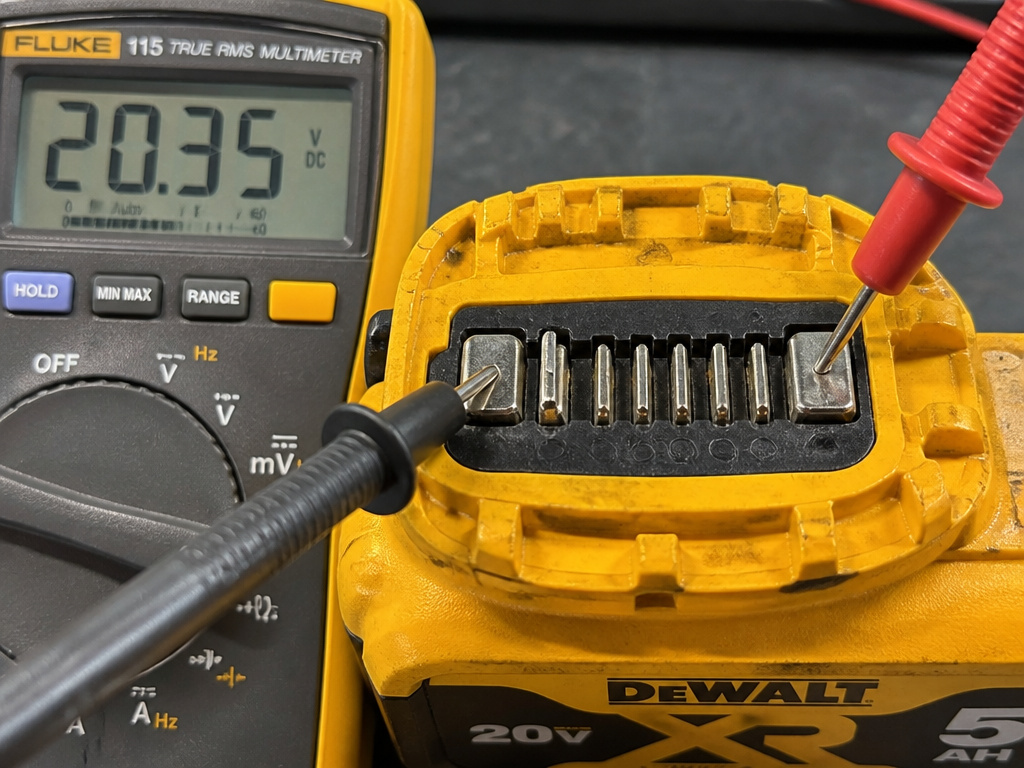
Not all battery terminals are simple plus and minus posts. Modern packs have multiple pins for communication, temperature sensing, and authentication. Knowing which is which can save you from a misdiagnosis.
DeWALT’s 8-Pin Layout.
A standard DeWALT 20V slide-on battery has eight terminals. The two you care about for a basic voltage test are B+ and B-, the largest contacts. However, if your battery shows good voltage but the tool won’t run, other pins might be the culprit.
- TH (Thermistor): This pin reads roughly 10kΩ at 25°C. If the pack is too hot or cold, the tool or charger will refuse to operate.
- ID (Authentication): A genuine DeWALT pack has a resistor here reading roughly 1kΩ. A third-party or damaged pack with an out-of-spec ID resistance may be rejected by the tool, even if B+ and B- are perfect.
Milwaukee Charger Testing Edge Case.
The Milwaukee service manual for V™-technology chargers specifies a crucial safety rule. The Milwaukee service manual for V™-technology chargers specifies that when testing a charger’s open circuit voltage, do not use a line-powered voltmeter and to use only a Battery Pack powered volt-ohm-meter because high voltage can be present at the terminals. The expected reading is 29 VDC – 38VDC, ±10% across the positive and negative terminals when plugged in.
This level of detail is what separates a quick check from a professional diagnosis. If your battery not charging, the problem might be the charger’s output, not the pack itself.
The Limits of a Simple Voltage Test
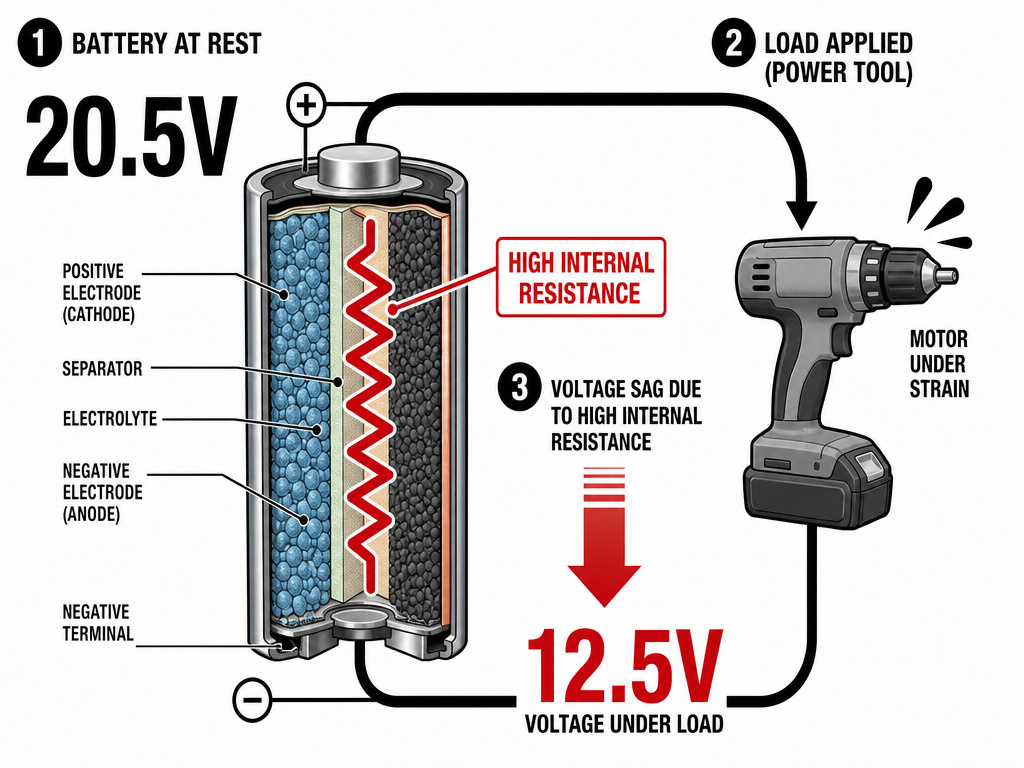
Your battery reads a solid 20.5V. You slap it on the drill, it spins up fine, but the second you hit a knot in a 2×4, the motor bogs and stops. The basic how to test a power tool battery with a multimeter voltage test passed, so what gives?
The issue is internal resistance. As a battery ages, its internal resistance increases. It can still show a full voltage with no load, but the moment you demand current (like driving a screw), that internal resistance causes the voltage to “sag” dramatically. The tool’s low-voltage protection kicks in and shuts it off.
How to suspect internal resistance:
- The battery shows correct or near-correct voltage at rest.
- The tool starts but stalls immediately under light load.
- The battery feels unusually warm after a short period of use.
A multimeter alone cannot measure internal resistance directly. You need a load test. The simplest load test is to use the tool itself: run a high-demand tool (like a circular saw) and observe if it bogs down instantly. A more formal method is to use a dedicated battery load tester or a carbon-pile resistor, but for most DIYers, the tool test is sufficient.
Advanced Diagnostics: Testing Individual Cells and Charger Output
If your voltage reading is way off, say, 10V on a 20V pack, you likely have one or more dead cells inside. A pack is a series of cells (five 3.6V-3.7V cells for an 18V/20V system). If one cell fails, it brings down the entire string.
Warning: Opening a battery pack is not recommended by manufacturers and voids all warranties. It can be dangerous due to the risk of short-circuiting cells. This information is for educational purposes only.
Inside a typical pack, individual cells are spot-welded together. With the pack open (and extreme caution exercised), you could use your multimeter to measure the voltage across each cell. A healthy individual Li-ion cell typically reads between 3.0V and 4.2V, but opening a battery pack is not recommended. Any cell reading 0V or significantly lower voltage than the others is likely dead and has caused the pack failure. This is the core process behind a battery pack rebuild, where dead cells are replaced.
Testing Charger Output.
Before you blame the battery, check the charger. Using your multimeter on DC volts, measure the output at the charger’s terminals. For safety, especially when probing inside a charger, consult the manual; for example, Milwaukee advises unplugging the charger and letting it sit for 3-4 minutes before checking terminals inside the connector block. You should get a reading in the charger’s specified range; for example, a Milwaukee V™-technology charger should output 29 VDC – 38VDC, ±10%. No output? The charger is dead. Correct output? The problem is almost certainly the battery or the tool.
Troubleshooting Flow: Battery, Charger, or Tool?
The frustration is understandable. Your tool doesn’t work. Is it the $80 battery, the $50 charger, or the $200 tool? Follow this sequence to stop guessing.
- Test Battery Voltage. Use your multimeter as described. If voltage is critically low, try charging it fully. If it won’t charge or holds a very low voltage, the battery is the prime suspect.
- Test Charger Output. If the battery voltage is zero or very low, verify the charger is providing output. Also, check the charger’s physical terminals for bent or recessed pins that aren’t making contact.
- Inspect and Clean Contacts. Visually inspect the battery and tool terminals for dirt, corrosion, or physical damage. Clean them with a dry cloth. Corrosion is a common, fixable cause of a charging failure.
- Try a Known-Good Component. If possible, try your battery on a different, working tool of the same brand. Try a different, known-good battery on your tool. This swaps variables and isolates the fault.
- Consider the Environment. Did the battery get wet? STIHL’s manual states a wet or moist battery must dry for at least 48 hours between 15°C and 50°C with less than 70% humidity before you can assess it. Has it been stored in a hot shed? DeWALT warns against storage above 104°F (40°C).
This flow chart turns a confusing problem into a logical process. Most of the time, you’ll find the answer at step one or three.
How to Test a Battery Under Load for True Health
A simple voltage check on a resting battery only shows its surface charge. To reveal its true health, you need to see how it performs under stress. Connect the battery to the tool and run it for a short period, or use a dedicated load tester if you have one. Immediately after this use, disconnect the battery and take a voltage reading with your multimeter. A healthy battery will show a voltage that, while lower than its resting state, does not sag excessively under load. A weak or failing battery will show a much more significant voltage drop under this simulated load, indicating it cannot deliver its rated power when needed.
Frequently Asked Questions
How do I test a DeWalt 20V battery with a multimeter?
Set your multimeter to DC voltage (20V range). Identify the two large terminals on the battery, these are B+ (positive) and B- (negative). Touch the red probe to B+ and the black probe to B-. A healthy, fully charged 20V MAX pack will read between 20.0V and 21.0V.
What should a 18V battery read on a multimeter?
An 18V lithium-ion battery (like a Milwaukee M18 or similar) is nominally 18V but actually reads between 20.0V and 21.0V when fully charged. A reading below 16.0V indicates it’s deeply depleted, and a reading below 15.0V often signals a dead cell and a pack that needs replacement or reconditioning.
How can you tell if a lithium-ion battery is bad with a multimeter?
Lithium-ion battery is likely bad if its resting voltage is significantly below the expected charged voltage (e.g., below 15V for a 20V pack) and it will not charge back up. Other signs include a pack that feels puffy or swollen, or one that shows correct voltage but cannot power a tool even under light load, indicating high internal resistance.
Is my battery dead or is it the tool?
Test the battery’s voltage with a multimeter. If the voltage is normal (e.g., ~20V for a 20V pack), the battery is likely okay. Next, clean the battery and tool contacts. Finally, try the battery in a different, working tool of the same brand. If it works in the other tool, your original tool has an internal fault. If it doesn’t work in any tool, the battery is the problem.
The Bottom Line
Testing a power tool battery with a multimeter isn’t about being an electrician. It’s about owning your tools, not being owned by their failures. The process boils down to a safe probe connection, a specific number, and a comparison to the real ranges, not the marketing labels.
The most common mistake is stopping at the voltage test. A battery that passes but performs poorly needs a load test or a swap into another tool. And remember, a battery that tests dead isn’t always trash. Sometimes it’s just deeply discharged and can be jump-started with careful procedures, though that’s a topic with its own risks.
The disagreement is real, but both agree on one thing, extreme heat is the enemy. Keep them under 104°F (40°C), and you’ll maximize their battery lifespan. Now go check that pack gathering dust in your garage. You might be surprised what a $20 multimeter can tell you.
