
How to Use a Belt Sander: 4-Step Setup and Technique
This post contains affiliate links. As an Amazon Associate, we earn from qualifying purchases.
To use a belt sander safely and effectively, you need the right sanding belt installed correctly, a firm two-handed grip, and a steady, controlled motion that lets the tool do the work. You must wear appropriate eye protection; sources specify ANSI Z87.1-rated safety goggles, safety glasses with side shields, or goggles, depending on the manufacturer. Start with a coarse grit for heavy material removal and progress through finer grits for a smooth finish, changing direction with each grit to erase the scratches from the previous one.
That last part about changing direction is what separates a clean job from a visible, scratchy mess. Most guides tell you to move the sander with the wood grain, which is correct for the final passes, but they skip the mechanical reason: a coarse belt’s scratches run parallel to the belt’s motion. A key principle of how to use a belt sander is to shift your sanding angle by 45 to 90 degrees when you switch to a finer belt. If you don’t, you’re just polishing the bottoms of those deep valleys, not leveling them out. The finish looks hazy because the deep scratches are still there, filled with fine dust.
What follows is the full walkthrough on how to use a belt sander: a pre-flight checklist you must not skip, the physical feel of correct pressure, how to handle edges without rounding them over, and a clear method to fix the gouge you will probably make on your first try.
Key Takeaways
- Install the sanding belt with its internal arrow pointing in the direction of rotation (clockwise when looking into the open side of most sanders) to prevent hazardous slipping and premature wear.
- Always operate the tool with two hands on the insulated grips, start the sander before it contacts the workpiece, and maintain a steady, light-to-medium pressure, let the grit do the cutting.
- For a truly flat surface, follow a grit progression (e.g., 80 → 120 → 180 → 220) and change your sanding direction with each step to erase the previous grit’s scratch pattern.
- Empty the dust bag when it’s half full for optimal dust collection and motor cooling, and never use the sander on direct current (DC) or with a voltage drop, as the motor will overheat.
- If the belt drifts to one side, adjust the tracking knob immediately; a misaligned belt will wear unevenly, reduce effectiveness, and can damage the sander’s rubber drive wheel.
The 4-Step Setup Before You Even Plug It In
You wouldn’t start a car without checking the oil. Don’t start a belt sander without this checklist. The vibration and noise of a new tool can hide a simple setup error until it’s cost you a belt or marred your project.
First, match the belt to the job and the machine. Your sander’s manual specifies the exact size. For instance, a Craftsman RRFTSMR uses a 4 inch x 24 inch (102mm x 610mm) belt, while a Makita 9403 uses a 100mm x 610mm belt. Do not use sanding belts narrower than 4 inches, as this can expose parts that could trap your fingers. For general woodworking, start with a synthetic abrasive belt, such as aluminum oxide or silicon carbide.
The arrow printed inside the sanding belt indicates its direction of rotation. On a typical sander, this arrow must point clockwise when you look into the open side where the belt is exposed. Installing it backwards creates a hazardous condition where the belt can slip or come off during operation. Belts without a direction arrow can be used in either direction.
Second, install the belt correctly. Unplug the sander. Lift the tension release lever to slacken the belt, slide the old one off, and loop the new one on. Roughly center it on the wheels. Lower the lever to re-tension it. Now, plug in the sander, turn it on for just a second, and watch where the belt goes. It should run centered on the crowned drive wheel. If it drifts left or right, turn the sander off, wait for it to stop completely, and use the tracking knob (usually at the rear) to make a slight adjustment. Turn it on again to check. Repeat until the belt runs true.
Third, attach the dust bag. This isn’t optional. The Craftsman manual is explicit: never attempt to use your sander without the dust bag properly installed. Sawdust and debris thrown into your face is one risk; the other is the motor ingesting its own dust, which leads to overheating and accelerated wear. Slide the bag’s retainer over the exhaust hole until it clicks snugly into place.
Fourth, dress for the job. This means appropriate ANSI Z87.1-rated eye protection; sources specify safety goggles, safety glasses with side shields, or goggles. If the operation is dusty, also wear a dust mask or respirator. The Makita 9403 manual notes a sound pressure level that requires hearing protection, so hearing protection is wise for extended use. Finally, check yourself: no loose clothing, gloves, neckties, or jewelry that could get caught in the moving belt.
Grip, Stance, and Starting the Cut
How you hold the tool decides everything that comes after. This isn’t about strength; it’s about control and letting the tool’s mass work for you.
Grip the sander with both hands on the insulated gripping surfaces. Your dominant hand goes on the rear handle, finger on the trigger. Your other hand goes firmly on the front handle, not on the body of the tool. This two-handed grip is essential for stability. Your stance should be balanced, with your feet shoulder-width apart, ready to move with the tool.
Here’s the sequence: position the sander on the workpiece with the belt clear. Start the motor. You should hear it ramp up to its full speed, for the Craftsman RRFTSMR, that’s between 800 and 1300 ft./min. Once the belt is moving at full speed, lower it gently onto the work surface. Starting the sander while it’s already pressed against the wood is a great way to gouge it or stall the motor.
Common mistake: Pinning the sander down with heavy pressure. You’ll hear the motor bog down, see burn marks on the wood, and load the belt with debris in seconds. The belt speed does the cutting; your job is to guide it.
You’ll feel the right pressure. The sander should glide across the surface with a slight resistance. If you have to lean into it, your grit is too fine or the belt is clogged. If it skitters and chatters, you might be going too fast or holding it at an angle. The sound is a dead giveaway: a smooth, consistent whir is good; a strained, fluctuating groan means back off.
The Right Way to Move: Technique for Flat Surfaces
For flattening a tabletop or a door, a core part of how to use a belt sander is to employ a methodical, overlapping pattern. Don’t just push the sander around randomly. That’s how you create dips and waves.
Begin with your coarse grit belt (e.g., 60 or 80). Move the sander slowly and steadily in the direction of the wood grain. Apply even, light pressure. At the end of the board, lift the sander slightly, bring it back to the start, and overlap your previous pass by about a third. Work your way across the entire surface in this back-and-forth, overlapping lane pattern. This ensures even material removal.
The critical move comes when you switch to the next grit. Before you change the belt, look at the surface. It should be uniformly rough. Now, change to your medium grit (e.g., 120). Here’s the key: change your sanding direction. Instead of going with the grain, go across it at a 45 to 90 degree angle. This new set of finer scratches will cut across the peaks and valleys left by the coarse belt, leveling them. Only after you’ve sanded the entire surface uniformly in this cross-grain direction should you make your final passes with the belt moving with the grain again.
| Material/Task | Starting Grit | Progression (Next Grits) | Finishing Grit | Notes |
|---|---|---|---|---|
| Rough Wood (Paint/Paint Removal) | 60-80 | 100, 120 | 150-180 | Coarse grit strips fast; stop when surface is uniform. |
| Flattening Solid Wood | 80-100 | 120, 150, 180 | 220 | Change direction with each grit for a truly flat surface. |
| Smoothing Plywood Edges | 100 | 120, 150 | 180 | Use light pressure to avoid rounding the sharp corner. |
| Metal Deburring/Smoothing | 80 (Silicon Carbide) | 120, 180 | 220 | Keep the sander moving to avoid heat buildup. |
When the belt stops cutting efficiently, you’re pushing harder but not removing material, it’s loaded. Turn off the sander, unplug it, and clean or replace the belt. Trying to power through with a clogged belt only creates friction heat, which can glaze the abrasive and scorch your workpiece.
Handling Edges, Corners, and Curves
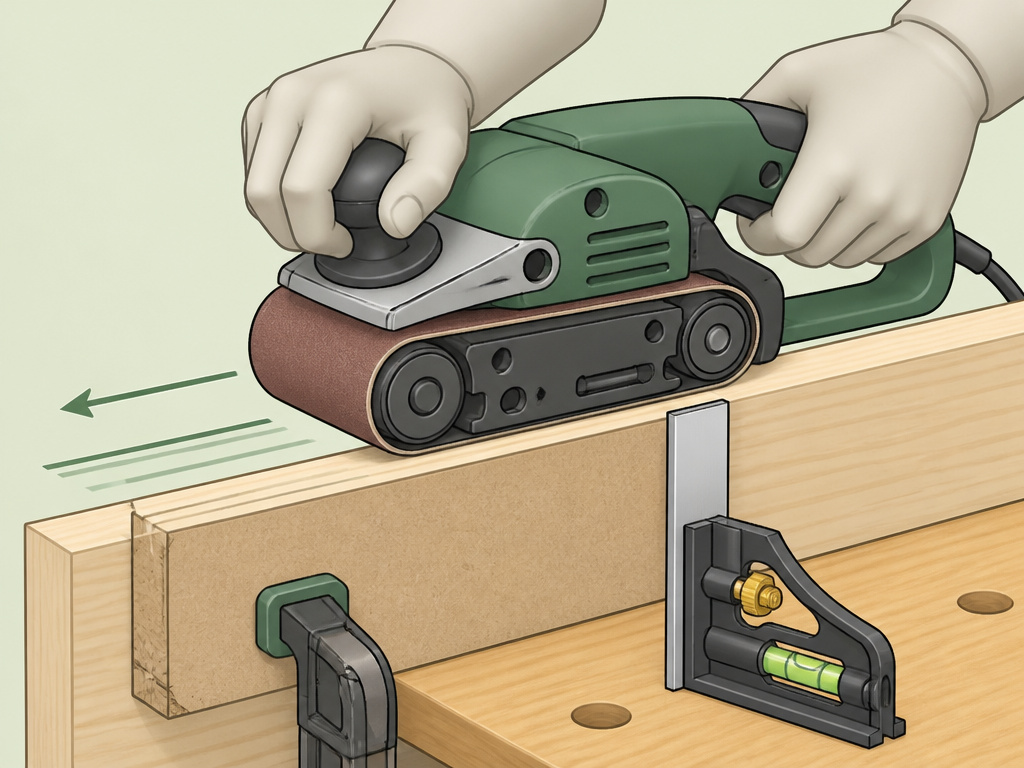
A belt sander is built for flats, but you can’t avoid edges. The trick is to manage the tool’s tendency to round over everything it touches.
For a long, straight edge, you need to keep the sander’s platen (the metal bed behind the belt) perfectly flat on the surface. Any tilt will start beveling the edge. It helps to clamp a straight, sacrificial board alongside your workpiece as a guide for the sander’s side. Run the sander along the edge, keeping the platen flush against the guide board. Go slow, and check for squareness often with a combination square.
Internal corners are a no-go zone for the belt. You’ll need a detail sander, a sheet of sandpaper wrapped around a block, or a sharp chisel to clean them out. For external corners, you can carefully sand each adjoining face separately, but the moment you let the sander’s corner touch both sides at once, it will round it. The goal is crispness, not a radius.
For gentle curves, you can sometimes use the unsupported section of the belt between the two drums. Turn the sander on its side and use a light, sweeping motion. This is advanced and risky, it’s easy to gouge. For consistent curves, a spindle sander or a handheld oscillating tool with a sanding pad is the right tool for the job. Using a belt sander here is a compromise.
Troubleshooting: When Things Go Wrong
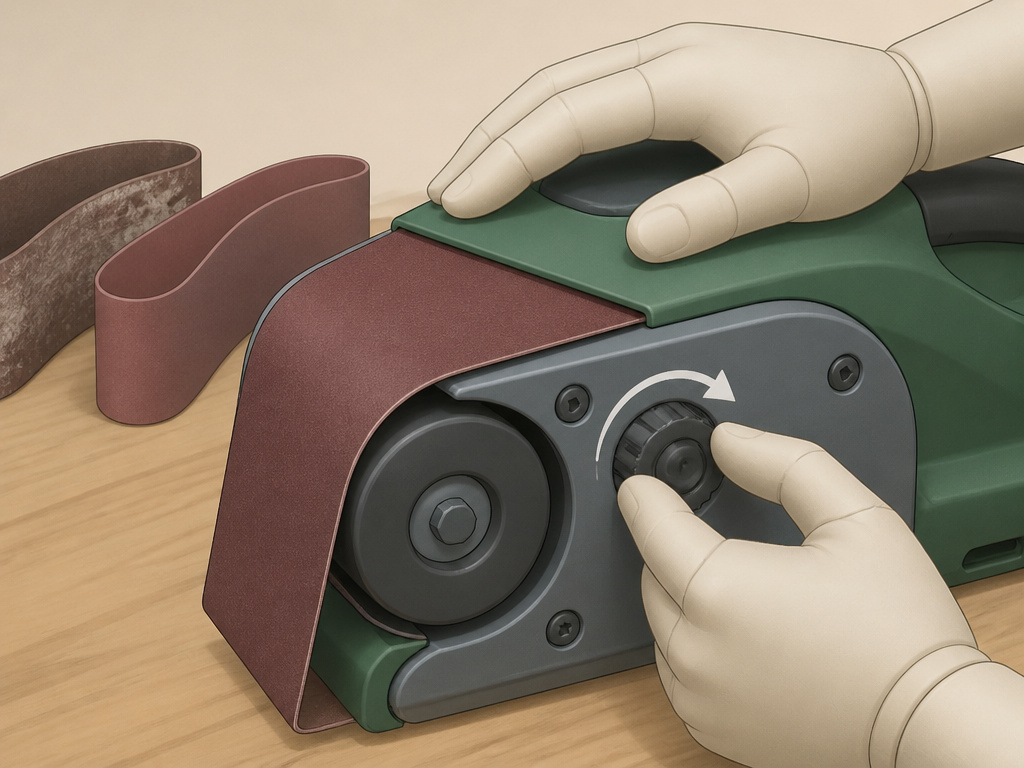
Even with perfect technique, belts drift, motors bog, and finishes get scratched. Here’s how to diagnose and fix the most common issues.
Problem: The belt keeps drifting off the wheels.
Cause & Fix: The tracking is out of adjustment. Turn off the sander. The tracking knob controls the tilt of the front roller. If the belt drifts left, turn the knob a quarter-turn to the right. If it drifts right, turn it left. Make small adjustments, then test. Also, check that the belt is the correct width for your sander and that it’s not overly worn or stretched.
Problem: The sander vibrates excessively or feels unbalanced.
Cause & Fix: First, ensure the belt is centered and tracking correctly. If vibration persists, the belt might be damaged or have a thick seam that’s slapping the platen. Replace it. Also, check that all screws securing the housing and handles are tight.
Problem: The motor slows down under pressure or smells hot.
Cause & Fix: You’re pressing too hard, using too fine a grit for material removal, or the belt is loaded. Ease up. If you’re working on an abrasive material like fiberglass or plaster, note the Craftsman warning: these materials accelerate wear. Clean the tool thoroughly with compressed air after such use. Never operate the tool on direct current (DC) or with a long extension cord that causes a voltage drop, this leads to power loss and overheating.
Problem: I’ve created a deep gouge or dip.
Cause & Fix: You stopped moving or applied uneven pressure. To fix it, you have to flatten the surrounding area down to the bottom of the gouge. Go back to your coarse grit (80) and sand the entire surface evenly until the gouge disappears. This removes material, so it’s a last resort. It’s why practicing on scrap wood first is not just a suggestion.
Belt and Tool Maintenance
A belt sander is a simple machine, but neglecting it shortens its life. The bearings are lubricated for life and require no further attention. The maintenance is about the consumables and cleanliness.
Clean the belt: A clogged belt is useless. For wood dust, you can often tap the belt against a bench to dislodge it. For resinous woods or paint, a belt cleaning stick (like a big eraser) rubbed against the moving belt can clear the pores. For a deeper clean, you can use specific solvents to clean sanding belts, but always unplug the tool first.
Empty the dust bag: Do it when it’s half full. A packed bag kills suction, strains the motor, and becomes a fire risk with fine, hot dust. Just unzip it and shake it out away from your work area.
Check the platen: Over time, the metal plate behind the belt can get scored or worn. A damaged platen won’t support the belt evenly, leading to poor results. If it’s deeply grooved, it may need replacement, a job for a qualified service technician for double-insulated tools.
Store it properly: After the sander has come to a complete stop, unplug it. Lock the switch in the off position if it has a key, and store it in a dry place. If you need to replace the sander belt before storage, do it then so it’s ready for the next job.
Belt Sander vs Orbital and Stationary Sanders
A belt sander is built for speed and material removal on large, flat surfaces like tabletops or flooring. Its continuous loop of abrasive cuts aggressively, making it less suitable for delicate finishing work where you might use an orbital sander. Unlike a stationary belt sander or disc sander, a handheld belt sander gives you control over the tool’s movement across the workpiece. This makes it versatile for shaping and leveling, but it requires a firm, two-handed grip to manage its power. For final smoothing, you typically follow up with a finer-grit tool, as a belt sander’s coarse action is designed for rapid stock removal.
Choosing a Corded or Cordless Belt Sander
Your primary choice is between corded and cordless models. Corded sanders provide consistent, uninterrupted power, which is crucial for the sustained high load of sanding large surfaces. They typically offer higher amperage and variable speed control, allowing you to adjust the belt’s speed for different materials. Cordless models offer portability but consider the runtime and power needed for your projects. Look for features like double insulation for electrical safety, an effective dust collection bag that should always be used, and a design that allows you to hold the tool firmly by insulated gripping surfaces with both hands for control.
Frequently Asked Questions
Can you go back and forth with a belt sander?
Yes, but not in a random scrubbing motion. You go forward on a controlled pass, lift the sander, return to the start, and overlap for the next forward pass. You should never sand on the “back” stroke while the sander is in contact with the workpiece, as this can cause you to lose control and create an uneven surface.
What do I use a belt sander for?
Its primary job is fast material removal and flattening. Use it to level tabletops, remove old paint or finish from flat surfaces, smooth rough-sawn lumber, and sharpen tools (like lawn mower blades). It’s aggressive, so it’s a first-step tool, not a finishing tool. For fine finish work, you’d follow up with an orbital sander.
How do I avoid leaving swirl marks?
Belt sanders don’t typically leave swirl marks like random orbital sanders can. The marks they leave are straight-line scratches. To avoid a visibly scratchy finish, you must follow a grit progression and change your sanding direction with each step, as outlined in the sanding technique section. The final passes should always be with the grain.
Is a belt sander or a planer better for flattening wood?
They do different jobs. A planer makes two faces parallel and reduces thickness uniformly. A belt sander flattens a single face, even if it’s twisted or cupped, but it doesn’t ensure parallelism. For a twisted board, you’d often use a belt sander to create one flat reference face first, then run it through a planer to make the opposite face parallel.
What grit should I start with for deck refinishing?
For deck sanding to remove old stain and smooth splinters, start with a very coarse grit. This will power through the weathered surface quickly. Then, progress to medium and then finer grits for a surface ready for a new coat. You rarely need to go to a very fine grit for a deck.
Before You Go
The real secret isn’t in the motor’s power or the belt’s brand. It’s in the three seconds between picking up the sander and pulling the trigger. That’s when you check the belt’s tracking, feel the balance in your hands, and plan your first pass. Most mistakes happen before the tool even turns on.
If you remember one thing, let it be this: a belt sander is a bulldozer, not a scalpel. It rewards a patient, systematic approach and punishes haste and force. Start every job by practicing your grip and a few passes on a piece of scrap. Listen to the motor. Feel how the tool wants to move. That cheap scrap wood is the best teacher you’ll have.
When you’re ready to move on, the next skill to learn is how to sand between grits properly for a glass-smooth finish. And if you’re looking to buy your first one, our roundup of the best belt sanders cuts through the spec sheets to what actually matters in the workshop. Now, go make some dust, the right way.
