
How to Use Ryobi Circular Saw Edge Guide: Setup and Tips
This post contains affiliate links. As an Amazon Associate, we earn from qualifying purchases.
To use a Ryobi circular saw edge guide, you need the correct accessory for your saw model, a straight workpiece edge to run it against, and an understanding of blade offset. The official guides, like part 969862009 for the CSB123, attach to the saw’s base. You position the guide’s face firmly against your workpiece, then make the cut while preventing the blade from binding.
That last part—preventing binding—is where most guides stop. They tell you to push steadily. They don’t tell you what binding sounds like or why it happens five inches into a perfectly aligned cut on a seemingly straight board. The sound is a rising, strained whine, not the saw’s normal healthy growl. It means the kerf is closing behind the blade, pinching it. A tutorial on how to use the optional Ryobi edge guide would address this.
What follows is the setup the manual assumes you’ll figure out, the offset trick it mentions in one line, and the choice between buying their guide or building a better one.
Key Takeaways
- The optional edge guide part number for the CSB123 is 969862009, while the optional edge guide kit for the CSB125 is 202218001.
- Always run a trial cut on scrap to calibrate your cut line offset, as blade thickness varies.
- For the guide to work, the guiding edge of your workpiece must be straight—a bowed board guarantees a crooked cut.
- Use the guide for long or wide rip cuts where a freehand cut would drift; it’s not for every cut.
- Blade binding is the main risk; listen for a high-pitched whine and feel for kickback, which happens when the kerf pinches the blade.
What a Ryobi Edge Guide Actually Is (And Isn’t)
It’s not a magic straightener. When you compare a how to use Ryobi circular saw edge guide, the official Ryobi edge guide is a simple, L-shaped aluminum bar that clamps to the saw’s base plate. One face runs along your workpiece edge; the other provides a mounting point. Its job is to turn the variable skill of guiding a saw freehand into the fixed, repeatable task of sliding a bar along a straight line.
Think of it as training wheels for your saw shoe. It helps, but it doesn’t replace a solid foundation—that straight workpiece edge. The manuals for the CSB123 and CSB125 state the same rule: “The guiding edge of the workpiece must be straight for the cut to be straight.” If your board edge looks like a shallow “C”, your cut will trace that curve, guide or not.
Technical Snippet: The optional edge guide for the Ryobi CSB123 circular saw (model CSB123) is part number 969862009. It is designed for making long or wide rip cuts by providing a fixed reference surface that runs against the edge of the workpiece, translating its straightness directly to the cut path.
This accessory exists because Ryobi knows most DIY cuts are crosscuts on shorter boards. When you need to rip an 8-foot sheet of plywood or a long 2×10, freehand accuracy drops fast. The guide mitigates that. It is also a hint: if you’re doing enough of this work to buy the guide, you might be better served by a different tool system altogether.
How to Install and Adjust the Ryobi Edge Guide
Unbox the guide. You’ll have the bar and a clamping mechanism, usually a wing screw or a knob that tightens into threaded holes on your saw’s base plate. These holes are pre-drilled on most Ryobi circular saws for this purpose.
First, find the mounting holes on your saw’s shoe (the metal base plate). They’re often covered by small plastic plugs. Pop them out. Slide the edge guide bar through these holes. The long face of the “L” should point away from the saw, parallel to the blade. Tighten the clamping mechanism just enough to hold the bar in place, but leave it loose enough to slide for adjustment.
Now, measure your offset. This is the step every quick video skips, and it’s the difference between a perfect cut and one that’s consistently 1/8 inch off. The edge guide runs on the left side of the shoe. The distance between the guide’s contact face and the blade’s right-side teeth is your cutting width.
It’s a rough indicator. Here’s the method from the RY6201 manual: “Since blade thicknesses vary, always make a trial cut in scrap material along a guideline to determine how much, if any, the guideline must be offset to produce an accurate cut.”
| Step | Action | Why It Matters |
|---|---|---|
| 1. Mark a Line | Draw a straight line on a scrap piece of your workpiece material. | Establishes your target cut line. |
| 2. Align & Cut | Set the guide against the scrap’s edge and cut, following your line as best you can. | Makes a real cut with your actual blade. |
| 3. Measure Error | Measure the distance between your cut edge and the original pencil line. | Reveals your exact blade-to-guide offset. |
| 4. Adjust Guide | Loosen the guide, shift it left or right by the measured error amount, and re-tighten. | Calibrates the guide for dead-on accuracy. |
| 5. Verify | Make a second cut on fresh scrap. The cut edge should now land right on your pencil line. | Confirms the calibration before cutting good material. |
Once calibrated, the guide is set for that specific saw and blade combination. Change the blade type or brand, and you should run the offset check again.
The One Rule for a Straight Guiding Edge
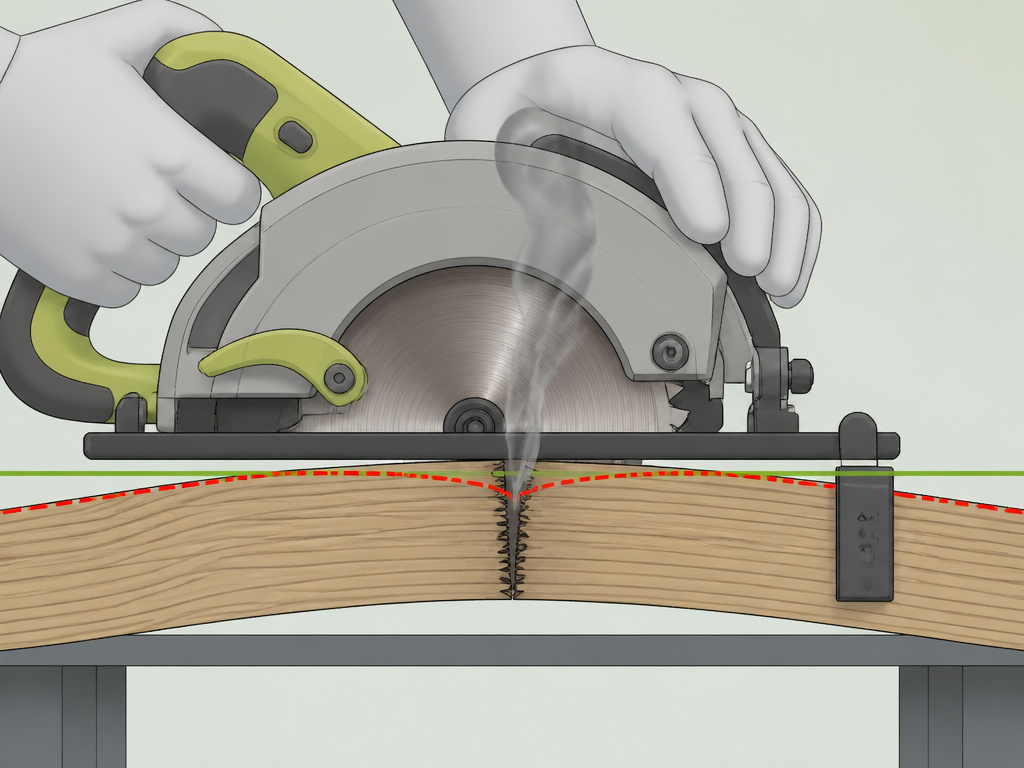
Your guide can only be as straight as the edge it’s riding against. This seems obvious until you’re in the shop, staring at a board that’s “straight enough.” It’s not.
A visual check isn’t reliable. Sight down the edge like a rifle barrel. Any dip, hump, or twist will steer the saw. For sheet goods like plywood, the factory edge is usually your best bet. For dimensional lumber, you often need to create a straight edge first. This is where a guide rail or a tablesaw is the real first step, not the edge guide.
Where this goes sideways: Using the edge guide on a slightly bowed board. The guide faithfully follows the curve, the blade binds in the middle of the cut where the kerf narrows, and the saw kicks back toward you. That’s not a tool failure; it’s a preparation failure.
If you must rip a board with a imperfect edge, don’t use the edge guide. Instead, clamp a known-straight board to the workpiece to act as a guide. This is essentially building a longer, more stable version of the edge guide itself. It’s also the core idea behind a DIY guide rail.
Making the Cut: Technique to Avoid Binding
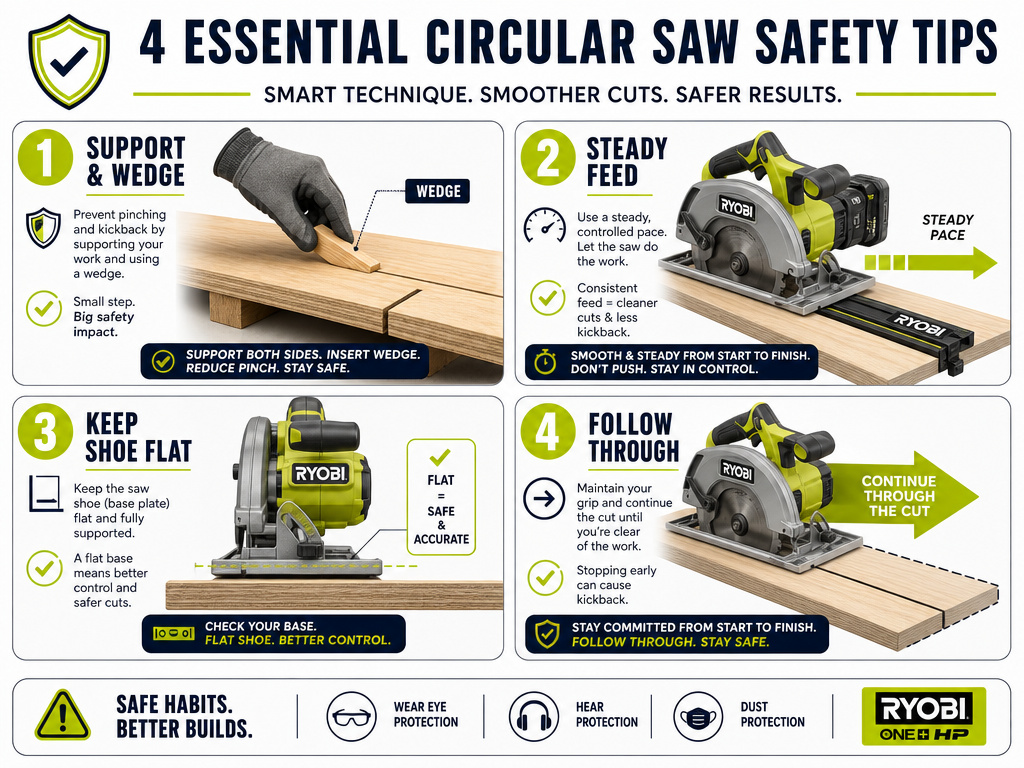
With the guide installed, calibrated, and running against a straight edge, you’re ready. But the manuals share one more universal warning: “Use caution to prevent the blade from binding in the cut.”
Binding happens when the material closes in on the blade, pinching it. On a long rip cut, internal stresses in the wood can release, causing the kerf to close. It’s a sudden grip that stalls the blade, often resulting in a violent kickback.
Here’s how to beat it:
- Support the workpiece. Both sides of the cut must be supported so the weight of the off-cut doesn’t sag and pinch the blade mid-cut. Use sawhorses and scrap wood to keep everything level.
- Let the saw do the work. Push at a steady, moderate pace. Forcing it heats the blade and increases the chance of deflection and binding. Listen to the motor. A smooth, consistent roar is good. A rising, straining whine means you’re pushing too hard or the kerf is closing.
- Keep the shoe flat. Don’t tilt the saw during the cut. The entire base plate must remain in full contact with the workpiece. Any tilt changes the blade’s relationship to the guide and the kerf.
- Follow through. Don’t stop in the middle. Once you commit, make a continuous, smooth motion until the cut is complete and the blade is fully clear of the material.
If you do feel the saw bog down and hear that tell-tale whine, do not jerk it back. Hold the saw firmly in place, release the trigger, and wait for the blade to stop completely before carefully backing it out of the cut. Check for pinching and relieve the pressure with a wedge before resuming.
DIY Guide vs. Official Ryobi Accessory: Which Should You Use?
This is the real question. The official guide is convenient and stores with the saw. But it has limits. Its length is fixed, and it relies on the saw’s relatively short base plate for stability. For a single, 3-foot rip cut on a 2×10, it’s perfect.
For breaking down a 4×8 sheet of plywood, it’s the wrong tool. You need a longer, more rigid system. That’s when you build a DIY guide rail. A straight 8-foot piece of aluminum or plywood, clamped to the sheet, gives you a longer reference surface that vastly improves accuracy over long distances.
| Factor | Ryobi Edge Guide | DIY Guide Rail |
|---|---|---|
| Best For | Short to medium rip cuts on boards. | Long, precise cuts on sheet goods. |
| Accuracy | Good, depends on workpiece edge. | Excellent, depends on the rail’s straightness. |
| Setup Speed | Fast (clamps to saw). | Slower (must measure and clamp to workpiece). |
| Versatility | Low (only works with that saw). | High (works with any saw that has a straight base). |
| Cost | Moderate (purchase accessory). | Low (scrap lumber and clamps). |
The official guide is for the job that pops up occasionally. The DIY guide is for the project you plan. Most home shops need both solutions ready. If you’re learning how to cut plywood with a circular saw, start with a DIY rail. If you’re just ripping a board to width, the edge guide is likely sufficient.
Troubleshooting Common Edge Guide Problems
Even with perfect setup, things can go wrong. Here are the fixes for the most common issues.
The cut is consistently too wide or too narrow.
Your offset is wrong. Re-run the trial cut calibration process on scrap. Remember, a different blade brand or a fresh sharpening can change the kerf width enough to throw off your setting.
The saw is hard to push and the motor whines.
This is blade binding. Stop immediately. The likely causes are:
- Pinching kerf: Internal wood stress. Try cutting from the opposite end of the board, or drive a wooden wedge into the kerf behind the saw to hold it open.
- Dull blade: A sharp blade removes material cleanly. A dull blade burns it, creating more friction and heat that can swell the wood. Change the blade.
- Incorrect blade depth: The blade should only protrude slightly past the bottom of the workpiece. Too deep creates more surface area for friction and increases binding risk.
The guide slips or feels wobbly during the cut.
The clamping mechanism isn’t tight enough. Ensure the guide bar is fully seated in the mounting holes on the saw’s shoe and that the wing screw or knob is firmly tightened. If the holes in the shoe are stripped, the guide is unsafe to use.
The cut starts straight but veers off.
Your guiding edge isn’t straight, or you’re not maintaining firm, consistent pressure with the guide face against that edge. Check the board. If the edge is good, focus on your technique: keep the guide pressed flush along its entire length as you push.
Choosing the right blade for the material (e.g., plywood)
The saw’s manual advises making a trial cut in scrap material along a guideline before your final cut. Since blade thicknesses vary, this test helps you determine how much, if any, your guideline must be offset to produce an accurate cut. This is especially critical when precision matters, like when using an edge guide for a clean rip in plywood. Always match the blade’s intended use to your material.
Differences between corded and cordless saws
The core function of using an edge guide remains the same for both types, which is the essence of how to use Ryobi circular saw edge guide: you position the guide firmly against a straight workpiece edge to make long, straight cuts. However, the power source creates practical differences. A corded model like the CSB123 runs on household current and offers consistent power for extended cutting sessions. A cordless model, like the RY6200, runs on a battery, providing complete freedom from outlets and cords, which can be a major advantage on a job site or when working away from power. Your choice often comes down to prioritizing unlimited runtime or maximum portability.
Frequently Asked Questions
What is the part number for the Ryobi circular saw edge guide?
The part number depends on your saw model. For the Ryobi CSB123 7-1/4″ saw, the optional edge guide is part 969862009. For the Ryobi CSB125, the optional edge guide kit is part 202218001. Always verify the part number in your specific saw’s operator’s manual before ordering.
Can I use a Ryobi edge guide on any circular saw?
No. The Ryobi edge guide is designed to attach to the pre-drilled holes in the base plate of specific Ryobi circular saw models. The mounting pattern and clamp mechanism are not universal. It will not fit other brands or even all Ryobi models.
How do I make a straight cut without an edge guide?
You clamp a straight board to your workpiece to act as a guide for the saw’s base plate. This is the fundamental principle behind a DIY circular saw guide. The key is to measure the exact distance from the edge of the saw’s base plate to the blade, then set your clamped guide board that distance away from your cut line.
Why does my saw keep binding when using the guide?
Blade binding is usually caused by the kerf closing and pinching the blade. Support your workpiece on both sides of the cut to prevent sagging. Use a sharp blade. Ensure your blade depth is set correctly. If the wood is known to be stressed, cut from the opposite end or use a wedge to hold the kerf open behind the saw.
Is a laser guide or an edge guide better for straight cuts?
An edge guide is mechanically superior. A laser guide only projects a line; it doesn’t physically steer the saw. Lasers can be knocked out of alignment, require batteries, and are often hard to see in bright light. An edge guide provides physical contact that enforces a straight path, making it more reliable for accurate rip cuts.
Before You Go
The edge guide turns a skill into a repeatable process. Its value isn’t in making every cut perfect—it’s in making the long, easy-to-mess-up rip cuts consistently accurate with less mental effort. Remember the order: straight workpiece first, calibrated guide second, supported cut third. Skip the first step, and the other two don’t matter.
If you find yourself using it for more than the occasional board, that’s your signal. You’re doing enough rip work to justify the time to build a proper, full-length guide rail. That’s the natural progression. The Ryobi edge guide is the training tool that shows you why a better system exists.
