
How to Use a Heat Gun: Step-by-Step (Without Damage)
This post contains affiliate links. As an Amazon Associate, we earn from qualifying purchases.
To use a heat gun, plug it into a 120V outlet, select the correct temperature setting for your task, allow it to heat up for one to two minutes, and then apply heat while keeping the tool moving at a consistent distance. After use, follow the manufacturer’s specific cool-down procedure, as methods and durations vary: Master (58221) says run on cold for approximately three minutes, Makita says adjust to lowest temperature then switch off, and Harbor Freight says set to low then off. The core technique is managing distance and motion to apply heat evenly without scorching the material.
That sequence seems simple. The manuals make it sound like flipping a switch. Where most guides stop is right there, at the plug-and-play level. They skip the part where different brands tell you to shut down in three different ways, or where a task like bending plastic needs a completely different approach than stripping paint. The real use isn’t in the on/off switch; it’s in the details the manuals assume you’ll figure out, like how to use a heat gun correctly for each material, and the ones where they openly disagree.
What follows is a breakdown of those details: the five essential safety steps, the conflicting cool-down rules straight from the OEM manuals, a table that matches tasks to real temperature specs, and the one maintenance item that will keep your tool running for years.
Key Takeaways
- Always run a manufacturer-specific cool-down cycle after use; Master says three minutes on cold, Makita says drop to low then off, Harbor Freight says set to low then zero, ignoring this burns out the element.
- For paint stripping, maintain a 1–2 inch distance and use a scraping tool in your other hand; holding it closer or in one spot scorches the wood underneath.
- Inspect and replace the motor brushes every 100 hours of runtime (or when worn below 1/8″); this is the single most common point of failure for brushed-motor heat guns.
- Sources disagree on lead-based paint: the Harbor Freight manual states it should only be removed by a professional and not with a heat gun, while the Sealey HS105 manual warns to follow specific safety warnings if it is being removed.
- Match the tool’s airflow setting to the task; open the air shutter (if equipped) for slightly cooler air for plastics, close it for maximum heat concentration for paint.
Before You Start: The Non-Negotiable Safety Setup
This isn’t scare talk. It’s the predictable outcome of ignoring the warnings printed in every manual I’ve pulled for this article. A heat gun isn’t a hair dryer. It generates enough concentrated heat to melt solder, soften steel, and ignite wood dust.
Before you start: The nozzle reaches 500°F (260°C) within two minutes and stays hot for a period after shut-off. Wear leather-palmed work gloves and ANSI-rated safety glasses. Work in a well-ventilated area and keep a fire extinguisher rated for Class A (wood/paper) and Class B (flammable liquids) fires within reach.
Your work area needs a clear zone. Move any flammable materials, solvents, rags, loose paper, at least ten feet away. If you’re working indoors, open windows and use a fan to pull air out of the room, not just circulate it. For any task that creates fumes or dust, like paint stripping, a respirator with particulate filters is mandatory, not optional.
The electrical side matters, too. Plug directly into a wall outlet if you can. If you must use an extension cord, it needs to be heavy-duty, a 16-gauge cord for runs under 50 feet, 14-gauge for longer runs. A cord that’s too thin will overheat, sag under voltage drop, and can trip the gun’s thermal cutoff or damage its motor.
The 5-Step Start-Up and Shut-Down Sequence
You can’t just yank the plug when you’re done. That’s the fastest way to cook the heating element. The element needs airflow to shed its residual heat, which is why every manual has a cool-down procedure. The problem is they don’t all agree on how to do it.
I learned this the hard way on an older Master model. I’d finish a job, switch it off, and set it down. After a few months, the heat output became uneven, and the gun would sometimes trip its internal breaker. The problem was a warped heating element from thermal shock. I wasn’t letting it cool down with the fan running.
Follow these five steps every time. They synthesize the procedures from Master, Makita, and Harbor Freight.
- Plug in and Set the Temperature. Before you plug in, set the temperature dial or switch to the lowest setting (often labeled ‘Low’ or ‘I’). This prevents a sudden high-power surge on startup. For guns with a separate fan switch, ensure it’s set to ‘On’.
- Power On and Heat Up. Flip the main power switch to ‘On’. The fan should start immediately. Allow the gun to reach its operating temperature. This takes one minute for a Harbor Freight 56434 model, or approximately two minutes for a Master HG-VT-D Series. You’ll feel the heat radiating from the nozzle.
- Adjust to Working Temperature. Once the fan is running and heat is building, adjust the temperature control to your desired setting for the task. Never switch from ‘Off’ directly to a high setting.
- Perform Your Work. Keep the gun moving. Technique is explained in the next section.
- Initiate the Cool-Down. When your work is complete, this is the critical phase. Do not turn the main power switch to ‘Off’.
- Master (58221) Method: Move the switch to the ‘I’ (Low) position. Run the gun on this cold setting for approximately three minutes.
- Makita (HG5030/HG6031V/HG6030) Method: Adjust the temperature dial to the lowest setting, let it run for a moment, then set the on/off switch to position ‘0’.
- Harbor Freight (56434) Method: Set the Power Switch to ‘I’ (Low), then to ‘0’ (Off). The manual states this sequence “cools down the Heating Element properly.”
- Universal Rule: Let the tool sit until the nozzle is cool to the touch before storing it. The Sealey HS105 manual is blunt: “only store when cold.”
The heating element will burn out if it is not cooled by the blower. If the blower motor does not turn on when activated, turn the switch OFF immediately. Wagner Furno F500 Manual
Mastering Distance, Motion, and Temperature
The difference between a clean strip job and a charred mess is in your hands and your knowledge of how to use a heat gun. Literally. The technique boils down to three variables you control: distance, motion, and temperature setting.
Distance is your primary control. For high-heat tasks like paint stripping, start with the nozzle about 1 to 2 inches from the surface. For lower-heat tasks like shrink tubing or drying glue, you can work from 4 to 6 inches away. If you see the material smoking aggressively or changing color (wood darkening, plastic bubbling violently), you’re too close. Back off immediately.
Constant, sweeping motion is required. A heat gun is not a paintbrush you hold in place. Use your wrist and elbow to move the gun back and forth or in small circles. The goal is to bring the entire target area up to temperature evenly, not to superheat one spot.
Temperature setting should match the material’s tolerance. This is where a guide with real numbers beats vague advice. The table below pulls specs from the Master and Makita manuals.
| Task | Recommended Setting | Target Temp (Approx.) | Key Technique |
|---|---|---|---|
| Paint Stripping | High (Shutter Closed) | 750°F / 400°C | 1-2 inch distance, scrape as paint bubbles. |
| Shrink Tubing | Low/Medium | 300–500°F / 150–260°C | 4-6 inch distance, rotate tubing evenly. |
| Bending PVC/Plastic | Medium | 300–500°F / 150–260°C | Wave heat along bend line until pliable. |
| Loosening Adhesives | Medium/High | 500–750°F / 260–400°C | Heat adhesive, not substrate; pry gently. |
| Drying or Thawing | Low | 200–300°F / 95–150°C | Keep moving at 6+ inches to avoid scorching. |
The “shutter” refers to an adjustable air intake on some models, like certain Master guns. Open for more, cooler airflow (good for plastics); closed for focused, hotter air (good for paint). It’s a simple mechanical feature, an adjustable air shutter for temperature control, that many users never touch.
What Are You Using It For? (Task-Specific Guides)
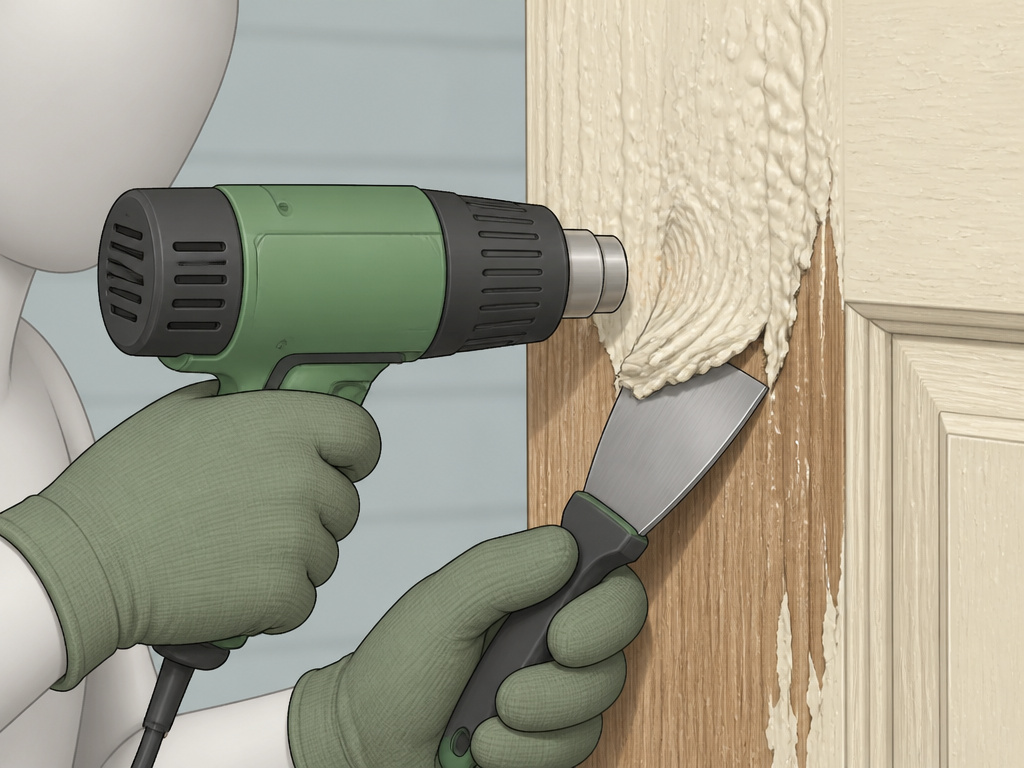
The generic “wave it around” advice on how to use a heat gun falls apart when you switch projects. Each common task has a specific best practice.
How to Strip Paint with a Heat Gun
This is the most common and most hazardous task. The Harbor Freight manual contains a clear, capitalized warning: “LEAD-BASED PAINT SHOULD ONLY BE REMOVED BY A PROFESSIONAL AND SHOULD NOT BE REMOVED BY USING A HEAT GUN.” If your home was built before 1978, assume paint contains lead until tested. For modern, non-lead paint, here’s the process:
- Safety First. Wear a respirator, gloves, and goggles. Work outdoors or in a ventilated shop with a fan exhausting air outside. Lay down drop cloths.
- Heat and Scrape. Set the gun to high heat (around 750°F/400°C). Hold it 1-2 inches from the surface. As the paint bubbles and wrinkles, usually within 5-10 seconds, use a wide putty knife or a dedicated paint scraper in your other hand to lift it off. The goal is to keep the scraper just behind the heated area.
- Keep Moving. Never stop the gun. If paint isn’t bubbling, you may need to close the air shutter (if equipped) for more heat or get slightly closer. The moment you see the wood underneath start to darken, you’ve lingered too long.
For a complete walkthrough of this method, including dealing with stubborn layers, see our dedicated guide on how to strip paint with a heat gun.
How to Use Heat Shrink Tubing
This is where precision matters. Too much heat melts the tubing; too little leaves it loose.
- Slide the tubing over the wire or connection before you solder or crimp.
- Set the gun to a medium temperature, around 300°C (572°F) is ideal. High heat will scorch the plastic.
- Hold the gun 4-6 inches away and rotate the wire so the heat encircles the tubing. It will contract smoothly. Start from the middle and work outwards to avoid trapping air.
This is a fundamental skill for electrical work, and we have a full tutorial on how to use heat shrink tubing with a heat gun.
Bending Plastic and Thawing Locks
For bending acrylic or PVC pipe, you need even, gentle heat. Wave the gun along the entire section you want to bend. Support the plastic so it sags into the shape you want, not onto your workbench. For thawing a frozen lock or pipe, use a low setting and keep the gun moving at a safe distance. Patience is key, you’re transferring warmth, not applying a blowtorch.
What Most People Get Wrong: Troubleshooting
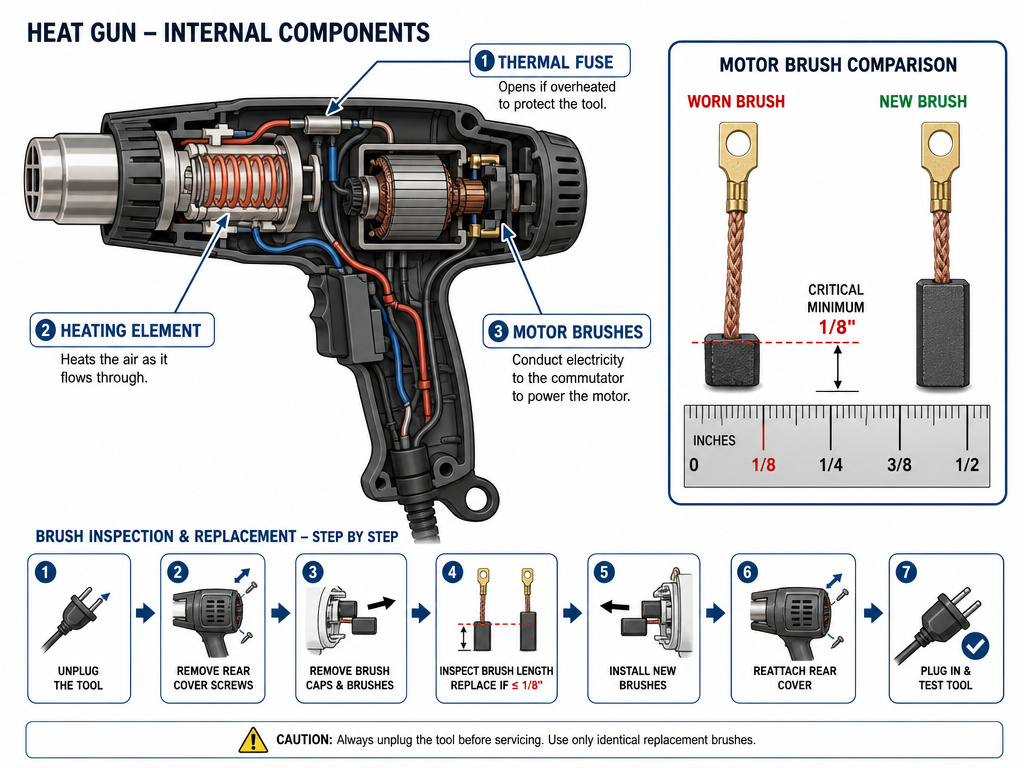
The gun is simple, so when it fails, the causes are usually simple too. Here’s a quick diagnostic table.
| Problem | Likely Cause | The Fix |
|---|---|---|
| No heat, fan runs | Blown thermal fuse or heating element. | Unplug. Let cool completely. If problem persists, internal repair is needed. |
| No fan, no heat | Power issue or failed motor. | Check outlet and cord. If outlet is live, the motor or switch may be dead. |
| Fan runs, heat is weak/uneven | Failing heating element or worn motor brushes. | For brushed motors, check the motor brush length. If under 1/8″, replace them. |
| Tool overheats and shuts off | Blocked air intake, wrong extension cord, or no cool-down. | Clean dust from vents, use a heavier cord, and always use the cool-down cycle. |
| Paint is scorching, not bubbling | Gun is too close or held still. | Increase distance to 2+ inches and double your sweeping speed. |
A note on motor brushes: the Master 58221 manual states you should “inspect brushes regularly (at least every 100 hours of running time). If brushes are less than 1/8″ long, replace them immediately.” This is standard maintenance for any brushed motor tool, and skipping it leads to the motor sparking, losing power, and eventually failing. It’s a ten-minute fix that adds years to your tool’s life.
Heat Gun vs. Hair Dryer: Why It’s Not a Substitute
You’ll see this question everywhere. Can you use a hair dryer instead? For crafts on very low heat, maybe. For any real task, absolutely not.
A hair dryer operates at significantly lower temperatures than a heat gun. A basic heat gun’s low setting, like on the Makita HG6031V, is 50°C. Its high setting is 600°C. The difference isn’t just degrees; it’s about focused airflow and thermal mass. A heat gun’s element and fan are built to sustain that heat without melting its own housing. A hair dryer isn’t.
Trying to strip paint or shrink tubing with a hair dryer will result in a dead hair dryer and a frustrated you. If you’re considering it for a one-off craft, look at legitimate alternatives to a heat gun first. For the full breakdown, our article on the difference between a heat gun and hair dryer covers the engineering reasons.
Maintaining Your Heat Gun for the Long Haul
A heat gun doesn’t need much, but it needs something. Beyond the motor brushes, keep it clean. After it’s fully cooled, wipe the exterior with a dry cloth. Never use solvents or immerse it. Periodically, check the air intake vents at the rear for dust buildup, a vacuum with a brush attachment works well.
If you’ve used it for paint or adhesive, residue will bake onto the nozzle. Once the gun is cold, you can gently scrape this off with a wooden or plastic tool. Metal can damage the nozzle plating. Proper cleaning and maintenance of your tools after a messy job is what separates a tool that lasts a season from one that lasts a decade.
What are the parts of a heat gun?
A heat gun is a straightforward tool with a few key components. The main body houses the motor and heating element. At the front, the nozzle directs the hot air stream; some models have an adjustable shutter around it to concentrate heat. Controls are typically on the handle or body, including a power switch and often a dial or slider to select temperature and airflow settings. The rear of the tool is an intake grille where cool air is pulled in. Always keep this grille clear. The power cord runs from the handle. Understanding these parts helps you operate the tool safely and effectively for any task.
Frequently Asked Questions
How long does a heat gun take to heat up?
It depends on the model. According to their manuals, a Harbor Freight 56434 gun requires one minute to build up to the desired heat level, while a Master HG-VT-D Series comes to full operating temperature in approximately two minutes.
Is it safe to use a heat gun indoors?
It can be, but with strict conditions. You must have strong, active ventilation, like an exhaust fan in a window pulling air outside. Never use one in a small, enclosed room. Fumes from paint, adhesives, or even overheated dust are a real health and fire hazard.
What should I never do with a heat gun?
Never use it as a hair dryer. Never point it at people, pets, or plants. Never use it on or near flammable gases, aerosols, or solvents. Never use it in combination with chemical paint strippers (per the Sealey HS105 manual). And never, ever leave it running unattended.
Can a heat gun start a fire?
Yes, absolutely. If directed at flammable materials like paper, fabric, or wood dust for even a few seconds, it can ignite them. This is why a clean work area, constant motion, and a nearby fire extinguisher are critical parts of safe operation.
Why does my heat gun keep shutting off?
Modern guns have a thermal overload protector. If the air intakes are clogged with dust, if you’re using a long, thin extension cord, or if you skipped the cool-down cycle on the last use, the internal temperature can rise enough to trip this safety switch. Unplug it, let it cool completely, clean the vents, and ensure proper power supply.
The Bottom Line
A heat gun is a deceptively simple tool that rewards a methodical approach. The single most important habit you can build is the cool-down ritual. Pick your manufacturer’s procedure. Master’s three-minute cold run, Makita’s step-down, Harbor Freight’s low-then-off, and follow it every single time. That alone will prevent the majority of premature failures.
For technique, let the task dictate the settings. Use the high, focused heat for paint, the medium, even heat for plastics, and gentle warmth for drying. Your hands will tell you when you’re doing it right: the material responds without burning, the gun doesn’t overheat, and the job gets done cleanly. Keep the vents clear, check the brushes at 100-hour marks, and store it cold. That’s how you use a heat gun.
