
Heat Gun Temperature Settings Guide: A Practical Reference
This post contains affiliate links. As an Amazon Associate, we earn from qualifying purchases.
A heat gun temperature settings guide matches specific tasks to verifiable temperature ranges from manufacturer manuals, with critical safety rules for materials like lead-based paint. Common DIY tasks like paint stripping need 500–750°F, while shrink tubing works at 200–300°F. The tool’s physical adjustments, air shutter and distance, change the effective heat as much as the dial does.
That range from a gentle 200°F to a blistering 1400°F is printed in the service manuals for specific models, and picking the wrong end burns projects or starts fires. Most guides talk about “low, medium, high,” but a heat gun temperature settings guide uses the numbers the engineers who built these tools published.
What follows: the real temperature specs for brands like Master, Wagner, and Harbor Freight, the one adjustment that changes output temperature by 250°F without touching a dial, and the safety protocols every manual repeats in bold font.
Key Takeaways
- Heat gun temperatures are model-specific. A Master HG-201A maxes at 300°F, while a Master HG-801D hits 1200–1400°F, check your manual before assuming.
- For paint stripping, start at 500°F with the air shutter open. Closing the shutter on a Master gun jumps the nozzle temperature to 750°F at one inch away.
- Lead-based paint removal is a hard no with a heat gun. The Master and Harbor Freight manuals state it must be done by a professional using other methods.
- Always initiate a cool-down cycle. Wagner’s FURNO 700/750 runs its fan for 3 minutes after shutdown; Master recommends a 3-minute cold air blast.
- The airflow setting is independent of temperature.
The 200°F to 1400°F Spectrum: What Your Heat Gun Can Really Do
Forget “gets hot.” The difference between a hobbyist tool and an industrial one is written in the spec sheet. A Harbor Freight 1500W model (Item 56434) delivers a maximum of 1000°F on its high setting. That’s useful. A Master Varitemp HG-801D requires a dedicated 20A outlet with a NEMA 5-20P plug to deliver 1200–1400°F. That’s in another league entirely.
The chart below is compiled from the instruction manuals.
| Model | Temperature Range | Key Spec / Note |
|---|---|---|
| Master HG-201A | 200–300°F (93–150°C) | 600W, basic drying, gentle shrink wrap. |
| Harbor Freight 1700W (Item 57988) | Starts at 120°F, adjusts in 10°F increments. | Built-in digital control, one-minute heat-up. |
| Master HG-501A-D | 500–750°F (260–400°C) | 1500W, standard paint stripping range. |
| Wagner Model 1000 | ~750°F (Low) / ~1000°F (High) | 1200W high, 650W low. |
| Master HG-751A-C | 750–1000°F (400–540°C) | 2160W, for heavy-duty stripping. |
| Master HG-801D | 1200–1400°F (649–760°C) | 2220W, requires 20A outlet. |
The Master HG-801D operates at 1200–1400°F and requires a 20-amp electrical outlet with a NEMA 5-20P plug. Using it on a standard 15-amp circuit risks tripping the breaker and damaging the tool’s heating element.
Why does this matter? If you’re trying to bend thick acrylic and your gun tops out at 750°F, you’ll wait forever and likely crack the material. If you’re drying a glued joint at 1000°F, you’re cooking the adhesive, not curing it. Matching the tool’s verified capability to the job is the first step in any heat gun temperature settings guide.
How to Actually Set the Temperature: Dials, Digital Controls, and the Forgotten Shutter
You have three ways to control the heat hitting your workpiece: the temperature setting, the airflow, and a mechanical shutter. Most people only use the first one.
Start Low, Then Bump Up. This isn’t just cautious advice. The Wagner FURNO manual states it directly: “Always start the heat gun at the lowest temperature in the range then raise the temperature until the optimum temperature is achieved.” Crank it to high immediately and you might scorch the surface before you even realize the material has softened.
Digital Precision vs. Simple Switches. Modern tools like the Wagner FURNO 700/750 offer ten-degree increments. The LCD model defaults to 300°C on startup; the touch pad model defaults to 650°F. Older two-speed guns like the Wagner Model 1000 give you a simple choice: about 750°F on low or about 1000°F on high.
The Secret Lever: The Air Intake Shutter. On the side of many Master heat guns, you’ll find a sliding shutter over the air intake. This is a manual bypass.
Where this goes sideways: Ignoring the air intake shutter. On a Master gun, the open position delivers about 500°F at the nozzle. Slide it closed, and the temperature at one inch away jumps to about 750°F. That’s a 250°F difference from a slider, not the dial.
If your material isn’t responding, check for that shutter before you assume you need a more powerful gun.
Common Tasks and Their Temperature Sweet Spots
Here’s where we move from general ranges to specific recommendations. This table is synthesized from application charts in the Wagner Model 1000 and HG0240-US manuals.
| Task | Recommended Setting | Why It Works |
|---|---|---|
| Shrink Tubing / Plastic Film | Low (200–300°F) | Gentle, even heat prevents melting the underlying material. A Master HG-201A is perfect. |
| Drying Paint or Concrete | Low/Medium (120–400°F) | Evaporates moisture without blistering the surface. The Harbor Freight 1700W starting at 120°F is ideal. |
| Bending Plastic/Plexiglass | Medium/High (500–750°F) | Softens the material to a pliable state without causing bubbles or discoloration. |
| Softening Adhesives (Floor Tiles) | Medium/High (500–750°F) | Breaks the bond of the mastic without igniting the subfloor. |
| Stripping Paint | High (750–1000°F) | Thermal shock breaks the bond between paint layers and the substrate. Requires constant motion. |
| Loosening Rusted Bolts | High (1000°F+) | Differential expansion can break the rust weld. This is a job for the Master HG-751A-C or similar. |
I learned the “start low” rule the hard way on a wiring project. I reached for a powerful gun set to 750°F to shrink some tubing. The tube shrunk instantly, then the insulation underneath melted into a sticky, conductive mess. The Wagner manual’s guideline for shrink tubing is “LOW.” Now I use my old Master HG-201A for all electrical work, its 300°F ceiling is a built-in safety limit.
For bending acrylic, use a steady, medium heat and keep the gun moving. Concentrated high heat will create internal stress points that turn into cracks days later.
Distance, Motion, and Time: The Variables You Control
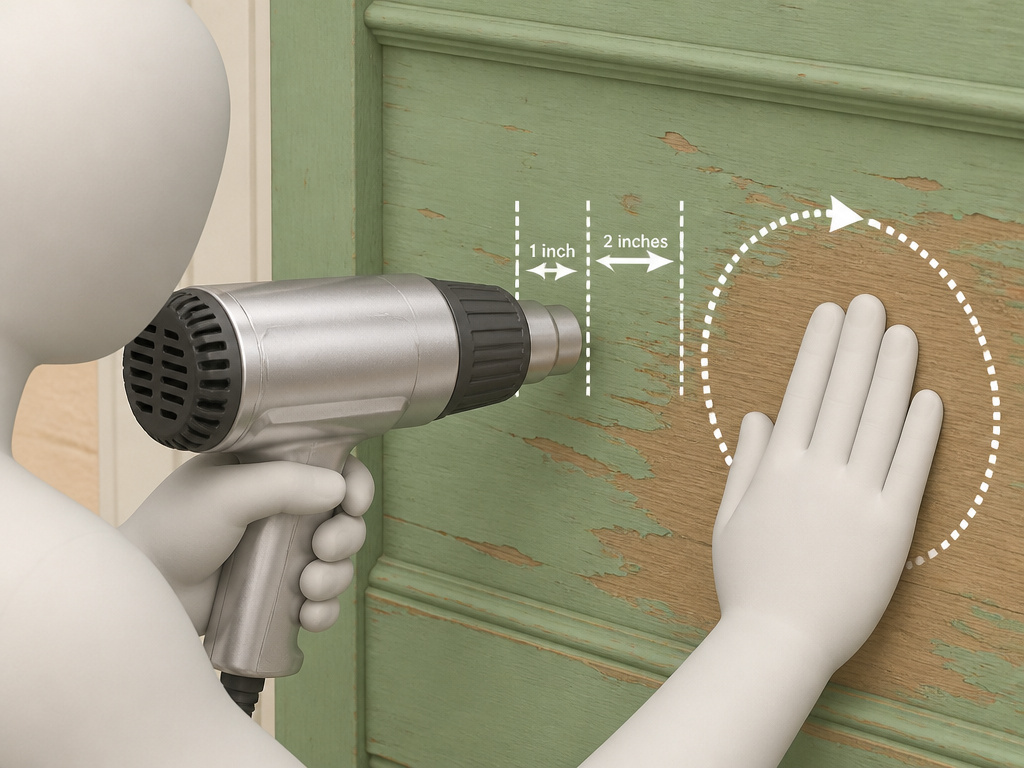
The setting on the dial is only part of the equation. Your technique dictates the actual heat transfer.
Distance is Your Primary Fine-Tuner. The manuals disagree on the exact number but agree on the principle. The Porter-Cable manual suggests 1-2 inches is optimum for stripping. The rule is universal: closer is hotter. If the material is scorching, pull back an inch before you touch the dial.
Never, Ever Stop Moving. A heat gun is not a blowtorch. You are applying a stream of hot air to progressively warm an area. Holding it in one spot is the surest way to burn wood, melt plastic, or start a fire inside a wall cavity. Use a slow, steady, back-and-forth or circular motion.
How Long Can You Run It? This is the duty cycle question most guides skip. Industrial guns like the Master series are built for sustained use, but they still generate immense internal heat. Consumer-grade guns often have a limited duty cycle before they need a cool-down period to prevent overheating the motor and element. If your gun has a thermal cutoff that keeps shutting it off, you’ve exceeded its duty cycle. Let it cool down fully according to the manufacturer’s instructions.
The Core Safety Rules (Read This Twice)
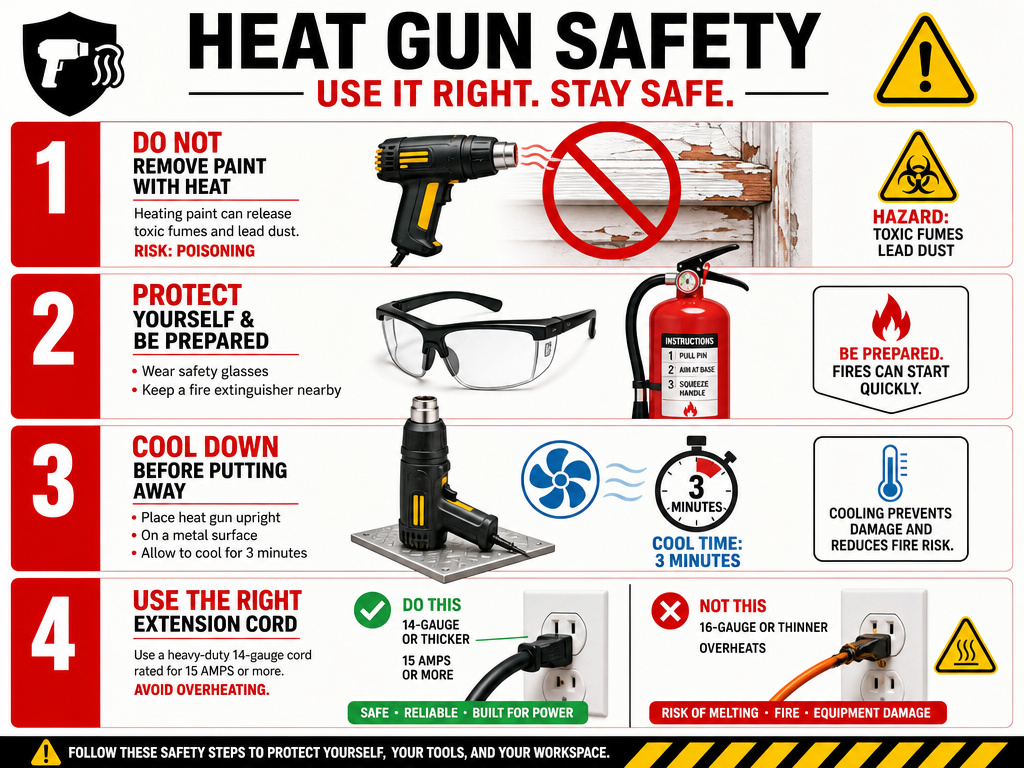
This is the aggregated warnings from a dozen manufacturer manuals.
1. Lead-Based Paint is an Absolute Deal-Breaker.
The Harbor Freight and Master manuals are unequivocal: “LEAD-BASED PAINT SHOULD ONLY BE REMOVED BY A PROFESSIONAL AND SHOULD NOT BE REMOVED USING A HEAT GUN.” Heating lead paint creates toxic fumes and dust. If your home was built before 1978, assume the paint contains lead and hire an abatement pro.
2. Your Eyes and a Fire Extinguisher are Non-Negotiable.
The Master manual states: “Wear safety glasses at all times.” The HG0240-US manual puts it in all caps: “ALWAYS use safety glasses.” Hot debris flies. The same Master manual says to “keep a fully-charged fire extinguisher close at hand.” The Wagner Model 1000 manual recommends keeping a container of water or an ABC fire extinguisher within reach.
3. The Cool-Down Ritual Prevents Fires and Extends Lifespan.
Turning the gun off and setting it on its side on a workbench is a mistake. Residual heat in the barrel can ignite sawdust or cardboard.
- The Wagner FURNO 700/750 has a dedicated 3-minute cool-down mode with maximum fan speed.
- The Master Varitemp manual recommends running on cold for three minutes after use.
- The Harbor Freight 1500W manual advises setting the switch to low, then off, to cool the element.
- The HG0240-US manual is blunt: “Always set the heat gun upright after it is turned off… Avoid laying the unit on the side after shutdown. The heat will remain in the unit and cooling will take longer.”
4. Power and Cords Matter.
That Master HG-801D needing a 20A outlet is a serious specification. Using a light-duty extension cord with any heat gun is a fire hazard. The Master manual mandates a 3-wire grounded cord with a minimum of 14-gauge wire. The HG0240-US manual agrees: “Cord shall be 14 AWG minimum for general indoor use.”
Common mistake: Plugging a high-wattage heat gun into a cheap, thin-gauge extension cord. The cord heats up, resistance builds, and you get voltage drop at the tool (poor performance) and a serious shock/fire risk at the cord.
Troubleshooting: When the Material Isn’t Behaving
Your settings seem right, but the paint won’t bubble or the plastic won’t bend. Before you blame the gun, run through this diagnostic list.
-
Material is scorching/burning.
- Likely Cause: Temperature too high, distance too close, or motion too slow.
- Fix: Increase distance by 2 inches. If that doesn’t help, lower the temperature setting and slow your movement further.
-
Material isn’t softening/reacting at all.
- Likely Cause: Temperature too low, distance too far, or you’re expecting results too quickly.
- Fix: Close the air intake shutter if you have one. Decrease distance by an inch. Be patient, some materials like thick paint need sustained, even heat to transfer through layers.
-
Heat gun keeps shutting off automatically.
- Likely Cause: You’ve exceeded the duty cycle, or the air intakes are clogged.
- Fix: Let the tool cool down completely. Check the vents at the rear and sides for dust blockage. This is a critical practice for power tool safety with all your gear.
-
Blower motor doesn’t start when you turn it on.
- Likely Cause: A faulty switch or motor. This is a critical failure.
- Fix: As per the Wagner FURNO manual: “turn the switch OFF immediately. The heating element will burn out if it is not cooled by the blower.” Unplug and repair.
Sometimes, the job calls for a different approach. If you’re dealing with delicate materials or no ventilation, knowing the best heat gun alternatives can save the project.
Heat gun types compared
Heat guns are categorized by their power source and intended use. Standard corded models are common for DIY and workshop tasks, with a variety of wattages available. Industrial-grade corded heat guns represent the high end, often requiring dedicated 20-amp outlets and delivering temperatures exceeding 1200°F. These tools are built for continuous, heavy-duty use. Cordless models offer portability but trade off sustained high heat output and runtime. Infrared heat guns, which use radiant heat, are a different technology not covered in these specifications. The core difference lies in the temperature range and electrical demands, separating hobbyist tools from professional equipment.
Key heat gun features
Choose a tool with adjustable temperature settings, ideally in precise increments, to match heat to the material. Some models allow you to adjust the air intake shutter; opening it provides cooler airflow while closing it yields the highest temperature. A selection of interchangeable nozzles is crucial for directing heat to specific areas. A built-in safety shutoff, often called a cool-down mode, is essential. This feature runs the fan after the heater is off to prevent internal damage. Always verify the tool has a safety feature that prevents the heating element from operating if the blower fan fails.
Heat gun nozzle guide
Different nozzle attachments concentrate or diffuse the hot air stream for specific tasks. A reflector nozzle, often included, wraps heat around pipes for soldering or thawing. A reducing nozzle, or concentrator, narrows the airflow to a small point for detailed work like shrinking tubing or removing paint from tight corners. A glass protection nozzle is a wide, flat deflector used when working near windows to spread heat and avoid direct, concentrated hot air. A spreading nozzle, or flatter, delivers a broad, even heat pattern ideal for drying large surfaces or softening adhesives over a wide area. Always let the nozzle cool completely before handling or storing it.
Frequently Asked Questions
What is the best heat gun setting for shrink tubing?
Use the lowest setting your gun offers, typically 200–300°F. High heat will melt the tubing or the wire insulation underneath. Move the gun constantly in a smooth motion for an even shrink. For more detail, see our dedicated guide on using heat shrink tubing.
How long can you run a heat gun continuously?
It depends entirely on the model. Consumer-grade heat guns often have a 10-minute duty cycle before needing a cool-down to prevent overheating. Industrial models like Master guns are built for longer runs but still require the mandated cool-down period with the fan running. Always refer to your manual.
Does a heat gun get hotter than a hair dryer?
Yes, significantly. A hair dryer reaches a much lower maximum temperature than a heat gun. Even a basic heat gun like the Master HG-201A reaches 300°F. Professional models exceed 1000°F. They are different tools for different jobs, which we break down in our heat gun vs hair dryer comparison.
What is a good heat gun with adjustable temperature?
The Wagner FURNO 700/750 with digital ten-degree increments is excellent for precise work. For robust, variable control, the Master Varitemp series (like the HG-501D/T) is a professional standard. The Harbor Freight 1700W (Item 57988) that starts at 120°F and adjusts in ten-degree steps is a strong budget-friendly option.
Can I use a heat gun to strip paint indoors?
You can, but you must take extreme precautions. Assume the paint contains lead. You need full respiratory protection, plastic sheeting to seal the area, and exceptional ventilation. Most manuals strongly advise against it. For a safer, detailed process, follow our guide on how to strip paint responsibly.
Before You Go
The number one mistake is ignoring the safety rules that come with these temperatures. That lead paint warning is in every major manual for a reason. That cool-down procedure exists because the engineers know how hot the barrel stays. The 14-gauge extension cord rule is there because thinner wires fail.
Treat the heat gun as a precision tool, not a brute-force heater. Start low. Use distance and motion to fine-tune. Let the cool-down cycle finish. If your project involves anything built before 1978, put the gun down and get a professional assessment first. The right heat gun guide gives you control, but the safety rules keep you and your home protected.
