
How to Toenail With a Nail Gun: Without Damage or Mistakes
This post contains affiliate links. As an Amazon Associate, we earn from qualifying purchases.
Toenailing with a nail gun requires a specific drive angle and starting point for structural connections, and using a framing nailer set between 70–120 PSI. This technique secures framing members like studs to plates with reliable lateral strength, but it demands precise tool handling to avoid ricochet and unintended discharge.
That 30-degree spec comes straight from structural engineering details, not guesswork. It’s the difference between a connection that holds and one that splits the wood or fails under load. This is why learning how to toenail with a nail gun correctly is critical.
What follows: the exact steps to position your nailer, how to adjust your air pressure for different woods, the critical safety rules that prevent the majority of worksite injuries, and a clear breakdown of why the official angle contradicts common advice.
Key Takeaways
- Drive toenails at a 30-degree angle relative to the member, starting one-third of the nail’s length from its end, as specified in structural engineering details.
- Set your framing nailer between 70–120 PSI and use 16d (3.5-inch) nails for standard SPF lumber to achieve a design capacity over 300 pounds per connection.
- Always engage the sequential trigger mode and maintain ANSI Z87.1 safety glasses; two-thirds of nail gun injuries stem from unintended discharge, often during awkward positions like toenailing.
- Account for the bump by starting your stud slightly off the line; the force of the first nail will shift it into alignment.
- For load-bearing connections, the design strength of a toenail is multiplied by a toe-nail factor (Ctn) of 0.67, meaning it’s about two-thirds the strength of a straight nail.
The Correct Toenailing Angle (30 Degrees vs. 45)
You’ll hear 45 degrees on jobsites and in videos from anecdotal advice. The Mitek-US engineering detail for lateral toenail connections specifies 30 degrees. That’s not a minor difference. It’s the difference between the nail having enough shank in the main member and blowing through the side.
The detail states: “TOE-NAILS SHALL BE DRIVEN AT AN ANGLE OF 30 DEGREES WITH THE MEMBER AND STARTED 1/3 THE LENGTH OF THE NAIL FROM THE MEMBER END.” That “1/3” start point is just as crucial. Starting the nail too close to the end risks splitting; starting it too far in reduces the amount of nail that catches the second piece of wood.
The structural engineering standard for a toenail connection is a 30-degree drive angle with the nail started at a distance of one-third the nail’s length from the end of the member. This geometry maximizes embedment in the main member while providing sufficient penetration into the adjoining piece.
So why does 45 degrees persist? It’s a rule of thumb that’s easier to eyeball, and in non-critical applications, it often works based on anecdotal advice. For structural connections following specific engineering details like those from Mitek-US, 30 degrees is the specified angle.
| Angle | Source | Best For | Risk If Ignored |
|---|---|---|---|
| 30 degrees | Mitek-US Engineering Detail | Structural connections, load-bearing walls | Reduced design capacity; connection may not meet engineered specs. |
| 45 degrees | Common jobsite practice | Non-structural, rough framing where code isn’t enforced | Increased chance of nail “spitting” out the side of the member, especially in harder woods. |
Nail Gun Setup & Nail Selection
Your framing nailer isn’t a hammer. You can’t just point and shoot. The tool’s settings dictate whether the nail sinks properly, bends, or ricochets back at you.
First, pressure. A tool like the WEN 21-Degree Framing Nailer (Model 61793) operates between 70 PSI (minimum) and 120 PSI (maximum). For toenailing, adjust pressure within the 70–120 PSI operating range of your nailer. The manual warns that high-end pressures can drive nails completely through thin or soft material. You’ll hear a solid thwack when the pressure is right. A weak puff means it won’t sink; a loud bang followed by the nail head disappearing means you’re blowing through.
Second, nails. The same WEN nailer accepts 21-degree round-head nails from 2″ to 3-9/16″ in length, with diameters from 0.113″ to 0.131″. For structural toenailing, you want the thicker, longer nails.
- 16d sinker nails (0.162″ x 3.5″): These are the go-to for framing. The 0.162-inch diameter and 3.5-inch length provide the shank and penetration needed for a strong connection.
- 8d common nails (0.131″ x 2.5″): Acceptable for lighter duty or thinner material. They’re less likely to split wood but have lower holding power.
- Avoid galvanized or hardened nails for general framing unless specified. They’re harder and can increase ricochet risk on knots.
Where this goes sideways: Using a finish nailer or brad nailer for toenailing framing members. They lack the power and nail size, resulting in a weak connection that will fail under any real load. Always use a framing nailer.
This is where knowing your nail sizes matters. The wrong nail jams the tool, bends, or simply doesn’t hold.
Step-by-Step Toenailing Technique
The process for how to toenail with a nail gun is straightforward, but each step has a consequence. Skip one, and you’ll be prying out a bent nail or realigning a kicked stud.
-
Mark and Position the Member. Hold your stud or joist in its final position. For a vertical stud to a bottom plate, mark its location. Now, pull the stud back slightly from that line to account for the ‘bump’. This accounts for the “bump”: the force of the nail driving will push the stud forward. If you start on the line, you’ll end up past it.
-
Set the Nailer. Ensure the tool is in sequential trigger mode (often a black trigger). This requires you to depress the safety tip against the work, then pull the trigger. It prevents bump-firing, which is dangerously unpredictable in the awkward stance of toenailing. Check your trigger modes if you’re unsure.
-
Position for the Angle. Place the nailer’s tip on the face of the stud at the starting point specified in your engineering detail (e.g., one-third the nail’s length from the member end). Cant the entire tool to achieve that 30-degree angle relative to the stud. Don’t just angle the tip. Your wrist and elbow should be in line with the intended nail path. The tool should feel stable, not cocked at a wrist-breaking angle.
-
Drive the First Nail. Firmly press the safety tip into the wood. The stud will want to slide. Hold it steady with your other hand, keeping fingers well clear of the exit path. Pull the trigger. You should hear a clean report and see the stud bump into its final position against your line.
-
Drive the Second Nail. Repeat the process from the opposite side of the stud. Two nails opposing each other create a locking effect that resists twisting and pulling.
-
Check Depth and Set. The nail head should be driven just flush with the wood surface. If it’s proud, increase your pressure slightly or check the depth adjustment on your nailer. If it’s sunk too deep, lower the pressure. A sunken nail loses holding power.
Essential Safety & Handling for Awkward Positions
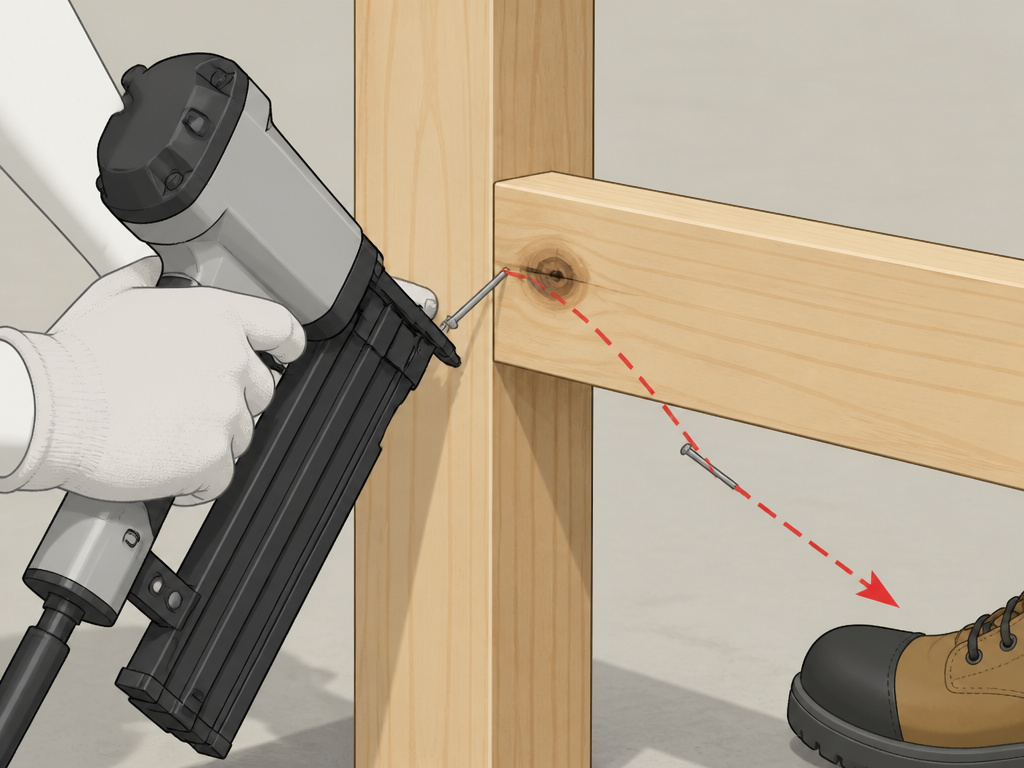
Toenailing is awkward. OSHA’s guide explicitly calls it out because the gun can’t be held flush. This instability increases risk, as two-thirds of nail gun injury claims involve some type of unintended discharge, which is a concern in awkward position work.
Your PPE for how to toenail with a nail gun is mandatory. Everyone in the area needs ANSI Z87.1 safety glasses. Not sunglasses, not regular glasses. Use rated safety glasses with side shields. Wear a dust mask and hearing protection. The manual’s requirement is absolute. OSHA also notes safety shoes are typically required on residential sites to protect toes from a dropped gun or a ricochet.
The two biggest risks are ricochet and unintended discharge. Ricochet happens when a nail hits a knot, metal hardware, or another nail. The nail can come straight back or deflect off at an angle. Unintended discharge often occurs when someone loses balance on a ladder or the safety tip skips off the wood.
Before you start: Inspect your lumber for knots and metal. Use a sequential trigger to prevent bump-firing. Never bypass the safety mechanisms. Plan your stance so you are balanced and not in the line of fire if the nail deflects.
The OSHA nail gun safety guide stresses hands-on training for a reason. Reading isn’t enough. You need to feel the recoil, learn to let the tool bounce back freely to prevent double-fires, and practice positioning in a controlled environment before you’re on a ladder holding a 2×6 overhead. This is the core of nail gun safety.
When Toenailing Is Wrong (And What to Use Instead)
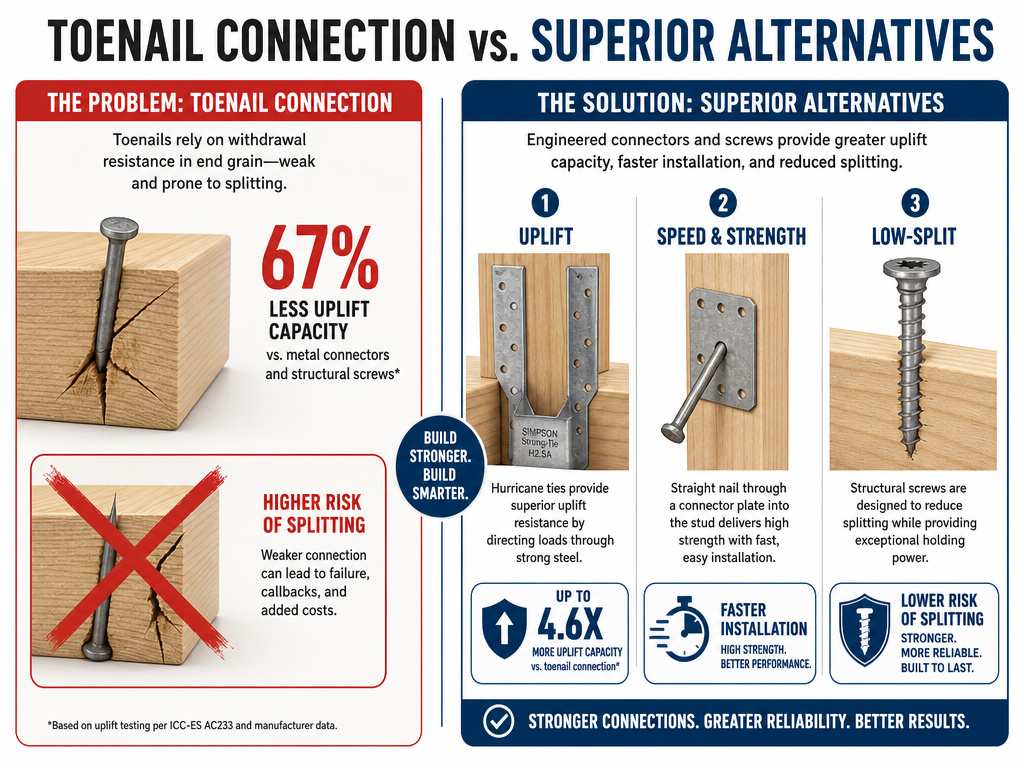
A toenail is a clever mechanical fastener, but it’s not always the right choice. Its design strength is only 67% of a straight nail’s withdrawal value, as per the AWC toenail connection design aid. That factor (Ctn = 0.67) is baked into the engineering math.
Don’t toenail when:
- The connection is sheer-heavy. A hurricane tie or joist hanger provides vastly superior uplift resistance.
- The wood is brittle or prone to splitting. Hardwoods, old dry lumber, or the very edge of a board will often split with a toenail, even with pre-drilling.
- You need speed and precision in high-volume framing. For sheer speed and alignment when building a wall frame, a straight nail through the plate into the stud is faster and stronger.
- The member is under significant lateral load. Use a metal bracket or a bolt.
Sometimes, the best alternative is a screw. A 3-inch structural screw has phenomenal withdrawal strength and is less likely to split. It’s slower, but for a one-off repair or a critical connection, it’s the right call.
Troubleshooting Common Toenailing Problems
You’ll run into these. Here’s what’s happening and how to fix it.
| Problem | Likely Cause | Immediate Fix |
|---|---|---|
| Nail bends | Hitting a knot, nail, or too-steel angle. | Stop firing. Reposition at a shallower angle (closer to 30°), or pre-drill if knot is unavoidable. |
| Wood splits | Nail too close to end, wood is too dry/brittle, nail diameter too large. | Move start point further from end (closer to the 1/3 point). Switch to a smaller-diameter nail or pre-drill. |
| Nail “spits” out side | Angle is too steep (closer to 45° or more), or nail is following wood grain. | Flatten your angle toward 30°. Try to drive perpendicular to the wood grain if possible. |
| Stud won’t hold alignment | Not accounting for the “bump,” or insufficient holding pressure during firing. | Start stud 1/8″ off line. Use a clamp or your foot to secure the plate while nailing. |
| Nail head is too deep or proud | Incorrect air pressure or depth setting on nailer. | Adjust compressor PSI or the tool’s depth adjustment dial. Test on scrap first. |
If you’re constantly fighting splits, especially in trim work, the technique for how to countersink nails with a nail gun involves similar depth-control skills.
Frequently Asked Questions
What is the best nail gun for toenailing?
21-degree or 30-degree round-head framing nailer is the standard. The 21-degree models like the WEN 61793 are common and the nails are widely available. Choose a tool with a reliable sequential trigger for safety. A framing nailer provides the necessary power and nail size.
Can you toenail with a cordless nail gun?
Yes, modern cordless framing nailers have enough power for toenailing. Ensure the battery is fully charged, as power drops can lead to incomplete drives and jammed nails. The technique and safety rules remain identical to pneumatic models.
How many toenails should I use per connection?
For a standard 2×4 stud to plate connection, two nails opposing each other is typical. For larger members like 2x6s, three nails may be used. Always refer to local building codes or project engineering specifications for required fastening schedules.
Is pre-drilling necessary for toenailing?
Usually not for softwoods like SPF. For hardwoods, dense laminates, or when nailing very close to the end of a piece, a 1/16-inch pilot hole can prevent splitting. It’s an extra step that saves you from wasted lumber and pulled nails.
Why does my toenail keep bending?
You are likely hitting a hidden knot, another nail, or metal hardware inside the wood. The angle may also be too severe, causing the nail to deflect against the dense grain of the second member. Try a different location or a shallower angle.
The Bottom Line
Toenailing with a nail gun is a skill that bridges rough carpentry and structural code. The official 30-degree angle isn’t a suggestion. It’s the engineered spec that ensures the nail has the correct path to do its job. Set your tool right, respect its power, and always prioritize the safety steps that prevent the majority of documented injuries.
If you only remember one thing, let it be this: test your setup on scrap lumber first. Thirty seconds of adjusting pressure and depth saves you an hour of prying out bad nails and repairing split wood. That’s the difference between a frustrating mess and a clean, solid connection that will last.
