
Nail Gun Nail Sizes Explained
This post contains affiliate links. As an Amazon Associate, we earn from qualifying purchases.
Nail gun nail sizes are defined by three specs: gauge (thickness), length, and collation angle (how they’re held together). The gauge uses an inverse scale, a lower number means a thicker, stronger nail. Common gauges are 15-16 for heavy trim, 18 for light trim, and 21-30+ for framing. Length is measured in inches or the penny (d) system. The collation angle (21°, 30°, 34°) must match your nail gun’s magazine.
That gauge number is the part that trips people up. It isn’t a rating of quality; it’s a wire diameter standard from before power tools existed, and it works backwards. A 16-gauge nail is thicker than an 18-gauge nail. If you remember that one rule, the rest of the sizing chart makes sense, which is essential for any guide to nail gun nail sizes explained.
What follows is the decoder ring for the nail gun nail sizes explained: what gauge, length, and angle mean, the real numbers from manufacturer manuals, and a simple way to match the nail to your project so you don’t buy the wrong box.
Key Takeaways
- Nail gauge works in reverse: a 15-gauge nail is thicker than an 18-gauge nail. Gauge refers to the wire diameter the nail is made from.
- The penny (d) system is for length only: an “8d nail” is 2.5 inches long. It says nothing about the nail’s thickness or head style.
- Collation angle is critical: a nail gun built for 21° plastic-strip nails will not load 34° paper-tape nails. The angle is printed on the nail strip and the tool’s magazine.
- Manufacturer tolerances matter: the ASTM F1667-21 standard allows a ±1/16 inch length variance for nails over 1 inch up to 2 1/2 inches and a ±0.004 inch diameter variance for diameters 0.076 inches and above.
- Store nails indoors: manufacturer guides advise keeping nails in a dry place within a recommended temperature range; for example, Kobalt recommends 41°F – 104°F (5°C – 40°C) for storage, while WEN suggests 50°F to 86°F (10°C to 30°C).
What Is Nail Gauge?
Gauge is the thickness of the nail’s shank. The system is a holdover from wire drawing, where a higher gauge number meant the wire was pulled through a smaller hole, resulting in a thinner wire. That’s why it’s counterintuitive: a 16-gauge finish nail is thicker than an 18-gauge brad nail.
According to the ASTM F1667-21 standard for driven fasteners, the shank diameter of a smooth nail is measured away from any gripper marks, and tolerances are tight: ±0.002 inches for diameters under 0.076 inches, and ±0.004 inches for diameters 0.076 inches and above.
The most common gauges you’ll see for nail guns are 15, 16, 18, 21, and 23. The jump from 18 to 16 gauge is a significant increase in holding power. A 23-gauge pin nail is so thin it leaves a hole barely visible, but it holds almost nothing on its own, it’s for tacking while glue dries. When you’re comparing 15 vs 16 gauge finish nailers, that single-digit difference changes what trim you can securely install.
Common mistake: Assuming all nails of the same length are interchangeable. A 2-inch 18-gauge brad and a 2-inch 15-gauge finish nail are for completely different tools and jobs. The brad nailer’s magazine is physically too narrow to load the thicker 15-gauge strip.
The Penny (d) System For Nail Length
If gauge is thickness, the penny system is for length. You’ll see it on boxes of common nails: 6d, 8d, 10d, 16d. The “d” stands for penny, a centuries-old measurement linked to the cost per hundred nails. Today, it’s a quick way to denote standard lengths.
| Penny Size | Length (inches) | Typical Use |
|---|---|---|
| 4d | 1.5 | Trim, small crafts |
| 6d | 2 | Light framing, fencing |
| 8d | 2.5 | Framing, sheathing, decking |
| 10d | 3 | Heavy framing, ledger boards |
| 16d | 3.5 | Structural framing, beams |
The penny size tells you nothing about the nail’s gauge, head style, or coating. A 16d nail could be a slim common nail for hand-driving or a thick, full-round-head nail for a framing gun. This is why understanding penny sizes is useful for historical context and buying bulk common nails, but for the nail gun nail sizes explained, you must cross-reference the length with the correct gauge and collation.
Nail Gun Types And Their Nail Sizes
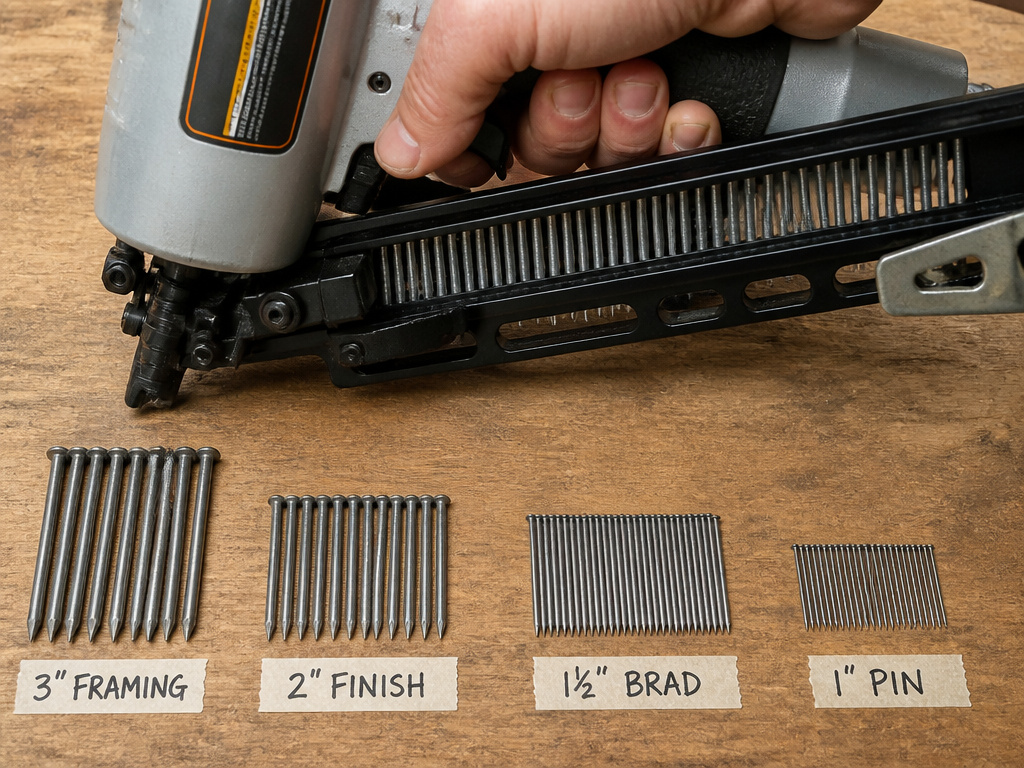
Nail guns are designed around specific nail sizes. Using the wrong nail doesn’t just cause a jam; it can damage the driver blade or magazine. Here’s how the primary nail gun types break down.
- Framing Nailers: These use the thickest nails, typically 0.113 to 0.148 inches in diameter (often called 30-34° or 21° nails). Lengths run from 2 inches up to 3-1/2 inches. They’re for building walls, decks, and roofs. The holding power is massive, but the nail heads are visible.
- Finish Nailers (15 & 16 Gauge): These are for trim work where you need strength but want to hide the fastener. The nail has a small, cupped head that you can drive below the surface and fill. They handle baseboards, crown molding, and door casings. The difference between finish and framing nailers is one of brute force versus finesse.
- Brad Nailers (18 Gauge): Thinner than finish nailers, brad nailers are for lighter trim, like quarter-round, shoe molding, and attaching thin plywood backs. The hole is smaller and easier to conceal.
- Pin Nailers (23 Gauge): The finest pin leaves a hole the size of a pinprick. It has no head. Use it to hold delicate moldings or veneer in place while glue sets, it provides zero structural hold on its own.
Choosing the right tool dictates the nail size you’ll be buying. You can’t put a framing nail in a finish nailer. Ever.
Matching Nail Size To Your Project
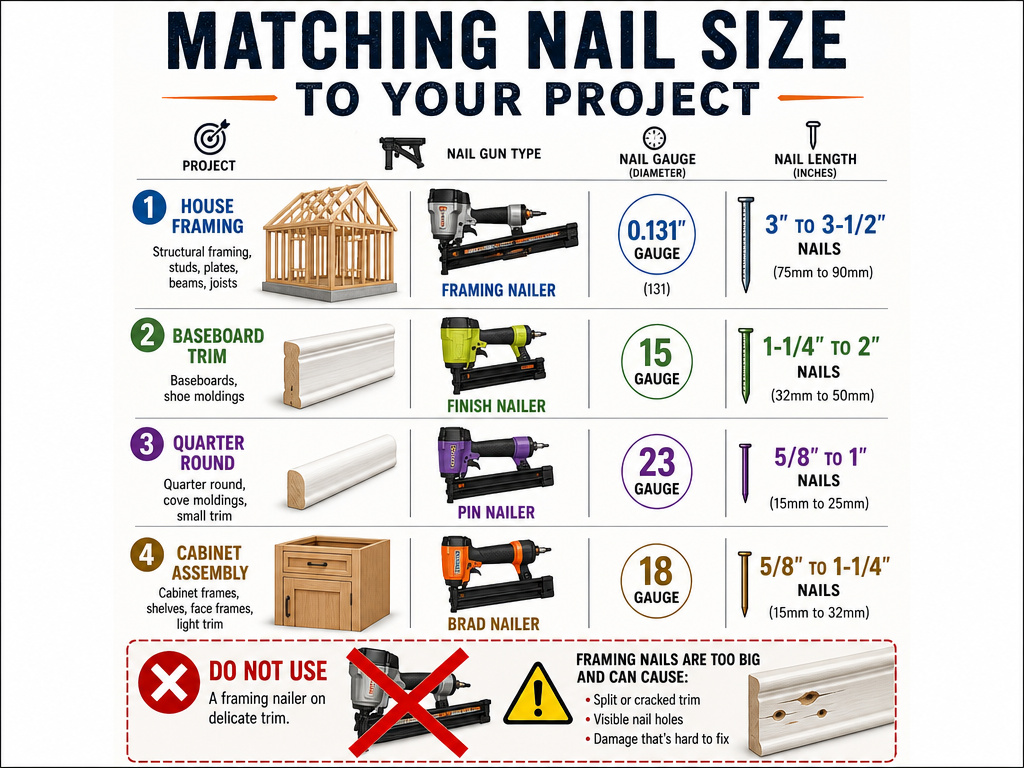
This is the decision tree. Start with your material and how strong the joint needs to be.
- Framing Walls, Decks, Sheathing: Use a framing nailer with 3-inch or 3-1/2-inch nails. For standard nails for framing a wall, 3-inch nails are the default. Go for 3-1/2 inches for attaching rim joists or beams. Diameter is usually 0.131 inches.
- Installing Baseboards, Door & Window Casing: Use a 15 or 16-gauge finish nailer. Nail length should be 2 to 2-1/2 inches, long enough to penetrate the wall stud behind the drywall. For detailed guidance, see our article on nail sizes for baseboard trim.
- Attaching Thin Trim (Quarter Round, Shoe Molding): An 18-gauge brad nailer with 1-1/4 to 2-inch nails is perfect. The thinner gauge minimizes splitting in the small trim pieces.
- Building Cabinets, Attaching Decorative Molding: A 23-gauge pin nailer with 1-inch pins will hold pieces for gluing without leaving noticeable marks.
Where this goes sideways: Using a framing nailer on baseboard “because it’s faster.” The power will split the trim every time, and the massive nail head will crater the wood. I learned this the hard way on my first major trim project, the sound of that oak casing splitting is unforgettable. Use the finesse tool.
The Critical Role Of Collation Angle
You have the right gauge and length. If the collation angle is wrong, the nails won’t load. Collation is how the nails are glued or welded together into a strip. The angle, 21°, 28°, 30°, 34°, refers to the angle of that strip, which matches the coil of the magazine in your gun.
A Makita GN900 gas nailer is built for 34° clipped-head paper tape nails. The WEN 3-IN-1 Framing Nailer (Model 61731) is an outlier, accepting 21°, 28°, and 34° nails by swapping internal parts.
| Collation Angle | Typical Collation Type | Common Nail Gun Type | Note | |———————|—————————-|————————–|———-| | 21° | Plastic Strip | Framing Nailer | Often used with full round heads, but specifications vary by manufacturer. | | 30°-34° | Paper Tape or Wire | Framing Nailer | Often used with clipped or offset heads; magazine capacity varies by model. | | 15°-16° | Plastic Strip | Finish Nailer | Standard for 15 & 16 gauge finish nails. | | 18°+ | Plastic Strip or Coil | Brad / Pin / Roofing | Varies widely; always check your manual. |
You cannot bend a 34° strip to fit a 21° magazine. The strip will jam, or the nails won’t seat against the driver blade correctly, leading to misfires. The angle is printed on the nail strip box and in your nail gun’s manual.
Manufacturer Specs & Tolerances In The Real World
Manufacturer specifications give you the acceptable range. The ASTM F1667-21 standard provides the allowed tolerances. This isn’t academic, it explains why nails from Brand A might jam in a gun tuned for Brand B, even if they’re both labeled “0.131-inch diameter, 3-inch, 34° nails.”
Let’s look at real numbers from product manuals:
| Nailer Model | Nail Diameter Range | Nail Length Range | Magazine Capacity | Key Source of Spec |
|---|---|---|---|---|
| Kobalt KXNA 324B-03 | 0.113 – 0.131 in. | 2 – 3-1/2 in. | 38-43 nails | Kobalt Product Spec Sheet |
| WEN 61731 (21° mode) | 0.113 – 0.131 in. | 2 – 3-1/2 in. | 60 nails | WEN Instruction Manual |
| Makita BN001G | 2.9 – 3.3 mm (0.113 – 0.131 in.) | 50-90 mm (2 – 3-1/2 in.) | 58 nails | Makita Product Leaflet |
| Spotnails NPR90 | 0.113 – 0.148 in. | 2 – 3-1/2 in. | 50-75 nails | Spotnails Catalog |
Notice the diameter tolerance. The ASTM standard allows a ±0.004 inch variance on these diameters. So a nail at the top of Kobalt’s range (0.131 in.) could be 0.135 inches and still be “in spec,” but it might be too tight for a magazine designed for the middle of that range. This is why pros often stick with one brand of nails for a given gun, it minimizes dimensional drift.
Skipping this in a cold garage leads to sluggish cycling and seals damage.
Nail Storage And Handling For Reliable Feeding
Nails are a consumable, but how you store them affects performance. The Makita DBN501 brad nailer manual explicitly warns: “Avoid storing nails in a very humid or hot place or place exposed to direct sunlight.”
Moisture can cause paper tape collation to swell and plastic collation to become brittle. Heat can soften the adhesive holding plastic strips together. Both lead to the same result: nails that don’t feed smoothly, causing frustrating jams. Recommended storage temperature ranges vary by manufacturer; for example, Kobalt recommends 41°F – 104°F (5°C – 40°C), while WEN suggests 50°F to 86°F (10°C to 30°C). A dry shelf in your climate-controlled workshop is ideal; a damp, unheated shed is not.
Rough handling can also deform nails or break the plastic connectors between them. Don’t throw boxes of nails around. A broken connector in the middle of a strip is a guaranteed jam that requires a full strip removal to clear. It’s a simple step that saves a major headache, much like learning how to adjust nail gun depth properly before you start a project.
Common nails vs box brad and finish nails
The main difference is in the nail’s head and shank. Common nails, used for framing, have a wide, flat head and a thick shank for maximum holding power. Their length is measured from under the head to the tip. Box nails are similar but have a slightly thinner shank to reduce splitting in dimensional lumber. Brad and finish nails are for trim and detail work. They have much smaller heads, often just a slight shoulder, and thinner shanks to minimize wood splitting and leave a smaller hole. For nails with flat heads or parallel shoulders, length is measured from under the head to the tip, while other nails are measured overall. The head dimensions for power-driven nails are made to suit specific tools.
Frequently Asked Questions
Should I use a 16 or 18 gauge nailer for trim?
For most interior trim like baseboard and crown molding, a 16-gauge finish nailer offers the best balance of holding power and concealment. Use an 18-gauge brad nailer for smaller, more delicate trim like quarter-round, shoe molding, or attaching thin plywood where the smaller hole is a bigger advantage.
What nail is bigger, 15 or 18 gauge?
15-gauge nail is bigger, it has a thicker shank diameter than an 18-gauge nail. Remember, the gauge system works in reverse: a lower number means a thicker nail.
How do I know what size nail gun to use?
Identify your project. For structural work (framing, decking), you need a framing nailer. For visible trim (baseboards, casing), you need a finish nailer (15/16 ga). For small trim or crafts, a brad (18 ga) or pin (23 ga) nailer. Your project dictates the tool, and the tool dictates the nail gauge and length.
Can I use any brand of nails in my nail gun?
You can use any brand that matches the exact specifications required by your gun: gauge, length, head style, and collation angle. However, for the most reliable feeding, it’s best to use nails from the tool manufacturer or a brand you’ve tested in your specific gun, as slight dimensional tolerances can vary.
Before You Go
The one rule that reframes everything: a nail gun is a system. The tool, the nails, and the air supply (or battery) have to be matched. Buying the right nails isn’t about grabbing the cheapest box labeled “framing nails.” It’s about cross-referencing three numbers on your tool’s manual, gauge, length, angle, with the numbers on the nail box.
If your nails keep jamming, check the collation angle first. It’s the most common compatibility mistake, and it has nothing to do with the nail’s size or strength. It’s a mechanical fit issue. Everything else, the holding power, the finish, the project suitability, flows from understanding that system.
