
How to Set up a Pancake Air Compressor: Step-by-Step
This post contains affiliate links. As an Amazon Associate, we earn from qualifying purchases.
To set up a pancake air compressor, you need to place it with 12 inches of clearance, conduct a model-specific break-in (15 or 30 minutes), connect an air hose to the 1/4-inch NPT outlet, close the tank drain valve, power it on, and adjust the regulator to your tool’s required PSI. The break-in procedure and drain valve direction vary by brand, so you must check your manual.
That 12-inch clearance rule isn’t just advice. It’s printed in the manuals for the Harbor Freight 58636, the CPo Power Tools GWKN41522, and the Lowe’s 3-gallon model. Block those vents, and the motor overheats within a cycle, you’ll smell the insulation before the thermal cut-off clicks. This is a key point for how to set up a pancake air compressor correctly.
What follows is the setup most manuals assume you’ll figure out, plus the specifics they bury in the safety warnings. This section explains the universal steps, the brand disagreements on break-in time and drain valves, and the one pre-flight check that finds leaks before you connect a tool.
Key Takeaways
- Maintain at least 12 inches of clearance on all sides of the compressor for cooling; this is a universal OEM requirement.
- Always perform the manufacturer’s break-in procedure before first use, it’s either 15 or 30 minutes of running with the drain or coupler open.
- Confirm your air hose and all fittings are rated for at least 150 PSI, or 150% of your compressor’s maximum pressure.
- Drain the tank after every use to prevent internal rust, which leads to catastrophic tank failure.
- Never modify the air tank, no drilling, welding, or repairs. A leaking tank must be replaced.
Before You Start: The 4-Step Safety Check
Before you start: Wear ANSI Z87.1 safety glasses and hearing protection. Ensure the power switch is OFF and the unit is unplugged. Verify the work area is clean, dry, and well-ventilated. Keep bystanders and pets away.
Skip this check, and you’re troubleshooting instead of working. I learned this the hard way when researching how to set up a pancake air compressor in a cramped corner of my shed. The motor cycled twice and shut down on thermal overload, a faint, sweet burning smell filled the air. That was the thermal protection doing its job, but the 15-minute cooldown killed my momentum.
Your setup location is the first decision in how to set up a pancake air compressor. The manuals are unanimous: you need a flat, level surface and 12 inches of open space on every side. This isn’t about neatness. The electric motor and pump head generate serious heat, and the cooling fins need airflow to work. A blocked compressor is a broken compressor.
Here’s your pre-flight checklist. Do these four things before you even think about plugging in the cord.
- Inspect the unit. Look for any shipping damage, loose parts, or oil leaks (if it’s an oil-lubricated model). Check that the pressure gauges are intact.
- Gather your PPE. This means certified safety glasses, like those meeting the ANSI Z87.1 standard, and earmuffs or plugs. A pancake compressor like the Harbor Freight 58636 runs at 83 dBA at three feet, that’s loud enough to require hearing protection for extended use.
- Plan your air route. Decide where your hose will run. Use a hose long enough to reach your work area without stretching, and keep it clear of sharp edges, hot surfaces, and foot traffic.
- Verify your power source. Use a dedicated 120V outlet. Do not use an extension cord unless absolutely necessary, and if you must, the requirements for a thick-wire cord are explained next.
Unpacking and Initial Assembly
You’ll typically find the compressor, a power cord, and sometimes a small accessory kit in the box. The compressor itself is almost fully assembled. Your main task is to identify the key components.
Locate these parts on your unit:
- Power Switch: Usually a toggle or rocker switch marked ON/OFF or AUTO/OFF.
- Tank Pressure Gauge: Shows the pressure (PSI) inside the air tank.
- Regulator/Outlet Pressure Gauge: Shows the pressure being delivered to your hose and tool.
- Regulator Knob: Turn this to adjust the output air pressure.
- Safety Valve: A small ring or tab; this is a mechanical fail-safe that will release air if tank pressure gets dangerously high.
- Drain Valve: A knob or petcock on the bottom of the tank for releasing condensed water.
- Air Outlet: A 1/4-inch NPT (National Pipe Thread) female port where you connect your hose. It will have either a built-in quick coupler or threads for you to install one.
Refer to your manual for any required assembly, which may include installing rubber feet or a quick coupler. To ensure an airtight seal on threaded connections, a common practice is to use Teflon tape (plumber’s tape). Tighten threaded connections securely but avoid over-tightening, which can damage components.
The Critical First Step: Breaking In Your Compressor
This is the step every video tutorial glosses over, and the manuals bury on page 8. Your new compressor needs a break-in period to seat the piston rings and lubricate internal components. The catch? The duration isn’t universal.
Manufacturers specify two different procedures. You must follow the one for your model.
| Break-In Procedure | Duration | Key Step | Model Example |
|---|---|---|---|
| Drain Valve Open Method | 15 minutes | Open the tank drain valve fully. Air expels freely here. | Harbor Freight 58636, Porter-Cable C2002 |
| Coupler Open Method | 30 minutes | Open all regulators and valves. Attach a male coupler to the outlet so air expels there. | Harbor Freight 61615 (3-Gallon) |
The goal is the same: run the compressor without allowing pressure to build in the tank for the specified time. This allows the pump to run cool and easy for its initial cycles.
Here’s the process for the more common drain-valve-open method:
- Ensure the power switch is OFF and the unit is unplugged.
- Pull out the regulator knob (if applicable) and turn it fully counter-clockwise to the open position.
- Open the tank drain valve. (See the next section for the clockwise/counter-clockwise confusion).
- Plug in the compressor.
- Turn the power switch to ON or AUTO.
- Let the unit run for the full break-in time (15 or 30 minutes). You’ll hear air rushing out of the open valve.
- Turn the switch OFF, unplug the unit, and close the drain valve firmly.
Don’t skip this. Running a brand-new compressor under load immediately can cause premature wear and void your warranty.
Connecting Your Air Hose and Accessories
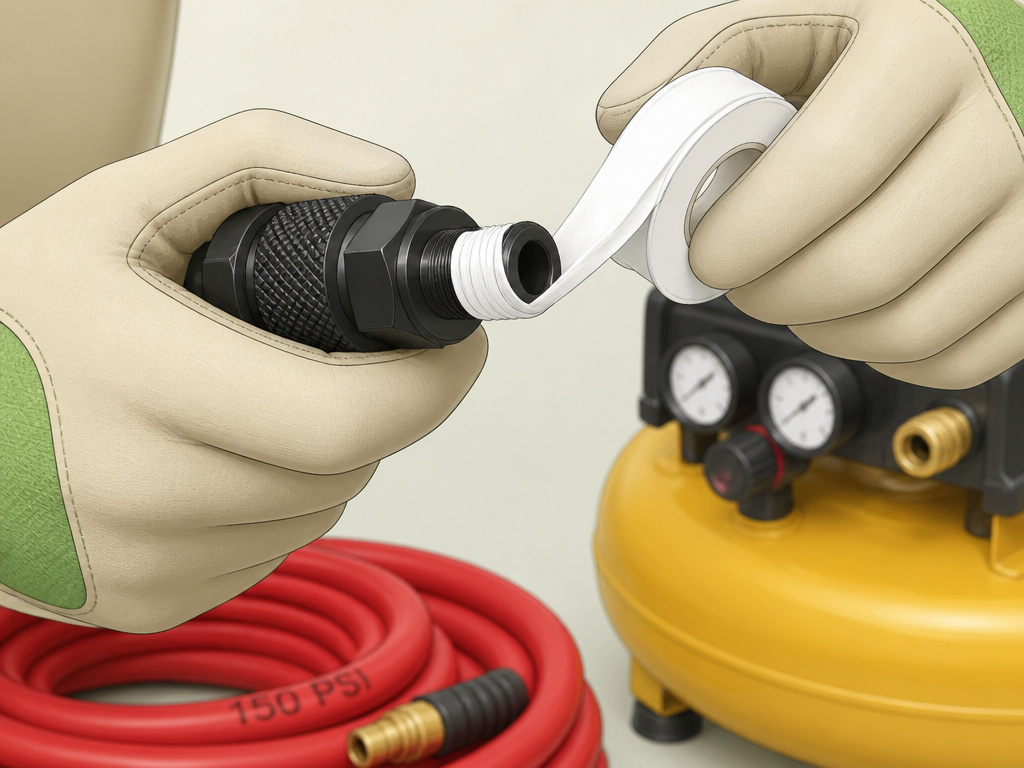
Now you can set up your air supply. This is where you build out from the compressor’s 1/4-inch NPT outlet to your tool.
You’ll need a few basic components, often sold separately:
- Air Hose: Get one rated for at least 150 PSI. The Harbor Freight 61615 manual explicitly states all components must be rated for 150 PSI or 150% of max system pressure.
- Quick Coupler Set: A male plug attaches to the hose end, and a female coupler threads into the compressor outlet. This allows you to connect and disconnect tools quickly.
- Teflon Tape: For sealing threaded connections.
Where this goes sideways: Using a hose or fitting not rated for your compressor’s pressure. A burst hose is a dangerous, whipping projectile. The pressure rating is stamped on the hose jacket, check it.
The connection order is simple. Start at the compressor and work your way out:
- Wrap Teflon tape clockwise around the threads of your female quick coupler.
- Screw the coupler into the compressor’s air outlet. Tighten with a wrench.
- Attach the male quick coupler plug to the end of your air hose.
- Push the hose’s male plug into the coupler on the compressor until it clicks and locks.
For many common tasks, a basic hose and coupler setup is sufficient. However, for tools like paint sprayers or sanders, you’ll need to add an inline filter or dryer to remove moisture and oil from the air stream. That’s a critical air compressor accessory for finishing work.
Setting Pressure and Operating Your Compressor
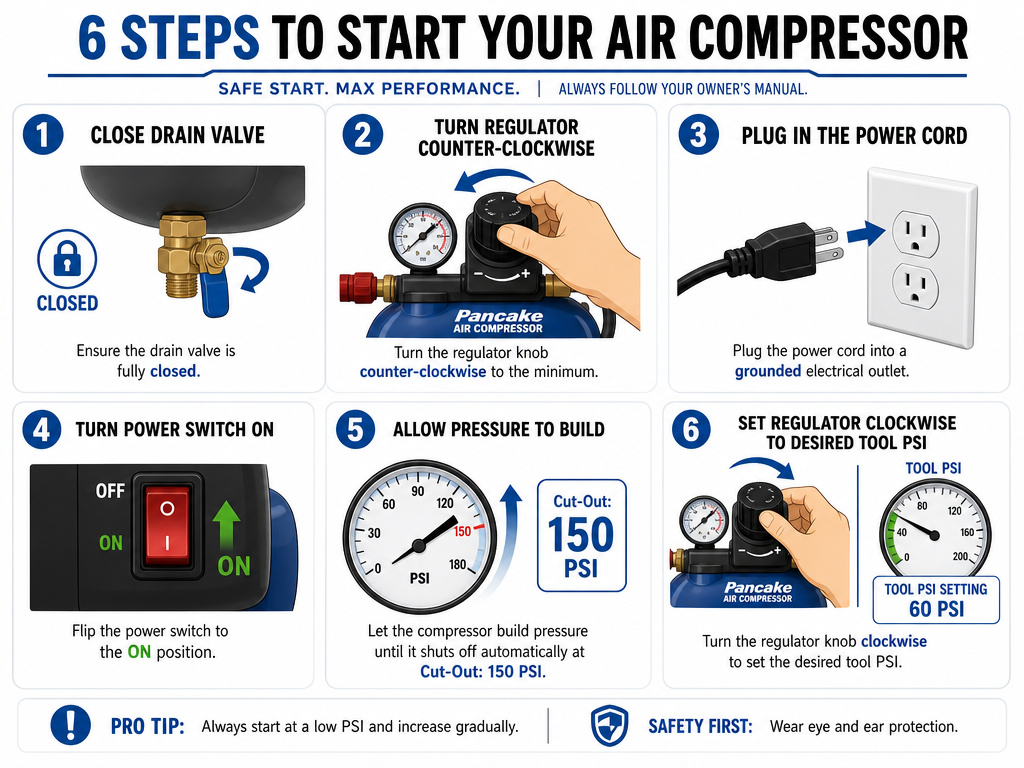
With the hose connected and the drain valve closed, you’re ready for the first real startup. This process is the core of basic air compressor operation.
Follow these steps:
- Close the tank drain valve. Ensure it’s fully sealed.
- Turn the regulator knob fully counter-clockwise (to the left). This closes the output so pressure can build in the tank.
- Plug the power cord directly into a wall outlet.
- Flip the power switch to ON or AUTO.
- Listen. The motor will start and run until the tank pressure reaches its specific “cut-out” pressure (e.g., 150 PSI for the Harbor Freight 58636 and Husky 6-Gallon). It will then shut off automatically.
- Once the tank is pressurized, turn the regulator knob clockwise (to the right) to your desired tool pressure. Watch the regulator/outlet gauge as you adjust.
How do you know what pressure to set? Check your air tool’s manual. Set the regulator pressure to match your air tool’s required PSI as specified in its manual. Never exceed your tool’s maximum pressure rating.
Common mistake: Adjusting the regulator while the tank is still filling. Always let the compressor reach its cut-out pressure and shut off before you dial in your tool pressure. Adjusting under load wears the regulator out faster.
The Confusing Truth About Extension Cords
You should plug your compressor directly into a wall outlet. Every manual says this. But in a garage or driveway, that’s not always possible. The manuals disagree sharply on what to do if you need an extension cord.
| Manufacturer Stance | Extension Cord Advice | Wire Gauge for 50 ft (example) |
|---|---|---|
| Harbor Freight 58636 | Not recommended. Use a longer hose instead. | N/A |
| Harbor Freight 61615 | Not recommended, but provides a table if you must. | 16 AWG for 0-6 amps |
| Husky 6-Gallon | The proper cord should be used. | 16 AWG for up to 50 ft (for an 11.8A motor) |
Here’s the real-world take. If you must use a cord, it needs to be heavy-duty and as short as possible. A voltage drop from an undersized cord makes the motor work harder, overheats it, and will trip breakers. If you must use an extension cord, consult your manual for the required wire gauge and length for your compressor’s specific amperage. The Husky guide recommends 16 AWG for up to 50 feet for its 11.8-amp motor, while the Harbor Freight 61615 manual recommends 16 AWG for a 50 ft cord only for loads of 0-6 amps, showing a disagreement in guidelines.
Daily Maintenance: Draining the Tank
Your most important habit is draining the moisture that condenses inside the air tank after each use. This isn’t optional. Water causes rust, and rust weakens the steel tank wall. A weakened tank can rupture violently.
The procedure is simple, but there’s a glaring contradiction in the manuals: which way do you turn the drain valve to open it?
- CPO Power Tools GWKN41522 manual says: “slowly opening the air tank drain valve by turning clockwise.”
- Porter-Cable C2002 manual says: “opening drain valve (counter-clockwise) on bottom of tank.”
- Husky and Lowe’s manuals say to close the valve by turning clockwise, implying you open it counter-clockwise.
What to do? Look for an arrow or text on the valve itself. If there’s none, assume lefty-loosey (counter-clockwise) to open. Test it when the tank is at low pressure (below 10 PSI, as the Lowe’s manual warns). Valve manufacturers aren’t consistent, so your specific model has the final say.
A safe draining process, as outlined in the Husky manual, is: 1. Turn off the compressor and unplug it. 2. Pull the safety valve ring to bleed all pressure from the tank. Wait until both gauges read 0 PSI. 3. Place a container under the drain valve. 4. Open the valve (direction varies by model) and let all moisture drain out. Tilt the compressor to help it along. 5. Close the drain valve firmly.
Make this part of your routine for draining an air compressor tank. Doing it daily adds years to your compressor’s life.
Troubleshooting Common Setup Issues
Even with perfect setup, small issues pop up. Here’s how to diagnose the usual suspects.
- Compressor won’t start: Check that the power switch is ON. Verify the outlet has power. Ensure the regulator knob is turned to the closed (counter-clockwise) position so tank pressure can build. If it recently overheated, it may be in thermal lockout; unplug it for 15 minutes (per Harbor Freight 58636) to an hour (per Husky 6-Gallon), as sources disagree on cool-down time.
- Motor runs but won’t build pressure: You likely have a major air leak. Check that the drain valve is fully closed. Listen for hissing at the hose connections. Ensure the quick coupler is properly engaged.
- Pressure drops quickly when tool is not in use: This indicates a leak in the system. Spray soapy water on all fittings, the drain valve, and the tank welds. Bubbles will reveal the leak. Tighten fittings or replace faulty components.
- Compressor cycles on/off too frequently: This is normal for small pancake compressors running a high-air-flow tool like a sander. The tank is small, so it refills often. It means you’re using the compressor at the edge of its capacity.
For more on these problems and others, our air compressor safety guide covers diagnostic steps in detail.
Frequently Asked Questions
How long does a pancake compressor take to fill?
Fill time from empty to cut-out pressure varies by model and is not specified in the provided fact sheets. The fill time is less important than the SCFM (Standard Cubic Feet per Minute) rating, which tells you how quickly it can replenish air while you’re using a tool.
Can I leave air in the compressor tank?
Yes, you can leave air in the tank for storage. The critical step is draining the water. Leaving moisture in the tank is what causes corrosion and weakness. It’s safe to store it pressurized, but for long-term storage (months), it’s better to release the air and drain it completely.
Why is my new compressor so loud?
Pancake compressors, especially oil-free models, are notoriously loud. The Harbor Freight 58636, for example, operates at 83 dBA measured from three feet away. This is in the range where hearing protection is required for prolonged exposure. The noise comes from the direct-drive, oil-free piston design. If noise is a concern, look for a “quiet” series compressor with a lower dBA rating.
What’s the difference between tank pressure and regulated pressure?
The tank pressure gauge shows how much compressed air is stored in the tank. The regulated pressure gauge (the one connected to the regulator knob) shows the pressure you are sending to your tool. You set the regulated pressure to match your tool’s requirement, regardless of how full the tank is.
Do I need to add oil to a pancake air compressor?
Most pancake compressors are oil-free. This means the piston rings are made of self-lubricating materials like Teflon. You do not need to add oil. If your compressor has an oil fill cap, it is an oil-lubricated model and will require periodic oil changes. Check your manual to be certain.
The Bottom Line
Setting up a pancake air compressor is straightforward if you respect the numbers: 12 inches of space, a 15 or 30-minute break-in, and a drain valve closed before startup. The biggest risk isn’t complexity, it’s ignoring the manual’s specifics because a YouTube video said it was fine.
Your first action after reading this should be to find your compressor’s manual, either in the box or online. Check its break-in time and its warning about extension cords. That document is your real guide; everything else is commentary.
One final, essential rule: if you ever smell burning, hear a new knocking sound, or see the motor struggling to reach pressure, stop. Turn it off, unplug it, and let it cool. These machines are simple, but they fail loudly and expensively when pushed past their limits. Set it up right the first time, and it’ll be the most reliable tool in your shed.
